background image

WAL 14 A1 

Deutsch  -  59 

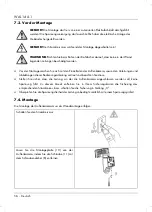
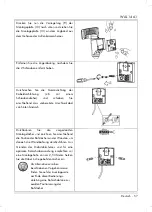
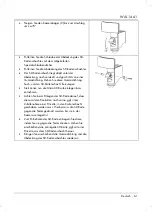
Drehen Sie als letzten Schritt die Schraube (11) 
mit dem Schraubendreher (B) von unten durch 
das Kameragehäuse in die Montageplatte (10) 
ein.  


Bei der Schraube (11) handelt es 
sich um eine Spezialschraube, mit 
der ein erhöhter Diebstahlschutz 
gewährleistet wird. Verwenden 
Sie ausschließlich diese 
Schraube! Die Schraube (11) ist 
zwingend anzubringen, um einem 
Diebstahl des kompletten 
Kamerakörpers vorzubeugen. 


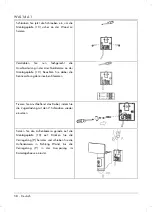
Schalten Sie den Stromkreis wieder ein. 


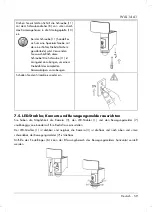
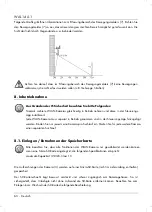
7.5. LED-Strahler, Kamera und Bewegungsmelder ausrichten 

Sie haben die Möglichkeit die Kamera (3), den LED-Strahler (1) und den Bewegungsmelder (7) 

unabhängig von einander auf Ihre Bedürfnisse einzustellen: 

Der LED-Strahler (1) ist drehbar und neigbar, die Kamera (3) ist drehbar und nach oben und unten 

schwenkbar, der Bewegungsmelder (7) ist drehbar.  

Mithilfe des Einstellringes (6) kann der Erfassungsbereich des Bewegungsmelders horizontal verstellt 
werden. 


Summary of Contents for WAL 14 A1

Page 1: ......

Page 2: ......

Page 3: ...V 1 23 Italiano 2 English 25 Deutsch 48...

Page 4: ...roduzione 14 8 1 Inserimento rimozione della scheda di memoria 14 8 2 Download e installazione dell applicazione di controllo 16 8 2 1 Istruzioni operative per l applicazione di controllo 16 8 3 Dati...

Page 5: ...per la sorveglianza automatica di ambienti interni ed esterni In scarse condizioni di visibilit possibile accendere la luce a LED per illuminare la zona da sorvegliare La telecamera da esterni adatta...

Page 6: ...strato il dispositivo con i numeri di riferimento Il significato dei numeri il seguente 1 Lampada a LED 2 Supporto della telecamera 3 Telecamera 4 Coperchio del pulsante RESET 5 Indicatore luminoso d...

Page 7: ...erativa Verticale lampada a LED in alto sensore di movimento al di sotto Temperatura ambientale Da 33 a 40 C Classe di sicurezza I con collegamento di messa a terra Grado di protezione IP54 Dimensioni...

Page 8: ...a salute e rischio di morte e o di danni a oggetti a causa di scosse elettriche Questo simbolo indica ulteriori informazioni sull argomento La telecamera da esterni dotata di collegamento del condutto...

Page 9: ...ediatamente a un medico PERICOLO Rischio d incendio Non coprire mai la telecamera da esterni in quanto si potrebbe surriscaldare PERICOLO Tutte le riparazioni devono essere eseguite da personale speci...

Page 10: ...one dell abitazione dei vicini anche se tali aree sono visibili dalla propria abitazione o da luoghi pubblici Ci non autorizza a pubblicare tali immagini In caso di dubbi restringere la visuale della...

Page 11: ...fissaggio in modo tale che siano a portata di mano La telecamera da esterni deve essere installata solo su superfici stabili come un muro L alimentazione deve avvenire tramite la rete elettrica dell...

Page 12: ...leggere e osservare le istruzioni e le immagini contenute in queste istruzioni operative Accertarsi che nel cavo a cui verr collegata la telecamera da esterni non passi la corrente A tale scopo rimuov...

Page 13: ...a dietro il cavo d alimentazione preparato Perforare i fori di montaggio preforati e poi segnare a matita la posizione dei fori sul muro per poter forare il muro col trapano Per evitare furti e garant...

Page 14: ...ssione sul supporto di montaggio 10 Prestare attenzione alle etichette dei singoli terminali Fissare quindi il cavo stringendo il passacavo con le 2 viti Posizionare la telecamera da esterni sul suppo...

Page 15: ...o di tutta la telecamera Riattivare l alimentazione elettrica 7 5 Impostazione della lampada a LED della telecamera e del sensore di movimento La telecamera 3 la lampada a LED 1 e il sensore di movime...

Page 16: ...a informatica prestare attenzione a quanto segue Non attivare mai diverse telecamere WiFi contemporaneamente e non installarle nell applicazione di controllo Ogni telecamera WiFi deve essere attivata...

Page 17: ...cheda SD L alloggiamento della scheda SD si trova direttamente sotto al coperchio nascosto e protetto da una guarnizione di gomma Sollevare la guarnizione di gomma per accedere all alloggiamento A que...

Page 18: ...i controllo Le istruzioni operative aggiornate e in diverse lingue possono essere scaricate dal link sottostante Utilizzare il codice QR o digitare l indirizzo vicino ad esso nel proprio browser Andro...

Page 19: ...id https www targa de downloads IAN284704 Android_CZ pdf iOS https www targa de downloads IAN284704 iOS_CZ pdf Android https www targa de downloads IAN284704 Android_ES pdf iOS https www targa de down...

Page 20: ...OS https www targa de downloads IAN284704 iOS_SI pdf Android https www targa de downloads IAN284704 Android_IT pdf iOS https www targa de downloads IAN284704 iOS_IT pdf Android https www targa de down...

Page 21: ...ord Una password sicura contribuisce a proteggere i dati personali Prendersi un po di tempo per mettere a punto una password sicura che sia anche ricordabile facilmente Evitare dati personali come la...

Page 22: ...sante di RESET si trova nel foro sopra a quello della vite Per premere il pulsante RESET spingere la punta del cacciavite speciale nel foro fino a quando non si avverte un cambiamento Tenere premuto i...

Page 23: ...re solo un panno morbido e un detergente per vetri Non impiegare mai detergenti abrasivi o contenenti solventi n spazzole o spugne dure che potrebbero graffiare la superficie 10 Risoluzione dei proble...

Page 24: ...ettronici devono essere smaltiti separatamente dai rifiuti domestici presso i centri di smaltimento ufficiali Anche le lampadine devono essere smaltite nella maniera appropriata Non smaltire il dispos...

Page 25: ...o fabbricazione Tale garanzia non si estende alle parti del prodotto esposte a normale usura i cosiddetti pezzi d usura o al danneggiamento di pezzi fragili ad es interruttori accumulatori o pezzi in...

Page 26: ...7 E Mail service CH targa online com Telefono 027 78 11 03 E Mail service MT targa online com IAN 284704 Produttore Considerare che il seguente indirizzo non coincide con l indirizzo dell assistenza C...

Page 27: ...itter camera and movement sensor 36 8 Getting started 38 8 1 Inserting removing the memory card 38 8 2 Downloading and installing the control app 39 8 2 1 Operating instructions for the control app 39...

Page 28: ...is designed for automatic surveillance of indoor and outdoor areas In poor visibility the LED light can also be switched on to illuminate the area under surveillance The outdoor camera is only suitab...

Page 29: ...out cover On the inside of the cover the outdoor camera is shown with figures indicated The meanings of the numbers are as follows 1 LED emitter 2 Camera holder 3 Camera 4 RESET button cover 5 Power...

Page 30: ...eight of approx 2 50 m Operating position Vertical LED emitter on top movement sensor underneath Ambient temperature 33 C 40 C Safety class I with ground wire connection Degree of protection IP54 Dime...

Page 31: ...connection The ground conductor green yellow must be connected to the terminal shown Significance of IP54 protection The WiFi outdoor camera is protected against dust at damaging levels and against w...

Page 32: ...rd party rights Rights to own images Rights to own images or pictures are a subset of the general law on personality They stipulate that all people have the fundamental right to determine whether and...

Page 33: ...rea of the IP camera with a screen Personal determinability Personal determinability is where it can be determined that a specific person was in a specific place at a specific time Identification can...

Page 34: ...ted on stable surfaces such as walls The power supply must be via the building s electrical circuit Do not mount the outdoor camera above a heat source or in the immediate vicinity of other light sour...

Page 35: ...in these operating instructions Make sure that the cable to which the outdoor camera is to be connected is not live To do this remove the fuse for the relevant power circuit or switch the circuit brea...

Page 36: ...er cable through from behind Drill through the pre punched mounting holes and then draw the position of the drill holes on the wall in order to drill holes in the wall To prevent theft and ensure opti...

Page 37: ...ction terminal on the mounting plate 10 Note the labelling of the individual terminals Then fix the cable by fitting the strain relief with the 2 screws Place the outdoor camera straight on the mounti...

Page 38: ...s fitted to prevent theft of the whole camera body Switch the power supply back on again 7 5 Setting up the LED emitter camera and movement sensor You can adjust the camera 3 the LED emitter 1 and the...

Page 39: ...of the movement sensor 7 Adjust the movement sensor 7 so it covers the area you want as best possible It must not be blocked by objects or similar Make sure there are no movements which are not to be...

Page 40: ...e in the camera housing This makes it difficult for unauthorised persons to remove the SD card Proceed as follows to insert or replace the SD card Tilt the camera holder 2 by around 70 until it stops...

Page 41: ...structions for the control app can be downloaded in various languages from the links below Either use the QR code or enter the address next to it into your browser Android https www targa de downloads...

Page 42: ...id https www targa de downloads IAN284704 Android_CZ pdf iOS https www targa de downloads IAN284704 iOS_CZ pdf Android https www targa de downloads IAN284704 Android_ES pdf iOS https www targa de down...

Page 43: ...OS https www targa de downloads IAN284704 iOS_SI pdf Android https www targa de downloads IAN284704 Android_IT pdf iOS https www targa de downloads IAN284704 iOS_IT pdf Android https www targa de down...

Page 44: ...password helps protect your personal data Take a little time to develop a secure password that you should also be able to remember well Avoid personal data such as your date of birth or the names of y...

Page 45: ...wdriver and lift the cover 4 off The RESET button can be found in the opening exposed above the screw thread To press the RESET button push the tip of the special screwdriver into the opening until yo...

Page 46: ...could scratch the surface 10 Troubleshooting The light does not come on The movement sensor 7 is not aimed correctly Correct the positioning The electrical connection is faulty Get the electrical conn...

Page 47: ...of properly Do not dispose of the device in household waste or bulky waste collections Information on collection points and pick up times can be obtained from your local council or waste disposal comp...

Page 48: ...mponents which are subject to normal wear and which can therefore be regarded as wearing parts or damage to fragile components such as switches rechargeable batteries or components made of glass This...

Page 49: ...vice IE targa online com Phone 027 78 11 03 E Mail service MT targa online com Phone 02 20 09 025 E Mail service CY targa online com IAN 284704 Manufacturer Please note that the following address is n...

Page 50: ...ra und Bewegungsmelder ausrichten 59 8 Inbetriebnahme 60 8 1 Einlegen Entnehmen der Speicherkarte 60 8 2 Download und Installation der Steuerungs App 62 8 2 1 Bedienungsanleitungen f r die Steuerungs...

Page 51: ...berwachung von Innen und Au enbereichen vorgesehen Bei schlechten Sichtverh ltnissen kann zus tzlich die LED Beleuchtung zur Ausleuchtung des berwachten Bereiches eingeschaltet werden Die Au enkamera...

Page 52: ...ehen Auf der Innenseite des Umschlags ist die Au enkamera mit einer Bezifferung abgebildet Die Ziffern haben folgende Bedeutung 1 LED Strahler 2 Kameratr ger 3 Kamera 4 Abdeckung RESET Taster 5 Betrie...

Page 53: ...50m H he Betriebslage senkrecht LED Strahler oben Bewegungsmelder unten Umgebungstemperatur ta 33 C 40 C Schutzklasse I mit Schutzleiteranschluss Schutzart IP54 Abmessungen B x T x H ca 179 x 165 x 25...

Page 54: ...und oder Sachsch den durch elektrischen Schlag Dieses Symbol kennzeichnet weitere informative Hinweise zum Thema Die Au enkamera hat einen Schutzleiteranschluss Der Schutzleiter Gr n Gelb muss an die...

Page 55: ...auf Augensch den suchen Sie sofort einen Arzt auf GEFAHR Brandgefahr Die Au enkamera darf niemals abgedeckt werden da sich diese ansonsten erw rmt GEFAHR Reparaturen d rfen nur durch eine Fachkraft a...

Page 56: ...re Die Privatsph re anderer darf durch die gezeigten Bilder nicht verletzt werden Richten Sie Ihre Kamera nicht in den Garten oder auf die Eingangst r Ihrer Nachbarwohnung auch wenn diese Orte aus Ihr...

Page 57: ...urecht Die Au enkamera darf nur auf stabilen Untergr nden z B Mauerwerk montiert werden Die Spannungsversorgung darf ausschlie lich ber die elektrische Anlage des Geb udes hergestellt werden Montieren...

Page 58: ...u enkamera sowie den Anleitungen und Abbildungen dieser Bedienungsanleitung vertraut und beachten Sie diese Stellen Sie sicher dass die Leitung an der die Au enkamera angeschlossen werden soll keine S...

Page 59: ...das vorbereitete Anschlusskabel von hinten hindurch Durchbohren Sie die vorgestanzten Montagel cher und zeichnen Sie anschlie end die Position der Bohrl cher an der Wand an um danach die Wandbohrung d...

Page 60: ...Montageplatte 10 Beachten Sie dabei die Kennzeichnung der einzelnen Klemmen Fixeren Sie anschlie end das Kabel indem Sie die Zugentlastung mit den 2 Schrauben wieder einsetzen Setzen Sie die Au enkame...

Page 61: ...ubringen um einem Diebstahl des kompletten Kamerak rpers vorzubeugen Schalten Sie den Stromkreis wieder ein 7 5 LED Strahler Kamera und Bewegungsmelder ausrichten Sie haben die M glichkeit die Kamera...

Page 62: ...WLAN Kamera muss separat in Betrieb genommen und in der Steuerungs App hinzugef gt werden Binden Sie nur jeweils eine Kamera pro Suchlauf ein Starten Sie f r jede weitere Kamera einen separaten Suchla...

Page 63: ...ulegen Sie k nnen nun die Micro SD Karte einlegen bzw entnehmen Achten Sie beim Einlegen der SD Karte darauf dass diese mit den Kontakten nach vorne ggf unter Zuhilfenahme einer Pinzette in den Karten...

Page 64: ...sanleitung f r die Steuerungs App kann in verschiedenen Sprachvarianten unter folgenden Links heruntergeladen werden Nutzen Sie entweder die QR Codes oder geben Sie die nebenstehende Befehlszeile in I...

Page 65: ...id https www targa de downloads IAN284704 Android_CZ pdf iOS https www targa de downloads IAN284704 iOS_CZ pdf Android https www targa de downloads IAN284704 Android_ES pdf iOS https www targa de down...

Page 66: ...OS https www targa de downloads IAN284704 iOS_SI pdf Android https www targa de downloads IAN284704 Android_IT pdf iOS https www targa de downloads IAN284704 iOS_IT pdf Android https www targa de down...

Page 67: ...aten Nehmen Sie sich etwas Zeit f r die Entwicklung eines sicheren Passwortes dass Sie sich im Idealfall trotzdem noch gut merken k nnen Vermeiden Sie pers nliche Daten wie z B Ihr Geburtsdatum den Na...

Page 68: ...Der RESET Taster befindet in der freigelegten ffnung oberhalb des Schraubengewindes Zum Dr cken des RESET Tasters f hren Sie die Spitze des Spezialschraubendrehers in diese ffnung bis Sie den Schaltvo...

Page 69: ...nschluss ist defekt Lassen Sie den elektrischen Anschluss von einer Elektrofachkraft pr fen Das Licht schaltet schnell ein und aus Der Sensor wird durch Fremdlicht oder helle reflektierende Fl chen ge...

Page 70: ...emeindeverwaltung oder ber Ihr rtliches Entsorgungsunternehmen F hren Sie auch die Verpackung einer umweltgerechten Entsorgung zu Kartonagen k nnen bei Altpapiersammlungen oder an ffentlichen Sammelpl...

Page 71: ...al oder Fabrikationsfehler Diese Garantie erstreckt sich nicht auf Produktteile die normaler Abnutzung ausgesetzt sind und daher als Verschlei teile angesehen werden k nnen oder f r Besch digungen an...

Page 72: ...rvice Telefon 02921 89 13 000 E Mail service DE targa online com Telefon 01 26 76 195 E Mail service AT targa online com Telefon 044 55 10 057 E Mail service CH targa online com IAN 284704 Hersteller...

Reviews: