background image

8

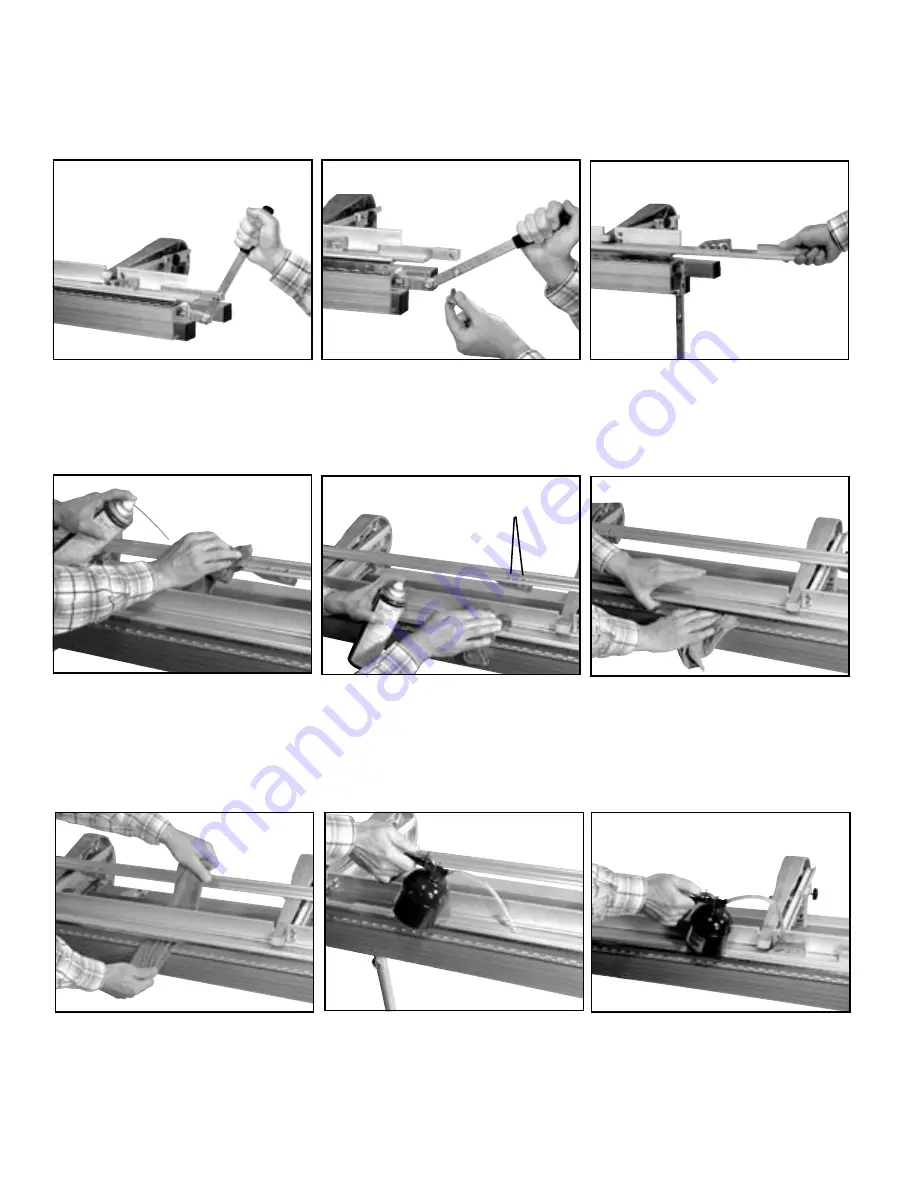
Clean Underneath Clampin 

Surfaces

Using solvent on a shop rag, clean upper 

and lower clamping surface as indicated 

and wipe dry. Do not apply oil here.

6

Replace Sliding Bar & Oil Wedges

Replace  Sliding  Bar  making  sure  that 

it slides easily along the Clamping Bar. 

Wipe  up  excess  oil.  Clean  and  oil  the 

Wedges now and regularly thereafter.

9

CLEANING THE LOCKING AND CLAMPING SURFACE

Open Brake

Move Locking Handle to Right. Follow 

steps 1, 2, and 3 in reverse order to 

reassemble.

Remove Top Yoke Pin

With  Brake  unlocked  remove  Cotter 

Pin from Top Yoke Pin and disengage 

handle.

Remove Sliding Bar

Grasp and pull Sliding Bar to the right 

and  forward  to  remove. Turn  upside 

down and rest on brake castings.

Loosen Dirt and Residue

Use  Gum-Out

®

,  WD-40

®

  or  quality 

commercial cleaning solvent on a clean 

shop rag and clean the bottom surface 

of the Sliding Bar.

Clean Clamping Bar

Clean the bottom surface of the Clamp-

ing  Bar  in  the  same  manner.  Before 

reinstalling check that screws securing 

wedges are tight.

1

2

3

4

5

Tools needed: clean shop rag, commercial cleaning solvent such as Gum Out

®

 or WD-40

®

, light weight oil

Wedge 

Screws

Oil Clamping Bar

Using  any  lightweight  oil  such  as 

“3  in  1”

®

  or  30  Wt.  motor  oil,  lightly 

lubricate the Clamping Bar. 

Note

Do not use

 graphite, silicone or 

heavy grease as these “hold” dirt.

8

“Spot” Cleaning

For everyday cleaning, a rag may be 

used between the clamping surfaces 

with the Brake assembled.

7

Summary of Contents for Windy SP PORT-O-BRAKE

Page 1: ...oubleshooting 8 Cleaning Locking and Clamping Surface 9 Replacing Stainless Edge 10 Replacing Vinyl Strip 10 Replacing Wedges 11 Replacing Hinges 11 Replacing Shoe Castings 12 All Tapco Tools are made under one or more of the following U S Patents 3 161 223 4 321 817 4 651 553 4 489 583 4 493 200 4 445 356 4 372 142 4 766 757 3 817 075 4 557 132 4 240 279 4 671 094 3 482 427 4 494 397 3 559 444 5 ...

Page 2: ...procedure outlined on page 9 2 Use a high quality cleaning solvent such as Gum Out or WD 40 3 Use only lightweight lubricants such as 3 in 1 Oil or 30 wt oil Note Do not use vasoline axle grease or graphite because they tend to hold dirt 4 Use only clean shop rags that are free of dirt or metal chips 5 Do not use your Brake around your saw table as the cuttings may get be tween clamping members an...

Page 3: ...fting Handle Handle Plug Assembly up through the holes in the bottom of the Moving Hinge Align holes in the Handle Plugs with the holes located in the face of the Moving Hinge 2With holes aligned insert screws through Moving Hinge and into Handle Plugs Place washers over ends of screws in back and tighten with hex nuts Handle can now be de tached from Handle Plugs by removing Faspins FACE OF MOVIN...

Page 4: ...ting Plate Channel Leg Plate 361 2 Center of Brake 3Set legs onto Brake with leg tubes near drilled pilot holes Place U clamps over leg tubes align holes and install sheet metal screws Drill re maining holes through clamps and install screws Install screws also in mounting plates as shown 1Position leg plates into mounting plate channels align holes and install nuts and bolts provided 361 2 361 2 ...

Page 5: ...s now become the bending points and are visible from either side On longer lengths fold the coil over as shown and snip both ends at once This saves time and ensures accuracy 4 Lock the pre marked coil blank into the Brake with the cut marks located directly under the outer edge of the Stain less Bending Edge Lock Brake To cut off the coil with a razor knife score the metal against the Stainless B...

Page 6: ...RNER Finish Side Down 1 2 1 2 1 2 2 3 1 2 1 3 4 1 2 4 1 2 3 Finish Side Finish Side Finish Side Down Finish Side Down Finish Side Up Finish Side Down Finish Side Down 3 4 Finish Side Up Finish Side Up Finish Side Down Finish Side Up Finish Side Down Finish Side Down Finish Side Down Finish Side Up Finish Side Up Finish Side Down Finish Side Up Finish Side Down Finish Side Up Finish Side Down Finis...

Page 7: ...ing mechanism C If your material is getting scratched examine the Clamping Bar and Hinge for roughness or burrs Replace worn parts D If you transport your Brake in the locked position lock a piece of vinyl siding or cardboard between the clamping members Vibration during transport can cause scoring of the clamping mechanism if dirt or foreign matter is present E Replace vinyl strip if excessively ...

Page 8: ... Sliding Bar to the right and forward to remove Turn upside down and rest on brake castings Loosen Dirt and Residue Use Gum Out WD 40 or quality commercial cleaning solvent on a clean shop rag and clean the bottom surface of the Sliding Bar Clean Clamping Bar Clean the bottom surface of the Clamp ing Bar in the same manner Before reinstalling check that screws securing wedges are tight 1 2 3 4 5 T...

Page 9: ...ount of oil while sliding into slot Wipe off excess afterwards 5 Punch Vinyl When Vinyl Protecto Strip is in place center punch both ends to prevent slip page 6 Close Brake Move Locking Handle to left 1 REPLACING THE STAINLESS BENDING EDGE Loosen Stainless Edge To loosen old Stainless Bending Edge insert screwdriver behind one end as indicated and twist to release from end Remove Stainless Edge Gr...

Page 10: ...s light oil and safety glasses REPLACING WEDGES Remove Wedge With the Sliding Bar removed and inverted as indicated remove the Flat Head Screws holding the Wedge to the Sliding Bar Replace Wedges Periodically check to insure that screws holding Wedges are tight Loose screws will cause uneven locking Clean Sliding and Clamping Bar Before Replacing Clean surfaces see page 9 Open Brake Move Locking H...

Page 11: ... Sliding Bar to the right and remove 1 2 3 4 Tools needed socket wrench with 7 16 socket Phillips screwdriver Remove Hex Head Screws Holding Clamping Bar This will allow you to reach flat head screws holding Fixed Hinge TAPCO PRODUCTS COMPANY Item 11102 T0069 L 9 03 Remove Pivot Arm Remove Pivot Arms and springs and replace the Shoe Casting When replac ing make sure all fasteners are tight 7 Remove...

Reviews: