background image

NOTICE 

Have your local Tao Motor dealer inspect brakes system for wear or damage. 

Always contact your local Tao Motor Dealer if you have any concerns after inspecting your brake system for wear or damage.

Recommended Brake Fluid 

Always use brake fluid type DOT 3 or 4.   

Brake Fluid Level  

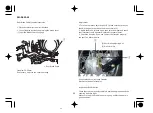
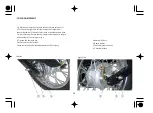
Always check for the proper brake fluid reservoir level as follows;

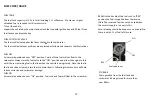
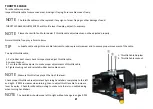
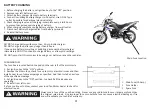
Brake fluid reservoir is located on the handlebar assembly right side. With the vehicle on a level surface, check brake fluid in reservoir  for 

proper level. The fluid should above the MIN mark.  Add fluid as required, but never overfill and clean filler cap before removing.

NOTICE 

The Reservoir is full when the fluid reaches the top of the window. A low fluid  level may indicate leaks or worn brake pads. 

1.

2.

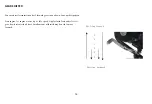
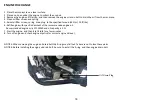
 Maximum Fluid 

 Level  Minimum 

Fluid Level 

HYDRAULIC FRONT BRAKE

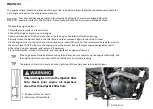
New brakes  will not perform to their maximum efficiency until after their initial brake-in is complete. Use extra 

caution.

Brake fluid replacement or brake system maintenance and repairs should be performed by an authorized Tao 

Motor dealer.  

The brakes can be very hot after prolong use of the vehicle and can cause burns. Wait for the brakes to cool down.

NOTICE 

The front brake system is a hydraulic type and no adjustment is required. Use the following checklist before each use to 

maintain the brake system in good operation condition;

-


Brake Fluid level

.

-


Brake system for fluid leaks

.

-


Brake cleanliness

.

-

Brake disk for excessive wear and surface condition.

-

Brake pads for wear, damage or looseness. 

24

Summary of Contents for Dual Sport TBR7D

Page 1: ...READ THIS MANUAL CAREFULLY It contains important safety and service information TBR7 Owner s Manual...

Page 2: ...ealer or professional motorcycle mechanic You should never try or attempt assembly of this vehicle it should be done by professionals Death or serious injury could result from failure to follow these...

Page 3: ...covers the main data basic structure and main procedures of operation adjustment maintenance and troubleshooting of motorcycle Products are always subject to further improvement which will cause some...

Page 4: ...RK PLUG 19 AIR FILTER ELEMENT 20 THROTTLE CABLE 21 ENGINE IDLE ADJUSTMENT 22 CLUTCH LEVER ADJUSMENT 23 HYDRAULIC FRONT BRAKE 24 REAR BRAKE 25 SIDE STAND SPROCKET 26 DRIVE CHAIN 27 CHAIN ADJUSMENT 28 D...

Page 5: ...inexperienced or untrained riders we urge all riders to take a certified course approved safety learning class Developing off road riding skills is a gradual step by step process Start by practicing a...

Page 6: ...p your motorcycle properly maintained and in safe riding condition Having a breakdown can be difficult especially if you are stranded off road far from help To help avoid problems inspect your motorcy...

Page 7: ...helmet eye protection and other protective apparel when you ride On Road Gear In addition to a helmet and eye protection we also recommend Motorcycle boots with non slip soles to help protect your fee...

Page 8: ...e labels on your TBR7 These labels contain important information for safe and proper operation Never remove any labels from your motorcycle If a label becomes difficult to read or comes off request a...

Page 9: ...11kW 6500r min wheelbase 1345mm Torque max 17 5N m 5500r min Dry weight 130 kg Idling speed 1500r min 150 Max load 150kg including the driver Front wheel 90 90 19 Spark plug D8EA Rear wheel 110 90 17...

Page 10: ...DATA Volure of lubricating oil 1 1L Fuse 10A Fuel Tank Capacity 12 5L Battery 12V9Ah Transmission ratio Ignition means C D I 1st gear 2 909 2nd gear 1 867 3rd gear 1 389 4th gear 1 150 5th gear 0 9545...

Page 11: ...DESCRIPTION Left rear view mirror Meter Ignition switch Right rear view mirror Front brake lever Throttle Engine start switch Clutch lever Horn switch 7 7...

Page 12: ...VIN is on the right side of the frame Fuel cock Fuel valve Gear shifter Side stand Rear wheel DESCRIPTION 8...

Page 13: ...Kick start lever Rear brake lever Front shockabsorber Front wheel Exhaust silencer Seat cushion Rear view mirror Front turn signal s DESCRIPTION 9...

Page 14: ...beam indicator Lit when high beam is on 4 Gear position display The gear position is displayed 5 Neutral indicator Comes on when the transmission is Neutral 6 Fuel level display Indicates fuel level 7...

Page 15: ...e vehicle engine switching off all circuits The key can be removed ON For starting or riding the vehicle powering all circuits The key can not be removed LOCK locking steering system The key can be re...

Page 16: ...ehicle by the main stand unlock fuel cap with ignition key and fill fuel Close fuel tank cap and remove key FUEL COCK FUEL VALVE The fuel cock valve supplies fuel from the tank to the carburetor The f...

Page 17: ...he way to the down in order to operate the vehicle STARTING ENGINE COLD 1 Turn the fuel valve lever to ON position 2 Turn the ignition key to the ON position 3 Set RUN position on main switch 4 Set Ge...

Page 18: ...uctions before starting the engine Engine Stop Kill Engine Run Engine Start Button Engine Start Stop Switch Use this switch to Stop the engine in an emergency situation The engine will not start when...

Page 19: ...ee positions OFF Running Light Headlight ON It s always recommended you ride with the headlight ON all the time 2 Headlight High Low beam switch High beam Low beam 3 Turn signal switch Move Switch to...

Page 20: ...TER Your motorcycle transmission has 5 forward gears in one down four up shift pattern Start engine let engine warm up at idle speed Apply clutch lever and select 1st gear slowly release clutch lever...

Page 21: ...Minimum Oil Level Mark 2 Maximum Oil Level Mark TIP The engine oil level should be checked before each ride In addition always follow the maintenance schedule for oil changes as shown in the maintena...

Page 22: ...m 10 ft lbs 6 Refill engine with specified amount of the recommended engine oil Recommended engine oil is SF 15W40 and oil capacity is 1 1L 7 Start the engine and then it let it idle for a few minutes...

Page 23: ...ectrode of the spark plug to see if it s worn out 2 Check the spark plug for electrode erosion and excessive carbon or other deposits and replace it if necessary 3 Measure the spark plug gap with a wi...

Page 24: ...filter element should be cleaned every 20 40 hours It should be cleaned and lubricated more often if the vehicle is operated In extremely dusty areas When servicing the air filter element be sure to...

Page 25: ...m to 6mm To adjust throttle cable 1 Pull rubber dust covers back to inspect and adjust throttle cable 2 Loosen lock nut 3 Turn throttle cable adjuster to make proper adjustments of throttle cable 4 Ti...

Page 26: ...reached Turning the idle screw in clockwise to raise RPM Turning the screw out counterclockwise will lower RPM 3 The standard idle RPM is 1500 150 ENGINE IDLE ADJUSTMENT If it is necessary to adjust...

Page 27: ...ver CLUTCH LEVER ADJUSMENT Checking the clutch lever freeplay Freeplay at the clutch lever Check the clutch cable for kinks or signs of wear If necessary have it replaced by your Tao Motor dealer Lubr...

Page 28: ...he fluid reaches the top of the window A low fluid level may indicate leaks or worn brake pads 1 2 Maximum Fluid Level Minimum Fluid Level HYDRAULIC FRONT BRAKE New brakes will not perform to their ma...

Page 29: ...d on the brake arm pin 3 2 Apply the brake release it and then spin the wheel and check that it rotates freely Repeat this procedure several times 3 Check the freeplay If you can t adjust the freeplay...

Page 30: ...age and loss of tension 2 Check the side stand assembly for freedom of movement Worn Sprocket Teeth Damaged Sprocket Teeth REPLACE Normal Sprocket Teeth GOOD REPLACE NOTICE Use of a new chain with wor...

Page 31: ...ive when the rear axle is moved to the farthest limit of adjustment Excessive slack indicates the chain is worn beyond its service limit The service life of the chain depends on proper lubrication and...

Page 32: ...2 2 Turn both the right and left chain adjusters clockwise or counterclockwise 3 equally to increase or decrease chain slack 3 After adjusting be sure the chain adjusters are equal in length on both...

Page 33: ...ler When the drive chain becomes extremely dirty it should be cleaned prior to lubrication 1 Clean the side surfaces of the chain with a dry cloth Do not brush Brushing will damage the O ring chain Us...

Page 34: ...install rear left side cover NOTICE Positive cable is red in color Battery electrolyte is poisonous and dangerous acid contains sulfuric acid which can cause severe burns Avoid contact with skin eyes...

Page 35: ...e specified amperage 3 Set ignition key to the ON position to check if all the devices are operating 4 Reinstall rear left cover If a fuse continues to blow contact your local Tao Motor dealer to chec...

Page 36: ...ty of clean water to remove any residue 5 Dry your motorcycle with a soft towel Lubricate the drive chain to prevent rusting 6 Start the engine and let it idle for several minutes The engine heat will...

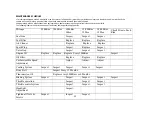
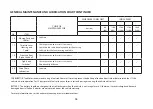
Page 37: ...Replace every 6000Kms or 6 Months Braking System Inspect Inspect Inspect Inspect Inspect Throttle operation Inspect Inspect Inspect Throttle control system Inspect Inspect Inspect Headlight Adjustment...

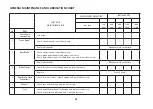
Page 38: ...y and adjust if necessary Check fluid and motorcycle for fluid leaks age and correct if necessary Replace brake pads Whenever worn to the limit 4 Brake Hoses Check for cracks or other damage and repla...

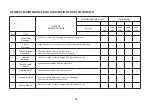
Page 39: ...peration and correct if necessary Check for oil leakage and replace if necessary 11 Stabilizer Bushings Check for cracks or other damage and replace if necessary 12 Rear Knuckle Pivots Lubricate with...

Page 40: ...ry Adjust headlight beams GENERAL MAINTENANCE AND LUBRICATION CHART CONTINUED 20 Drive Chain Lubrication Lubricate CARBURETOR Tao Motor recommends using a fuel stabilizer at all times to prevent the b...

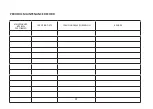
Page 41: ...PERIODIC MAINTENANCE RECORD MAINTENANCE INTERVAL PERFORMED SERVICING DATE SERVICING DEALER OR PERSON REMARK 37...

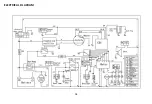
Page 42: ...ELECTRICAL DLACRAM 38...

Page 43: ...uding diagnosis parts and labor MANUFACTURER S WARRANTY COVERAGE The 2019 and later model year highway motorcycle are warranted for 18 000 km or for 5 years whichever comes first If any emission relat...

Page 44: ...r the duration of the warranty period Warranty repairs will be made without charge for diagnosis parts or labor All defective parts replaced under this warranty become the property of Tao Motor A list...

Page 45: ...ao Motor dealer or service shop who is authorized by Tao Motor to sell or service that Tao Motor product during his normal business hours Claims for repair or adjustment found to be caused solely by d...

Page 46: ...trol system warranty implied by law including any warranty of merchantability or fitness for a particular purpose is limited to the express emission control system warranty terms stated in this warran...

Page 47: ...Find important product information and how to videos on our website www taomotor com...

Reviews: