background image

35

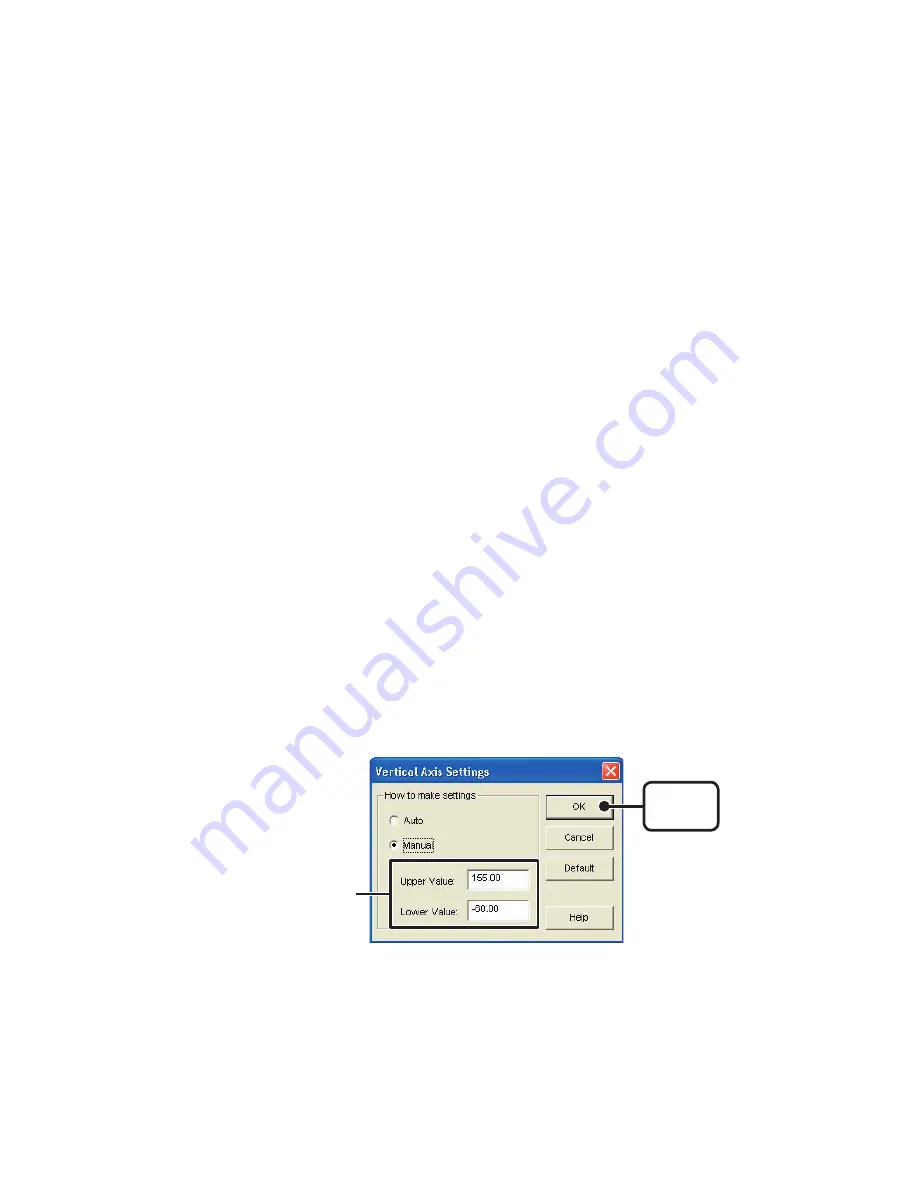
2.

Click 

[

OK

]

 to complete the settings.

Operating the Graph

:

[

Graph

]

 Menu

Return to Original Size

Clicking here will return the graph to its original size.

Zoom In

/

Zoom Out

Zooms in or out one step at a time

Move Cursor Right

/

Left

Simultaneously move the AB Cursors to the right or left.

Move Graph Right

/

Left

Move the Graph Display to the right or left.

Move Graph Up

/

Down

Move the Graph Display up or down.

Vertical Axis Settings 

(

AUTO in Default Settings

)

Set the vertical axis scale 

(

temperature

)

1.

Check either 

[

Auto

]

 or 

[

Manual

]

.


AUTO: 

The vertical axis will automatically be changed according to the 


 values of the data.

 MANUAL: 

You can set the upper and lower values of the vertical axis scale.

[

OK

]

button

Enter  the  range  of  the 

vertical axis scale.

Distributed by MicroDAQ.com, Ltd.                   www.MicroDAQ.com                   (603) 746-5524

Summary of Contents for TR-7xU Series

Page 1: ...2004 03 16004264150 User s Manual Thank you for purchasing our product Carefully read this instruction manual before using this unit 603 746 5524 www MicroDAQ com Distributed by MicroDAQ com Ltd...

Page 2: ...where strict safety precautions are necessary such as in connection with medical equipment whether directly or indirectly We are not responsible for any malfunction or trouble caused by the use of ou...

Page 3: ...or Windows T D Corporation has no obligation to correct any defects found in T D Recorder for Windows Copyright The Copyright for T D Recorder for Windows including the program and relevant documents...

Page 4: ...Connecting with USB Cable Connecting the USB cable to the TR 71U 72U unit 10 Basic Functions TR 71U 72U The Main Window 11 Starting Recording 12 Downloading Recorded Data 14 Other Functions 16 Tempera...

Page 5: ...ctions Saving Recorded Data 37 Creating Text File 38 Opening Saved Files 39 Reinstalling the Software 40 Other Troubleshooting 41 Specifications 45 Distributed by MicroDAQ com Ltd www MicroDAQ com 603...

Page 6: ...Sub pin possible Memory 16MB or above Hard Disk 4 MB or more of available space more space necessary for data Monitor VGA SVGA 800 600 or above 256 or more colors possible is necessary Basic Functions...

Page 7: ...the highest value will appear in red the lowest in blue and the average in pink Printing the Data List It is possible to print the entire list as displayed or to select pages for printing Creating Tex...

Page 8: ...about how to install the driver see the TR 71U 72U Hardware Manual Installing the Accompanying Software After installing T D Recorder for Windows the TR 71U TR 72U Quick Start Program will automatica...

Page 9: ...ph upon downloading as well as specify file names for saving files NOTE Before making Recording Start settings make sure that your computer s date and time are correct If your computer s date and time...

Page 10: ...OM drive In a few seconds the Install Program window will appear If that window does not automatically open please open it by double clicking the CD ROM icon in My Computer on your desktop Select Inst...

Page 11: ...om the Taskbar Click the Quick Start icon in the task tray and click on Quick Start Settings Place a check next to Do not use Quick Start for TR 71U TR 72U and click the OK button Check OK button From...

Page 12: ...tton the setting will be completed Icons By clicking an TR 71U 72U icon you can open the Settings and Communication Display You can also open the Settings and Communication Display from the Start Menu...

Page 13: ...r that topic By clicking on the Help button in any dialog box the explanation for that dialog box will appear By clicking the Toolbar in the Graph Display you can then view explanations for menus icon...

Page 14: ...is secure USB Port Mark The USB cable is a USB A plug USB mini B plug type Please connect to a place with this kind of mark Connecting a communication cable to your computer Connect the USB cable US 1...

Page 15: ...on make sure that the communication cable connection is secure USB cable already connected to computer Examples of Serial Port Marks The communication cable jack is a D Sub 9 pin male type Please conn...

Page 16: ...ssary to first select a device from the device list The type of icon used in the display can be changed in the View Menu Device Properties Information about the device selected in the device list will...

Page 17: ...e Recording Conditions In the Main Window click on the TR 71U 72U icon Click on the icon of the data logger you wish to make settings for Click the Start Recording tab and make the necessary settings...

Page 18: ...less When the possible number of recorded data readings is reached the oldest data is overwritten and recording continues Device Name Channel Name Make settings for each data logger concerning the dev...

Page 19: ...on TR 71U 72U Downloading Recording Data Downloading Recorded Data In the Main Window click on the TR 71U 72U icon Click on the icon of the data logger you wish to download data from Click the Downloa...

Page 20: ...ultaneously displayed NOTE If there are more than 8 channels of data that data cannot be displayed automatically and must be opened from the data file File Name Settings You can choose to save downloa...

Page 21: ...0512_143015 trx DeviceName SerialNumber Date Time Refrigerator_00001234_ 20030512_143015 trx Date Time Device Name 20030512_143015_Refrigerator Trx Date Time Serial Number 20030512_143015_00001234 trx...

Page 22: ...will appear where in you can select the folder into which you wish to save the data then click OK A Data Folder will then appear under Device Properties in the Main Window The default setting will cre...

Page 23: ...of Current Readings Reset button Click to reset the display for highest and lowest measurements the new display will show highest and lowest measurements from the time of resetting Graph button Click...

Page 24: ...Settings button the changes will be completed Send Settings button Enter a name Settings Menu LCD Display Settings Settings can be made for the Thermo Recorder s LCD display such as changing the tempe...

Page 25: ...ternate display between Ch 1 and Ch 2 Display Ch 1 only or Display Ch 2 only Check one of the patterns By clicking the Send Settings button the changes will be completed Check one of these Send Settin...

Page 26: ...justment Use when measuring in a wide range NOTE When adjusting at 2 points make sure the difference in points is at least 10 When measuring in a wide range and adjusting at 2 points make sure that th...

Page 27: ...d TR 71U reads 10 when the standard says the true measurement is 10 2 In this case the slope a is 10 2 0 4 10 0 0 98 The offset is 0 4 so the conversion equation becomes Y 0 98X 0 4 The range of the s...

Page 28: ...n of a TR 71U TR 72U unit via USB cable If the setting is ON the Quick Start Program will periodically communicate with the device driver and upon the detection of a USB connection will open the main...

Page 29: ...monitoring current readings and using the adjustment function Check either unit of temperature Celsius or Fahrenheit Click OK to complete the setting After completing settings please close the TR 71U...

Page 30: ...graph program click on Open Temp Humidity Graph in the Settings Communication Display under the File Menu If you have checked After downloading automatically display graph in the detailed settings the...

Page 31: ...buttons Horizontal Gauge Bar By dragging the gauge you can move left and right to the data you want to be displayed Button for Moving Vertical Axis The vertical axis moves up or down by clicking thes...

Page 32: ...With the left button drag the mouse to outline the area you want to zoom in on Menu Display Using the Mouse By right clicking on the graph the Menu will be displayed Distributed by MicroDAQ com Ltd ww...

Page 33: ...By clicking this button you can shift the display between the recorded date and the amount of elapsed time since recording started 28 The highest value is in RED lowest is in BLUE and the average is i...

Page 34: ...he Toolbar Changing the Method of Graph Display Changing graph display colors From the View Menu You can change the letters used in the data list display for each channel between monochrome and channe...

Page 35: ...rage values for each channel of data in the list will be changed In the graph display the data for the calculation range that you have set will be displayed Name Up to 32 letters can be entered Starti...

Page 36: ...nnel Data From the Tools Menu You can re order the data during graph display There are two methods to use when re ordering channels Re order by Dragging a Channel Number and Specify the Channel Number...

Page 37: ...he OK button the deletion will be completed Specify the Channel Numbers to be Moved Specify the channels to be moved From original position To desired position Click Re order button to complete the re...

Page 38: ...you wish to change the color By clicking each button color samples will be displayed Choose the color you want and click the OK button After confirming the color by clicking the OK button the change...

Page 39: ...ware Graph Line Width Settings Change the width of the data lines and the scale lines By clicking the Default button you will return to the color settings when the software was opened OK button Every...

Page 40: ...Left Move the Graph Display to the right or left Move Graph Up Down Move the Graph Display up or down Vertical Axis Settings AUTO in Default Settings Set the vertical axis scale temperature Check eit...

Page 41: ...36 Distributed by MicroDAQ com Ltd www MicroDAQ com 603 746 5524...

Page 42: ...can be carried out from Save in the Toolbar In the File Menu select Save All Data as Save with a new File Name In the File Menu select Save Displayed Data Save only that data in the current display T...

Page 43: ...File Type and Range to be Saved and click OK Comma Tab Space and Semi colon are codes used by common spreadsheet software such as Excel and Lotus when reading Text File to divide cells Designate the...

Page 44: ...Opening Saved Files To open a previously saved file designate the file name to open it Click Open in the File Menu Select the name of the data you wish to open and click Open to view the data in graph...

Page 45: ...folders and locations they were saved in Also saved Remote Unit registration info may still remain If you wish to delete all of these data and registration files make sure to delete all of the relevan...

Page 46: ...with energy saving function settings make sure that the serial port has not been turned off Especially on NEC brand PC98 notebook computers the default setting maybe such A Check to make sure that th...

Page 47: ...lect the port with a mark and then click on Properties to view the details about that port A If your computer has an internal modem make sure that the communication port is not being used by it When t...

Page 48: ...ion cable has been added to the communication cable A Check to see if some other communication software is in use A If your desktop computer has two serial ports try connecting the communication cable...

Page 49: ...n adapter D SUB 25 pin male to a D SUB 9 pin male If the connector on your computer is a Half pitch 14 pin female then use the adapter Half pitch 14 pin male to a D SUB 9 pin male or a combination Hal...

Page 50: ...d Difference between Cursor A and B 8 Channel Simultaneous Display and Processing Possible to process mixed data from TR 71U and TR 72U units up to 4units Data List Display Calculation Range Settings...

Page 51: ...r company news products upcoming events software and user s Manual downloads as well as other support Please stop by and see what we have to offer http www tandd jp This is printed on 100 recycled pap...

Page 52: ...Distributed by MicroDAQ com Ltd www MicroDAQ com 603 746 5524...

Reviews: