

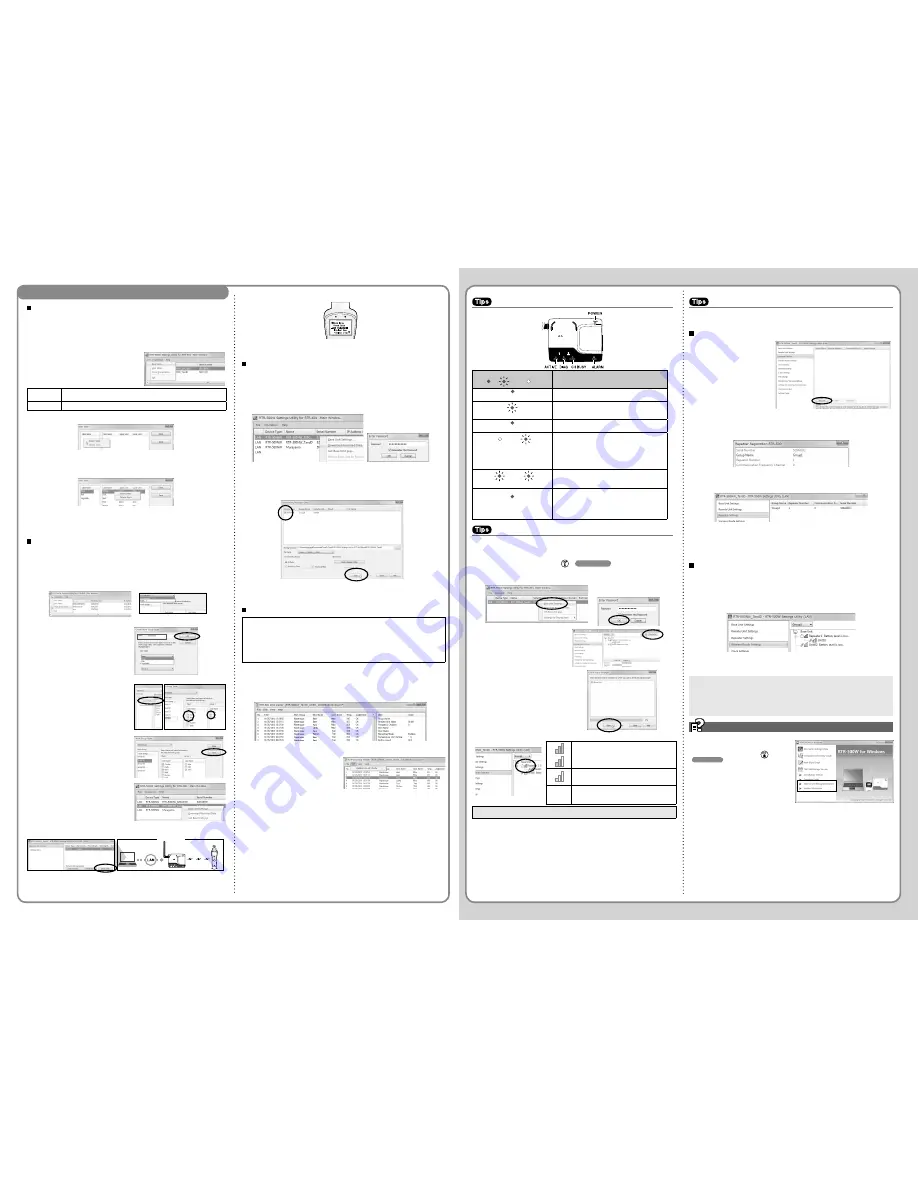
LED Lamp Display
LED Status
ON
BLINKING
OFF
Description
ACTIVE
• Network communication available
• UConnected via USB
ACTIVE
• Network communication in progress (wireless
communication with Remote Unit)
• USB communication in progress
DIAG
• Initializing after power turned ON
• FTP or E-mail transmission failed
ACTIVE
DIAG
• Clock Settings not completed
• Clock settings have been reset (power failure and so on)
• No Remote Units have been registered
• FTP or E-mail settings have not been properly made
• No Settings for autonomic operations such as monitoring
have been made
ACTIVE
DIAG
• Failed to connect to wireless LAN access point (only
RTR-500AW)
• IP address cannot be received from DHCP server
ALARM
• A measurement has exceeded the set upper or lower limit
• A Remote Unit wireless error has occurred
• The contact input is ON
• There is trouble in the Remote Unit (battery level is low, a
sensor connection is poor, etc…)
How to Check the Wireless Signal Strength
11
To check the wireless signal strength between the Base Unit and Remote Unit, use
RTR-500W Settings Utility.
21
Click the [Operations] menu > [Network Search].
In a few seconds, the Base Unit set in
of
Before Using
will appear in the address list.
31
Right click the target Base Unit, and select [Base Unit Settings] in the pop-up menu.
Enter the LAN password and click [OK].
41
Open [Wireless Route Settings] and
click [Test Signal Strength].
51
Click [Start] to begin the signal check.
After the test has been completed, click
[Close] to see the results.
Communication is stable.
Communication is unstable. If communication errors
repeatedly occur, reposition the Remote Unit or add a
Repeater (RTR-500).
If no antenna mark appears a communication error has
occurred. Try to reposition the Remote Unit or add a
Repeater (RTR-500).
• For details about checking the signal strength, refer to [RTR-500W Settings Utility Help] > [How to
Use] > [Basic Settings] > [7.Deploying the Units] > [Check Wireless Signal Strength].
Extending Wireless Communication Range with Repeater(s)
If you wish to increase the wireless communication range or increase the stability of commu-
nication between a Base Unit and Remote Unit(s), you can add Repeater(s) and make the
necessary wireless route settings.
Adding a Repeater
11
In the RTR-500W Settings Utility,
open the [Repeater Settings]
menu.
21
Click [Register]. With a USB cable
connect the RTR-500 you wish to
register as a Repeater to your
computer.
• When connecting a device for the first time, the USB driver installation will start automatically.
31
The [Repeater Registration] window will appear, wherein you can select the Group Name
to which you wish to add the Repeater and make any necessary name changes.
41
After having completed all entries, click [Register].
The settings will be sent to the Repeater and the registered Repeater will appear in the
Repeater Registration List.
51
Place the Remote Unit(s) and Repeater(s) in their actual positions.
61
Select the [Wireless Route Settings] Menu and confirm the wireless communication route
for the Base Unit - Remote Unit(s).
Perform the signal strength test to confirm that communication is possible between the
Base Unit, Repeater and Remote Unit.
Wireless Route Settings
It is possible to make changes to the route of wireless communication taking into consider-
ation the actual locations of and signal strength between the registered Remote Units and
Repeaters.
11
In the RTR-500W Settings Utility, open the [Wireless Route Settings] Menu.
21
The Wireless Route can be changed by dragging and dropping the Remote Unit and
Repeater icons.
31
Click [Apply].
Perform the signal strength test to confirm the signal strength between the Base Unit,
Repeater and Remote Unit.
• Do not connect more than one Repeater (RTR-500) to your computer at one time.
• After changing the wireless route, make sure to once again test signal strength.
• It is not possible to move Remote Units or Repeaters to a different group's wireless route. If you
wish to move a unit to another group, you must first initialize that unit or delete it from the group it
belongs to and re-register it to the new group.
• For details, refer to [RTR-500W Settings Utility Help] > [How to Use] > [Advanced Settings] >
[Wireless Route Settings].
Help for Unit Recognition Failure and Other Info
Help for Unit Recognition Failure:
When the connected USB device is not recognized
(and the screen does not change in
of
Before Using
), information on how to check
and reinstall the USB driver can be found here1
Update Information:
Information about software and firmware updates
can be found here1
Preparing Item and User Tables for Work Groups
Item and User Tables cannot be sent directly to Remote Units, and are only used in
creating Work Group Tables1
11
From the Start Screen or Start Menu, open
"RTR-500W for Windows (for RTR-601)" > "RTR-500W Settings Utility for
RTR-601".
21
Select the target Base Unit in the main
window, and go to [File] > [Item Table] or
[User Table].
Item Table
You can create multiple tables and register up to 63 items to be measured in each table. Upper
and lower limits can also be set for each item here.
User Table
You can create multiple tables and register up to 62 users in each table.
31
Right click in the left side box, and select [Insert Table] in the pop-up menu.
41
To make or edit the item list for the inserted table, right click in the right side
box and select from the [Insert Item] or [Delete Item] options.
If you don't need to set upper and lower limits, leave them as they are.
51
Click [Save].
• If you accidentally delete a table, close the window without saving and re-open it to recover the previously
saved settings.
61
Follow the same steps to make a User Table.
Creating and Sending Work Group Tables
Using the above Item and User Tables, it is now possible to create and send Work
Group Tables1
11
From the [File] menu, select [Work Group Table] to open the Work Group Table
window. To make a new Work Group Table, select the <Create New...> option
from the drop-down list.
The <Edit...> option allows you to
rename or delete a Work Group Table.
21
In the displayed window, enter a
desired name for the Work Group Table
and select the Item Table and User
Table to be used.
Click [OK] and the new Work Group
Table will be added to the drop-down
list.
31
Right click in the left side "Work Group"
box and select [Insert Work Group].
Check the Items and Users to register
to that group. In one Work Group Table,
you can create multiple Work Groups
and register the selected Items and
Users for each group.
41
After completing desired settings for
the target Work Group Table, click
[Save].
51
Next, in the main window right click the
target Base Unit in the device list.
Select [Base Unit Settings] in the
pop-up menu.
61
Select the target Remote Unit from the right hand list and click [Send Table].
Send Table
Selecting the User and Item on the Remote Unit:
Go to RTR-601 MENU > [Select Work] > [Select User] > [Select Item]
• For each Work Group found under [Select Work], only those Users and Items registered to each group will be
displayed and can be selected.
Downloading Recorded Data Manually
11
From the [Operation] menu, select [Search Network].
In a few seconds, the registered Base Units will appear in the list.
21
Right click on the target Base Unit, and select [Download Recorded Data] in
the pop-up menu.
Enter the LAN password and click [OK].
31
The [Downloading Recorded Data] window will appear.
Place a check mark next to the target Remote Unit, and click [Start] to start
downloading.
• More than one data reading needs to be recorded in the Remote Unit.
41
Downloaded data will be saved as a recorded data file in the specified storage
folder.
Viewing Recorded Data via "DataViewer"
Both data sent by the Base Unit via FTP/E-mail and data manually downloaded to a PC are saved as .prz
files. To view these data files, use the DataViewer application.
Storage Location of Recorded Data
Recorded data will be saved in the default folder under the Documents folder as shown in the example
below.
Example:
C:\Users\(Login User Name)\Documents\TandD Corp\RTR-500W Settings Uty for RTR-601
11
From the Start Screen or Start Menu, open
"RTR-500W for Windows (for RTR-601)" > "DataViewer".
21
In the [File] menu, click [Open] and then open the selected file from the
storage location.
Deleting Selected Data
In the opened data table, select unnecessary
data (using the [Ctrl] or [Shift] key to select
several sets of data), and go to [Edit] > [Delete
Line of Choice].
Uploading Additional Data Files
It is possible to add new data files to the already uploaded file(s) and view several sets of data in one
table. To save the file after editing, go to [File] > [Save as]. The new file will be saved in .puw format.
Saving Data as Text File
It is possible to convert recorded data to text format which can be read by common spreadsheet
software. When the data table is open, go to [File] > [Save Data in Text File].
• Text files are saved in .txt format.
• The .puw file can be read by DataViewer but the .txt file cannot.
Using LAN Communication
RTR-500W for Windows (for RTR-601)


