background image

Chapter 2 Setting Up Your Printer

Quick Start Guide

20

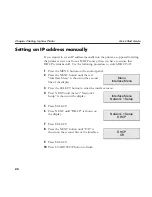
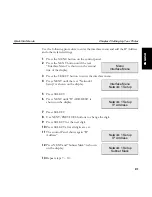
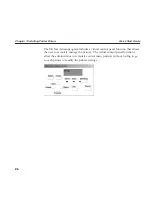
Setting an IP address manually

If you require to set an IP address manually into the printer, as opposed to letting  
the printer receive one from a DHCP source, then you have to ensure that 
DHCP is switched off. Use the following procedure to switch DHCP off.

1

Press the MENU button on the control panel.

2

Press the NEXT button until the text 
“Interface Menu” is shown on the second 
line of the display.

3

Press the SELECT button to enter the interface menu.

4

Press NEXT until the text “Network 1 
Setup” is shown on the display.

5

Press SELECT.

6

Press NEXT until “DHCP” is shown on 
the display.

7

Press SELECT.

8

Press the NEXT button until “Off ” is 
shown on the second  line of the interface.

9

Press SELECT.

10

Press START/STOP button to finish.

Menu

Interface Menu

Interface Menu

Network 1 Setup

Network 1 Setup

DHCP

DHCP

Off

Summary of Contents for Intelliprint 9035

Page 1: ...Intelliprint 9035 Quick Start Guide Kurzanleitung Guide de d marrage rapide Guida di avvio rapida Gu a de instalaci n Laser Printer...

Page 2: ...art 15 of FCC rules which are designed to provide reasonable protection against such interference in a residential installation However there is no guarantee that interference will not occur in a part...

Page 3: ...tting Up Your Printer 6 Checking Your Package 6 Preparing a Location for the Printer 7 Dimensions 7 Installation Precautions 7 Space Requirements 8 Installation procedure 9 Removing the Tape 9 Install...

Page 4: ...able of contents Quick Start Guide ii Chapter 3 Installing Printer Drivers 23 Driver Installation 23 TGNet Admin administration program 25 Chapter 4 Specifications 27 Chapter 5 Options and supplies 28...

Page 5: ...nual Conventions This following conventions are used throughout this manual to emphasize certain procedures or information NOTE A note is a tip or extra information that may be helpful in installing o...

Page 6: ...all circum stances beforehand Be alert and use your common sense For detailed informations informations on Safety Guidelines please refer to the User Guide on the CD ROM Safety Precautions This printe...

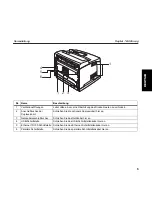
Page 7: ...ay 3 Ventilation hole Releases heat to prevent the interior of the printer from heating up 4 Paper meter Indicates the amount of paper remaining 5 Paper tray A4 150 sheets Load paper here 6 Paper tray...

Page 8: ...o prevent the interior of the printer from heating up 2 Duplex module connector Connect the optional duplex module here 3 Power cord connector Connect the power cord here 4 USB port Connect the USB ca...

Page 9: ...2 Toner Cartridge Contains the toner and the photosensitive drum 3 Top cover Open this when replacing the Toner Cartridge and removing jammed paper 4 Fuser unit Fixes the toner on the paper Do not tou...

Page 10: ...r Checking Your Package Before installing the printer check that all the items are contained in the package Should any components be missing or damaged contact your dealer Printer Toner Cartridge Powe...

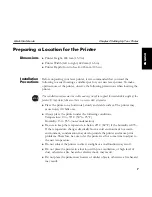
Page 11: ...s Place the printer on a horizontal sturdy and stable surface The printer may cause injury if it falls over Always place the printer under the following conditions Temperature 10 to 35 C 50 to 95 F Hu...

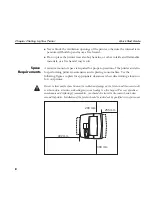
Page 12: ...r and also for performing printer maintenance and replacing consumables Use the following figures to plan for appropriate clearances when determining a location for your printer Be sure to leave ample...

Page 13: ...t taken out of the packaging box the covers of the printer are taped as shown in the diagram Remove the tapes Installing Options If you have purchased any optional accessories please refer to the User...

Page 14: ...y to finish the installation within 5 minutes Do not touch the surface of the photosensitive drum Do not stand or place the Toner Cartridge upside down The drum might get damaged A drum shutter protec...

Page 15: ...gram 3 Place the Toner Cartridge on a flat surface and pull the seal out horizontally When pulling out the seal pull it out horizontally The tape might break if it is pulled out diagonally After the s...

Page 16: ...Chapter 2 Setting Up Your Printer Quick Start Guide 12 Do not touch any parts inside the printer Ensure that the Toner Cartridge is firmly set 5 Close the top cover securely...

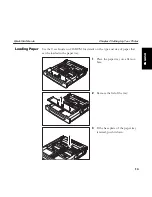
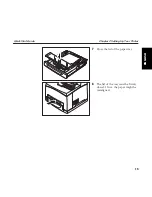
Page 17: ...LISH Loading Paper See the User Guide on CD ROM for details on the type and size of paper that can be loaded in the paper tray 1 Place the paper tray on a flat sur face 2 Remove the lid of the tray 3...

Page 18: ...to be printed facing up and with all 4 corners aligned Make sure that the right width guide is correctly aligned with the paper size Do not place paper over the right width guide Do not load paper ex...

Page 19: ...Quick Start Guide Chapter 2 Setting Up Your Printer 15 ENGLISH 7 Close the lid of the paper tray 8 The lid of the tray must be firmly closed If not the paper might be misaligned...

Page 20: ...rd to the power cord connector at the back of the printer 2 Make sure that the power switch has been firmly pushed to the O position and then insert the other end of the power cord to a correctly rate...

Page 21: ...me When you have finished using the printer for the day or you do not intend to use it for a long period of time switch off the power The top line of the LCD display reads Followed by asterisks progre...

Page 22: ...LED is lit or follow these steps Depending upon the options installed and menu settings your Configuration Summary may vary 1 From the Ready status press MENU the control panel display will read eithe...

Page 23: ...Quick Start Guide Chapter 2 Setting Up Your Printer 19 ENGLISH Example of a Configuration Summary...

Page 24: ...n on the control panel 2 Press the NEXT button until the text Interface Menu is shown on the second line of the display 3 Press the SELECT button to enter the interface menu 4 Press NEXT until the tex...

Page 25: ...the interface menu 4 Press NEXT until the text Network 1 Setup is shown on the display 5 Press SELECT 6 Press NEXT until IP ADDRESS is shown on the display 7 Press SELECT 8 Use NEXT PREVIOUS buttons t...

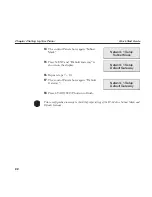
Page 26: ...ubnet Mask and Default Gateway 14 The control Panel shows again Subnet Mask 15 Press NEXT and Default Gateway is shown on the display 16 Repeat steps 7 10 17 The control Panel shows again Default Gate...

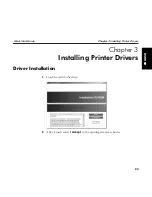
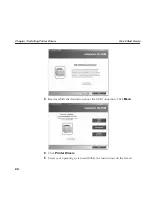
Page 27: ...art Guide Chapter 3 Installing Printer Drivers 23 ENGLISH Chapter 3 Installing Printer Drivers Driver Installation 1 Load the cd into the drive 2 After it loads select I Accept to the opening screen a...

Page 28: ...stalling Printer Drivers Quick Start Guide 24 3 Read carefully the instruction about the USB connection Click Menu 4 Click Printer Drivers 5 Select your operating system and follow the instructions on...

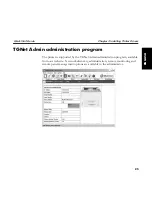
Page 29: ...NGLISH TGNet Admin administration program The printer is supported by the TGNet Admin administration program available from our web site Network discovery administration remote monitoring and remote p...

Page 30: ...dmin program includes a virtual control panel function that allows the user to remotely manage the printer The virtual control panel functions allow the administrator to remotely control many printers...

Page 31: ...utive 5 5 8 5 Statement Paper type Plain Thick1 Thick2 paper 60 216 g m2 transparencies envelopes labels some envelopes and labels cannot be used due to the paper quality and size Standard paper tray...

Page 32: ...the rear cover page of this manual The table below list available printer options and order numbers Option Supply Order No Process Unit Toner Cartridge 17 K 062 415 Tray Module 550 Sheet max of two mo...

Page 33: ...l 2 Drucker einrichten 7 Lieferumfang berpr fen 7 Druckerstandort vorbereiten 8 Abmessungen 8 Sicherheitsma nahmen bei der Installation 8 Platzbedarf 9 Installation 10 Klebeband entfernen 10 Optionen...

Page 34: ...tsverzeichnis Kurzanleitung ii Kapitel 3 Druckertreiber installieren 24 Treiber installieren 24 Verwaltungsprogramm TGNet Admin 26 Kapitel 4 Technische Daten 28 Kapitel 5 Optionen und Verbrauchsmateri...

Page 35: ...Informationen besonders hervorzuheben oder vor Problemen zu warnen HINWEIS Hinweise sind Tipps oder Zusatzinformationen die bei der Installation oder dem Betrieb des Druckers hilfreich sein k nnen AC...

Page 36: ...ler oder den Kundenservice Denken Sie bitte daran dass bei den Warnungen in dieser Anleitung oder auf dem Drucker nicht jeder m gliche Fall ber cksichtigt werden kann es ist unm glich alle Eventualit...

Page 37: ...rtusche und Papier betr gt ca 21 kg 46 lbs Versuchen Sie deshalb niemals den Drucker alleine anzuheben Um den Drucker anzuheben m ssen sich zwei Personen an der Vorder und R ckseite gegen berstehen un...

Page 38: ...eine berhitzung des Druckerinneren zu verhindern 4 Paperstandanzeiger Zeigt das verbleibende Papier an 5 Papierschacht A4 150 Blatt Legen Sie hier Papier ein 6 Papierschacht A4 550 Blatt Legen Sie hie...

Page 39: ...lu buchse der Duplexeinheit Schlie en Sie die optionale Duplexeinheit hier an 3 Netzkabelanschlu buchse Schlie en Sie das Netzkabel hier an 4 USB Schnittstelle Schlie en Sie das USB Schnittstellenkabe...

Page 40: ...n Toner und die photoempflindliche Trommel 3 Obere Abdeckung ffnen Sie diese Abdeckung um Tonerkartuschen auszutauschen und gestautes Papier zu entfernen 4 Fixiereinheit Fixiert den Toner auf dem Papi...

Page 41: ...llen Sie vor der Installation des Druckers sicher dass alle ben tigten Bestandteile in der Verpackung sind Sollte etwas fehlen oder besch digt sein setzen Sie sich mit Ihrem H ndler in Verbindung Druc...

Page 42: ...nn Verletzungen verursachen wenn er herunterf llt Stellen Sie den Drucker immer unter den folgenden Umgebungsbedingungen auf Temperatur 10 bis 35 C 50 bis 95 F Luftfeuchtigkeit 15 bis 85 ohne Kondensa...

Page 43: ...um um den Drucker herum erforderlich Verwenden Sie die Angaben in der folgenden Darstellung um angemessene Abst nde bei der Wahl des Druckerstandortes einzuhalten Stellen Sie sicher da zwischen den Ve...

Page 44: ...ngen mit Klebeband gesichert wie in der Abbildung gezeigt Entfernen Sie das Klebeband Optionen installieren Informationen ber die Installation von gegebenenfalls erworbenem optionalem Zubeh r finden S...

Page 45: ...und versuchen sie den Installationsvorgang inner halb von 5 Minuten abzuschlie en Ber hren Sie die Oberfl che der photoempfindlichen Trommel nicht Stellen Sie die Tonerkartusche nicht auf den Kopf da...

Page 46: ...bene Oberfl che und ziehen Sie das Versiegelungs band in horizontaler Richtung heraus Ziehen Sie das Versiegelungsband in horizontaler Richtung heraus Das Band kann abrei en wenn es in diagonaler Rich...

Page 47: ...nleitung Kapitel 2 Drucker einrichten 13 DEUTSCH Ber hren Sie keine Teile im Druckerinneren Vergewissern Sie sich da die Toner kartusche fest eingesetzt ist 5 Schlie en Sie die obere Abdeckung ordnung...

Page 48: ...und formate die in den Papierschacht eingelegt werden k nnen finden Sie im Benutzerhandbuch auf der CD ROM 1 Legen Sie den Papierschacht auf eine ebene Oberfl che 2 Entfernen Sie den Deckel des Schac...

Page 49: ...e die rechte Seitenf h rung zusammen und schieben Sie diese auf die Position des gew nschten Papierformats 6 Legen Sie das Papier mit der zu bedruckenden Seite nach oben ein Achten Sie darauf da es an...

Page 50: ...Schachtkapazit t nicht bersteigt Stellen Sie die rechte Seitenf hrung korrekt auf das Papierformat ein Ist die F hrung nicht richtig eingestellt wird das Papier nicht richtig eingezogen was einen Papi...

Page 51: ...der R ckseite des Druckers 2 Stellen Sie sicher da der Netz schalter sich in der Stellung O befindet und stecken Sie den Stecker am anderen Ende des Netzkabels in eine Steckdose mit der korrekten Nenn...

Page 52: ...bestimmte Zeit dauer hinaus nicht benutzt wird In der ersten Zeile der LCD Anzeige erscheint gefolgt von Sternchen die sich entlang der ersten Zeile aufbauen Nach einem LED Selbsttest bauen sich Stern...

Page 53: ...en Sie wie folgt vor Abh ngig von den installierten Druckeroptionen und Men einstellungen kann Ihre Konfigura tions bersicht von dem folgenden Beispiel abweichen 1 Dr cken Sie im Bereit Modus MENU in...

Page 54: ...Kapitel 2 Drucker einrichten Kurzanleitung 20 Beispiel f r eine Konfigurations bersicht...

Page 55: ...auf dem Bedienfeld die MENU Taste 2 Dr cken Sie die NEXT Taste bis der Text Schnittst Men in der zweiten Zeile der Anzeige erscheint 3 Dr cken Sie die SELECT Taste um das Schnittstellen Men zu aktivie...

Page 56: ...e NEXT bis der Text Netzwk 1 Konfig in der Anzeige erscheint 5 Dr cken Sie SELECT 6 Dr cken Sie NEXT bis IP Adresse in der Anzeige erscheint 7 Dr cken Sie SELECT 8 Verwenden Sie die NEXT PREVIOUS Tast...

Page 57: ...r fen 14 In der Bedienfeldanzeige erscheint erneut Subnet Maske 15 Dr cken Sie NEXT und Standard Rou ter in der Anzeige erscheint 16 Wiederholen Sie die Schritte 7 10 17 In der Bedienfeldanzeige ersch...

Page 58: ...eiber installieren Kurzanleitung 24 Kapitel 3 Druckertreiber installieren Treiber installieren 1 Legen Sie die CD ROM in das Laufwerk ein 2 W hlen Sie nach dem Laden des Startmen s I Accept wie in der...

Page 59: ...installieren 25 DEUTSCH 3 Lesen Sie sorgf ltig die Information ber den USB Anschlu Klicken Sie auf Menu 4 Klicken Sie auf Printer Drivers 5 W hlen Sie das Betriebssystem Ihres Rechners aus und folgen...

Page 60: ...ogramm TGNet Admin Der Drucker ist mit dem Verwaltungsprogramm TGNet Admin ausgestattet das Sie von unserer Website herunterladen k nnen Es erm glicht dem Administrator die Pr fung und Verwaltung von...

Page 61: ...Programm verf gt ber eine virtuelle Bedienfeldfunktion die es dem Bediener erlaubt den Drucker fernzubedienen Diese Funktion erm glicht die Fernsteuerung mehrerer Drucker ohne dass es n tig w re die e...

Page 62: ...pier St rke 1 St rke 2 60 216 g m2 Folien Umschl ge Etiketten einige Umschl ge und Etiketten k nnen aufgrund von Papierqualit t und Gr e nicht verwendet werden Standardpapierschacht Papierschacht A4 1...

Page 63: ...auf der letzten Seite dieses Handbuchs In der folgenden Tabelle sind die erh ltlichen Optionen mit den jeweiligen Bestellnummern aufgef hrt Option Verbrauchsmaterial Bestell Nr Proze einheit Tonerkar...

Page 64: ......

Page 65: ...on de la fourniture 7 Pr paration de l emplacement de l mprimante 8 Dimensions 8 Pr cautions prendre avant l installation 8 Espace requis 9 Proc dure d installation 10 Retrait des rubans adh sifs 10 I...

Page 66: ...mati res Guide de d marrage rapide ii Chapitre 3 Pilotes d imprimante 24 Installation du pilote 24 Programme d administration TGNet Admin 26 Chapitre 4 Sp cifications 28 Chapitre 5 Options et consomm...

Page 67: ...ertaines informations ou vous avertir d ventuels probl mes REMARQUE Les remarques vous fournissent des conseils ou compl ments d informations qui pourront vous tre utiles lors de l installation ou de...

Page 68: ...elle indiqu e dans ce manuel En cas de doute veuillez contacter votre distributeur ou le S A V Gardez l esprit que les avertissements de danger dans ce manuel ou sur l imprimante ne peuvent pas couvri...

Page 69: ...du toner et papier non inclus N essayez pas de la soulever tout seul Deux personnes l une face au panneau avant et l autre face au panneau arri re de l imprimante doivent se placer de chaque c t de ce...

Page 70: ...vacue la chaleur pour pr venir toute surchauffe de l int rieur de l imprimante 4 D tecteur de papier Indique la quantit de papier restant 5 Bac papier A4 150 feuilles Charger le papier ici 6 Bac papie...

Page 71: ...pour pr venir toute surchauffe de l int rieur de l imprimante 2 Prise de module Duplex Brancher ici le module Duplex optionnel 3 Prise de c ble d alimentation Brancher ici le c ble d alimentation 4 Po...

Page 72: ...ner Contient le toner et le tambour photosensible 3 Couvercle Ouvrir le couvercle pour remplacer la cartouche de toner et pour liminer les bourrages de papier 4 Unit de fusion Fixe le toner au papier...

Page 73: ...iture Avant d installer l imprimante assurez vous que l emballage contient bien tous les articles et accessoires Si l un des composants venait manquer ou tait endommag veuillez contacter votre distrib...

Page 74: ...consid rable de l im primante La chute de l imprimante peut entra ner des blessures graves Placez l imprimante sur une surface horizontale stable et solide L imprimante peut entra ner des blessures g...

Page 75: ...rtain espace s av re n cessaire pour garantir le bon fonctionnement de l imprimante assurer sa maintenance et remplacer ses consommables Utilisez les chiffres fournis ci dessous pour d terminer l empl...

Page 76: ...sa bo te les couvercles et capots de l imprimante sont encore munis de rubans adh sifs comme indiqu sur la figure Retirer les rubans adh sifs Installation des Options Si vous avez achet des accessoire...

Page 77: ...re d installation dans un endroit fortement clair et essayez de terminer l op ration le plus rapidement possible environ 5 minu tes Ne touchez jamais la surface du tambour photosensible Ne renversez p...

Page 78: ...ez la cartouche sur une sur face plane maintenez la ferme ment et retirez la bande en plas tique en tirant dessus horizonta lement Lorsque vous retirez le joint tirez le l horizontale Le ruban risque...

Page 79: ...e 2 Installation de l imprimante 13 FRAN AIS Ne toucher aucune pi ce se trouvant l int rieur de l imprimante Assurez vous que la cartouche de toner est fermement en place 5 Fermez le capot sup rieur A...

Page 80: ...papier Reportez vous au Guide d utilisateur sur CD ROM pour tout d tail concernant le type et le format de papier pouvant tre charg dans le bac 1 Placez le bac papier sur une sur face plane 2 Retirer...

Page 81: ...at de papier souhait 5 Comprimer le guide papier lat ral droit et le faire glisser jusqu au for mat de papier souhait 6 Charger le papier avec la face imprimer vers le haut et avec les quatre angles a...

Page 82: ...hargement du papier Ajuster le guide papier lat ral droit exactement la largeur de papier Si le guide papier lat ral droit n est pas en place le papier ne sera pas transport correctement ce qui pourra...

Page 83: ...ranchez le cordon d alimenta tion dans le connecteur CA situ au dos de l imprimante 2 Assurez vous que le bouton d ali mentation de l imprimante est en position O arr t puis ins rez le connecteur du c...

Page 84: ...vous avez termin d utiliser l imprimante pour la journ e ou pour une p riode prolong e coupez l alimentation en tension La ligne sup rieure de l cran cristaux liquides affiche suivi d ast risques d f...

Page 85: ...uche d info quand la DEL Start Stop est allum e ou proc dez comme suit Le r capitulatif de configuration peut varier en fonction des options install es et des choix de menu 1 partir de l tat Pr t appu...

Page 86: ...Chapitre 2 Installation de l imprimante Guide de d marrage rapide 20 Exemple d un r capitulatif de configuration...

Page 87: ...puyer sur le bouton NEXT jusqu ce que l affichage Menu interface appa raisse la deuxi me ligne de l cran 3 Appuyer sur le bouton SELECT pour entrer le menu interface 4 Appuyer sur NEXT jusqu ce que l...

Page 88: ...u 1 configuration r seau 1 apparaisse l cran 5 Appuyez sur le bouton SELECT 6 Appuyer sur NEXT jusqu ce que l affi chage Adresse IP apparaisse l cran 7 Appuyez sur le bouton SELECT 8 Modifier le chiff...

Page 89: ...r seau et passerelle Routeur par d faut 13 R p ter les op rations 7 10 14 Le panneau de commande affiche de nou veau Masque ss r seau 15 Appuyer sur NEXT et l affichage Rou teur appara t l cran 16 R...

Page 90: ...imprimante Guide de d marrage rapide 24 Chapitre 3 Pilotes d imprimante Installation du pilote 1 Introduisez le c d rom dans le lecteur 2 Apr s le chargement s lectionnez I Accept pour arriver au masq...

Page 91: ...tre 3 Pilotes d imprimante 25 FRAN AIS 3 Read carefully the instruction about the USB connection Cliquez sur Menu 4 Cliquez sur Printer Drivers 5 S lectionnez votre syst me d exploitation et suivez le...

Page 92: ...d administration TGNet Admin L imprimante est assist e par le programme d administration TGNet Admin disponible sur notre site web Les options de d couverte r seau administration commande distance et...

Page 93: ...lit de commande virtuelle de panneau permettant l utilisateur de g rer l imprimante distance Les fonctions de commande virtuelle de panneau autorisent la commande distance de plusieurs imprimantes san...

Page 94: ...8 5 Statement Type de papier Papier simple epaisseur 1 epaisseur 2 60 216 g m2 transparents enveloppes tiquettes certaines enveloppes et tiquettes ne peuvent pas tre utilis es en raison de la qualit e...

Page 95: ...icant Les accessoires disponibles avec les num ros de commande correspondants sont indiqu s dans le tableau suivant Option mat riel d usage No de commande Unit de processus cartouche de toner 17 K 062...

Page 96: ......

Page 97: ...o 7 Preparazone del luogo di installazione della stampante 8 Dimensioni 8 Precauzioni per l installazione 8 Requisiti di spazio 9 Procedura di installazione 10 Rimozione del nastro 10 Installazione de...

Page 98: ...dice Guida di avvio rapida ii Capitolo 3 Driver di stampa 24 Installazione dei driver 24 Programma di amministrazione TGNet Admin 26 Capitolo 4 Specifiche 28 Capitolo 5 Opzioni e materiali di consumo...

Page 99: ...convenzioni per mettere in risalto le informazioni o per avvertire l operatore di possibili problemi NOTA una nota contiene un consiglio o un informazione supplementare che pu essere utile per install...

Page 100: ...critta nel presente manuale In caso di dubbio contattare il rivenditore o la societ di assistenza Si ricordi che le segnalazioni di pericolo riportate in questo manuale e sulla stampante non esaurisco...

Page 101: ...artuccia di toner e carta di circa 21 kg 46 lbs Non cercare mai di sollevare la stampante da soli Per sollevare la stampante una persona si colloca davanti alla stampante ed un altra dietro di essa e...

Page 102: ...Foro di ventilazione Rilascia il calore evitando che l interno della stampante si surriscaldi 4 Sensore carta Indica la quantit di carta rimanente 5 Cassetto carta A4 150 fogli Caricare qui la carta 6...

Page 103: ...interno della stampante si surriscaldi 2 Connettore unit stampa fronte retro Inserire qui il gruppo stampa fronte retro opzionale 3 Connettore cavo alimentazione Inserire qui il cavo di alimentazione...

Page 104: ...cia Toner Contiene il toner e il tamburo fotosensibile 3 Copertura superiore Aprire per sostituire la cartuccia toner o per rimuovere la carta inceppata 4 Gruppo fusore Fissa il toner sulla carta Non...

Page 105: ...contenuto Prima di installare la stampante accertarsi che la confezione contenga tutti gli elementi illustrati Se alcuni componenti risultassero mancanti o danneggiati contattare il rivenditore Stampa...

Page 106: ...dovesse cadere potrebbe fare o sostenere gravi danni Posizionare la stampante su una superficie orizzontale stabile e forte La stam pante pesa 23 kg e la sua caduta pu causare molti danni Assicurarsi...

Page 107: ...poter svolgere la manutenzione e la sostituzione dei materiali di consumo occorre un certo spazio Per pianificare lo spazio necessario per l installazione della stampante si possono osservare le segue...

Page 108: ...fissate da un nastro come indicato nel disegno Rimuovere il nastro Installazione degli accessori opzionali If you have purchased any optional accessories please refer to the User Guide on the CD ROM...

Page 109: ...ato e completate le procedure d installazione entro tempi i pi brevi possibili circa 5 minuti Non toccare mai la superficie del tamburo fotosensitivo Non capovolgere la cartuccia n girarla su se stess...

Page 110: ...iformemente 3 Tenere ferma la cartuccia di toner su una superficie orizzon tale e rimuovere il nastro di pla stica dalla cartuccia tirandolo in direzione orizzontale Rimuovere il sigillo orizzontalmen...

Page 111: ...2 Installazione della stampante 13 ITALIANO Non toccare le parti interne della stampante Assicurarsi che la Cartuccia Toner sia fissata saldamente 5 Chiudere il coperchio superiore Assicurarsi che il...

Page 112: ...della carta Consultare la Guida Utente su CD ROM per maggiori dettagli sui tipi e i formati di carta caricabile nel vassoio 1 Collocare il cassetto della carta su una superficie orizzontale 2 Rimuover...

Page 113: ...derato 5 Premere la guida di destra per la larghezza della carta e farla scor rere fino a raggiungere il formato desiderato 6 Caricare la carta con il lato da stampare rivolto verso l alto e con i 4 a...

Page 114: ...a Adattare correttamente la guida di destra per la larghezza in base al formato di carta desiderato Se la guida di destra non correttamente fissata la carta viene caricata in modo sbagliato e pu incep...

Page 115: ...spina elettrica del cavo di alimentazione nel connettore AC sul lato posteriore della stam pante 2 Verificare che l interruttore della stampante sia in posizione O quindi inserire la spina sull altra...

Page 116: ...si usa per un periodo prolungato consigliabile tenerla spenta La prima riga del display LCD indica che la stampante si sta caricando Seguito da asterischi che seguono come si vede nell ultima riga de...

Page 117: ...are la procedura seguente Il riassunto della configurazione che stamperete pu variare a secondo delle opzioni installate e delle impostazioni eseguite nel menu 1 Dallo stato di Pronta premere MENU il...

Page 118: ...Capitolo 2 Installazione della stampante Guida di avvio rapida 20 Esempio di riassunto di configurazione...

Page 119: ...ollo 2 Premere il pulsante NEXT finch sulla seconda riga del display non compare la scritta Menu interfaccia 3 Premere il pulsante SELECT per accedere al menu dell interfaccia 4 Premere il pulsante NE...

Page 120: ...sante NEXT finch sul display non compare la scritta Impost rete 1 5 Premere SELECT 6 Premere NEXT finch sul display non compare la scritta Indirizzo IP 7 Premere SELECT 8 Per modificare la cifra utili...

Page 121: ...k e del gateway Router primario predefinito 14 Il pannello di controllo mostra nuova mente Subnet Mask 15 Premere NEXT sul display compare la scritta Router primario 16 Ripetere i passaggi 7 10 17 Il...

Page 122: ...Driver di stampa Guida di avvio rapida 24 Capitolo 3 Driver di stampa Installazione dei driver 1 Inserire il CD nell unit ottica 2 Attendere la lettura del disco e selezionare I Accept sulla mostrata...

Page 123: ...ida Capitolo 3 Driver di stampa 25 ITALIANO 3 Leggere attentamente le istruzioni sulla connessione USB Fare clic su Menu 4 Fare clic su Printer Drivers 5 Selezionare il sistema operativo e seguire le...

Page 124: ...istrazione TGNet Admin La stampante utilizza il programma di amministrazione TGNet Admin scaricabile dal nostro sito internet che mette a disposizione dell amministratore opzioni di network discovery...

Page 125: ...Admin comprende anche la funzione di pannello di controllo virtuale che permette all utente di gestire la stampante da remoto Le funzioni di pannello di controllo virtuale permettono all amministrato...

Page 126: ...ment Tipo di carta Carta semplice spessore 1 spessore 2 60 216 g m2 lucidi buste e etichette alcune buste o etichette non possono essere utilizzate a causa della qualit e del forrmato della carta Cass...

Page 127: ...dal produttore i numeri di contatto sono indicati nell ultima pagina del manuale Nelle tabelle che seguono sono elencati tutti gli accessori con i relativi numeri di ordinazione Opzioni materiale di c...

Page 128: ......

Page 129: ...ora 7 Comprobaci n del contenido del paquete 7 Preparaci n de un emplazamiento para la impresora 8 Dimensiones 8 Precauciones de instalaci n 8 Requisitos de espacio 9 Procedimiento de instalaci n 10 Q...

Page 130: ...ntenido Gu a de instalaci n ii Cap tulo 3 Drivers de impresora 24 Instalaci n de drivers 24 Programa de administraci n TGNet Admin 26 Cap tulo 4 Especificaciones 28 Cap tulo 5 Opciones y consumibles 2...

Page 131: ...tes convenciones para resaltar informaci n o advertirle sobre posibles problemas NOTA Una nota es un consejo o una informaci n suplementaria que podr a resultar provechosa a la hora de instalar o usar...

Page 132: ...te de lo indicado en el presente manual En caso de duda p ngase en contacto con su comerciante o su compa a de servicio postventa Tenga en cuenta que los avisos de riesgo indicados en el presente manu...

Page 133: ...papel cartucho de t ner y papel asciende a 21 kg 46 lbs No intente nuncar levantar solo la impresora Para levantar la impresora las dos personas deben enfrentarse en el lado delan tero y trasero de l...

Page 134: ...ventilaci n Descarga el calor para evitar que el interior de la impresora se caliente 4 Medidor de papel Indica la cantidad de papel que queda 5 Bandeja de papel A4 150 hojas Cargue el papel aqu 6 Ba...

Page 135: ...calor para evitar que el interior de la impresora se caliente 2 Conector de m dulo d plex Conecte aqu el m dulo d plex opcional 3 Conector del cord n energ tico Conecte el cord n energ tico aqu 4 Puer...

Page 136: ...ne el t ner y el tambor fotosensible 3 Tapa de arriba Abra esta tapa cuando sustituya el cartucho de tambor y cuando elimine papel atascado 4 Unidad de fusi n Fija el t ner en el papel No toque esta u...

Page 137: ...Antes de proceder a la instalaci n de la impresora compruebe si todos los componentes est n incluidos en el correspondiente paquete En caso de faltar o estar da ado un componente p ngase en contacto...

Page 138: ...ie horizontal s lida y estable La impresora puede causar lesiones serias si se caiga al suelo Siempre coloque la impresora bajo las siguientes condiciones Temperatura de 10 a 35 cent grados de 50 a 95...

Page 139: ...ora y los trabajos de sustituci n de materiales de consumo Usar las siguientes medidas para prever espacios libres suficientes al fijar el emplazamiento de su impresora Aseg rese de dejar amplio espac...

Page 140: ...de la caja de embalaje las tapas de la impresora est n provistas de cintas tal y como se aprecia en la imagen Quite las cintas Instalaci n de opciones Si usted ha adquirido accesorios opcionales por...

Page 141: ...instalaci n lo m s r pido que le sea posible dentro de aproximadamente 5 minutos Nunca toque la superficie del tambor fotosensible No le d vuelta al cartucho ni lo pare sobre la parte final del mismo...

Page 142: ...Sujetar el cartucho de t ner fir memente sobre una superficie plana y extraer horizontalmente la cinta de pl stico del cartucho Al tirar del sellado para sacarlo h galo de forma horizontal La cinta se...

Page 143: ...i n de su impresora 13 ESPA OL ESPA OL No toque ninguna pieza dentro de la impresora Cerci rese de que el cartucho de t ner est colocado de forma fija y estable 5 Cierre la cubierta superior Ase g res...

Page 144: ...el Usuario en el CD ROM para conocer los detalles respecto al tipo y tama o de papel que se puede cargar en la bandeja de papel 1 Colocar la bandeja del papel sobre una superficie plana 2 Quite la tap...

Page 145: ...papel deseado 5 Apriete la gu a derecha para el ancho y c rrala al tama o deseado de papel 6 Cargue el papel con el lado a imprimir mirando hacia arriba y con las 4 esquinas alineadas Deje garantizado...

Page 146: ...nee la gu a derecha para el ancho correctamente respecto al ancho del papel Si la gu a derecha para el ancho no est en su posici n debida el papel no ser alimentado correctamente y se podr causar un a...

Page 147: ...alimenta ci n en el conector CA en el lado posterior de la impresora 2 Comprobar que el interruptor de encendido de la impresora se encuentre en posici n O apa gado introducir el enchufe del cable de...

Page 148: ...a impresora para el d a o si no tiene la in tenci n de utilizarla durante un per odo prolongado desconecte la energ a La primera l nea del monitor LCD dice lo siguiente Luego siguen unos asteriscos en...

Page 149: ...Start Stop est encendido o haga lo siguiente Seg n las opciones instaladas y los ajustes de men su Resumen de Configuraci n podr variar 1 Desde el estado de Listo presione MENU el panel de control ind...

Page 150: ...Cap tulo 2 Instalaci n de su impresora Gu a de instalaci n 20 Ejemplo de un resumen de la configuraci n...

Page 151: ...HCP 1 Pulse el bot n MENU en el panel de control 2 Pulse el bot n NEXT hasta que aparezca el texto Men interfaz en la segunda l nea del display 3 Pulse el bot n SELECT para pasar al men de interfaz 4...

Page 152: ...hasta que aparezca el texto Config red 1 en el display 5 Presione SELECT 6 Pulse NEXT hasta que aparezca Direc ci n IP en el display 7 Presione SELECT 8 Use los botones NEXT PREVIOUS para cambiar el d...

Page 153: ...ecto Direccionamiento hayan sido ajustados correctamente 14 El panel de control vuelve a presentar M scara subred 15 Pulse NEXT y en el display aparecer Direccionamiento 16 Repita los pasos 7 10 17 El...

Page 154: ...vers de impresora Gu a de instalaci n 24 Cap tulo 3 Drivers de impresora Instalaci n de drivers 1 Cargue el CD en la unidad 2 Despu s de cargar seleccione I Accept en la pantalla de apertura como vien...

Page 155: ...vers de impresora 25 ESPA OL ESPA OL 3 Lea detenidamente las instrucciones sobre la conexi n USB Haga clic en Menu 4 Haga clic en Printer Drivers 5 Seleccione su sistema operativo y siga las instrucci...

Page 156: ...traci n TGNet Admin La impresora es apoyada por el programa de administraci n TGNet Admin que est disponible en nuestro sitio Web El administrador dispone de las opciones descubrimiento de red network...

Page 157: ...ncluye una funci n virtual de panel de control que permite al usuario maniobrar la impresora de forma remota Las funciones virtuales de panel de control permiten al administrador maniobrar de forma re...

Page 158: ...normal espesor 1 espesor 2 60 216 g m2 transparencias sobres etiquetas algunos sobres y etiquetas no pueden ser utilizados debido a la calidad y al tama o del papel Bandeja de papel est ndar Bandeja d...

Page 159: ...n la siguiente tabla figuran los accesorios disponibles con los n meros de pedido correspondientes Opci n consumible N pieza para el pedido Unidad de Proceso Cartucho de t ner 17 K 062 415 M dulo de b...

Page 160: ......
Page 161: ...lk TrueType Laser Writer and Macintosh are trade marks of Apple Computer Inc Microsoft Windows Windows 9x Windows 2000 Windows NT and MS DOS are registered trademarks of Microsoft Corporation PostScri...

Page 162: ...075 100 http www tallygenicom de ITALY TallyGenicom S R L Via Borsini 6 I 20094 Corsico MI Italia Tel 39 02 48608 1 Fax 39 02 48601 141 http www tallygenicom it CANADA TallyGenicom 125 Traders Bouleva...

Reviews: