background image

Tally T8006/T8306 Color Laser Printers User Guide

4

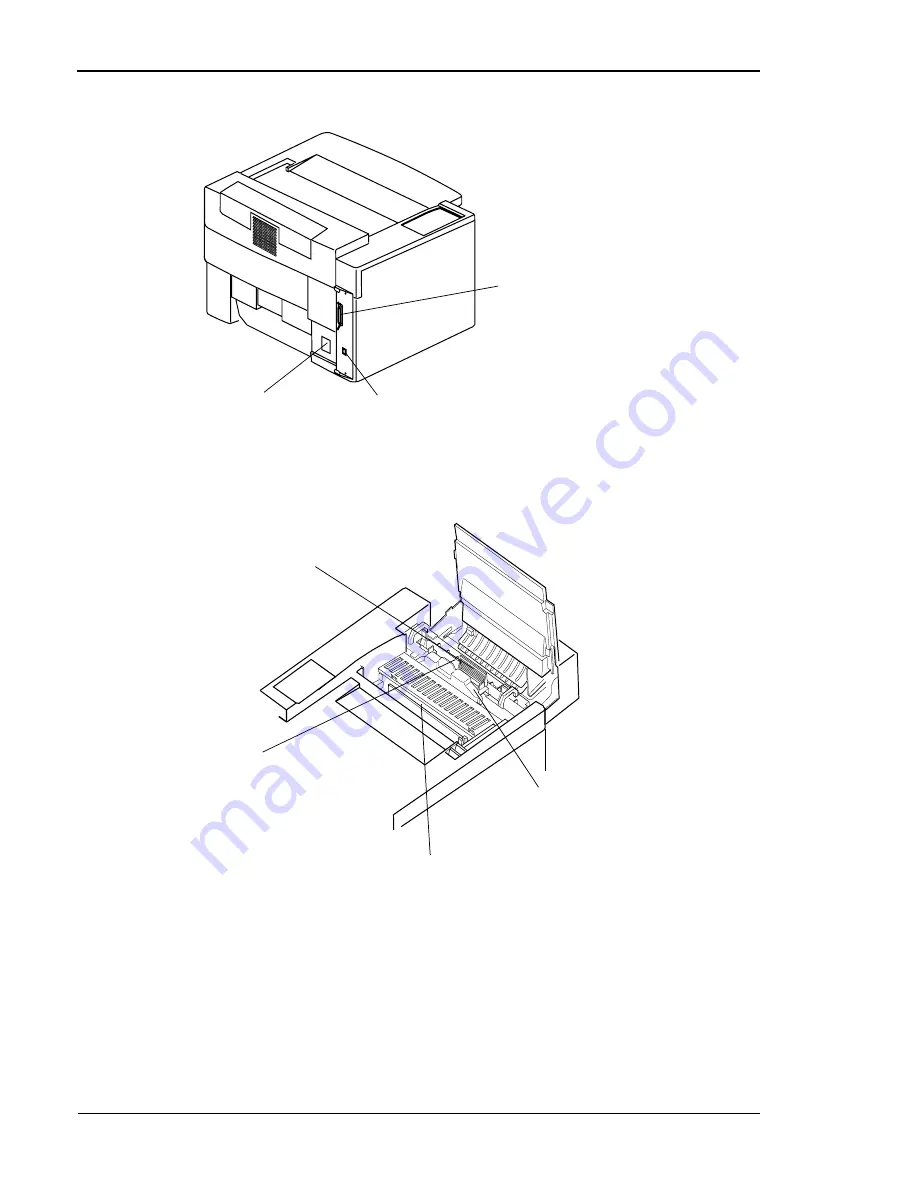
Power Cord Socket


provides power to the printer.

RJ-45 Port

 provides 

printer-to-network connection.

Parallel Port

 provides direct 

printer-to-computer connection.

Fusing Unit 

thermally 

bonds the toner to the 
media.

Fuser Cleaning Roller


removes any dust from 
the fusing unit and the 
fixing roller.

Oil Bottle

 stores oil for 

use in the fixing process. 

Optical Photoconductor (OPC) 
Belt Cartridge

 processes laser 

beam activity that produces images 
one color at a time (not shown).

Summary of Contents for T8006

Page 1: ...Tally T8006 T8306 Color Laser Printers User Guide...

Page 2: ...atus as set out in the radio interference regulations of the Canadian department of communications This unit complies with DOC standard C108 8 M 1983 Attention Le pr sent appareil num rique n met pas...

Page 3: ...Printer for Shipment 10 Installing the Starter Kit 12 Installing the Paper Tray 13 Installing Toner Cartridges 13 Installing the Oil Bottle and Fuser Cleaning Roller 15 Setting the Fuser Cleaning Roll...

Page 4: ...38 Trays 2 and 3 38 Loading Media 39 Installing The Envelope Feeder T8306 Only 40 Control Panel 41 Display 41 Indicators 41 Control Keys 42 Chapter 5 Changing Print Defaults 45 Changing Default Print...

Page 5: ...Jam Areas 89 Clearing Jam 1 90 Clearing Jam 2 93 Clearing Jams 3 and 4 96 Poor Print Quality 100 Slow or No Printing 103 Macintosh Chooser Problems 106 Network Problems 107 Printer Driver Restriction...

Page 6: ...rinter With NetPilot 149 Network Dialog 149 Properties Dialog 153 Configuring the Printer With TCP IP Utilities 158 Setting with ARP 158 Setting with RARP 159 Setting with BOOTP 159 Setting with DHCP...

Page 7: ...anual Carefully follow all the warnings cautions and notes as you read through the instructions in this manual before you operate the printer Information in the warnings and cautions describe potentia...

Page 8: ...a single unit so there are fewer supplies to replace T8006 T8306 accepts various printing media The printer accepts many types sizes and weights of paper and other media including envelopes heavy pap...

Page 9: ...correction 600 dpi x 600 dpi Correction After correction 2 400 dpi equiva lent x 600 dpi Control Panel keys and indicator lights allow you to control and monitor printer operations Top Cover provides...

Page 10: ...Port provides direct printer to computer connection Fusing Unit thermally bonds the toner to the media Fuser Cleaning Roller removes any dust from the fusing unit and the fixing roller Oil Bottle stor...

Page 11: ...r 1 Introduction 5 Toner Cartridges provide the toner for the printing process Ozone Filter reduces the amount of ozone emitted during the printing process Waste Toner Pack collects and retains waste...

Page 12: ......

Page 13: ...rating systems Windows 95 Windows 98 ME Windows NT 4 0 The Windows NT 4 0 printer driver will only operate on X86 architectures Windows 2000 Hardware Requirements The connecting computer must meet the...

Page 14: ...rates magnetic fields electrical noise vibration or shock The surface that holds the printer must support at least 313 pounds or 142 kilograms which includes the weight of the printer paper and all op...

Page 15: ...es of electrical power as shown below If you need additional information about the power requirements contact your dealer or a Tally Service Technician Warning Use properly grounded wall sockets Do no...

Page 16: ...printer push it carefully and slowly Sudden shocks or strong vibration may damage the printer Caution Have two people carry the printer without tilting it Repacking the Printer for Shipment Before th...

Page 17: ...ions or for assistance go to World Wide Web site www Tally com or contact Tally at e mail address support Tally com See the Tally T8006 T8306 Color Laser Printers Quick Start Guide on the Tally CD ROM...

Page 18: ...f the fusing unit when the printer must be moved or shipped Keep the dropper in a convenient safe location for future use The printer also comes with an ozone filter and a waste toner pack that have b...

Page 19: ...s immediately flush your eyes with water for at least 15 minutes and contact a physician Warning Make sure the printer is off and unplugged before installing supplies Caution Handle the toner cartridg...

Page 20: ...evel out the toner inside 4 Peel the tape off the cartridge and remove the protective cover from the cartridge Note Save the protective cover for future use when shipping the printer and toner cartrid...

Page 21: ...ver latch and open the top cover 2 For the T8006 push the large green levers at the sides of the fuser rollers backward until they click into position For the T8306 remove the two orange fuser stops f...

Page 22: ...e pressing the power switch press and hold MENU ENTER Note For more information about displayed error messages see Appendix D Control Panel Messages on page 141 2 When PLEASE WAIT is displayed release...

Page 23: ...t to light 1 Open the top and front covers 2 Lift the green OPC belt cartridge lock levers up until they unlock with the channels upright 3 With the top cover open remove the protective sheet from the...

Page 24: ...ters User Guide 18 Note After replacing the OPC belt cartridge reset the OPC belt counter to zero 6 Press the green OPC belt car tridge lock levers to the closed position 7 Close the top and front cov...

Page 25: ...x D Control Panel Messages on page 141 2 When PLEASE WAIT is dis played release MENU ENTER The display will show Utility Menu Clear FC Roll 3 Press either TRAY or MEDIA until the display shows Clear B...

Page 26: ...ter Kit and plug in the printer load paper into the paper tray turn on the printer and print a test page Loading Paper for Test Printing 1 Plug the printer power cord into the printer 2 Plug the print...

Page 27: ...til it locks 1 Press the main power switch The printer will perform a series of diag nostic tests and then begin the warm up cycle This process may take up to 4 minutes 2 Once the printer has complete...

Page 28: ...st Menu Test Menu Test Menu Test Menu 3 Press the MENU ENTER key Tray 1 A4 Tray 1 A4 Tray 1 A4 Tray 1 A4 Test Print Test Print Test Print Test Print 4 Press the MENU ENTER key a second time Tray 1 A4...

Page 29: ...nt properly check for error indications on the control panel display See Chapter 9 Troubleshooting on page 89 Before you can send files from your computer application to the printer you must install t...

Page 30: ......

Page 31: ...senses your operating system and supplies the appropriate driver Setting up a Local Printer in Windows The Tally auto install CD ROM automatically installs the Tally T8006 T8306 printer drivers on yo...

Page 32: ...8 When prompted by the installation wizard choose Custom Install 9 When prompted by the installation wizard select install NetPilot and PrintMonitor 10 Click Exit This CD to complete the software inst...

Page 33: ...mpted by the installation wizard select install NetPilot and PrintMonitor 10 Click Exit This CD to complete the software installation process Note By default your printer is installed on LPT1 the phys...

Page 34: ...oftware button or the T8306 Install Software button 5 Click the Network button to configure the computer for network printing 6 Click the Install Printer Driver button to install the printer drivers 7...

Page 35: ...click the Next button Note If you are uncertain about the IP address that should be used consult your network administrator 17 Enter an eight character name that your printer will have on your net wor...

Page 36: ...server the logical printer name should remain LPT1 and click OK 9 The LPR port will then be added automatically to the list of available ports and will be selected as the current port 10 Click OK to...

Page 37: ...art the Add Standard TCP IP Printer Port Wizard Click Next to begin the Wizard 6 Enter the IP address This will also be used as the Port Name of the printer Click Next to continue 7 If the printer was...

Page 38: ...Printer Driver button to install the printer drivers 7 Click the Network Utilities button to install the network utilities 8 When prompted by the installation wizard choose Custom Install 9 When prom...

Page 39: ...ame shown on the network 15 In the Network Environments dialog deselect all but the Netware check box and click the Next button 16 Select the print queue that the printer will be connected to If the p...

Page 40: ...e is recommended Configuring Macintosh for Network Printing To print from your Macintosh over an Ethernet network you must first configure your printer Make sure the printer is connected to the networ...

Page 41: ...our printer Note If the Connected To window does not show your printer verify the printer is connected to the network and the printer is configured properly For further help see Macintosh Chooser Prob...

Page 42: ......

Page 43: ...printer is not printing a job or warming up 2 Press the power switch Note When restarting the printer wait at least five seconds after turning off the printer before turning it on again Selecting Medi...

Page 44: ...B5 JIS B5 ISO letter legal executive and custom sizes to 8 5 x 11 7 T8306 In addition to the sizes above this model handles A3 B4 WB 13 x 19 tabloid and custom sizes to 13 x 19 Thick Stock Laser Print...

Page 45: ...oth hands gently lift and pull the paper tray out of the printer 2 Remove the tray cover T8306 only 3 Using the green grips adjust the lateral and end paper retainers according to the paper size 4 Pla...

Page 46: ...will only work in Tray 1 6 Put the paper tray into the printer 7 Confirm that the display shows the correct paper size If appears on the display as the paper size reinstall the paper making sure the p...

Page 47: ...e display below shows the printer printing a paper loaded into Tray 1 Indicators MESSAGE lamp orange Lights when an error message is on the display READY lamp green Is lit when the printer is ready to...

Page 48: ...ollowing example shows the messages that will display when you use FORMFEED to print on letter paper instead of transparencies FORMFEED Forces a job to print CLEAR Clears print data ONLINE Places the...

Page 49: ...printing from the new source tray The following example shows the messages that will be displayed when changing the source tray In this example the source tray is changed from Tray 1 containing letter...

Page 50: ...trol Panel Messages on page 141 Tray1 LTR Tray1 LTR Tray1 LTR Tray1 LTR Tray1 Load Trans Tray1 Load Trans Tray1 Load Trans Tray1 Load Trans The display indicates that the currently selected source tra...

Page 51: ...ication you are currently printing from Whether you are setting the default properties or customizing the settings for a particular document the Tally driver interface is exactly the same To set the p...

Page 52: ...Print Driver Properties Windows 95 98 1 From the Windows taskbar click the Start button 2 Go to Settings 3 Click on Printers to open the Printers folder 4 In the Printers folder right click the Tally...

Page 53: ...47 Windows NT 4 0 1 From the Windows taskbar click the Start button 2 Go to Settings 3 Click on Printers to open the Printers folder 4 In the Printers folder right click the Tally T8006 T8306 Printer...

Page 54: ...skbar click the Start button 2 Go to Settings 3 Click on Printers to open the Printers folder 4 In the Printers folder right click the Tally T8006 T8306 Printer icon 5 Click on Properties to open the...

Page 55: ...loaded in the current paper tray Paper Source Paper Source allows you to select the current paper tray Media Type Use Media Type to select the type of media you want to print on Copies Use Copies to...

Page 56: ...int Details there are three major selection choices Use Binding Position to select which edge the binding will be set to on the paper and how large the margin will be Use Print Order to specify the pa...

Page 57: ...Chapter 5 Changing Print Defaults 51...

Page 58: ...use it again After you choose your settings on the Color tab click OK Item Description Color Mode Set tings Use Color Mode settings to configure how images will be printed according to the type of im...

Page 59: ...w when adjusting the colors Base Color Use the Base Color drop down list to select a color mode based on the content you are printing Brightness When you move the scroll box to the right the col ors l...

Page 60: ...he scroll box to the left to make the black print density lighter or to the right to make it darker Cyan Move the scroll box to the left to make the cyan print density lighter or to the right to make...

Page 61: ...ing from the Color Mode section of the Color tab Item Description List Displays names of your custom settings Name Allows you to type the name of your custom set ting Save Click this button to save a...

Page 62: ...before and after your print job Display User ID when printing Select Display User ID when printing to adjust the user information that displays during printing To change the user information select th...

Page 63: ...ompression Ratio to increase the compression of print data sent to the printer Clear this box to reduce the chances of printing errors Watermark The Watermark button provides a separate proper ties sh...

Page 64: ...predefined watermark from this list or type in up to sixteen characters to specify your cus tom watermark Font Select a font for the watermark Style Select a character style Font Size Select a font p...

Page 65: ...nd also gives you an opportunity to replace all of your customized settings with the original Tally default print settings To close the About tab click OK Item Description Restore All Items to Default...

Page 66: ......

Page 67: ...e following steps to replenish the supplies in your printer Warning Make sure the power switch is off and that the printer has cooled for a minimum of 30 minutes before supplies near the fusing unit R...

Page 68: ...ing upward 3 Pull the empty toner cartridge out of the printer 4 Discard the empty toner car tridge See Disposing of Sup plies on page 71 5 Rock the new toner cartridge three or four times in the dire...

Page 69: ...quires extra oil for the initial coating of its rollers Warning Make sure the power switch is off and the printer has cooled for a minimum of 30 minutes before replacing supplies near the fusing unit...

Page 70: ...aper Warning If you get toner in your eyes immediately flush your eyes with water for a minimum of 15 minutes and contact a physician 4 Lift the used oil bottle out of the printer 5 Discard the used o...

Page 71: ...ack 4 Peel the provided seal off of the side of the used waste toner pack and seal the used toner pack 5 Remove the new waste toner pack from its polyethylene bag 6 Insert the used waste toner pack in...

Page 72: ...6 is about 12 000 pages and in the T8306 is about 20 000 pages at a 5 toner coverage rate on letter size paper Warning Make sure the power switch is off and that the printer has cooled for a minimum o...

Page 73: ...d the used fuser cleaning roller as indicated in Disposing of Supplies on page 71 7 Insert the new fuser cleaning roller 8 Turn the two green lock levers to lock the new fuser cleaning roller in place...

Page 74: ...eaning roller at least once every 12 months 1 Turn the power switch off 2 At the rear of the printer slide the ozone filter case out 3 Remove the ozone filter from the case 4 Discard the used ozone fi...

Page 75: ...of the OPC belt cartridge for the T8006 is about 60 000 images 15 000 color pages and for the T8306 is about 120 000 images 30 000 color printed pages at a 5 toner coverage rate on letter size paper...

Page 76: ...ies on page 71 Caution Do not touch or wipe off any powder that is on the OPC belt nor expose the OPC belt to light 7 Remove the two shipping pins from the new OPC belt cartridge 8 Remove the protecti...

Page 77: ...rmation on Tally replacement printer parts see Appendix B Periodic Replacement Parts on page 117 11 Close the top and front covers carefully until they both lock Note Set the OPC belt counter to zero...

Page 78: ......

Page 79: ...gistration roller following the procedure below Caution Do not use alcohol or water to clean the registration roller 1 Turn off and unplug the printer 2 Open the back cover of the printer 3 Using a dr...

Page 80: ...an the transfer roller following the procedure below 1 Turn off and unplug the printer 2 Open the back cover of the printer 3 Using a dry cotton cloth gently rotate and wipe off any paper or toner par...

Page 81: ...slid ing it to the left then lifting it out of its cradle on the right side 4 Use a dry cotton cloth to remove any dust or toner on the exterior of the discharger 5 Use a dry cotton swab to clean the...

Page 82: ...OPC belt cartridge following the procedure below Caution Do not expose the OPC belt cartridge to light and do not touch the surface of the OPC belt 1 Turn off and unplug the printer 2 Open the front c...

Page 83: ...veral sheets of clean paper over the OPC belt cartridge to protect the photosensitive belt from light 8 Gently slide the wire cleaner lever along the charging wire sev eral times 9 Reposition the wire...

Page 84: ...Tally T8006 T8306 Color Laser Printers User Guide 78 11 Push the green OPC belt car tridge lock levers down until they lock 12 Close the top and front covers and plug in the printer power cord...

Page 85: ...e below Caution Do not expose the OPC belt cartridge to light and do not touch the surface of the OPC belt 6 Put the OPC belt cartridge on a sheet of clean paper with the photo sensitive belt facing u...

Page 86: ...the printer power cord Cleaning the Inside of the Printer Use a toner vacuum and a soft cotton cloth to clean the inside of the printer following the procedure below Caution Before cleaning the inside...

Page 87: ...sheets of clean paper over the OPC belt cartridge to pro tect the photosensitive belt from light 6 Use a toner vacuum to clean any dust or toner that is loose in the bottom of the printer 7 Use a dry...

Page 88: ...uger directly below the drum cleaning roller 13 Reinstall the drum cleaning roller 14 Reinstall the toner cartridges 15 Close the top cover 16 Carefully remove the waste toner pack 17 Vacuum the end o...

Page 89: ...er trays to increase the paper capacity up to 750 sheets in the T8006 and 1 250 sheets in the T8306 For information on how to order options and accessories for the Tally T8006 T8306 printers see the C...

Page 90: ...d slide the controller board out of the printer 4 Place the controller board on a flat surface 5 Holding the memory module by the edges remove the memory module from its protective bag 6 Hold the memo...

Page 91: ...ASE WAIT 007 PLEASE WAIT 007 PLEASE WAIT 007 DRAM WRITE 128 DRAM WRITE 128 DRAM WRITE 128 DRAM WRITE 128 10 Turn on the printer and ensure that during the self test cycle the dis play shows the new me...

Page 92: ...optional paper feeder see the operation manual supplied with the paper feeder When you have installed the paper feeder test the installation by printing the print test pattern The duplex printing uni...

Page 93: ...y 2 Margin Tray 2 Margin Tray 2 Margin 5 In the Utility menu adjust the Mar gin settings using the menu naviga tion keys Utility Menu Utility Menu Utility Menu Utility Menu Tray 2 Margin Tray 2 Margin...

Page 94: ...Guide 88 Utility Menu Utility Menu Utility Menu Utility Menu Tray 2 Margin Tray 2 Margin Tray 2 Margin Tray 2 Margin 10 Press the ENTER key again to confirm the settings 11 Restart the printer 12 Rep...

Page 95: ...for further troubleshooting and or repair If the problem is not found and corrected after following these troubleshooting steps contact a Tally Service Technician Paper Jam Areas Paper jams are indica...

Page 96: ...between the paper tray and the transfer drum If you are unable to clear the jam or if the jam continues to occur follow the troubleshooting procedures at the end of the steps for clearing the Jam 1 ar...

Page 97: ...r 4 Pull the jammed paper slowly and evenly out of the printer or the paper feeder whichever is applicable 5 Make sure that no jammed or torn pieces of paper remain in the printer 6 Close and carefull...

Page 98: ...paper feeder use the same steps as main paper tray Note Make sure that the four corners of the paper are aligned squarely and sit firmly in the paper tray 9 Close the back cover carefully until it loc...

Page 99: ...s area because the paper jams near the transfer drum If you are unable to clear the jam or if the jam continues to occur follow the troubleshooting procedures at the end of the steps for clearing the...

Page 100: ...he printer for further troubleshooting and or repair If the problem is not found and corrected after following these troubleshooting steps contact a Tally Service Technician 2 Pull the jammed paper ou...

Page 101: ...the tray with fresh paper from new packages The edges of the paper are damaged Make sure that paper or media is not damaged or wrinkled Reload paper trays with fresh paper from new packages The paper...

Page 102: ...ccur follow the troubleshooting procedures at the end of the steps for clearing the Jam 3 and 4 areas Warning Make sure that the printer power switch is off and that the printer has cooled for a minim...

Page 103: ...fuser cleaning roller out by the green handle at its center 5 Pull the large green levers at the ends of the fuser cleaning roller housing toward the front of the printer Caution Do not touch the tra...

Page 104: ...g and or repair If the problem is not found and corrected after following these troubleshooting steps contact a Tally Service Technician 8 Push the large green levers at the end of the fuser cleaning...

Page 105: ...of the paper are damaged Make sure the paper is not damaged or wrinkled Reload trays with fresh paper from new packages The paper or material is the wrong thickness for proper printer operation Reloa...

Page 106: ...ssy Characters and graphics printed on transparencies are too light or dark when projected The printer is set to print at Standard or High Speed Mode Set the printer to High Quality Mode The printer i...

Page 107: ...med paper Print several sheets to remove residual toner General printing of charac ters and graphics is poor The color of printed graphics and electronic image differs significantly The electronic ima...

Page 108: ...125 If a file size is too large mega bytes the print data may be printed without being spooled regardless if printer is set to spool Reduce the file size by break ing the file into smaller print jobs...

Page 109: ...rbled con trol panel message The printer was not turned on properly Turn the power switch off Wait approximately 5 seconds Turn the power switch on Printing is slow The printer is set to print on spec...

Page 110: ...spooled Reduce the file size by break ing the file into smaller print jobs Postpone the timeout or sleep mode of the user s com puter page 125 The image and or file is too large megabytes for availabl...

Page 111: ...inter so it can not add or replace character strings Set the Network operating sys tem so it will not add text code data Example 1 Set the Network operating system so it does not print the banner page...

Page 112: ...Ethernet is selected in the Appletalk window on the Control Panel Verify that TCP IP is selected for the connection in the TCP IP window on the Con trol Panel Others on the network are visible but no...

Page 113: ...e set by the printer driver If this happens set the number of copies in the application EMF spooling EMF spooling can increase printing speed but may also cause incorrect printing to occur If errors o...

Page 114: ...a per session basis Your default print driver settings will override any settings entered at the printer control panel until they are changed Reduced Print from Word If reduced printing and 2 pages 4...

Page 115: ...int results may contain lines Some characters may be missing Lotus 1 2 3 96 When print orientation differs between the application and the driver print results may be partially missing Lotus 1 2 3 97...

Page 116: ...ters may be missing Background may appear in black and white Part of the image may be missing Line feed position or characters may be misaligned Image data print location may be wrong Lines may be par...

Page 117: ...30 000 Pages Per Month 50 Color 50 Monochrome Acoustic Level Standby Less than or equal to 48 dB A Operation Less than or equal to 55 dB A Time to First Page Monochrome Plain Paper 16 5 sec Color 24...

Page 118: ...heet Feeder Max 1 Paper Output 250 sheets face down Duplexing Optional Automatic Duplex Print Media Plain Paper Transparencies Thick Stocks Labels Avery 5260 Envelopes Media Weights Plain Paper 18 to...

Page 119: ...Cartridge 60 000 Color Planes Avg 15 000 pages color 60 000 pages monochrome 5 coverage each color Fuser Oil Bottle 12 000 pages Avg Fuser Cleaning Roller 12 000 pages Avg 5 Toner Coverage Each Color...

Page 120: ...0960JA 16 MHz plus 33 MHz ASIC Memory Standard 64 MB Max 192 MB Print Language Tally Compressed Printer Language CPL Compatibility Windows 95 98 NT 4 0 2000 Macintosh Color Matching Automatic one butt...

Page 121: ...ase Unit 19 7 W x 16 1 H x 20 5 D 86 lb With LFU 19 7 W x 21 9 H x 20 5 D 89 6 lb With LFU Duplexer 19 7 W x 23 8 H x 23 8 D 107 lb Temperature Operating 50 F 90 5 F Non Operating 41 F 95 F Humidity O...

Page 122: ...ner Coverage Each Color Waste Toner Pack 18 000 pages Avg 5 Toner Coverage Each Color OPTIONS Lower Feeder Unit w 500 sheet Cassette Letter A4 Standard Cassette Universal to 13 x 19 Lower Feeder Casse...

Page 123: ...er jams may occur A service engineer should replace these parts Contact your dealer or authorized Tally service representative Note After high volume printing conditions approximately 100 000 to 600 0...

Page 124: ...0 pages are printed Printer Transfer Roller About 240 000 pages are printed Printer Drum Cleaner About 240 000 pages are printed Printer Transfer Drum About 240 000 pages are printed About 150 000 pag...

Page 125: ...119 Appendix C Control Panel Menu Functions...

Page 126: ...press the ONLINE key then press the MENU key Test Menu TestPrint ConfigPage TestMode PLAIN TRANS THICK Config Menu Timeout 5 999 OFF SleepTime 5M 15M 30M 60M 120M 240M Port Priority AUTO NET LOCAL Dis...

Page 127: ...items further down the menu and enters the displayed set tings key Displays the next item at the same menu level If the item is a numeric value it is incremented key Displays an item at a higher menu...

Page 128: ...y 2 Press ONLINE to go offline Tray1 A4 Tray1 A4 Tray1 A4 Tray1 A4 Not Ready Not Ready Not Ready Not Ready 3 Press TRAY and select a tray as the paper feed source for the test print Tray1 A4 Tray1 A4...

Page 129: ...ray2 A3 Tray2 A3 Not Ready Not Ready Not Ready Not Ready 2 Press ONLINE to go offline Tray1 A4 Tray1 A4 Tray1 A4 Tray1 A4 Not Ready Not Ready Not Ready Not Ready 3 Press TRAY and select a tray as the...

Page 130: ...go offline Tray1 A4 Tray1 A4 Tray1 A4 Tray1 A4 Test Menu Test Menu Test Menu Test Menu 3 Press the MENU key Tray1 A4 Tray1 A4 Tray1 A4 Tray1 A4 Test Menu Test Menu Test Menu Test Menu 4 Press the key...

Page 131: ...A4 Tray1 A4 Tray1 A4 TestMode TRANS TestMode TRANS TestMode TRANS TestMode TRANS 9 Press the key to enter the setting into memory 10 Press the ONLINE key to resume normal operations Tray1 LTR Tray1 L...

Page 132: ...sing the and keys select the desired setting Tray1 LTR Tray1 LTR Tray1 LTR Tray1 LTR Timeout 600 Timeout 600 Timeout 600 Timeout 600 8 Press the key to enter the setting into memory 9 Press the ONLINE...

Page 133: ...bmenu The display shows the current setting Tray1 EXE Tray1 EXE Tray1 EXE Tray1 EXE SleepTime 15M SleepTime 15M SleepTime 15M SleepTime 15M 8 Using the and keys select the desired setting Tray1 EXE Tr...

Page 134: ...s select Port Tray1 A4 Tray1 A4 Tray1 A4 Tray1 A4 Port AUTO Port AUTO Port AUTO Port AUTO 7 Press the key to enter the Port submenu The display shows the cur rent setting Tray1 A4 Tray1 A4 Tray1 A4 Tr...

Page 135: ...select Pri ority Tray1 A4 Tray1 A4 Tray1 A4 Tray1 A4 Priority AUTO Priority AUTO Priority AUTO Priority AUTO 7 Press the key to enter the Priority submenu The display shows the cur rent setting Tray1...

Page 136: ...ray1 A4 Tray1 A4 Display Display Display Display 6 Using the and keys select Dis play Tray1 A4 Tray1 A4 Tray1 A4 Tray1 A4 Display ENGLISH Display ENGLISH Display ENGLISH Display ENGLISH 7 Press the ke...

Page 137: ...ray1 LGL Ready Ready Ready Ready 1 Check that Ready appears on the display and the DATA light is off Tray1 LGL Tray1 LGL Tray1 LGL Tray1 LGL Not Ready Not Ready Not Ready Not Ready 2 Press the ONLINE...

Page 138: ...Laser Printer User Guide 132 Tray1 LGL Tray1 LGL Tray1 LGL Tray1 LGL ComMode CMPA ComMode CMPA ComMode CMPA ComMode CMPA 8 Press the key to enter the setting into memory 9 Press the ONLINE key to ret...

Page 139: ...enter the menu Tray1 A4 Tray1 A4 Tray1 A4 Tray1 A4 Parallel Menu Parallel Menu Parallel Menu Parallel Menu 4 Using the and keys select Paral lel Menu Tray1 A4 Tray1 A4 Tray1 A4 Tray1 A4 ComMode ComMo...

Page 140: ...e Tray1 A4 Tray1 A4 Tray1 A4 Tray1 A4 Test Menu Test Menu Test Menu Test Menu 3 Press the MENU key to enter the menu Tray1 A4 Tray1 A4 Tray1 A4 Tray1 A4 Parallel Menu Parallel Menu Parallel Menu Paral...

Page 141: ...1 27 To return to the previous step press the key Tray1 A4 Tray1 A4 Tray1 A4 Tray1 A4 Timing A B A Timing A B A Timing A B A Timing A B A 9 Press the key to enter the setting into memory 10 Press the...

Page 142: ...Addr IP Addr IP Addr 192 168 192 168 192 168 192 168 7 Using the and keys change the number in parentheses to 168 Then press the key IP Addr IP Addr IP Addr IP Addr 192 168 031 192 168 031 192 168 03...

Page 143: ...entheses to 255 Then press the key SubNet Mask SubNet Mask SubNet Mask SubNet Mask 255 255 255 255 255 255 255 255 7 Using the and keys change the number in parentheses to 255 Then press the key SubNe...

Page 144: ...select the Gateway Addr submenu GateWay Addr GateWay Addr GateWay Addr GateWay Addr 000 000 000 000 5 Press the key to enter the Gateway Addr submenu GateWay Addr GateWay Addr GateWay Addr GateWay Add...

Page 145: ...1 1 192 168 31 1 192 168 31 1 192 168 31 1 10 The Gateway address has now been set Network Menu Network Menu Network Menu Network Menu 11 Press the key to leave the Gateway Addr submenu Tray1 A4 Tray1...

Page 146: ......

Page 147: ...OE LTR Plain JDOE User has sent a job that requires a certain media size and type in Tray 1 2 or 3 Check Front Cover Check Front Cover Check Front Cover Check Front Cover The front cover is not fully...

Page 148: ...alid print data received by the printer EEPROM Error EEPROM Error EEPROM Error EEPROM Error A temporary error occurred Check the print job and continue printing Jam3 Upper Rear Jam3 Upper Rear Jam3 Up...

Page 149: ...rly installed Replace Fuser Replace Fuser Replace Fuser Replace Fuser Contact a qualified Tally service repre sentative Replace Parts 0092 Replace Parts 0092 Replace Parts 0092 Replace Parts 0092 Cont...

Page 150: ...sage appears regularly contact your dealer or Tally Technical Services Toner CG Error Toner CG Error Toner CG Error Toner CG Error The installed toner cartridge is not the correct type Tray 2 Load A4...

Page 151: ...g table lists and describes the types of paper and media that may display in messages on the control panel Display Description A3W A3W T8306 only 13 x 19 A3 A3 T8306 only B4 B4 T8306 only A4 A4 B5 B5...

Page 152: ......

Page 153: ...ow to execute these functions Printing a Print Server Test Page Press the test button once 1 time to output the test page After installing the printer you can output a test page to confirm whether the...

Page 154: ...allow a network administrator to set up and change the printer s network configuration through the Tally NetPilot and a number of on board network servers Using these tools you can quickly configure t...

Page 155: ...ly polled to determine whether a printer job exists The NetWare print server or workstation on which PSERVER runs is emulated This enables high speed printing without applying a load to the network In...

Page 156: ...arate from the printer port and print queue Delete Deletes a printer that is running in remote printer mode Use this button when the printer queue network interface or printer is deleted manually from...

Page 157: ...rinter and physical port are both given as the printer name Available buttons of the Windows network dialog Once the maximum number of attached printers is reached the Add button is grayed Button Desc...

Page 158: ...unction of the printer Available buttons of the EtherTalk network dialog Once the maximum number of attached printers is reached the Add button is grayed Button Description Delete Deletes the existing...

Page 159: ...nds to the number on the label attached to the rear of the printer Configuration Password Access can be restricted by setting a password in the network interface set ting file If a password is set tha...

Page 160: ...rom 1 to 255 seconds Conf Check Delay Enter the interval at which the network interface dedicated to NDS mode updates the setting by retrieving the NDS tree NCP Burst Mode If this check box is selecte...

Page 161: ...er is valid PostScript Font Set Specifies the fonts of the PostScript printer In the default status it is assumed that the printer has no fonts and that all required fonts must be downloaded If this p...

Page 162: ...For the default value 0 0 0 0 the subnet mask is automatically set according to the IP address Default Router Enter the IP address of the default router For the default value 0 0 0 0 no gateway is se...

Page 163: ...nged then click the Mod ify button Delete Select the user to be deleted then click the Delete button Item Description Logical Printer Select the logical printer to be set from PR1 to PR8 Filters Selec...

Page 164: ...g any of these methods ARP Used under UNIX Windows 95 98 and Windows NT RARP Used under UNIX This method cannot be used on a router BOOTP Used under UNIX This method can be used through a router DHCP...

Page 165: ...Unix see the ARP manual Note If the ping command results in a timeout turn the printer power off then back on and retry immediately after printer warm up Setting with RARP An example of the setting ma...

Page 166: ...ping utility Confirm the settings by using the network test button located on the back of the printer Configuring the Printer Using HTTP To use the Web browser the TCP IP must already be configured on...

Page 167: ...lays the Manufacturer Model and Command Set for the connected printer Help The Help page contains additional information about configuring the printer through the Web server Configuring the Printer Us...

Page 168: ...version help print this list status show current printing status account show current account file softreset protocol restart of Tally PS hardreset reboot of Tally PS defaults set default parameters i...

Page 169: ...Using SNMP The Simple Network Management Protocol SNMP can be used for the remote monitoring of the network interface SNMP is the standard network management protocol In order to use SNMP you must fi...

Page 170: ...int to With Logical Printers you can Add character strings before and after print data Replace character strings in print data Convert data from ASCII to PostScript The network interface has eight log...

Page 171: ...A for logical printer 1 This is the default setting for logical printers 5 to 8 Conversion from ASCII to PostScript To set PostScript conversion you must turn on postscript filtering in the printer co...

Page 172: ...must be set in the config file Number of characters per inch CPI 10 100 10 0 characters per inch Number of lines per inch LPI 60 60 6 0 lines per inch Left margin 30 30 1 8 inch 3 0 mm Upper margin 50...

Page 173: ...six digits of the printer name 90D6A1 are the six low order digits of the Ethernet address General Menu NODE_ADDR 00 00 87 90 D6 A1 Node address ROOT_PWD pass root password USERS User authority and p...

Page 174: ...0 0 0 IP address for the secondary WINS server NBT_SCOPE_ID Must not be set RTN_OPT YES Must not be changed RTEL_PR1 0 Must not be changed RTEL_PR2 0 Must not be changed RTEL_PR3 0 Must not be changed...

Page 175: ...ng interval of the print server CONF_CHECK_DELAY 300 Automatic setting check inter val FR_802_3 YES Whether the IEEE 802 3 frame type is valid FR_ETH_2 YES Whether the Ethernet II frame type is valid...

Page 176: ...INDERY10 Bindery file server name PSERVER_BINDERY11 Bindery file server name PSERVER_BINDERY12 Bindery file server name PSERVER_BINDERY13 Bindery file server name PSERVER_BINDERY14 Bindery file server...

Page 177: ...PR3 PR4 PR5 PR6 PR7 PR8 LPT1 Logical printer of printer 1 LPRINT_2 Name of printer 2 LLOGIC_2 PR2 Logical printer of printer 2 LPRINT_3 Name of printer 3 LLOGIC_3 PR3 Logical printer of printer 3 LPRI...

Page 178: ...A1_LPT1 Name of printer 1 ATYPE_1 LaserWriter Type of printer 1 ALOGIC_1 LPT1 PR1 PR2 PR3 PR4 PR5 PR6 PR7 PR8 LPT1 Logical printer of printer 1 APRINT_2 Name of printer 2 ATYPE_2 Type of printer 2 ALO...

Page 179: ...l printer 1 Courier when omitted Printer2 Menu PR2_IN AUTO AUTO NONE COM1 Read back port of logical printer 2 PR2_BEF Character string before the print job of logical printer 2 PR2_STR Replacement of...

Page 180: ...inter 3 PR3_CSET NONE Must not be changed character set conversion PR3_FILT NONE NONE POSTSCR AUTO_PS Conversion of printer language of logical printer 3 PR3_AFT Character string after the print job o...

Page 181: ...Character string after the print job of logical printer 4 PR4_DUMP NO Hexadecimal dump mode of log ical printer 4 PR4_SIZE A4 A4 LETTER LEGAL EXECUT PostScript page size of logical printer 4 PR4_ORNT...

Page 182: ...TR R_LANDS Orientation of the PostScript page of logical printer 5 PR5_FORM 66 0 100 60 30 50 PostScript page format of logical printer 5 LPP_CPL_CPI_LPI_LM_TM PR5_FONT PostScript font of logical prin...

Page 183: ...string before the print job of logical printer 7 PR7_STR 01 0A 02 0D 0A Replacement of character strings of logical printer 7 PR7_CSET NONE Must not be changed character set conversion PR7_FILT NONE...

Page 184: ...ILT NONE NONE POSTSCR AUTO_PS Conversion of printer language of logical printer 8 PR8_AFT Character string after the print job of logical printer 8 PR8_DUMP NO Hexadecimal dump mode of log ical printe...

Page 185: ...ement 179 L1_CENTR HISPEED IBM_PC STNDRD FAST HIS PEED Interface timing L1_BSYTM 60 Busy status time out For 0 all status reports are invalid L1_MGM_INFO AUTO DISABLE AUTO Whether the printer manageme...

Page 186: ......

Page 187: ...ver 53 components printer 3 Config Menu 125 configuration NetPilot 149 network 148 utilities for printer 158 control keys control panel 42 control panel Config Menu 125 display 41 indicators 41 keys 3...

Page 188: ...printer 8 logical printers 164 M Macintosh chooser problems 106 printer driver 34 35 maintenance fuser cleaning roller 16 66 OPC belt cartridge 69 OPC belt counter 19 ozone filter 68 printer 61 toner...

Page 189: ...13 Parallel Menu 131 parts replacement 117 port LAN settings list 147 parallel 4 RJ 45 4 TCP IP configurations 30 power cord installing 20 socket 4 power switch 3 print defaults 45 test function 122...

Page 190: ...uirements system 7 34 restrictions print driver 109 RJ 45 port 4 S SNMP configuring 163 software print driver 45 specifications printer 111 system 7 start printer 20 Starter Kit installation 12 system...

Page 191: ...tWare 31 local print driver setup 25 network printer setup 26 Windows 2000 print driver 48 system requirements 7 Windows 95 98 print driver 46 system requirements 7 Windows NT 4 0 print driver 47 syst...

Page 192: ......

Reviews: