background image

Ajustes 

En este capítulo se describe cómo se ajustan la posición de corte, la primera línea de impresión,
la distancia de cabeza grabadora, como también la fuente y la densidad de caracteres.

Ajustar la posición 
de corte

Si la posición de corte del papel no coincida con la hoja de corte de la impresora, se puede ajustarla.
Si papel está cargado, hay que cortarlo y posicionarlo a la posición de aparcamiento. 

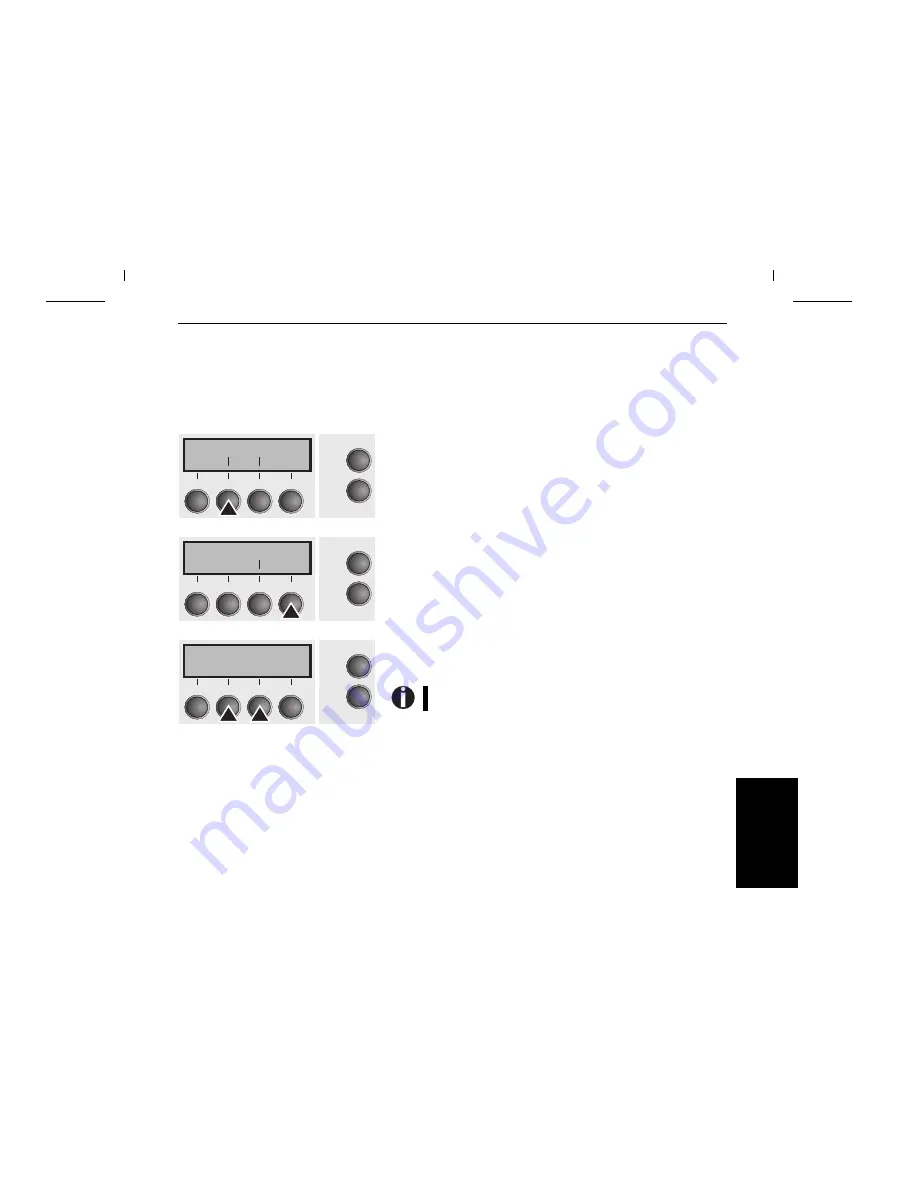
Presione el pulsador Setup. La impresora cambia al modo Setup. 
Presione el pulsador Ajustar (2).

Presione el pulsador Tirar (4).

Por medio del pulsador 

<

 (2) o 

> (3) ponga la perforación a la posición deseada.

Confirme la entrada presionando el pulsador Set (1).
Presione el pulsador Setup. La impresora vuelve al estado inicial.

Ajustar Aliment.
Menú        Char

Online

Setup

2

1

3

4

TOF

Ajust      Tirar

Online

Setup

2

1

3

4

TearAdj= 00/72"*
Set  <   > Salir

Online

Setup

2

1

3

4

La corrección efectuada se guarda todavía después de apagar la
impresora.

E

S

P

A

Ñ

O

L

Introducción rápida

Ajustes 

15

Summary of Contents for t2145

Page 1: ...perator s manual Matrix printer Bedienungsanleitung Matrixdrucker Manuel d utilisation Imprimante matricielle Manuale utente Stampante a matrice Instrucciones de servicio Impresora matricial T2245 T2145 ...

Page 2: ...sibill all operatore ADVERTENCIA Las cubiertas y piezas sólo deberán ser quitadas o abiertas por personal especializado Se exceptúan de esta regla sólo las cubiertas y piezas cuya retirada y apertura estén indicadas y descritas expresamente en las Instrucciones de uso This device fulfils the European standards requirements by complying with the Directive of the Commission dated May 3 1989 89 336 E...

Page 3: ... the printer 6 Control panel 7 Online mode 7 Offline mode 7 Setup mode 7 Changing the ribbon cassette 8 Paper handling 10 Paper path quick selection 10 Loading paper 11 Fanfold paper 11 Single sheets 13 Paper transport 14 Moving the paper to the tear position 14 Settings 15 Setting the tear position 15 Setting the first printing line TOF 16 Setting the print head gap 17 Selecting character density...

Page 4: ...l information about a specific topic Important safety instructions Read the following instructions thoroughly before starting up your printer in order to prevent injuries and avoid damage to the device Keep this Operator s Manual in a place which is easily accessible at all times Place the printer on a solid base so that it cannot fall down to the ground Do not expose the printer to high temperatu...

Page 5: ...s the Reference Manual A detailed description of the printer and its powerful features Drivers for Windows 3 1 Windows 95 98 Windows NT3 51 NT4 Additional documentations Programming instructions and descriptions of the available options If your CD ROM should be defective or missing please consult your dealer The Online Documentation is also available as a hardcopy against a fee or can be downloade...

Page 6: ...nterface connector Paper support Top cover Latches Tractor 1 Manual single sheet feeder open Tear edge Bottom cover Manual single sheet feeder closed Rear cover Printhead Ribbon cassette Printer in fanfold paper mode Printer in single sheet mode Printer at a glance Quick Start up 4 ...

Page 7: ...ay that it cannot fall down Make sure to facilitate access to the control panel and the paper input trays and to leave sufficient space for the paper ejected When selecting the printer location observe the following additional instructions Never place the printer in the vicinity of easily inflammable gas or explosive substances Do not expose the printer to direct sunlight If you cannot avoid placi...

Page 8: ...rinter The power switch for switching on the printer is located at the front bottom right of the printer Make sure that the device has been set to the correct voltage e g 220 240 V in Europe 120 V in the USA To do this check the type plate above the power inlet at the back of the printer Contact your dealer if the setting is incorrect Never switch on the printer if the voltage setting is incorrect...

Page 9: ...er path quick selection Key 2 Short keypress Microstep forward Long keypress Continuous paper feed Key 3 Short keypress Microstep reverse Long keypress Continuous paper reverse feed up to the park position Load key 4 Loads paper from the set paper source the display changes to LF FF LF FF key 4 Short keypress Line Feed LF Long keypress Form Feed FF Setup key Sets the printer to setup mode Online k...

Page 10: ...elative to the top cover of the printer and remove it Cautiously slide the print head carriage to the left stop viewed from the printer front Raise the printer bar cover and remove the used cassette 90 The print head becomes hot during printing You should therefore let it cool down for some time before touching it Only use genuine ribbon cassettes for replacement STOP Changing the ribbon cassette ...

Page 11: ...s down on both sides until it clicks into place In this way the cartridge is automat ically positioned correctly Use the knob on the right side of the cassette to take up slack of the ribbon again Thereby the ribbon will slide over the plastic noses on the left and right of the print head into the correct position Press the printer bar cover down until it clicks into place remount the top cover ma...

Page 12: ...Then press any key If a single sheet is loaded in the printer it is ejected Use one of the marked keys to select the desired paper path for example Single 2 The display alternates between the basic menu and the menu in the following figure Insert a single sheet for the procedure see page 11 Loading paper Press the Online key to set the printer to ready status When the printer receives data from th...

Page 13: ...Paper path quick selection Raise the front cover Open the right and left tractor flaps You may also want to remove the bottom cover in order to facilitate loading the fanfold paper However you can also feed paper to the tractor with the bottom cover mounted First insert fanfold paper into the left hand tractor Make sure that at least three paper transport holes are positioned on the tractor pins C...

Page 14: ...nter The active paper source Tractor1 appears in the display The paper is automatically loaded when the printer is in online mode and receivesdatafromthecomputer Press the Load 4 key to load paper before starting the printout Do not tension the paper excessively to avoid tearing the perforation holes do not allow excessive slack since in this case the paper will bulge and there may be problems in ...

Page 15: ...o the width of the paper used Insert the single sheet into the input tray as far as possible Press the Online key to set the printer to ready status The sheet is automatically loaded when the printer is in online mode and receives data from the computer Press the Load 4 key to load paper before starting the printout Install the paper support as required for the paper width For wide printers you ca...

Page 16: ...is 22 inches Moving the paper to the tear position You can use the Tear key to move the paper to the tear position Make sure that the printer is in online mode Press the Tear 4 key The printer moves the perforation edge of the fanfold paper to the tear edge The display alternates between and After having torn off the paper press the Exit 4 key The printer returns the paper to the first printing po...

Page 17: ... the park position Press the Setup key The printer changes to setup mode Press the Adjust 2 key Press the Tear 4 key Press the 2 or 3 key to move the perforation to the desired position Confirm the setting by pressing the Set 1 key Press the Setup key The printer is reset to the initial status Adjust Paperway Menu Char Online Setup 2 1 3 4 TOF Head Tear Online Setup 2 1 3 4 TearAdj 00 72 Set Exit ...

Page 18: ...r edge The factory setting for the first printing position TOF is 12 72 Press the 2 or 3 key to move the first printing line to the desired position You can set values in the range from 0 to 220 72 for fanfold paper and for single sheets Confirm the setting by pressing the Set 1 key Press the Setup key The printer is reset to the initial status Adjust Paperway Menu Char Online Setup 2 1 3 4 TOF He...

Page 19: ...rence manual on the online CD ROM Press the Setup key The printer changes to setup mode Press the Adjust 2 key Press the Head 1 key Use the 2 or 3 key to set the range within which the automatic gap adjustment is to be corrected You can select a value from 10 to 10 Values from 0 to 10 reduce the distance between the print head and the paper positive values increase the distance Confirm the setting...

Page 20: ...t the desired font Confirm the selection by pressing the Set 1 key You can cancel the selection and leave the setting unchanged by pressing the Exit 4 key Press the Setup key The printer is reset to the initial status It is also possible to press the Online key The printer then changes directly to online mode Adjust Paperway Menu Char Online Setup 2 1 3 4 Font CPI Online Setup 2 1 3 4 10 CPI Set E...

Page 21: ... 10 cpi 12 cpi 15 cpi 17 1 cpi 20 cpi Resolution max Horizontally 360 dpi Vertically 360 dpi Emulations Standard MTPL Tally Printer Language Epson LQ2550 IBM XL 24 Acoustic noise level 53 dB A Dimensions Narrow printer 424 x 399 x 300 mm W x D x H Wide printer 600 x 399 x 300 mm W x D x H Weight Narrow printer 10 5 kg Wide printer 13 2 kg Power supply U S A Canada 120 V 10 60 Hz 2 Europe 220 240 V...

Page 22: ...s Form thickness max 60 120 g m2 1 5 0 60 mm Single sheet input tray Single sheets Single set of forms requires individual testing Paper weight No of copies Form thickness 80 120 g m2 1 5 0 60 mm Sets of forms Sets of forms can only be processed if the top edge is bound Multi part forms must be inserted with the bound top edge first They must be tested for suitability Order number Ribbon cassette ...

Page 23: ... 7 Online Modus 7 Offline Modus 7 Setup Modus 7 Farbbandkassette wechseln 8 Papierhandhabung 10 Papierweg Schnellumschaltung 10 Papier einlegen 11 Endlospapier 11 Einzelblätter 13 Papiertransport 14 Papier in Abreißposition fahren 14 Einstellungen 15 Abreißposition einstellen 15 Erste Druckzeile einstellen TOF 16 Druckkopfabstand einstellen 17 Zeichendichte und Schriftart wählen 18 Technische Date...

Page 24: ...ätzliche Informationen zu einem bestimmten Thema Wichtige Sicherheits hinweise Lesen Sie die folgenden Hinweise genau durch bevor Sie den Drucker in Betrieb nehmen Dadurch schützen Sie sich und vermeiden Schäden an dem Gerät Bewahren Sie diese Bedienungsanleitung an einem jederzeit zugänglichen Ort auf Den Drucker auf stabilem Untergrund so aufstellen daß er nicht zu Boden fallen kann Den Drucker ...

Page 25: ...enthält das Referenzhandbuch eine ausführliche Beschreibung des Druckers und seiner Leistungs merkmale Treiber für Windows 3 1 Windows 95 98 Windows NT3 51 NT4 weitere Dokumentationen Programmieranleitungen und Beschreibung der Optionen Für den Fall daß die CD ROM fehlerhaft ist oder fehlt wenden Sie sich bitte an Ihren Händ ler Die Online Dokumentation ist auch in gedruckter Form gegen Gebühr ode...

Page 26: ...ker Papierstütze Obere Abdeckung Rasthaken Traktor 1 Manueller Einzelblatteinzug geöffnet Abreißkante Untere Abdeckung Manueller Einzelblatteinzug geschlossen Druckkopf Hintere Abdeckung Farbbandkassette Drucker im Endlospapierbetrieb Drucker im Einzelblattbetrieb Auf einen Blick Der schnelle Einstieg 4 ...

Page 27: ...herunterfallen kann Der Zugang zum Bedienfeld und den Papiereinzügen muß gewährleistet und genügend Platz für das ausgeworfene Papier vorhanden sein Beachten Sie bei der Wahl des Ortes an dem Sie den Drucker aufstellen außerdem folgende Punkte Stellen Sie den Drucker keinesfalls in der Nähe von leicht entzündlichen Gasen oder explosiven Stoffen auf Den Drucker keiner direkten Sonneneinstrahlung au...

Page 28: ...it dem der Drucker eingeschaltet wird befindet sich rechts unten auf der Vorderseite des Druckers Vergewissern Sie sich daß das Gerät auf die richtige Spannung eingestellt ist z B 220 240 V in Europa 120 V in den USA Siehe dazu das Typenschild über dem Netzanschluß auf der Rückseite des Druckers Benachrichten Sie Ihren Händler wenn dies nicht der Fall ist Niemals den Drucker einschalten wenn er ni...

Page 29: ... umschaltung Taste 2 Kurzer Tastendruck Mikroschritt nach vorn Langer Tastendruck dauerhafter Papiervorschub Taste 3 Kurzer Tastendruck Mikroschritt zurück Langer Tastendruck dauerhafter Papierrückschub bis max Parkposition Taste Load 4 Papier aus eingestelltem Papierweg laden Anzeige wechselt dann auf LF FF Taste LF FF 4 Kurzer Tastendruck Zeilenvorschub LF Langer Tastendruck Seitenvorschub FF Ta...

Page 30: ...tenachobenklappen und herausnehmen Den Druckkopfschlitten vorsichtig bis zum Anschlag nach links von der Druckervorderseite aus betrachtet schieben Die Druckbalkenabdeckung anheben und die verbrauchte Kas sette herausnehmen 90 Der Druckkopf wird während des Druckens heiß Vor dem Berühren deshalb gegebenenfalls einige Zeit abkühlen lassen Benützen Sie ausschließlich Original Farbbandkas setten STOP...

Page 31: ...bis sie einrastet Damit befindet sich die Kassette automatisch in der richtigen Position Das Farbband mit Hilfe des Knopfes auf der rechten Kassetten seite noch einmal spannen Dadurch gleitet das Farbband über die Plastiknasen links und rechts vom Druckkopf automatisch in die richtige Position Die Druckbalkenabdeckung bis zum Einrasten nach unten drük ken die obere Abdeckung wieder einsetzen dabei...

Page 32: ...breißen Dann eine beliebige Taste drücken Be findet sich ein Einzelblatt im Drucker wird es ausgeworfen Mit einer der markierten Tasten den gewünschten Papierweg wählen in unse rem Beispiel Einzel 2 Im Wechsel mit dem Grundmenü erscheint in der Anzeige Ein Einzelblatt einlegen zum Vorgehen siehe Seite 11 Papier einlegen Taste Online drücken um den Drucker betriebsbereit zu machen Erhält der Drucke...

Page 33: ...ach oben klappen Die rechte und linke Traktorklappe öffnen Falls gewünscht kann die untere Abdeckung abgenommen werden um das Einlegen von Endlospapier zu erleichtern Der Traktor kann jedoch auch mit angebrachter unterer Abdeckung mit Papier versorgt werden Endlospapier zuerst in den linken Traktor einlegen Darauf achten daß mindestens drei Papiertransportlöcher über die Transportstacheln des Trak...

Page 34: ...en Der aktive Einzugsschacht Trak tor1 erscheint in der Anzeige Papier wird automatisch einge zogen wenn der Drucker Online ist und Daten vom Computer erhält Taste Load 4 drücken um Papier vor Druckbeginn zu laden Papier weder zu straff spannen da sonst Transport löcher ausreißen können noch zu locker führen da es sich in diesem Fall wölbt und Probleme bei der Zuführung auftreten können Entfernen ...

Page 35: ...ent sprechend des verwendeten Papierformats einstellen Das Einzelblatt bis zum Anschlag in die Papierführung einfüh ren Die Taste Online drücken um den Drucker betriebsbereit zu machen Das Einzelblatt wird automatisch eingezogen wenn der Druk ker Online ist und Daten vom Computer erhält Taste Load 4 drücken um Papier vor Druckbeginn zu laden Papierstütze entsprechend der Papierbreite anbrin gen Fü...

Page 36: ... Der maximale Wert des Papierrücktransports beträgt 22 Zoll Papier in Abreiß position fahren Endlospapier wird mit der Taste Tear in Abreißposition gefahren Sicherstellen daß der Drucker Online ist Taste Tear 4 drücken Der Drucker fährt die Perforationskante des Endlospapiers an die Abreißkante Die Anzeige wechselt zwischen und Nach Abreißen des Papiers Taste Exit 4 drücken Der Drucker fährt das P...

Page 37: ...rückgefahren werden Taste Setup drücken Der Drucker wechselt in den Setup Modus Taste Adjust 2 drücken Taste Tear 4 drücken Durch Drücken der Taste 2 oder 3 die Perforation in die gewünschte Position bewegen Die Eingabe durch Drücken der Taste Setze 1 bestätigen Taste Setup drücken Der Drucker geht in die Grundstellung zurück Adjust Pap Weg Menü Char Online Setup 2 1 3 4 TOF Kopf Tear Online Setup...

Page 38: ...e erste Druck position auf 12 72 eingestellt Durch Drücken der Taste 2 oder 3 die erste Druckzeile in die ge wünschte Position bewegen Es können Werte von 0 bis 220 72 für Endlos papier und für Einzelblätter eingestellt werden Eingabe durch Drücken der Taste Setze 1 bestätigen Taste Setup drücken Der Drucker geht in die Grundstellung zurück Adjust Pap Weg Menü Char Online Setup 2 1 3 4 TOF Kopf Te...

Page 39: ...h auf der Online CD ROM Taste Setup drücken Der Drucker wechselt in den Setup Modus Taste Adjust 2 drücken Taste Kopf 1 drücken Mit Taste 2 oder 3 den Bereich einstellen innerhalb dessen die auto matische Kopfabstandseinstellung korrigiert wird Es können Werte von 10 bis 10 gewählt werden 0 bis 10 verkleinern den Kopfabstand zum Papier positive Werte vergrößern den Abstand Die Eingabe durch Drücke...

Page 40: ...hte Schriftart auswählen Die Auswahl durch Drücken der Taste Setze 1 be stätigen Durch Drücken der Taste Exit 4 kann die Auswahl ohne Änderung ver lassen werden Taste Setup drücken Der Drucker geht in die Grundstellung zurück Es ist auch möglich die Taste Online zu drücken Der Drucker wechselt daraufhin direkt in den Online Modus Adjust Pap Weg Menü Char Online Setup 2 1 3 4 Font CPI Online Setup ...

Page 41: ...x 399 x 300 mm B x T x H Gewicht schmaler Drucker 10 5 kg breiter Drucker 13 2 kg Stromversorgung USA Kanada 120 V 10 60 Hz 2 Europa 220 240 V 10 50 60 Hz 2 Leistungsverbrauch bei 100 Durchsatz 35 VA im Leerlauf 11 VA Umgebungsbedingungen Temperatur 10 bis 35 C Luftfeuchtigkeit 16 bis 73 Druckkopf Anzahl Nadeln 24 Nadeldurchmesser 0 25 mm Anzahl Kopien 1 Original 5 Kopien Zulassungen ISO 950 CE GO...

Page 42: ...arbeitung von Recyclingpapier entsprechend DIN 19 309 geeignet Rücknahme von Drucker und Verbrauchsmaterial Unsere Geräte mit Umweltzeichen und Verbrauchsmaterial wer den in unserem Recycling Center Tally GmbH Glockeraustraße 4 D 89275 Elchingen gebührenfrei angenommen und können dort persönlich oder auf dem Versandwege angeliefert werden Gewährleistung 1 Jahr eine Erweiterung auf 2 bzw 3 Jahre is...

Page 43: ...line 7 Mode Offline 7 Mode Setup 7 Remplacement de la cartouche du ruban encreur 8 Manipulation du papier 10 Sélection rapide du chemin de papier 10 Chargement du papier 11 Papier continu 11 Papier feuille à feuille 13 Transport du papier 14 Déplacement du papier en position de séparation 14 Réglages 15 Réglage de la position de séparation 15 Réglage de la première ligne d impression TOF 16 Réglag...

Page 44: ...ns générales ou supplémentaires sur un sujet précis Consignes impor tantes de sécurité Lire attentivement les instructions suivantes avant de mettre l imprimante en service pour éviter de vous blesser et d endommager l imprimante Veiller à ce que le présent manuel soit toujours parfaitement accessible Placer l imprimante sur un support stable de façon à ce qu elle ne puisse pas tomber Ne pas expos...

Page 45: ...M Online contient le Manuel de référence une description détaillée de l imprimante et de ses capacités Pilotes pour Windows 3 1 Windows 95 98 Windows NT3 51 NT4 Autres documentations instructions de programmation et description des options Si le CD ROM est défectueux ou manque contacter votre revendeur La documentation Online est également disponible sur papier moyennant une participation ou sur I...

Page 46: ...t supérieur Leviers de verrouillage Tracteur 1 Alimentation feuille à feuille manuelle ouverte Arête de séparation Capot inférieur Alimentation feuille à feuille manuelle fermée Capot arrière Tête d impression Cartouche du ruban encreur Imprimante en mode feuille à feuille Imprimante en mode continu Vue d ensemble Initiation rapide 4 ...

Page 47: ... ce que le panneau de commande et les magasins d alimentation en papier soient aisément accessibles et à ce qu il y ait suffisamment de place pour l éjection du papier Pour le choix de l emplacement de l imprimante observer ce qui suit Ne jamais placer l imprimante à proximité de sources de gaz aisément inflammables ou de substances explosives Eviter d exposer l imprimante à la lumière directe du ...

Page 48: ...upteur secteur qui sert à la mise sous tension de l impri mante se trouve sur la face avant de l imprimante en bas à droite Assurez vous que l imprimante est réglée à la ten sion appropriée p ex 220 240 V pour l Europe 120 V pour les USA Voir la plaque signalétique placée au dessus de la prise secteur au dos de l im primante Si ce n est pas le cas contacter votre revendeur Ne jamais mettre l impri...

Page 49: ...in de papier Touche 2 appuyer brièvement sur la touche micropas vers l avant appuyer longuement sur la touche avancement continu du papier Touche 3 appuyer brièvement sur la touche micropas vers l arrière Appuyer longuement sur la touche recul continu du papier jusqu à la position de parcage maxi Touche Load 4 Chargement du papier à partir du chemin de papier programmé l affichage passe alors à LF...

Page 50: ... imprimante et déposez le Pousser avec précaution le chariot de tête d impression vers la butée gauche vu de l avant de l imprimante Relever le capot de la barre d impression et déposer la cartouche usagée 90 La tête d impression est brûlante pendant l impres sion C est pourquoi laissez la refroidir quelques instants avant d y toucher Utiliser uniquement des cartouche de ruban encreur d origine ST...

Page 51: ...côtés jusqu à ce que la cartouche s enclenche De cette façon la cartouche est enclenchée automatiquement dans la bonne position Retender le ruban encreur en tournant la molette placée à droite de la cartouche Le ruban encreur glisse alors automatiquement dans la bonne position sur les taquets en plastique à gauche et à droite de la tête d impression Rabattre le capot de la barre d impression jusqu...

Page 52: ...choix Si une feuille simple est chargée dans l imprimante elle est alors éjectée Sélectionner la fonction papier désirée en appuyant sur l une des touches indiquées Insert 2 dans l exemple représenté L affichage alterne entre le menu de base et le menu affiché ci dessous Insérer une feuille simple voir la procédure page 11 Chargement du papier Appuyer sur la touche Online pour que l imprimante soi...

Page 53: ...lever le capot avant Ouvrir les volets de tracteur à gauche et à droite Vous pouvez également déposer le capot inférieur afin de fa ciliter le chargement du papier continu Vous pouvez néanmoins alimenter le tracteur en papier avec le capot inférieur monté Charger le papier continu dans le tracteur de gauche Veiller à ce que trois trous de transport du papier minimum soient posi tionnés sur les erg...

Page 54: ... tension Le bac de chargement actif Tract 1 s affiche Le papier est chargé automatiquement si l imprimante est Online et reçoit des données de l ordinateur Appuyer sur la touche Load 4 pour charger le papier avant im pression Ne pas trop tendre le papier pour éviter que les trous de transport ne se déchirent mais le tendre suffisam ment pour éviter qu il ne se gondole avec pour conséquence des pro...

Page 55: ...Insérer la feuille simple dans le guide papier jusqu à la butée Appuyer sur la touche Online pour que l imprimante soit prête à fonctionner La feuille simple est chargée automatiquement si l imprimante est Online et reçoit des données de l ordinateur Appuyer sur la touche Load 4 pour charger le papier avant impression Positionner le guide papier en fonction de la largeur du papier Un deuxième guid...

Page 56: ... activé La valeur maximale du retour de papier s élève à 22 pouces Déplacement du papier en position de séparation Le papier continu est transporté en position de séparation en appuyant sur la touche Coupe Assurez vous que l imprimante est en mode Online Appuyer sur la touche Coupe 4 L imprimante déplace l arête de perforation du papier continu sur l arête de séparation L affichage alterne entre e...

Page 57: ...lacer en position d attente Appuyer sur la touche Setup L imprimante passe en mode Setup Appuyer sur la touche Ajuster 2 Appuyer sur la touche Coupe 4 Appuyer sur la touche 2 ou 3 pour amener la perforation dans la position désirée Valider la sélection en appuyant sur la touche Valid 1 Appuyer sur la touche Setup L imprimante regagne la position initiale Ajuster Chem Pap Menu Char Online Setup 2 1...

Page 58: ...de séparation La position du début d impression est réglée en usine sur 12 72 Appuyer sur la touche 2 ou 3 pour amener la première ligne d im pression dans la position désirée Vous pouvez régler des valeurs comprises entre 0 et 220 72 pour le papier continu et pour les feuilles simples Valider la sélection en appuyant sur la touche Valid 1 Appuyer sur la touche Setup L imprimante regagne la positi...

Page 59: ...nuel de référence sur le CD ROM Online Appuyer sur la touche Setup L imprimante passe en mode Setup Appuyer sur la touche Ajuster 2 Appuyer sur la touche Tête 1 Appuyer sur la touche 2 ou 3 pour régler la plage dans laquelle le réglage automatique de l écartement de la tête doit être corrigé Vous pouvez sélectionner des valeurs comprises entre 10 et 10 Les valeurs de 0 à 10 réduisent l écartement ...

Page 60: ... la police désirée en appuyant sur la touche 2 ou 3 Valider la sélection en appuyant sur la touche Valid 1 Vous pouvez annuler la sélection et quitter le réglage inchangé en appuyant sur la touche Quit 4 Appuyer sur la touche Setup L imprimante regagne la position initiale Vous pouvez également appuyer sur la touche Online L imprimante passe ensuite directement en mode Online Ajuster Chem Pap Menu...

Page 61: ...ECMA Densités des caractères 10 cpi 12 cpi 15 cpi 17 1 cpi 20 cpi Résolution maximale horizontale 360 dpi verticale 360 dpi Emulations standard MTPL Tally Printer Language Epson LQ2550 IBM XL 24 Niveau sonore 53 dB A Dimensions version étroite 424 x 399 x 300 mm L x P x H version large 600 x 399 x 300 mm L x P x H Poids version étroite 10 5 kg version large 13 2 kg Alimentation USA Canada 120 V 10...

Page 62: ...1 5 0 60 mm Alimentation feuille à feuille Feuille simple Liasse de formulaires doit être testée individuellement grammage nombre de copies épaisseur de formulaire 80 120 g m2 1 5 0 60 mm Liasses de formulaires Seules les liasses de formulaires dont les bords d en tête sont collés peuvent être utilisées Les liasses multiples doivent être chargées avec le collage en bas en premier Un essai préalabl...

Page 63: ...odo Offline 7 Modo Setup 7 Come cambiare la cartuccia nastro 8 Modalità di gestione della carta 10 Commutazione rapida del percorso carta 10 Caricamento della carta 11 Moduli continui 11 Fogli singoli 13 Trasporto carta 14 Posizionamento della carta nel punto di strappo 14 Impostazioni 15 Impostazione della posizione di strappo 15 Impostazione della prima riga di stampa TOF 16 Regolazione della di...

Page 64: ...to a un determinato argomento Indicazioni di sicurezza importanti Prima di mettere in funzione la stampante leggere attentamente le seguenti indicazioni In questo modo si possono evitare rischi per la propria incolumità personale e danni all apparecchio Conservare le presenti istruzioni per l uso in un luogo sempre accessibile Collocare la stampante su una superficie stabile per evitare che cada a...

Page 65: ...e contiene il Manuale d uso descrizione dettagliata della stampante e delle sue caratteristiche Driver per Windows 3 1 Windows 95 98 Windows NT3 51 NT4 altra documentazione Istruzioni di programmazione e descrizione delle opzioni Se il CD ROM è difettoso o non è allegato alle istruzioni per l uso rivolgersi al proprio rivenditore La documentazione online è disponibile anche su carta a pagamento op...

Page 66: ...perchio superiore Ganci Trascinamoduli 1 Ingresso fogli singoli manuale aperto Bordo di strappo Coperchio inferiore Ingresso fogli singoli manuale chiuso Cartuccia nastro Coperchio posteriore Testina di stampa Stampante configurata per alimentazione fogli singoli Stampante configurata per alimentazione moduli continui Vista d insieme Per cominciare subito 4 ...

Page 67: ...tampante su una superficie stabile piana e non scivolosa in modo da evitare che cada aterra Verificarechevisiaunagevoleaccessoalpannellocomandi aipuntidi alimentazione della carta e che vi sia sufficiente spazio per l uscita della carta Nella scelta del luogo di installazione della stampante tenere presente i seguenti aspetti Non collocare mai la stampante nelle vicinanze di gas facilmente infiamm...

Page 68: ...uò accendere la stampante è posto a destra in basso sul lato anteriore della stampante Verificare che la stampante sia impostata sulla ten sione adeguata ad esempio 220 240 V in Europa 120 V negli USA A questo proposito si veda la targhetta tipo posta sopra la presa di alimentazione sul retro della stampante Se dovesse mancare que sta targhetta comunicarlo immediatamente al ri venditore Non accend...

Page 69: ...Commutazione rapida del percorso carta Tasto 2 breve pressione del tasto micropasso in avanti Pressione prolungata del tasto avanzamento continuo della carta Tasto 3 breve pressione del tasto micropasso all indietro Pressione prolungata del tasto ritorno continuo della carta fino alla posizione di parcheggio Tasto Load 4 Caricare la carta secondo il percorso carta impostato sul display compare qui...

Page 70: ... superficie superiore della stampante e rimuoverlo Spostare la testina di stampa fino al fermo di sinistra visto dal lato anteriore della stampante Aprire il premicarta ed estrarre la cartuccia esaurita 90 Durante la stampa la testina si surriscalda note volmente Prima di toccarla è opportuno lasciarla raffreddare qualche istante Utilizzare esclusivamente cartucce nastro originali STOP Come cambia...

Page 71: ...a In questo modo la cartuccia verrà a trovarsi automaticamente nella posizione corretta Tendere di nuovo il nastro con l ausilio dell apposita manopola posta sul lato destro della cartuccia In questo modo il nastro scivola al di sopra delle linguette in plastica poste a sinistra e a destra della manopola tendinastro posizionandosi automa ticamente nel modo corretto Spingere verso il basso il premi...

Page 72: ...o la carta premere un tasto a piacere Se nella stampante è caricato un foglio singolo questo viene espulso Con uno dei tasti indicati selezionare il percorso carta desiderato nel nostro esempio Foglio 2 fogli singoli Alternativamente al menu principale sul display compare Inserire un foglio singolo per la relativa procedura vedere la pagina 11 Caricamento della carta Premere il tasto Online per po...

Page 73: ...are i coperchietti dei trascinamoduli destro e sinistro Se desiderato per facilitare il caricamento dei moduli continui si può rimuovere il coperchio inferiore La carta può comunque essere agganciata ai trascinamoduli anche con il coperchio inferiore installato Inserire la carta a moduli continui nel trascinamoduli sinistro facendo attenzione che ai perni di trascinamento del trascina moduli si ag...

Page 74: ...nte Sul display compare il cassetto carta attivo Trattor1 trascinamoduli 1 La carta viene automati camente trascinata all interno della stampante se quest ultima è nella condizione Online e riceve dati dal computer Premere il tasto Load 4 per caricare la carta prima dell inizio della stampa Non tendere eccessivamente la carta poichè si ri schierebbe di strappare la perforazione nè lasciarla troppo...

Page 75: ...e il foglio nella guida carta fino in fondo Premere il tasto Online per portare la stampante nella condi zione pronta al funzionamento Il foglio viene automaticamente trascinato all interno della stampante se quest ultima è nella condizione Online e se riceve dati dal computer Premere il tasto Load 4 per caricare la carta prima dell inizio della stampa Applicare i supporti carta corrispondenti all...

Page 76: ...ta è 22 Posizionamento della carta nel punto di strappo Il tasto Stp consente di posizionare la carta a moduli continui nel punto di strappo Verificare che la stampante sia Online Premere il tasto Stp 4 La stam pante posiziona la perforazione dei moduli continui in corrispondenza del bordo di strappo Il display passa dall indicazione all indicazione Dopo lo strappo della carta premere il tasto Esc...

Page 77: ...izione di parcheggio Premere il tasto Setup La stampante passa al modo Setup Premere il tasto Regolaz 2 Premere il tasto Stp 4 Premendo il tasto 2 o 3 spostare la perforazione nella posizione desiderata Confermare il valore premendo il tasto OK 1 Premere il tasto Setup La stampante torna nella posizione di riferimento Regolaz Dir Cart Menu Char Online Setup 2 1 3 4 TOF Test Stp Online Setup 2 1 3 ...

Page 78: ...ione di inizio stampa è impostata a 12 72 Premendo il tasto 2 o 3 portare la prima riga di stampa nella posizione desiderata Si possono impostare valori compresi tra 0 e 220 72 per i moduli continui e per i fogli singoli Confermare l immissione premendo il tasto OK 1 Premere il tasto Setup La stampante si riporta nella posizione di riferimento Regolaz Dir Cart Menu Char Online Setup 2 1 3 4 TOF Te...

Page 79: ...tagli si rimanda al manuale d uso sul CD ROM online Premere il tasto Setup La stampante passa al modo Setup Premere il tasto Regolaz 2 Premere il tasto Test 1 Con il tasto 2 o 3 settare l intervallo dei valori entro il quale deve essere corretta l impostazione automatica della distanza della testina Si possono selezionare valori compresi tra 10 e 10 I valori da 0 a 10 riducono la distanza della te...

Page 80: ...uò selezionare il tipo di carattere desiderato Confermare la scelta premendo il tasto OK 1 Premendo il tasto Esci 4 si può abbandonare la scelta oppure la modifica Premere il tasto Setup La stampante torna all impostazione di default Premendo il tasto Online La stampante passa direttamente al modo Online Regolaz Dir Cart Menu Char Online Setup 2 1 3 4 Fonte CPI Online Setup 2 1 3 4 10 CPI OK Esci ...

Page 81: ...cpi 12 cpi 15 cpi 17 1 cpi 20 cpi Risoluzione max orizzontale 360 dpi verticale 360 dpi Emulazioni Standard MTPL Tally Printer Language Epson LQ2550 IBM XL 24 Picco di rumorosità 53 dB A Dimensioni stampante modello stretto 424 x 399 x 300 Larghezza x Profondità x Altezza stampante modello largo 600 x 399 x 300 mm Larghezza x Profondità x Altezza Peso stampante modello stretto 10 5 kg stampante mo...

Page 82: ...mm Fogli singoli per alimentazione con guida Fogli singoli Modulistica da provare singolarmente Grammatura Numero di copie Spessore modulo 80 120 g m2 1 5 0 60 mm Modulistica Si possono utilizzare esclusivamente moduli con bordo incollato in testa I moduli multicopia vanno inseriti dalla parte del bordo incollato E necessario in tal caso verificarne l idoneità Numero d ordine Cartuccia nastro colo...

Page 83: ...esora 6 Encender la impresora 6 Panel de mando 7 Modo Online 7 Modo Offline 7 Modo Setup 7 Cambiar el cartucho de cinta 8 Manejo del papel 10 Selección rápida del origen de papel 10 Cargar papel 11 Papel continuo 11 Hojas sueltas 13 Arrastre de papel 14 Transportar el papel a la posición de corte 14 Ajustes 15 Ajustar la posición de corte 15 Ajustar la primera línea de impresión TOF 16 Ajustar la ...

Page 84: ...NOTA marca las informaciones relativas a un tema particular de carácter general o adicional Instrucciones de seguridad importantes Lea las siguientes instrucciones con esmero antes de poner la impresora en servicio Con esto se protege Ud a su mismo y evita dañar el equipo Guarde las presentes instrucciones de servicio en un lugar de fácil acceso en cualquier momento Pónga la impresora sobre una ba...

Page 85: ...n línea en el disco CD ROM contiene el Manual de referencia una descripción detallada de la impresora y sus características de rendimiento driver para Windows 3 1 Windows 95 98 Windows NT3 51 NT4 más documentaciones instrucciones para la programación y una descripción de las opciones En el caso que el disco CD ROM esté defecto o no incluido consulte su agente de ventas Se ofrece la presente docume...

Page 86: ...erta superior Cierres Tractor 1 Dispositivo de alimentación de hojas sueltas manual abierto Hoja de corte Dispositivo de alimentación de hojas sueltas manual cerrado Tapa inferior Cartucho de cinta Cubierta posterior Cabeza de impresión Impresora en estado para hojas sueltas Impresora en estado para papel continuo Vista de conjunto Introducción rápida 4 ...

Page 87: ...aigar al suelo Hay que facilitar el acceso al panel de mando y los mecanismos de alimentación de papel y hay que proveer espacio suficiente para el papel expulsado En cuanto a la ubicación de la impresora asegure también los puntos siguientes Nunca coloque la impresora en la vecindad de gases de fácil inflamabilidad o sustancias ex plosivas No exponga la impresora a la irradiación solar directa Si...

Page 88: ...de la red con el cual se enciende la impresora se encuentra a la derecha abajo en el frente de la impresora Asegúrese de que el equipo ha sido ajustado para la tensión correcta de la red p ej 220 240 V en Europa 120 V en los EE UU Véase el rótulo en cima de la conexióndecorrienteeléctricaenlaparte trasera de la impresora Consulte su agente de ven tas si no está ajustado correctamente Nunca enciend...

Page 89: ...2 Pulsación breve del pulsador Micropaso de avance Pulsación larga del pulsador Avance continuo del papel Pulsador 3 Pulsación breve del pulsador Micropaso hacia atrás Pulsación larga del pulsador Retroceso continuo del papel hasta posición de aparcamiento Pulsador Load 4 Carga papel del origen de papel seleccionado el visualizador cambia a LF FF Pulsador LF FF 4 Pulsación breve del pulsador Avanc...

Page 90: ...impresora y quite la cubierta Empuje el carro de la cabeza a la izquierda hasta el tope con cuidado visto del frente de la impresora Levante la cubierta de barra de impresión y quite el cartucho usado 90 La cabeza de impresión se pone muy caliente duran te la impresión Por lo tanto deje enfriarlo algún tiempo antes de tocarla si fuese necesario Solamente utilice cartuchos de cinta originales STOP ...

Page 91: ...abajo con cuidado hasta que se engatilla Así se posiciona el cartucho correctamente sin más Tensar la cinta otra vez mediante el botón a la derecha del cartucho Con esto la cinta pasa automaticamente a su posición correcta por las salientes a la izquierda y derecha de la cabeza de impresión Presionar la cubierta de barra de impresión hacia abajo hasta que engancha reinstalar la cubierta arriba ase...

Page 92: ...lsador Si se encuentra una hoja suelta en la impresora se la expulsa Seleccione el origen de papel deseado con uno de los pulsadores marcados por ejemplo Sueltas 2 Alternan el menú inicial y el mensaje siguiente en el visualizador Coloque una hoja suelta se describe el procedimiento en la página 11 Cargar papel Presione el pulsador Online para poner la impresora en estado listo para el servicio Si...

Page 93: ...n de papel Levante la tapa delantera Abra las abrazaderas de papel izquierda y derecha Es posible también de quitar la tapa inferior para facilitar la carga de papel continuo Sin embargo se puede cargar el papel también con la tapa inferior instalada Coloque papel continuo en el tractor izquierdo Cuide que al menos tres agujeros se encuentren sobre los pernos del rodillo de accionamiento Cierre la...

Page 94: ...esora Aparece el origen de papel activo Trac tor1 en el visualizador Se carga el papel automaticamente si la impresora está en modo Online y recibe datos del ordenador Presione el pulsador Load 4 para cargar el papel antes del inicio de la impresión No tensar el papel excesivamente porque los aguje ros de arrastre pueden rasgarse ni lo deje flojo porque en este caso va a ondularse causando pro ble...

Page 95: ...ía lateral derecha al tamaño del papel utilizado Insierte la hoja suelta hasta el tope en el dispositivo de alimen tación de papel Presione el pulsador Online para poner la impresora en estado listo para el servicio Se carga la hoja automaticamente si la impresora está en modo Online y recibe datos del ordenador Presione el pulsador Load 4 para cargar el papel antes del inicio de la impresión Inst...

Page 96: ...nsportar el papel a la posición de corte Se transporta el papel continuo a la posición de corte con el pulsador Tirar Asegúrese de que la impresora esté en modo Online Presione el pulsador Tirar 4 La impresora posiciona la línea de perforación del papel continuo a la hoja de corte La visualización alterna entre y Después de cortar el papel presione el pulsador Salir 4 La impresora repo siciona el ...

Page 97: ...ón de aparcamiento Presione el pulsador Setup La impresora cambia al modo Setup Presione el pulsador Ajustar 2 Presione el pulsador Tirar 4 Por medio del pulsador 2 o 3 ponga la perforación a la posición deseada Confirme la entrada presionando el pulsador Set 1 Presione el pulsador Setup La impresora vuelve al estado inicial Ajustar Aliment Menú Char Online Setup 2 1 3 4 TOF Ajust Tirar Online Set...

Page 98: ...ineada con la hoja de corte Se ha ajustado la primera posición de impresión a 12 72 en fábrica Por medio del pulsador 2 o 3 ajuste la primera línea de impresión a la posición deseada Se pueden ajustar valores entre 0 y 220 72 para papel continuo y para hojas sueltas Confirme la entrada presionando el pulsador Set 1 Presione el pulsador Setup La impresora vuelve al estado inicial Ajustar Aliment Me...

Page 99: ...manual de referencia en el disco CD ROM Presione el pulsador Setup La impresora cambia al modo Setup Presione el pulsador Ajustar 2 Presione el pulsador Ajust 1 Por medio del pulsador 2 o 3 ajuste la gama dentro de la cual se efectúa la corrección del ajuste automático de la cabeza Puede seleccionar valores entre 10 y 10 Valores entre 0 y 10 reducirán la distancia entre la cabeza y el papel los va...

Page 100: ...e la fuente deseada con el pulsador 2 o 3 Confirme la selección presionando el pulsador Set 1 Puede cancelar la selección presionando Salir 4 Presione el pulsador Setup La impresora se pone al estado inicial Alternati vamente puede presionar el pulsador Online Entonces la impresora cambia al modo Online directamente Ajustar Aliment Menú Char Online Setup 2 1 3 4 Font CPP Online Setup 2 1 3 4 10 CP...

Page 101: ...ECMA Densidad de caracteres 10 cpp 12 cpp 15 cpp 17 1 cpp 20 cpp Resolución máxima Horizontal 360 ppp Vertical 360 ppp Emulaciones Estándard MTPL Tally Printer Language Epson LQ2550 IBM XL 24 Nivel de ruido 53 dB A Dimensiones Impresora estrecha 424 x 399 x 300 mm ancho x prof x alto Impresora ancha 600 x 399 x 300 mm ancho x prof x alto Peso Impresora estrecha 10 5 kg Impresora ancha 13 2 kg Alim...

Page 102: ... 120 g m2 1 5 0 60 mm Alimentación hojas sueltas Hoja suelta Copias múltiples requieren pruebas individuales Peso de papel Copias Espesor de formulario 80 120 g m2 1 5 0 60 mm Formularios en copias múltiples Sólo se pueden manejar formularios del tipo encolado por los cantos de cabeza Los formularios múltiples requieren inserción con el canto encolado hacia abajo Hay que comprobarlos en cuanto a a...

Page 103: ......

Page 104: ......

Page 105: ...les y en cualquier forma será necesaria nuestra autorización expresa por escrito Nos reservamos el derecho de modificar el contenido de este manual sin previo aviso Este manual fue elaborado con cuidado pero no podemos responsabilizarnos por eventuales errores e imperfecciones del presente manual ni por daños consiguientes que resulten de ellos TRADEMARK ACKNOWLEDGEMENTS CENTRONICS is a trademark ...

Page 106: ...Corsico MI Italia Tel 39 02 48608 1 Fax 39 02 48601 141 http www Tally it C I S Tally Representative Park Place Moscow office D 206 Leninsky Prospekt 113 1 117198 Moscow Russia Phone 7 502 256 56 40 Inside C I S 095 956 56 40 Fax 7 502 256 56 41 Inside C I S 095 956 56 41 http www Tally com U S A Tally Corp P O Box 97018 8301 South 180th Street Kent WA 98032 U S A Phone 1 425 25155 00 Fax 1 425 25...

Reviews: