background image

3. Intended use 

The hand mower is designed for cutting grass. 
It is intended for private use, i.e. for use in home 
and gardening environments. Private use here 
refers to the maintenance of small-scale, residential 
areas and does not include public facilities, sporting 
halls, or agricultural/forestry applications. 

Important. Due to the high risk of 

bodily injury to the user, the hand 

mower may not be used to cut 

scaling vegetation, planted roofs, or 

balconygrown grass. 

The equipment may only be used for the tasks it is 
designed to handle. Any other use is deemed to be 
a case of misuse. The user / operator and not the 
manufacturer will be liable for any damage or 
injuries of any kind caused as a result of this. 

Please note that our equipment has not been 
designed for use in commercial, trade or industrial
applications. Our warranty will be voided if the 
equipment is used in commercial, trade or industrial 
businesses or for equivalent purposes. 

4. Assembly 

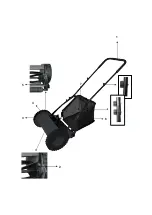
4.1 Mower assembly 

Screw the push bar top section to the two 
push bar extensions . Use the two screws and two 
hexagonal nuts for this purpose. 

Screw push bar bottom section A, push 
bar bottom section B and the two push bar 
extensions together.  

First attach one push bar bottom section to the 
mower, then press the push bar together slightly 
and attach the other side. 

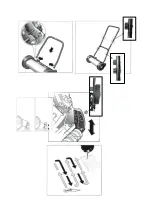
4.2 Grass box assembly 

A. Push the bar frame into the grass box tube. 

B. Snap the side fastening lugs on the grass box 
over the bar frame. 

C. Snap the bottom fastening lug on the grass box 
over the bar frame. 

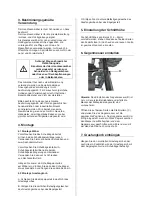
5. Adjusting the cutting height 

cutting heights can be set between a range of 12 – 
45 mm. To do so, pull the spring-loaded bolts (A) on 
both sides of out and then engage them in the 
required holes. 

6. Adjusting the counter blade 

Note: 

The counter blade (B) is only be adjusted 

before using the machine for the first time or if the 
blades on the mower spindle are worn. 

Undo the adjusting nuts (C) (10 mm) on both sides 
and adjust the counter blade to the required 
position. 
The counter blade (B) is correctly adjusted if a piece 
of paper placed between the blades on the mowing 
spindle and the counter blade is cut if you turn one 
of the wheels forwards by hand. 

7. Attaching the grass box 

Attach the assembled grass box to the roller.  
The grass box must also be secured to the push bar 
using the belt supplied. 

Summary of Contents for AVR HGM30

Page 1: ...2 011 FR Tondeuse h lico dale manuelle NL Handgrasmaaier GB Cylinder Lawnmower D Spindelm her ART HGM30...

Page 2: ...1 2 3 4 5 6 7...

Page 3: ......

Page 4: ...e sont pas us s ou endommag s 8 Ne tondez qu en plein jour ou avec un bon clairage artificiel 9 Prenez toujours une position quilibr e sur les pentes 10 Ne guidez la machine qu au pas 11 Sur une pente...

Page 5: ...ez la partie sup rieure du guidon avec les deux rallonges de guidon Utilisez pour ce faire les deux vis et deux crous Vissez ensemble la partie inf rieure du guidon A la partie inf rieure du guidon B...

Page 6: ...centim tres pour viter des rayures 9 Entretien et stockage _ Apr s l emploi nettoyez la machine l aide d une brosse ou d un chiffon _ Stockez la machine dans un endroit sec et inaccessible aux enfants...

Page 7: ...aanwijzingen voor de toekomst 2 Beschrijving van het gereedschap 1 Schuifbeugel 2 Maaispil 3 Wiel 4 Huis 5 Looprol 6 Grasopvangkorf 7 Bevestigingsriem Bij het gebruik van dit gereedschap neem de veli...

Page 8: ...te krijgen moet de maaihoogte op ca 2 5 cm worden afgesteld Rijdt uw gazon indien mogelijk een keer per week af Als u vaak het gras afrijdt gaat de groei de kort gesneden halm in een maakt hem resist...

Page 9: ...iebepalingen wordt verwezen naar de bijgevoegde garantievoorwaarden 11 Technische Daten Snijbreedte 300 cm Maaihoogte 12 45 mm Het aanpassen van de maaihoogte progressief Gewicht kg 6 7 9 Onderhoud en...

Page 10: ...n good working order i e not worn out or damaged 8 Only mow in broad daylight or in well lit conditions 9 Always maintain good footing on inclines 10 Operate the machine at a walking pace only 11 Alwa...

Page 11: ...two hexagonal nuts for this purpose Screw push bar bottom section A push bar bottom section B and the two push bar extensions together First attach one push bar bottom section to the mower then press...

Page 12: ...ly strips of grass 9 Maintenance and storage _ Clean the machine with a brush or rag after each use _ Store the machine in a location that is dry and not accessible by children _ Ensure that all mount...

Page 13: ...zen und die gesamte Schneideeinheit abgenutzt oder besch digt sind 8 M hen Sie nur bei Tageslicht oder bei guter k nstlicher Beleuchtung 9 Achten Sie immer auf einen guten Stand an H ngen 10 F hren Si...

Page 14: ...den Sie hierzu die beiden Schrauben und zwei Sechskantmuttern Verschrauben Sie Schubb gelunterteil A Schubb gelunterteil Bund die beiden Schubb gelverl ngerungen miteinander Verwenden Sie dazu sechs S...

Page 15: ...erung _ Nach Gebrauch das Ger t mit einer B rste oder Lappen reinigen _ Bewahren Sie das Ger t an einem trockenen und von Kinder nicht zug nglichen Ort auf _ Sorgen Sie daf r dass alle Befestigungsele...

Page 16: ...Burg Janssenstraat 10 7951 TG Staphorst Nederland Tel 0522 463333 www talentools nl www avrtools be...

Reviews: