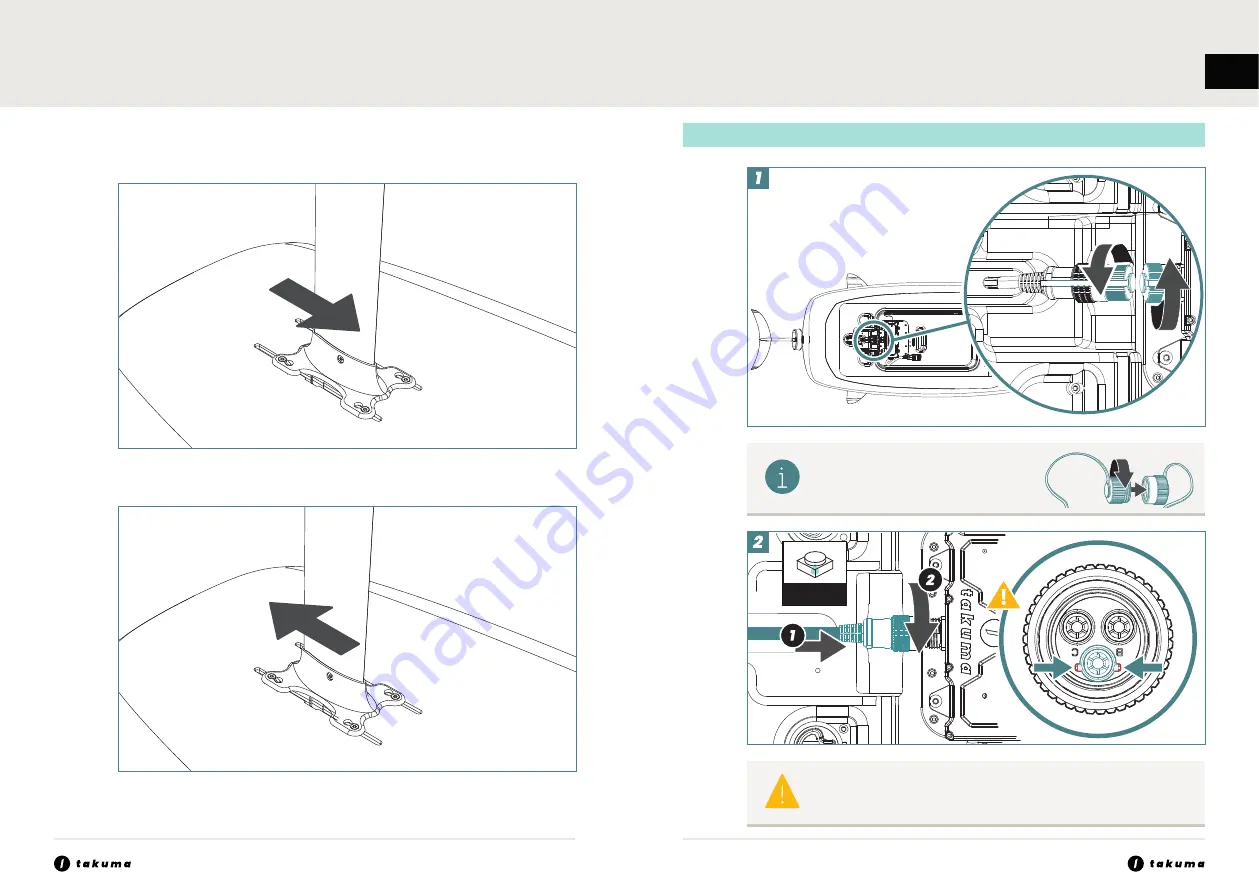
Takuma e-Foil User Manual Download Page 13

23 

/

 38 

EN

22 

/

 38 

Foil Position

For more lift

For less lift

4.4  Propulsion to ESC connection 

After removing the 2 caps:


Screw together the 2 M/F caps of the 

connectors.

Connector 

grease

The pins will only connect if the notches are properly aligned.  No 

great force is needed.

Summary of Contents for e-Foil

Page 1: ...1 2 EN USER S GUIDE e foil EN...

Page 2: ...ing 15 4 ASSEMBLY 16 4 1 ESC Installation 16 4 2 ESC Antenna Installation 17 4 2 Foil and Propulsion Assembly 18 4 3 Propulsion to ESC connection 23 4 4 Battery Installation 24 5 USE 26 5 1 Activation...

Page 3: ...nsibly the following instructions must be read and complied with TAKUMA cannot be held liable for non compliance with the warnings and instructions in this guide 1 2 1 Navigation The following is stri...

Page 4: ...addle in the direction of the coast or the nearest shelter 1 2 2 Users Using TAKUMA E FOIL can be dangerous This product must be operated with caution and common sense It requires some foiling ability...

Page 5: ...battery or the chargers make sure you are in a dry place away from water splashes Never operate in the water or in the presence of humidity Never open the electrical connectors when your E FOIL is on...

Page 6: ...SC is mounted inside the TAKUMA E FOIL It allows you to vary the propeller s speed via the remote control It is controlled by the remote control Connectors Never allow sand and or water to get in the...

Page 7: ...icians for the purposes of control This marking indicates in the European Union electric and electronic devices that must be separated from household waste In order to preserve the environment this de...

Page 8: ...les Check that the device and the battery connector are completely dry Ensure that you are in a dry place away from splashes of water Never operate in the water or in the presence of humidity Do not c...

Page 9: ...go out and the charger indicator turns to green Disconnect the charger from the wall socket Disconnect the battery from the charger Place the protections back on the connectors in order to ensure wat...

Page 10: ...akuma com Assemble your TAKUMA E FOIL in a clean and dry place Apply TEF GEL on all screws to avoid corrosion 4 1 ESC Installation CHCM8 16 M8 16mm 4 2 ESC Antenna Installation Clean area with alcohol...

Page 11: ...19 38 EN 18 38 4 3 Foil and Propulsion Assembly 1 2 x3 M6 18mm M6 14mm x2 M6 30mm...

Page 12: ...21 38 EN 20 38 Efoil Carver 2 M6 70mm Efoil Cruising 2 M6 14mm M6 T Nuts...

Page 13: ...ore lift For less lift 4 4 Propulsion to ESC connection After removing the 2 caps Screw together the 2 M F caps of the connectors Connector grease The pins will only connect if the notches are properl...

Page 14: ...4 38 4 5 Battery Installation Connector grease After removing the 2 caps Screw together the 2 M F caps of the connectors The pins will only connect if the notches are properly aligned No great force i...

Page 15: ...27 38 EN 26 38 5 USE 5 1 Activation and Pairing Keep you finger on the button until all 5 led lights are on Hold down on the power button even after the remote has turned on until it is pared...

Page 16: ...the ESC light remains red this means that the remote control cannot connect to the board The barred wifi is shown in the middle of the screen Try to pair again turn off the remote and battery and rep...

Page 17: ...lay Speed adjustment dial Boost button Power button Trigger switch Safety cut off 5 3 2 Trigger switch and speed adjustment dial The speed adjustment dial must be at the minimum setting before you can...

Page 18: ...tton increases the speed by 20 Releasing the button will return you to the initial speed Boost mode will allow beginners to have a much smoother take off You can then take off more easily without havi...

Page 19: ...35 38 EN 34 38 The speed adjustment dial must be put back to the minimum setting before starting the propulsion again 5 5 Low battery warning 5 6 Power off 2...

Page 20: ...ller Dry the inside of the board with a clean dry cloth until there is no sign of water left Also dry the ESC battery and connector caps If the connectors get wet rinse them with clean fresh water the...

Page 21: ...merservices takuma com Please find our tutorial videos on our youtube channel http youtube takuma com Other languages Espa ol Deutsche Italiano Portugu s Polskie Rom n Slov k Sloven ina e tina Hrvatsk...

Reviews: