background image

11

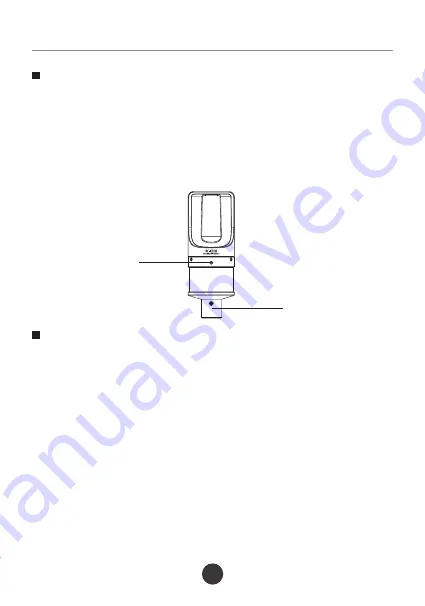
① 

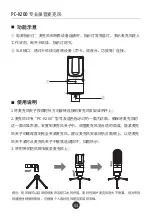
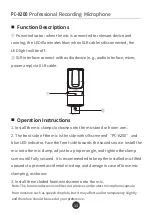
Power indicator: when the mic is connected to relevant device and 

running, the LED illuminates blue; when XLR cable is disconnected, the 

LED light will be off.

② XLR interface: connect with audio device (e.g., audio interface, mixer, 

power amp) via XLR cable.

Function Descriptions

1. Install the mic clamp clockwise onto the mic stand or boom arm.

2. The front side of the mic is the side with silkscreened “PC-K200” and 

blue LED indicator. Face the front side towards the sound source. Install the 

mic onto the mic clamp, adjust to a proper angle, and tighten the clamp 

screw until fully secured. It is recommended to keep the installed mic tilted 

upwards to prevent accidental mic drop and damage in case of loose mic 

clamping, as shown:

3. Install the included foam windscreen onto the mic.

Operation Instructions

① 

Note: The foam windscreen can filter out plosives and protect microphone capsule 

from moisture such as speech droplets, but it may affect audio transparency slightly 

and therefore should be used at your preference.

Professional  Recording  Microphone

PC

-

K200

Summary of Contents for PC-K200

Page 1: ...User Manual Professional Recording Microphone PC K200...

Page 2: ...PC K200 01 PC K200 400 6828 333 K 1 1 1 1...

Page 3: ...80 100 16mm 20Hz 20KHz 36dB 3dBV 0dB 1V Pa at 1KHz 28dBA IEC 581 5 130dB THD 0 5 at 1KHz 200 30 at 1KHz 48V 54mm 148mm 351g 210 120 240 30 330 300 270 60 90 180 150 30 0 PC K200 02...

Page 4: ...XLR 03 1 2 PC K200 3 PC K200...

Page 5: ...4 48V 48V 48V DC 48V 4V 2 8mA 20 48V 04 PC K200...

Page 6: ...48V 5 6 7 XLR 1 2 3 05 PC K200...

Page 7: ...1 2 3 4 5 6 RL2004 108 EG European Low Voltage Directive RL2006 95 EG 06 PC K200...

Page 8: ...FCC 15 1 2 WEEE 2012 19 EU WEEE https www takstar com 07 PC K200...

Page 9: ...08 PC K200...

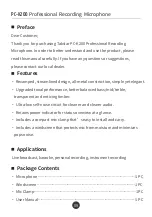
Page 10: ...mple yet elegant Upgraded tonal performance better balanced bass mid treble transparent and enticing timber Ultra low self noise circuit for cleaner and clearer audio Retains power indicator for statu...

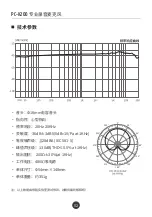
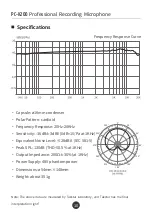
Page 11: ...ak SPL 130dB THD 0 5 at 1KHz Output Impedance 200 30 at 1KHz Power Supply 48V phantom power Dimensions 54mm 148mm Weight about 351g Note The above data are measured by Takstar laboratory and Takstar h...

Page 12: ...Face the front side towards the sound source Install the mic onto the mic clamp adjust to a proper angle and tighten the clamp screw until fully secured It is recommended to keep the installed mic ti...

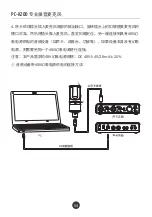
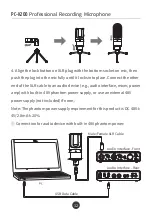
Page 13: ...udio interface mixer power amp with built in 48V phantom power supply or use an external 48V power supply not included if none Note The phantom power supply requirement for this product is DC 48V 4V 2...

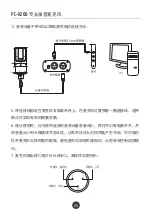
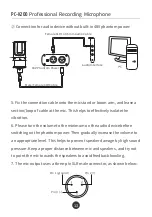
Page 14: ...on the phantom power Then gradually increase the volume to an appropriate level This helps to prevent speaker damage by high sound pressure Keep a proper distance between mic and speakers and try not...

Page 15: ...duct to the local dealer for repair 3 Keep this product and its accessories in a dry and ventilated area Do not store in a humid or dusty area for extended time Keep away from fire rain liquid intrusi...

Page 16: ...ver there is no guarantee that interference will not occur in a particular installation If this equipment does cause harmful interference to radio or television reception which can be determined by tu...

Page 17: ...this product should not be disposed of with your household waste according to the WEEE directive 2012 19 EU and your national law This product should be handed over to an authorized collection site f...

Page 18: ......

Page 19: ......

Page 20: ......

Reviews: