background image

GENERAL

I-9

REV. 1

CAUTIONS DURING REMOVAL AND
INSTALLATION OF THE HYDRAULIC UNITS

1. Make sure that the temperature of the hydraulic

oil has dropped.

2. To prevent a loss of flow of the hydraulic oil, the

residual pressure in the piping and the internal
pressure in the hydraulic tank should be released.

3. Be sure to install caps or plugs  on all openings in

the hydraulic unit to prevent dirt from getting into
the unit through the openings.

4. It is easy to mistake hydraulic oil adhering to the

hydraulic unit for an oil leak, so wipe the unit off
thoroughly.

5. Be sure that no damage is done to the plating on

the rod in the hydraulic cylinder.

6. As a rule, removal and installation of the hydrau-

lic cylinder should be done with the rod fully
retracted.

7. Be sure to bleed the air after replacing the hydrau-

lic oil or removing any of the hydraulic devices.

“III. Machine Configuration, Hydraulic Sys-
tem”

CAUTIONS DURING DISASSEMBLY AND
ASSEMBLY

1. Clean the machine before disassembly operation.

2. Before disassembly, check the machine condi-

tions and record them.
• Model, Machine Serial Number, Hourmeter
• Reason for Repairs, Repair History
• Dirtiness of Filters
• Fuel and Oil Conditions
• Damage to each parts, etc.

3. To make reassembly operations easy, make match-

ing marks at the necessary points.

4. Clean all disassembled parts and new parts, then

arrange them in the proper sequence.

5. Be sure to replace all seals and cotter pins, etc.,

with new parts.

6. Keep parts which should not come in contact with

oil and water separate from parts with oil on them.
• Electrical Parts, Rubber, V-Belts, etc.

7. When installing bearings, bushings and oil seals,

as a rule, use a press. When a hammer, etc., is
used, it leaves bruises.

8. Wipe all joining surfaces clean so that there is no

dirt or dust adhering to them.

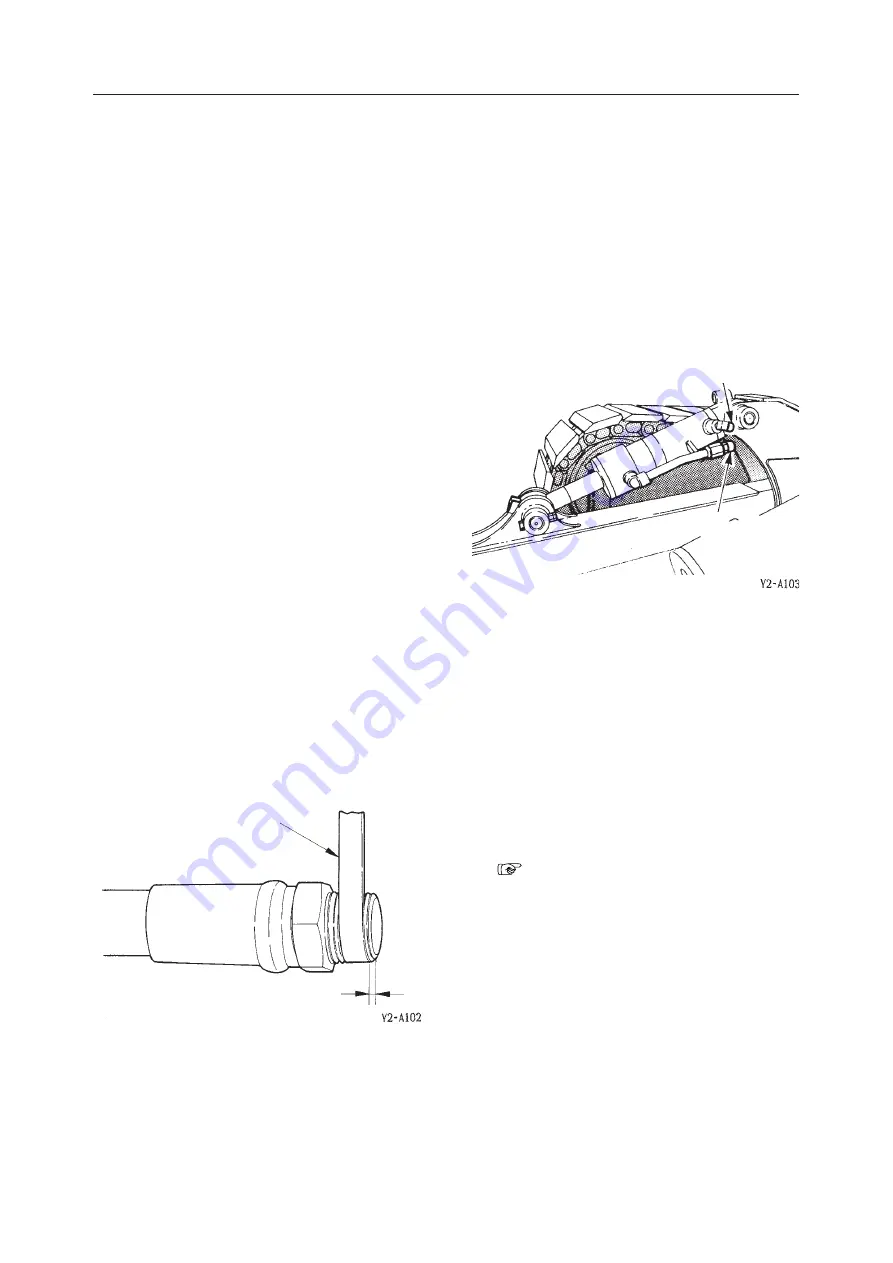
9. Wrap seal tape from the front end, Wrapping it

tight and leaving 1 or 2 threads bare, Overlap the
tape by about 10 mm.

10. When fitting the snap rings, the bigger, rounder

side of their circumferences should face the mat-
ing surfaces.

SEALING TAPE

LEAVE 1 OR 2 THREAD MARGIN

PLUG

PLUG

Summary of Contents for TL130

Page 1: ...0 1 REV 1 ...

Page 2: ...III 77 III 78 III 79 III 80 III 81 III 82 III 83 III 84 III 85 III 86 III 87 III 88 III 89 III 90 III 91 III 92 III 93 III 94 1 1 1 1 1 1 1 1 1 1 1 1 1 1 1 1 1 1 1 1 1 1 1 1 1 1 1 1 1 1 1 1 1 1 1 1 1 1 1 1 1 A A R R R R R R R R R A R R R R R R R R A R R R R R A R A R R III 95 III 96 IV 1 IV 2 IV 3 IV 4 IV 5 IV 6 IV 7 IV 8 IV 9 IV 10 IV 11 IV 12 IV 13 IV 14 IV 14 1 IV 15 IV 16 IV 17 IV 18 IV 19 IV ...

Page 3: ...73 IV 74 IV 75 IV 76 IV 77 IV 78 IV 78 1 IV 78 2 IV 78 3 IV 78 4 IV 78 5 IV 78 6 IV 79 IV 80 IV 81 IV 82 IV 83 IV 84 IV 85 1 1 1 1 1 1 1 1 1 1 IV 86 IV 87 IV 88 IV 89 IV 90 IV 91 IV 92 IV 93 IV 94 IV 95 IV 96 IV 96 1 IV 97 IV 98 IV 99 IV 100 IV 101 IV 102 IV 103 IV 104 IV 104 1 IV 105 IV 106 IV 107 IV 108 V 1 V 2 V 3 V 4 V 5 V 6 V 7 V 8 V 9 V 10 V 11 V 12 V 13 V 14 V 15 V 16 V 17 V 18 V 19 V 20 V ...

Page 4: ...T AND RIGHT The end where the bucket is mounted is the front and the end with the travel motors is the rear Also the right and left sides of the operator when he is seated in the driver s seat are the right and left sides of the machine MACHINE SERIAL NUMBER The machine serial number is stamped on the identification plate When sending reports and inquiries and when ordering parts etc be sure to in...

Page 5: ...If a page has been revised it is to be used in place of the page used before revision and it is not necessary to keep the old page 3 Model s SYMBOLS means Please refer to the section quoted Indicates the tightening torque at the specific section that requires special attention in designing Indicates the mass of a part or device FOOT OF THE PAGE 6 Bleed the air from the cylinders a With the engine ...

Page 6: ...0 7 I GENERAL II SPECIFICATIONS III MACHINE CONFIGURATION IV HYDRAULIC UNITS V TROUBLESHOOTING VI ENGINE REV 1 ...

Page 7: ...I 1 I GENERAL ...

Page 8: ... Safety Precautions 3 Cautions during Disassembly and Assembly 9 Cautions during Removal and Installation of the Hydraulic Units 9 Cautions during Removal and Installation of Piping 10 Handling of Seals 10 Tightening Torques 11 ...

Page 9: ...MPORTANT is used to alert against operators and maintenance personnel about situations which can result in possible damage to the machine and its components This manual is intended for trained and qualified personnel only Warnings or cautions described in this manual do notnecessarilycoverallsafetymeasures Formaintenancework eachpersonmusttakeadequatesafetyprecautions against possible hazards pres...

Page 10: ... safety parts periodically Replace fuel hoses periodically Fuel hoses be come weaker over time even if they appear to be in good shape Replace important safety parts whenever an ir regularity is found even if it is before the normal time for replacement Anti explosive lighting Use anti explosive electrical fixtures and lights when inspecting fuel oil coolant battery fluid etc If lighting that is n...

Page 11: ... hands clothing and tools away from the rotating fan and running fan belts Securely block the machine or any component that may fall Before performing maintenance or repairs under the machine set all working equipment against the ground or in the lowermost position Securely block the tracks If you must work beneath the raised machine or equipment always use wood blocks jack stands or other rigid a...

Page 12: ...er s approved cap Use of a non ap proved cap without proper venting may result in pressurization of the tank Never use fuel for cleaning purposes Use the correct fuel grade for the operating season Handling of hoses Fuel oil or hydraulic fluid leaks can cause a fire Do not twist bend or hit the hoses Neverusetwisted bentorcrackedhoses tubesand pipes They may burst Retighten loose connections Be ca...

Page 13: ...s or screws or disconnecting hoses stand to the side and loosen slowly to gradu ally release the internal pressure before removing Handling of the Accumulator Highpressurenitrogengasisenclosedintheaccumu lator and incorrect handling could possibly bring about serious injury due to explosion The following matters should be strictly observed Do not disassemble Do not bring close to fire or throw int...

Page 14: ...y terminals may result in sparks Be sure to fasten terminals tightly Make sure the vent caps are tightened securely Do not charge a battery or jump start the engine if the battery is frozen Warm to 15 C 60 F or the battery may explode Have a Takeuchi service agent repair welding cracks or other damage Ask a Takeuchi service agent to repair any welding problems which are detected If not feasible ma...

Page 15: ...Y AND ASSEMBLY 1 Clean the machine before disassembly operation 2 Before disassembly check the machine condi tions and record them Model Machine Serial Number Hourmeter Reason for Repairs Repair History Dirtiness of Filters Fuel and Oil Conditions Damage to each parts etc 3 Tomakereassemblyoperationseasy makematch ing marks at the necessary points 4 Clean all disassembled parts and new parts then ...

Page 16: ...hosesorsteelpipes applythemaximumworkingpressure5or6times and confirm that there is no leakage HANDLING OF SEALS 1 Clean the grooves for O rings and if there is any burr etc remove it 2 Be careful not to twist O rings If an O ring is twisted remove the twist with the fingertips 3 During insertion be careful not to damage the seal 4 Handling of Floating Seals Wipe all oil off the O ring and housing...

Page 17: ...5 1 6 4 108 5 10 7 144 7 14 3 9 8 4 9 24 5 4 9 49 4 9 58 8 4 9 117 7 4 9 137 3 4 9 7 3 3 5 18 1 3 5 36 2 3 5 43 4 3 5 86 8 3 5 101 3 3 5 8 10 12 15 16 18 22 27 2 28 32 35 Pipe Outer Diameter mm Torque N m ft lb 34 3 4 9 41 7 2 5 58 8 4 9 88 3 4 9 93 2 4 9 132 4 4 9 205 9 9 8 245 2 9 8 313 8 19 6 313 8 19 6 411 9 19 6 25 3 3 5 30 7 1 7 43 4 3 5 65 1 3 5 68 7 3 5 97 6 3 5 151 8 7 2 181 0 7 2 231 4 1...

Page 18: ...26 6 12 5 Nominal Thread Diameter G Torque N m ft lb 1 8 1 4 3 8 1 2 3 4 1 1 1 4 1 1 2 19 6 2 0 34 3 4 9 53 9 4 9 63 7 4 9 93 2 4 9 107 9 9 8 117 7 9 8 137 3 9 8 14 5 1 4 25 3 3 5 39 8 3 5 47 0 3 5 68 7 3 5 79 5 7 2 86 8 7 2 101 2 7 2 Nominal Thread Diameter UNF Torque N m ft lb 7 16 20 1 2 20 9 16 18 3 4 16 1 1 16 12 1 5 16 12 1 5 8 12 16 7 2 0 22 6 2 0 31 4 2 9 59 8 4 9 102 0 5 9 135 3 7 8 181 4...

Page 19: ...3 48 5 2 42 2 9 0 14 6 0 0 30 10 4 0 52 16 1 0 80 26 1 1 30 53 5 2 66 8 7 0 4 19 5 0 9 40 5 2 0 71 6 3 5 115 0 5 7 177 9 8 9 350 8 17 5 21 0 1 0 43 4 2 2 75 2 3 8 116 5 5 8 188 8 9 4 387 0 19 2 Bolts and Nuts for ISO Strength Category 10 9 1 General Tightening Points Non lubricated Allsecuringpointsotherthanthespecialtight ening points 2 Special Tightening Points Grease with molyb denum disulfide ...

Page 20: ...I 15 II SPECIFICATIONS II 1 ...

Page 21: ...omthefactory It should be used as the target value for maintenance work after operation Allowable Value The dimensions of parts change during use because of wear and deformation Also the performance of pumps motors and other hydraulic equipment drops and this is the estimated value indicating the use limit for the respective part It is decided under reference to the standard at the time of shippin...

Page 22: ...ulic Tank 4 Canopy 5 Safety Bar 6 Pilot Valve L H 7 Pilot Valve R H 8 HST Pump 9 Bucket Cylinder 10 Fuel Tank 11 Arm Cylinder 12 Travel Motor 13 Track Roller 14 Crawler Belt 15 Idler 16 Quick Attachment 17 Bucket 18 Control Valve Sub 19 Self Level Valve NAMES OF COMPONENTS 6 ...

Page 23: ...H J K L M 3430 2740 1390 2235 2120 310 1580 320 1430 985 980 1675 510 30 Unit mm Standard Bucket Rubber Crawler A B C D E F G H 3905 3030 2370 730 2080 1375 1585 30 Operating Range SPECIFICATION DIAGRAMS T7K0011A L M D J H K C F G A E B T7K0021A F H C A D B G E REV 1 Canopy Cab 2235 985 21300004 21301098 Canopy Cab ...

Page 24: ... of Departure degree Working Range Maximum Lift Height to Bucket Pin mm Maximum Dumping Height mm Maximum Dump Angle Fully Raised degree Maximum Bucket Rollback at Ground Level degree Reach Fully Raised mm Performance Breakout Force kN Travel Speed 1 st 2 nd km h Gradeability degree Ground Pressure kPa Tipping Load kg Cycle Time Raise Full Load Lift Arm Sec Lower No Load Lift Arm Sec Dump Full Loa...

Page 25: ...Pa Gear Pump Model Type Displacement cm3 rev Delivery L min Control Valve Model Number of Circuits Main Relief Valve Pressure Setting MPa L min Port Relief Valve Pressure Setting MPa L min Control Valve Sub Model Rated Flow L min Relief Valve Pressure Setting MPa L min Pilot Valve R H Model Secondary Side Pressure MPa Operating Angle Single Ports 1 3 degree Single Ports 2 4 degree Pilot Valve L H ...

Page 26: ... Stroke mm Fully Retracted Length Pitch mm Cushion Mechanism Travel Motor Model Type Total Displacement 1st cm3 rev 2nd cm3 rev Motor Displacement 1st cm3 rev 2nd cm3 rev Reduction Gear Ratio 2 Speed Control Pressure MPa Parking Brake Torque N m Parking Brake Release Pressure MPa Amount of Reduction Gear Lubricant L PV6P1013A 0 49 2 06 21300004 Serial Number REV 1 21300004 21301932 39055 EBW 66 34...

Page 27: ...BUY NOW Then Instant Download the Complete Manual Thank you very much ...

Reviews: