SER
VICE PR
OCEDURE
S
SER
VICE PR
OCEDURE
S
38 • On-Demand Water Heater Service Handbook for 240, 340 & 540 Condensing Models
Descaling the Unit
During operation, a tankless water
heater accumulates hard water
deposits on the interior surfaces of the
heat exchanger. These deposits make it
difficult to transfer heat into the water,
lowering the water heater’s efficiency
and causing excessive wear to the
components. Removing any deposits is
essential to the proper operation and
longevity of the water heater.
Tools and Materials:
●
Submersible transfer pump
●
3 gallons of 5% acidity white
vinegar (food grade), available
from most grocery stores
●
Washing machine hoses (2)
●
Five gallon bucket
●
Water heater isolation valve kits,
installed on both the cold water
inlet and hot water outlet of the
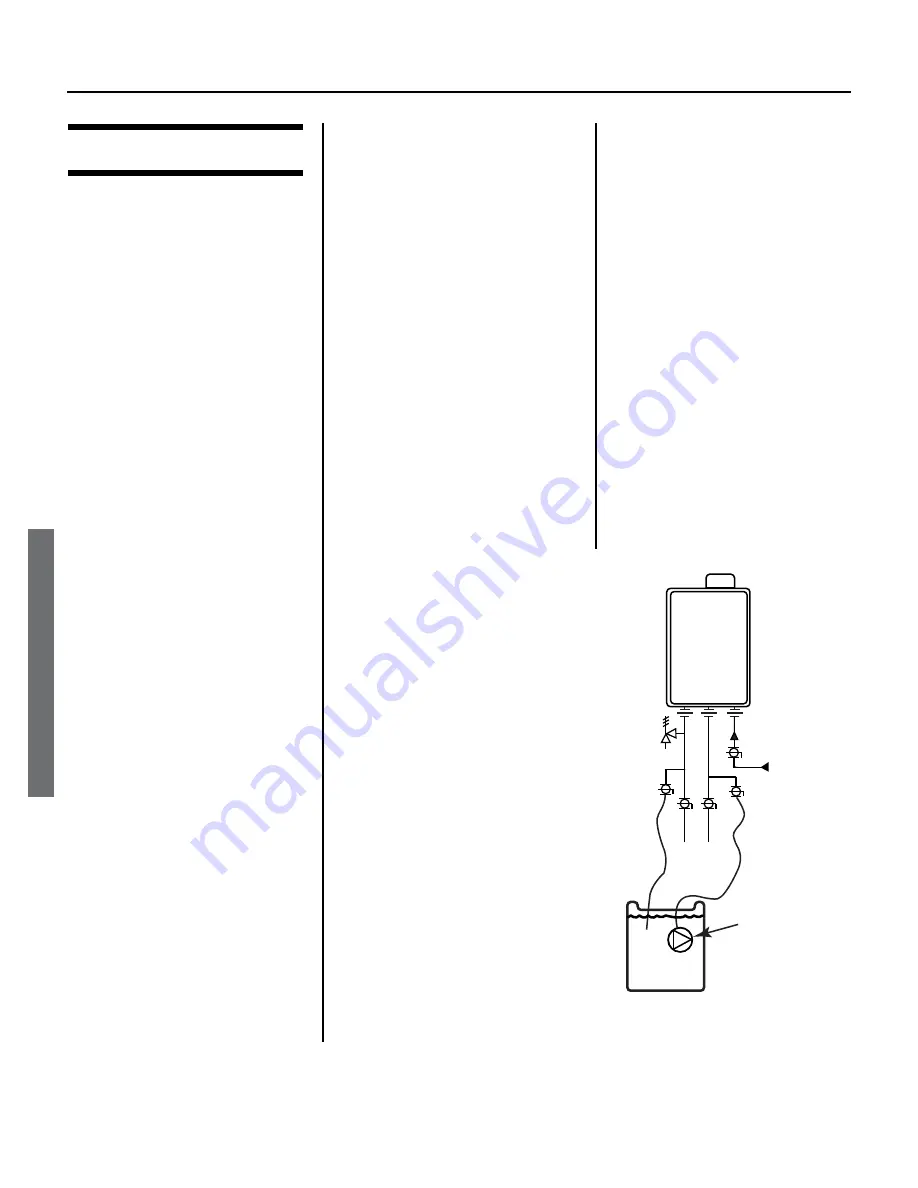
water heater (See Figure 27.)
1. Press the UP ARROW on the
temperature controller or remote
temperature controller to increase
the set temperature to 140°F.
To increase the temperature
above the 120- and 140-degree
safety stops, press and hold the
INFO and UP ARROW buttons
simultaneously until the display
starts flashing. You can now
increase the temperature by
releasing the buttons and pressing
the UP ARROW button until the
desired setting is reached.
2.
Open any hot water fixture to
begin heating water.
2.1 Allow the water heater to
operate for 60 seconds.
2.2
Turn off power with the power
switch at the water heater’s
fuse box, by unplugging the
heater (indoor models), or
by turning off the associated
circuit breaker (outdoor
models).
3. Once power to the water heater
has been disconnected, close the
hot water fixture.
4.
Close the isolation valves (C & D).
5. Pour the white vinegar (3 gallons)
into the five gallon bucket.
6. Connect one hose to the transfer
pump’s discharge outlet.
Connect its opposite end to the
service connection at the cold
water inlet’s isolation valve (B).
7. Place the pump in the bucket of
vinegar.
8. Connect the second hose to the
service connection at the hot water
outlet (A). Place its loose end into
the bucket with the vinegar.
9.
Open the hot and cold service
valves (A & B).
10. Turn power to the pump on and
let it run.
11.
Turn the pump’s power off after
45 minutes.
12. Ensure that the bucket is placed
underneath the drain port. (See
13. Remove the drain plug from the
drain port by turning it counter-
clockwise. See Figure 17, page
NOTICE: Do not lose the O-ring.
14. Reinstall the drain port plug
after all of the vinegar has
drained out.
15.
Close both service valves (A & B)
and remove the hoses.
16.
Open the isolation valves (C &
D).
17.
Open the hot water fixture
nearest to the water heater
and let the water run for several
minutes to remove any remaining
vinegar from the water heater.
18. Close valve D.
19.
Remove the drain port’s plug
again (Figure 17, p. 32), making
sure that the bucket is placed
underneath it.
20. Open valve D for about 10
seconds, allowing water to flow
through the drain port.
21. Close valve D.
22. Reinstall the drain port’s plug.
NOTICE: Be sure that the O-ring is still
attached at the end of the plug.
23. Open valve D again.
24. Turn power to the water heater
back on, then lower the set
temperature to where it was before
you began the descaling procedure.
25.
Wait until all air is pushed out of
the water line, then close the open
hot water fixture.
Descaling the Water Heater
Figure 27.
On-Demand
Water
Heater
H C
A
B
C
D
Pump
Outlet Hose
(Hot)
Inlet Hose
(Cold)
Descaling
Solution
Gas Supply
Pressure Relief
Valve


