background image

-  Use heavy gloves when inspecting or servicing the blades.

-  Wear eye protection and use gloves when installing the virtual wire and
   driving the wire stakes/pegs. Firmly drive all pegs in order to keep the
   wire from becoming a tripping hazard.

-  Do not use the charging station power supply with an extension cord.

-  Use only the original equipment power pack and power supply/charger   
   with this mower.

-  Do not use the power supply/charger if the cord has become damaged.

-  Do not place metal objects in the area of the charging contacts on the  
   charging station.

-  Do not place metal objects across the charging pins of the mower.

-  Do no spray water directly into the docking area of the charging station 
   or onto the operating panel of the charging station.

-  The mower has sharp rotating blades! Please care the mower when it is 
   mowing, in case of serious injury occur.

-  Keep the lawn mower in perfect operating conditions by performing the 
   maintenance procedures outlined by the manufacturer. Good   
   maintenance 
   guarantees better performance and longer service life.

-  In order not to irreversibly damage electric and electronic parts, do not   
   wash the robot with water jets at a high pressure and do not plunge it 
   partially or thoroughly in water, as it is not watertight.

-  It is absolutely forbidden to use the robot in explosive and flammable 
   environments.

  1.INTRODUCTION AND SAFETY

- The operator or user is responsible for accidents or hazards occurring to
  other people or their property.

-

P6

-

-

P5

-

  2. PRESENTATION

2. Presentation

This chapter contains information you should be aware of when planning 
the instalation.

12

13

11

10

14

25

31

19

18

17

20

28

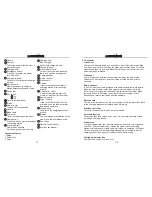
2.1 What's in box 

1

2

3

9

2

2

3

8

6

5

4

7

15

16

23

30

27

26

24

29

22

21

Summary of Contents for TC-G158 with lead-acid

Page 1: ...ROHS ...

Page 2: ...re injury or death to persons and pets or damage to personal property CONTENTS 1 INTRODUCTION AND SAFETY P1 2 PRESENTATION P6 3 INSTALLATION P13 4 REMOTE CONTROL P24 5 USE P25 6 MAINTENANCE AND STORAGE P29 7 TROUBLE SHOOTING P33 8 EXPLODED VIEW P38 1 1 Introduction P1 1 2 Symbols on mower P2 1 3 Symbols in the User Manual P3 1 4 Safety instructions P4 2 1 What s in box P6 2 2 Functions P8 2 3 Tech...

Page 3: ...fore 1 2Symbols on mower These symbols can be found in the mower Study them carefully so you understand their significance 1 The symbol is pasted on the top of mower please read it carefully before using the appliance 1 INTRODUCTION AND SAFETY P1 P2 2 Specifications symbol Pasted on mower Pasted on charging station Waste electrical products should not be disposed of with household waste Please rec...

Page 4: ...follow all the safety and warning instructions This machine has sharp rotation blades Never allow the mower to operate unattended keep bystanders children and pets away from mower when in operation Never allow anyone to ride or ait on mower Never allow anyone or person who is not familiar with the safe operation of the mower to operate the mower Keep hands and feet away from the cutting blades and...

Page 5: ...ower has sharp rotating blades Please care the mower when it is mowing in case of serious injury occur Keep the lawn mower in perfect operating conditions by performing the maintenance procedures outlined by the manufacturer Good maintenance guarantees better performance and longer service life In order not to irreversibly damage electric and electronic parts do not wash the robot with water jets ...

Page 6: ...e lift sensors located on each front wheel If the mower was lifted 2cm from the ground in level way the blade stop working within 2s but the wheels keep running And the blades start cutting within 5s after two front Tilt sensor There is tilt sensor installed on the mower too when the mower was tilted over 30 degree at any direction it also will stop working within 2 seconds Bump sensors In front o...

Page 7: ... mower and red in color If you press it in any case during operating the mower must stop all movement and stop the rotating of blades immediately Rotating the switch to reset it Two cutting modes There are two cutting modes of the mower go straight and go circle high efficiency P10 P9 2 PRESENTATION 2 3 Technical data Model Coverage for once charging 600m2 20 600m2 20 1500m2 20 1500m2 20 Working c...

Page 8: ...el TC G158 with lead acid 2 3hours 2 3hours Lead acid battery Lithium battery 7 2Ah 6 6Ah 3 4hours 4 5hours Average working time Type of battery battery Charging time Battery Mower can t be started when Mower can t be started when charging station is out of power TC G158 with lithium X X X X X X X X X X X X X X 2 4 Working route Manual pattern Mower s running path by user s willingness Auto patter...

Page 9: ...w the mower to mainly mow in dry wether to obtain the best possible result The blades must be in good condition to obtain the best mowing result In order to keep the blade sharp for as long as possible it is important to keep the lawn free from branches small stones and other objects especially the objects less than 6 5cm height How to adjust the cutting height The cutting height can be varied for...

Page 10: ...on in level place Charging station best install place 1 Make sure it 2 No magnetic interference 3 No water 4 No obstacle in front 3 INSTALLATION Lay virtual wire in the middle of charging station Fix the charging station with four stakes IMPORTANT INFORMATION Before fix the charging station on the lawn please examine the lawn and decide the best location which is easy for the mower to find the sta...

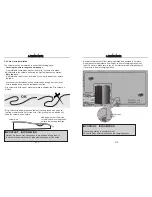
Page 11: ... wire below grass and fasten it on the ground with pegs so that the mower should not cut the wire If the grass grow up we can still keep the virtual wire as before virtual wire Add pegs in order to pull the virtual wire down to the ground surface below the grass tips OK IMPORTANT INFORMATION Hard or dry ground may cause pegs to break when driving them in In extreme cases watering the lawn where th...

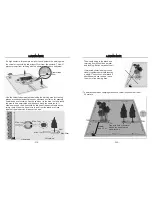
Page 12: ...ire should be laid under the same staple on the return route When the virtual wire to and from the island are close together the mower can drive over the wire 3 INSTALLATION Greater than 35cm Virtual wire Root Max 1cm Max 1cm Max 1cm Virtual wire Max 20cm 35cm 3 INSTALLATION The wires leading to the island and returning from it should be parallel and touding But do not cross them If protected obst...

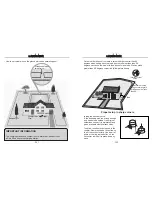
Page 13: ... reliable electrical connection To splice Insert both cable ends in the coupler Now press down the button on top of the connector fully Use a pair of pliers or the like as the button on the connector is difficult to press down by hand Correct corner set up using several angle to avoid an angle of less than 90 Greater than 2 5m Care must be taken not to create a corner sharper shorter than 90 degre...

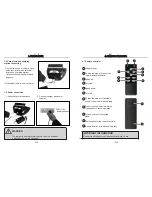
Page 14: ...oof therefore it must be located on a place which is dry and ventilated 4 1 Remote controler 1 2 3 4 5 6 7 4 REMOTE CONTROLER To stop the mower Press it the mower enters taskstate Indicator light Speed up Turn on or turn off the cutting blade Press it during mower is working it goes back to charging station Speed down 1 2 3 4 5 6 7 3 8 9 10 Turn right Turn left To start the mower In taskstate pres...

Page 15: ...ight is less than 6cm Periodically visually inspect to see that the blades blade bolts and cutter assembly are not worn or damaged Replace worn or damaged Read the safety instructions before you start your mower Keep your hands and feet away from the rotating blade Never put your hands or feet close to or under the body when the motors are running WARNIN WARNIN On multi spindle appliances take car...

Page 16: ...USE 5 USE 5 5 Recharging Steps as follow 1 Turn off the mower by key 2 Insert charger and screw the Knob 3 4 Connect the charger to power supplier Connect the charger to power supplier Recharge Voltage 24V Lead acid battery 29 4V Lithium battery Recharge current 2A The charger is not water proof therefore it must be located on a place which is dry and ventilated WARNIN The mower could goes back to...

Page 17: ... charging station from any accumulated residues 9 Keep all nuts bolts and screws tight to be sure the appliance is in safe working condition 10 Replace worn or damaged parts for safety 11 Ensure that only replacement cutting means of the right type are used 12 Ensure that batteries are charged using the correct charger recommended by the manufacturer 13 Incorrect use may result in electric shock o...

Page 18: ...son and how many hours per week the robot is used A long season or many hours of use per week means that the battery must be replaced more regularly Attentions for lead acid batteries Charge the batteries at least once every six months of they are at 25 The interval of this charge should be reduced to 50 by each 10 rise in temperature above 25 The self discharger state their capacity may not recov...

Page 19: ...round Put the mower in lever ground turn off the mower and restart it Remote control does not work The electricity power is low Change batteries Mower stop working and beeping Mower stop working and beeping Mower is tilted over than 30 degree from the ground Put the mower in lever ground turn off the mower and restart it by enter password and choose operate pattern 1 Cutting height too low 2 Blade...

Page 20: ...w cutting motor Power is not fully charged for operation The ground before the charging station is not flat Short run time operates less time than normal Mower does not detect the charging station contacts Recharge the mower fully Reset the charging station in a flat place 7 TROUBLE SHOOTING Problem Solutions Possible reasons Confirm the ground before the charging station is leveled with the charg...

Page 21: ...idues tapes ropes plastic fragments etc 3 The start of the robot occurred with obstacles being too closed less than 1m away or in presence of unexpected obstacles fallen branches forgotten objects etc The robot is very noisy 7 TROUBLE SHOOTING Problem Solutions Possible reasons P38 8 EXPLODED VIEW 8 1 Charging Station Exploded View 1 2 3 4 5 6 7 1 top cover 2 PCB 3 Power terminal 4 Virtual wire te...

Page 22: ...ht Rain se nso r Emerge ncy switch Cutti ng motor Blade ho lder Bla de Motor pres sure plate Running motors Running motor gear Bear ing pressure plate Gear Bearing Axl e Wheel She ll Bottom cover Lift sens or Scr ew cap Gasket Omni directional wheels Sprin g sheet Micro switch PCB Midd le bum per Charging head Sid e bumper Oilse al Chargin g termi nal 8 EXPLODED VIEW 8 2 Mower Exploded View ...

Reviews: