background image

MIL-BOOK™ 

 OPERATORS 

MANUAL 


- 2-15 - 

.


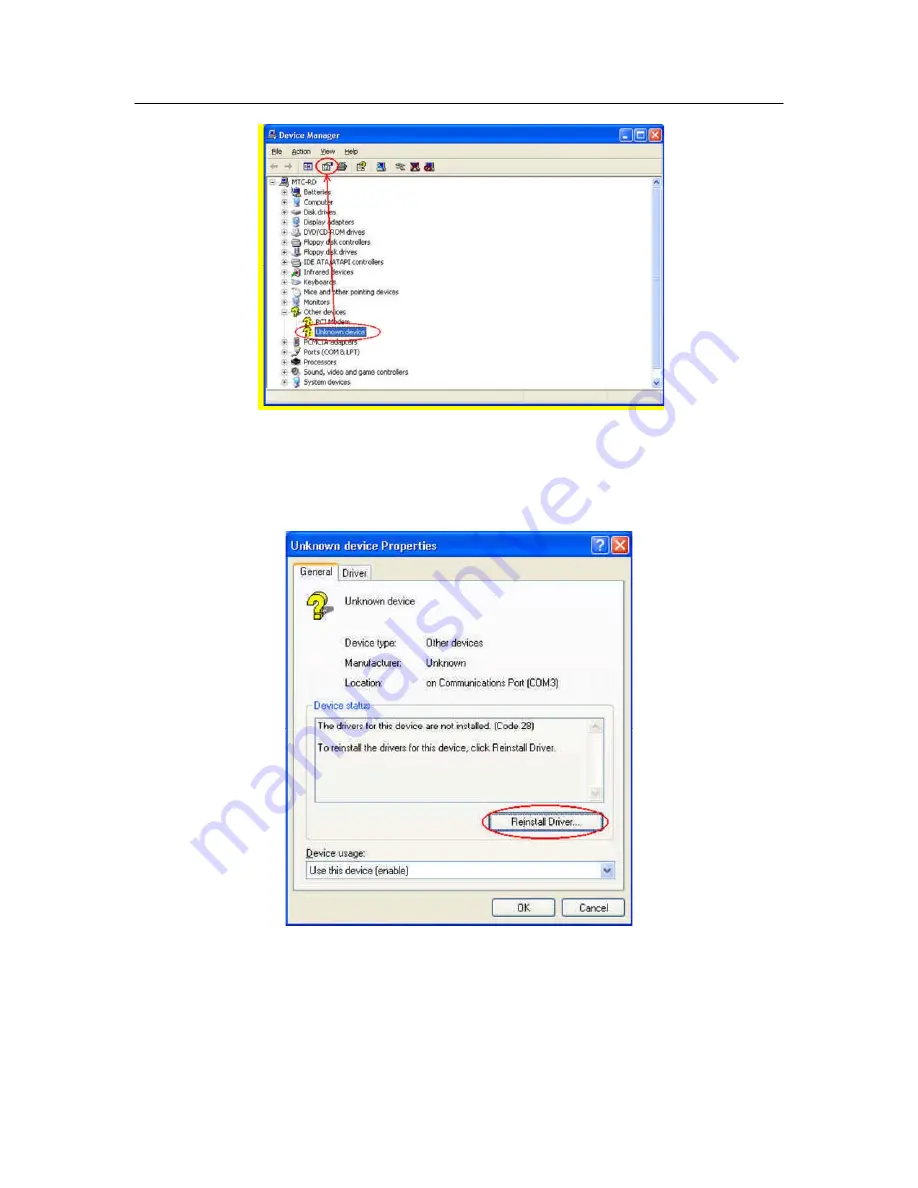
Figure 2-18 Unknown Device Properties 


6.


When the “Device Manager” screen appear, then click on “Unknown device” 
and then click on the “Properties” icon. 


Figure 2-19 Reinstall Driver 


7.


When the “Unknown Device Properties” screen appear, and then click on “ 
Reinstall Driver” button. 


Summary of Contents for MIL-BOOK 1000 Series

Page 1: ...OPERATOR S MANUAL MIL BOOK 1000 SERIES NOTEBOOK 22355 TAG Way Dulles VA 20166 Tel 703 406 3000 Fax 703 607 3853 ...

Page 2: ...MIL BOOK OPERATORS MANUAL ii ...

Page 3: ...roup Inc reserves the right to make changes to this manual or product specifications without obligation to notify any person of such changes Technology Advancement Group TAG and the TAG ball graphic are registered trademarks of Technology Advancement Group Inc MIL BOOK is a trademark of Technology Advancement Group Inc IBM IBM PC AT and OS 2 are registered trademarks of International Business Mach...

Page 4: ...cur in a particular installation If this equipment does cause harmful interference to radio or television reception which can be determined by turning the equipment off and on the user is encouraged to try to correct the interference by one or more of the following measures Reorient or relocate the receiving antenna Increase the separation between the equipment and receiver Connect the equipment i...

Page 5: ...g European Norms EN50081 1 Electromagnetic compatibility Generic emission standard EN55022 conducted Emission Radiated Emission EN61000 3 2 Current Harmonic EN61000 3 3 Voltage Flicker EN50082 2 Electromagnetic compatibility Generic immunity standard IEC1000 4 2 Electrostatic Discharge IEC1000 4 3 Radiated Susceptibility IEC1000 4 4 Electrical Fast Transients IEC1000 4 5 Surge Test IEC1000 4 6 Con...

Page 6: ... about any software included with the system Audience All operators using the notebook in or out of the field should read and become familiar with this manual Organization This manual has four chapters Chapter 1 introduces the notebook pointing out its major features Chapter 2 explains daily operation Chapter 3 gives detailed information about configuring the notebook Chapter 4 introduces the note...

Page 7: ...n senstive control pad with Microsoft Win Mouse function coexist Support Glove hand Touch Pad Bay 1 Modules Swappable for CD ROM DVD DVD RW FDD Battery 2nd HDD COMBO drive Bay 2 Modules 2nd PCMCIA Removable Type III x 1 or TYPE II x 2 Module COM port Module Removable Sealed Water Proof RS 232 422 or 485 Module DGPS DGPS Module Bay2 Battery Pack Removable and Recharge Li Ion Battery Pack Bay2 FDD W...

Page 8: ...harge and hot swap Primary battery pack 97 watts Removable rechargeable Bay 1 Li ion battery pack in Bay 1 total 65 watts Removable rechargeable Bay 2 Li ion battery pack in Bay 2 total 65 watts Power adapter I P AC 100 240 V 50 60 Hz O P DC 19V 5 4 74A 90W CV mode 9 12 VDC direct input without charging function 12 32 VDC external car adaptor charger Operating system Windows 2000 Windows XP Temper...

Page 9: ... so that they are out of traffic and unobstructed by personnel or equipment 9 Avoid using extension cords with this product If an extension cord is needed make sure it is rated for at least 10 amperes 10 Make sure amperage drawn by all items plugged into an outlet with this system does not exceed 15 amperes 11 Do not put any objects except those designed for use with this system inside the compute...

Page 10: ...rd Backlight Option 1 10 1 5 4 5 CRT LCD Simulscan Toggle 1 10 1 5 4 6 Panel On Off 1 10 1 5 4 7 Toggle LCD Backlight On Off Option 1 10 1 5 4 8 1 5 4 1 Hot Key Function 1 11 1 5 5 Status Row Indicators 1 11 1 5 6 Status Row Descriptions 1 12 1 5 7 The AC Power Adapter 1 12 1 5 8 Status Row 1 12 1 5 9 Battery Pack 1 13 1 5 10 Low Battery Indication 1 13 1 5 11 Battery Charger 1 14 1 5 12 CHARGE LE...

Page 11: ... Use 2 9 2 4 1 Installing Software Drivers 2 9 2 4 2 Install Device Driver for Windows 2000 Windows XP 2 10 2 4 3 Install Touch Screen Driver for Windows 2000 2 11 2 4 4 Installing Drivers for Windows XP 2 11 2 4 5 Install Touch Screen Driver for Windows XP 2 12 2 5 Daily Operation 2 19 2 5 1 Starting the Computer 2 19 2 5 2 Turning Off The Notebook 2 20 2 5 3 Using the Notebook in the Car 2 20 2 ...

Page 12: ... Port 3 8 3 2 3 Security Menu 3 8 3 2 3 1 System Password 3 9 3 2 3 2 Hard Disk Boot Sector 3 9 3 2 4 Boot Menu 3 10 3 2 5 Exit Menu 3 11 CHAPTER 4 NOTEBOOK MAINTENANCE 4 1 4 1 Introduction 4 1 4 2 Daily Use 4 1 4 3 Battery Maintenance 4 1 4 3 1 Conserving Power 4 1 4 3 2 Changing the Battery Pack 4 1 4 4 Cleaning 4 1 ...

Page 13: ...2 9 FIGURE 2 11 INSTALLING DRIVERS 2 10 FIGURE 2 12 INSTALLING DRIVERS 2 12 FIGURE 2 13 WINDOWS 2000 DRIVER 2 12 FIGURE 2 14 CONTROL PANEL 2 13 FIGURE 2 15 PERFORMANCE AND MAINTENANCE 2 13 FIGURE 2 16 SYSTEM PROPERTIES 2 14 FIGURE 2 17 DEVICE MANAGER 2 14 FIGURE 2 18 UNKNOWN DEVICE PROPERTIES 2 15 FIGURE 2 19 REINSTALL DRIVER 2 15 FIGURE 2 20 HARDWARE UPDATE WIZARD 2 16 FIGURE 2 21 HARDWARE INSTAL...

Page 14: ...the MIL BOOK 1000 notebook and its computer parts 1 2 System Description The MIL BOOK 1000 computer is a compact fully portable notebook computer It operates as a stand alone system for most applications It offers superior performance under harsh environmental and operating conditions It is fully compatible with the IBM PC AT standard 1 3 System Configuration This section presents and explains pos...

Page 15: ... Ion Smart Battery Keyboard 87key shower proof rubber keyboard Embedded two button track pad Optional LED Backlight Rubber Keyboard Expansion Two PCMCIA sockets type II or one type III compatible I O Devices One RS 232 serial port One Centronics parallel port support EPP ECP One VGA monitor port One RJ 11 port One RJ 45 port One Port Replicator port One DC input power supply port One infrared port...

Page 16: ...ng the notebook and its peripherals easier It has compartments for up to four diskettes this manual the power supply and all notebook cables 1 3 3 System Identification The nameplate listing system information is at the bottom of the notebook It contains Factory configuration Model number Serial number 1 4 Unpacking Use this checklist to make sure all items included with the notebook are present i...

Page 17: ...f description will accompany each call out to help you get stated and become familiar with your MIL BOOK 1000 Some of the features described in this section might vary from your individual MIL BOOK 1000 due to the different configuration and optional items available Figure 1 1 Features of the MIL BOOK 1000 Figure 1 2 Features of the MIL BOOK 1000 ...

Page 18: ...nditions of several key components and devices 3 Sealed Keyboard The MIL BOOK 1000 is equipped with 87 key shower dust proof sealed rubber keyboard 4 Sealed Access Doors Well sealed and secured access doors protect the expansion bays from water and dust intrusion when transporting the MIL BOOK 1000 5 Flat Panel Display The MIL BOOK 1000 provides a sealed non glare 12 1 13 3 14 1 color flat panel d...

Page 19: ...installed in bay 2 14 Removable Hard Disk Drive Module The MIL BOOK 1000 is equipped with a standard removable shock proof hard disk drive module 15 Removable Primary Battery The MIL BOOK 1000 is equipped with rechargeable and removable primary battery 16 Audio jacks Two audio jacks line out and mic in are provided on the MIL BOOK 1000 17 PCMCIA CardBus slots The MIL BOOK 1000 provides two 2 Type ...

Page 20: ...onfiguration parameters 3 Numeric Lock This key switches the number pad between acting as numeric keys or editing keys When the keyboard Num Lock indicator is lit the number pad is active 4 Prt SC Sys Req Sends the information currently showing on the display to a connected printer Pressing this key in conjunction with the Ctrl key sends all output to a connected printer Press this key combination...

Page 21: ...on hold down the Alt key along with the other key 15 Application One of two Windows keys provided on the MIL BOOK 1000 The Application key is used in conjunction with other keys to perform software specific functions 1 5 3 2 Cursor Control Keys Item Key Function 16 Home Moves the cursor to the first character position on the top line of the screen 17 End Moves the cursor to the last character posi...

Page 22: ...cession There are two ways to drag Move the cursor to the desired location the press down the left button While still holding down the left button move the cursor to the desired location Then release the button Move the cursor to the desired location Quickly tap the touchpad as if you were double clicking however do not move your finger after the second tap While maintaining contact with the touch...

Page 23: ...ightness and continue to adjust the screen image when it is already set to either the minimum or the maximum setting the system will keep on beeping each time the F5 or the F6 key is pressed 1 5 4 3 Toggle Key Option for RS485 The Hot Key is Fn F7 to toggle the RX TX direction 1 5 4 4 Keyboard Backlight Option The turn the keyboard backlight On and Off press the Fn F8 keys 1 5 4 5 CRT LCD Simulsca...

Page 24: ...ng Switches the display mode to LCD only CRT only or simultaneously display LCD CRT Fn F10 LCD panel toggle on off Switches the flat panel On Off Fn F11 LCD Backlight On Off Toggle Backlight On Off Transflective LCD only Fn F12 System Sleep System sleep button function For user define Table 1 2 Hot Key Function 1 5 5 Status Row Indicators The Status Row Indicators keeps you informed of the compute...

Page 25: ...e AC IN Charge The green AC IN light indicates that the system is On and the AC adapter is connected Charging is in progress when the orange Charge light is lit When the battery is fully charged the orange Charge light goes off Power On Suspend The green Power On light indicates that the system is power On The orange Suspend blinks indicates that the system is in a suspend mode Table 1 3 Status Ro...

Page 26: ...without the top bottom or any lines in between moving 1 5 9 Battery Pack The removable battery pack with on line charge capability comes standard with the MIL BOOK 1000 The battery pack provides power to the system when the AC power is Off or not connected The primary battery type is Li ion At 4 2V the battery pack consists of twelve cells The capacity of each cell is 2200 mAH or more The output v...

Page 27: ...me for the primary battery pack is about 5 5 6 5 hours As for the auxiliary battery pack the charge current is 1 4 1 6A and the charge time is about 3 4 hours whether the power is On and Off 1 5 12 CHARGE LED Indicator Status 1 When you insert the battery pack into the system and the AC power adapter is already connected the CHARGE LED Orange flashes three seconds or more and then stays On during ...

Page 28: ...OOK 1000 It is not necessary to connect an external monitor to the MIL BOOK 1000 but by using an external you can achieve higher resolutions than on the internal flat panel display 1 5 17 USB2 0 Port The MIL BOOK 1000 provides a USB2 0 Universal Serial Bus port for connecting USB compliant devices Most peripheral devices require the user to shutdown the system plug in the device and restart the sy...

Page 29: ...ntinuous period connect the external power adater into the power port Then plug the power cord into a 3 prong grounded wall socket to provide external power to the MIL BOOK 1000 The power port is located on the rear panel of the MIL BOOK 1000 1 5 21 IEEE 1394 Port The MIL BOOK 1000 provides a standard IEEE 1394 port for high speed connections The High Speed Serial Bus is located on the right side ...

Page 30: ...00 can be fitted with up to two battery The primary 97whr and an auxiliary battery 65whr The batteries can be hot swapped 1 5 24 Diskette Drive and CD ROM DVD COMBO DVD RW The notebook has space for a 1 44 MB 3 5 diskette drive and CDROM DVD COMBO DVD RW drive The space can put removable FDD drive or CD ROM DVD COMBO DVD RW drives The diskette drive allows permanent data storage in a compact trans...

Page 31: ...e covered in this chapter The MIL BOOK 1000 provides two compartment bays for optional removable device modules and PCMCIA CardBus slots for add in expansion 2 2 Opening and Closing the Notebook This section provides instructions for opening up and closing the MIL BOOK 1000 Instructions for removing and replacing all of the access doors and covers around the MIL BOOK 1000 will also be covered in t...

Page 32: ...e use one of the loosened screws to pull open the door Figure 2 2 Opening a Door 2 2 4 Closing the PCMCIA FDD CD ROM DVD COMBO DVD RW Door Be sure to close and secure the access doors before transporting the MIL BOOK 1000 1 Shut the door or put the PCMCIA FDD CD ROM DVD COMBO DVD RW back in place 2 Align the door or cover securing screws with their sockets 3 Use your finger to hold the screw in pl...

Page 33: ...ach side of the connector Figure 2 3 Connecting the External Power Serial and Parallel 2 3 2 External Power Adapter Use the provided AC adapter to supply your MIL BOOK 1000 with power form an external source The MIL BOOK 1000 can either be On or Off when connecting or disconnecting the AC adapter Item 3 Figure 2 3 shows how to connect the power adapter Make sure the mating connector is tightly sec...

Page 34: ...dle outwards about 3 cm Do not force it out any further as it might damage the unit 5 Using both hands gently slide the entire FDD CD ROM DVD COMBO DVD RW module out form the bay 1 compartment 2 3 3 1 Replace the FDD CD ROM DVD COMBO DVD RW Using both hands gently insert the FDD CD ROM DVD COMBO DVD RW module back into the bay 1 compartment Continue to slide it in unit it seats firmly in place Be ...

Page 35: ...C card Since both type II slots are co located in the same opening one type III PC card can be inserted instead of two type II PC cards The type III PC card occupies both slots The MIL BOOK 1000 supports hot insertion You can insert the PC card into the slot while the system is powered On 1 Open the PCMCIA slot diskette drive door 2 Slide the card into the slot with the insert marking facing up un...

Page 36: ...ptive screws securing the access door 3 Use the handle on the access door to carefully pull the HDD module out and away from the MIL BOOK 1000 See Fig 2 8 4 Insert the new Hard module into the slot Gently push the HDD module in until it seats firmly in place Secure the captive screws on the access door Turn the power back On to the MIL BOOK 1000 5 If necessary run the system configuration utility ...

Page 37: ...e Compatible With 3 3V and 5V PCI Signaling Environments Compliant to Latest PCI Specification PCI 2 2 PCI Power Management Compliant c Cable Power Presence Monitoring Low Cost 24 576MHz Crystal Provides Transmit Receive Data at 100 200 400 Megabits per Second and Link Layer Controller Clock at 49 152 MHz Fully Interoperable with FireWire Implementation of IEEE Standard 1394 Provides 6 Pin IEEE139...

Page 38: ...should be put close to the computer side for best performance 2 EMI Cable There are two same EMI cables One is for the microphone port and the other is for the speaker port The male connectors are connected to the microphone and speaker ports and the female connectors are connected to the microphone and speaker s 3 Modem Cable One modem cable together with the EMI core is used for the modem port N...

Page 39: ...partment 2 Plug the connector from the AC adapter into the external power port on the rear panel of the MIL BOOK 1000 Now plug the power cord into the adapter 3 Plug the other end of the power cord into grounded 3 prong wall outlet of power strip 4 Turn On the MIL BOOK 1000 2 4 1 Installing Software Drivers To take full advantage of the unique features of your computer some operating systems requi...

Page 40: ...ts Windows 2000 and Windows XP only The available items may differ according to your computer model and Operating System NOTE If driver CD version is not the same as the one shown on the Operation Manual please refer to the User Guide file on the driver CD for the latest driver installation action steps and sequence 2 4 2 Install Device Driver for Windows 2000 Windows XP To install the necessary d...

Page 41: ... main chipset driver installing the device drivers 10 Touchscreen Allows you to use your fingers as a pointing device on the LCD screen refer to the next section for further instructions 2 4 3 Install Touch Screen Driver for Windows 2000 1 Insert the driver CD into the drive 2 Click on TOUCH SCREEN then WIN2000 and follow the onscreen instructions to continue 3 When finished installing select Yes ...

Page 42: ...NUAL 2 12 Figure 2 12 Installing Drivers 2 4 5 Install Touch Screen Driver for Windows XP Hardware Install Figure 2 13 Windows 2000 Driver 1 Insert the driver CD to the CD drive to bring up the following screen Select WINXP ...

Page 43: ...3 Figure 2 14 Control Panel 2 When the TSRC XP htm file appear then select START Control Panel button Figure 2 15 Performance and Maintenance 3 When the Control Panel screen appears then click on performance and Maintenance button ...

Page 44: ...gure 2 16 System Properties 4 When the Performance and Maintenance screen appear and then click on System button Figure 2 17 Device Manager 5 When the System Properties screen appear and then click on Hardware and Device Manager button ...

Page 45: ...wn Device Properties 6 When the Device Manager screen appear then click on Unknown device and then click on the Properties icon Figure 2 19 Reinstall Driver 7 When the Unknown Device Properties screen appear and then click on Reinstall Driver button ...

Page 46: ...ardware Update Wizard 8 When the Hardware Update Wizard appears click on Install the software automatically Recommended then click on Next Figure 2 21 Hardware Installation 9 When the Hardware Installation screen appears click on Continue Anyway ...

Page 47: ...2 Finish 10 When the Hardware Update Wizard screen appears click on Finish button Figure 2 23 PenMount DMC9000 Properties 11 When the PenMount DMC9000 and DMC9100 Properties screen appears click on Close button to exit the driver installation ...

Page 48: ...if this is the first time to run this setup 5 When the Install Shield Wizard appears click on Next to continue 6 Select I accept the terms in the license agreement then click on Next 7 When the Ready to Install the Program screen appears click on Install to continue 8 Reboot the system 9 After the system has restarted click on the PM icon located on the lower right portion of your taskbar to bring...

Page 49: ...ction discusses expected daily notebook activity 2 5 1 Starting the Computer To start the computer 1 Make sure all peripherals are properly connected 2 If using the AC adapter or external power make sure it is connected 3 Open the cover 4 Press the Power button The power on indicator lights up The computer performs a Power On Self Test POST and checks configuration settings Depending on the config...

Page 50: ...irmation the system tries to boot from O S 2 Adjust brightness and viewing angle for best appearance and comfort 2 5 2 Turning Off The Notebook To turn off the notebook 1 Save all data and close all open programs 2 Press the Power button to turn off power 3 Swing the cover closed until it clicks shut 4 Turn off and disconnect all peripheral devices 5 Close and tighten all access doors and covers 2...

Page 51: ...ing AC External Adapter A Series provides an AC external adapter for standard configuration Use the nearby AC power source To save battery power use power adapter with an external power source whenever possible Tips for using the external power adapter 1 Connect the external adapter to the computer as the main power source no matter when the computer is in use or not 2 If the external adapter is n...

Page 52: ...rged before shipment it gradually loses its battery power during transit and storage Step 1 Please charge battery for six hours before turn on the computer Step 2 If the computer has not been operated for last six months Please repeat step 1 2 7 Running On Battery Power The notebook has several power management features to prolong continuous operation on battery power This section describes the po...

Page 53: ...plementary Metal Oxide Semiconductor RAM A RTC backup battery backs up CMOS RAM data You may need to run SCU when You see an error message on the screen requesting you to run SETUP You change factory default settings for some special features You want to modify some specific setting to optimize system performance 3 2 Running SETUP and Moving Around NOTE 1 All the SCU screens shown in this chapter ...

Page 54: ...s help information of the selected item The bottom lines of the screen give keyboard instructions for moving around and making selections 3 2 2 Moving Around and Making Selections A brief description of keyboard usage is listed next Key Function Key Function Selects a menu title Selects an item or option Enter Opens or closes the options window when an item is selected Space bar Cycles through the...

Page 55: ... category from the menu bar if you wish to change these settings A description is provided for each option listed on the pull down menu Figure 3 2 Main Menu 3 2 2 2 Date and Time The Date and Time option allows you to reset the current date and time for your system When this option is selected the submenu will displayed as show below Figure 3 3 Date and Time ...

Page 56: ... a number keys on the internal keyboard When disabled the Internal Num Lock of the BIOS setup then turn on the Num lock on keyboard internal keyboard is not available for entering but external ones A check mark indicates Enabled an underline _ indicates Disabled The default setting is Disabled Figure 3 4 Internal Num Lock 3 2 2 4 USB Emulation Enables or disables the USB devices in DOS mode The de...

Page 57: ...t need dark at power on status then select the Keyboard Backlight setting is Disable The Fn F8 function can toggle Backlight of the keyboard light or dark but Fn F8 can t effect the CMOS Setup of the Keyboard Backlight item Figure 3 6 Keyboard Backlight 3 2 2 6 Advanced Menu The Advanced pull down menu as shown below contains the I O configuration settings of the system Figure 3 7 Geyserville Supp...

Page 58: ...ile still maintaining a high performance If this item is enabled the CPU will automatically change its speed whenever necessary based on the Power Scheme setting in Windows s Control Panel If this item is disabled the CPU will always run in the lowest speed Figure 3 8 Geyserville Support 3 2 2 8 Share Video Memory Sets the shared memory size of the video controller The options are 4M 8M 16M and 32...

Page 59: ...to the type of device with which the notebook is to communicate Figure 3 10 IR Ports 3 2 2 10 COM Ports The COM Port item allows you to assign COM1 to specific functions that you wish to use In general COM1 3F8 IRQ4 can be assigned to RS 232 the serial port or touch screen User select the TouchScn 3E8 IRQ5 was assigned COM 3 to Touch Screen User select the Disabled was assigned COM 4 Figure 3 11 C...

Page 60: ...this item is selected the submenu displays as shown below Figure 3 12 LPT Port 3 2 3 Security Menu The Security pull down menu as shown below contains the Security settings that safeguard your system against unauthorized use Figure 3 13 Security Menu The followings describe in sequence all the items of the Security menu ...

Page 61: ...Enable Password to Power on sub item is enabled the set password is always required to boot the computer 3 2 3 2 Hard Disk Boot Sector Sets if a warning message will appear when the hard disk boot sector partition table has been changed A check mark indicates enabled while an underline _ indicates disabled The default setting is disabled Figure 3 15 Hard Disk Boot Sector CAUTION sets this item to ...

Page 62: ...ow Figure 3 16 Boot Menu Sets the first second third and fourth booting device The system will try to boot from the first device but if it is not available will try the next boot device If you set the first boot device to LAN the system will boot from the LAN server first The optionals are Hard Disk C CD ROM Drive Diskette A and LAN The default setting is Diskette A Hard Disk C CD ROM Drive then L...

Page 63: ... exit SCU so that the settings can take effect Figure 3 17 Exit Menu Descriptions of the Exit choices are 1 Save Change and Exit Save changes you have made and exit 2 Discard Changes and Exit Exit without saving the changes you has made 3 Get Default Values Load factory default values for all the items 4 Load Previous Values Restore previous values for all the items ...

Page 64: ...d consistent work habits Set the power management features according to your style For example if you do not read from or write to the hard disk very often set the hard disk time out setting to a very short time Plan each computing session ahead of time Don t waste valuable time and power thinking about what to do Disable the cache if you do not need it 4 3 2 Changing the Battery Pack To change th...

Reviews: