


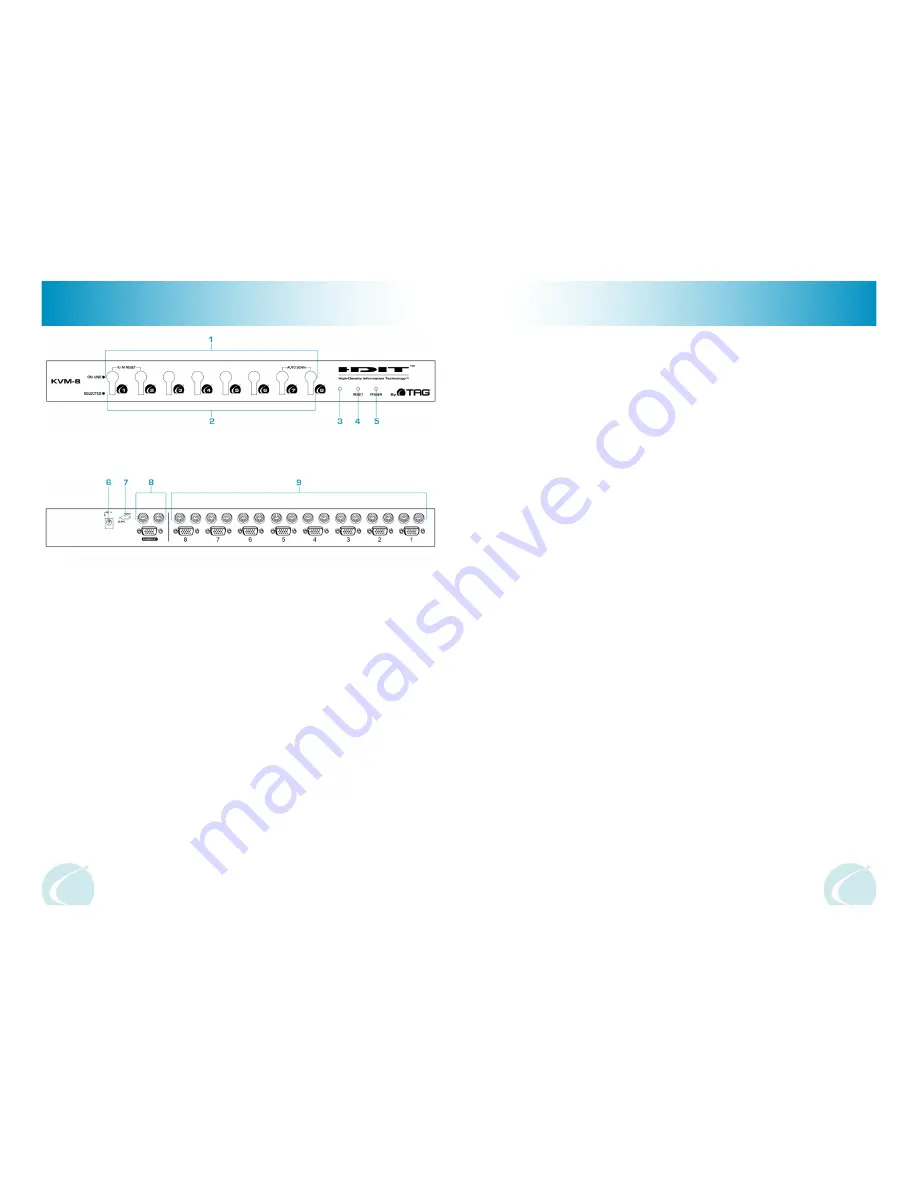
Front Panel
1.
Port LEDs - On Line: Lights ORANGE to indicate that the PC attached to the corresponding port
is up and running. If the LED is flashing, it indicates that the Port is being used for Cascading to
another TAG® KVM-8. Selected: Lights GREEN to indicate the currently selected port. The LED
is steady under normal conditions, but flashes when its port is accessed under Auto Scan mode.
2.
Port Selection Switches - Press a switch to access the PC attached to the corresponding port.
Pressing Buttons 1 and 2 simultaneously for 3 seconds performs a Keyboard and Mouse reset;
pressing Buttons 7 and 8 simultaneously starts Auto Scan Mode.
3.
Sound Opening - System sounds (beeps, etc.), are emitted from this opening.
4.
Reset Button - To reset the TAG® KVM-8, use a thin object (such as the end of a paper clip, or
a ballpoint pen), to press this recessed switch in to initiate a warm reset. If the switch is kept in
for longer than three seconds, a cold reset takes place.
5
. Power LED - Lights to indicate that the TAG® KVM-8 is receiving power.
Rear Panel
6.
Power Jack - The power adapter plugs in here.
7.
Root/Slave Switch - Slide this switch to the ROOT position if this unit is the first station on the
installation (i.e., the one that the monitor, mouse, and keyboard plug into). Slide this switch to the
SLAVE position if this unit is daisy chained down from a higher TAG® KVM-8 unit.
8.
Console Port Section - If this is a first station unit, your monitor, keyboard and mouse plug in
here. If this is a daisy chained unit, the cables that link back to a port on a higher TAG® KVM-8
unit plug in here.
9.
CPU Port Section - The cables that link to the PCs plug in here.
Figure 3 - Front Panel
Figure 4 - Rear Panel
11
2
Front & Rear Panels
On-Screen Display (OSD) Security
Access authorization
In order to prevent unauthorized access to the computers, OSD provides two security features: Pass-
word; and Lock/Unlock Console. If a password is set, the console can only be locked/unlocked, by
first specifying the password. When the console is locked, only the current monitor screen displays.
Attempts to input information from the console has no effect; attempts to switch to a different port,
either from the console or by pressing the manual switches have no effect, either. The only way to
regain access to the computers is by unlocking the console.
Password
To set a password:
1 - Highlight this item, then press [Enter]. You are presented with a screen that allows you to key in
your own password. The password may be up to 15 characters long, and can consist of any combina-
tion of letters and numbers (A - Z, 0 - 9).
2 - Key in the new password, then press [Enter]. You are asked to key in the password again, in order
to confirm that it is correct.
3 - Key in the new password again, then press [Enter]. If the two entries match, the new password
is accepted and the screen displays the following message:
PASSWORD OK
If the entries do not match, the screen displays the message:
INVALID PASSWORD
In which case you must start again from the beginning.
Note:
To modify or delete a previous password, use the backspace key to erase individual letters or
numbers, or, with the cursor at the beginning of the password, press the [Spacebar] to erase the
entire password at once.
Lock/Unlock Console
To lock/unlock the console:
1 - Highlight this item, then press [Enter].
If no password has been set, the system locks the console (if it is unlocked), or unlocks the console
(if it is locked).
To acknowledge the change, the buzzer sounds three times, and one of the following messages dis-
plays on the screen for three seconds; ‘LOCK OK’ (if the console has been locked), or ‘UNLOCK OK’
(if the console has been unlocked).
When the Console is Locked, a zzz displays in front of the Port ID on the monitor to indicate so.
2 - If a password has been set (see above), a password entry screen appears. Key in the password,
then press [Enter]. If the password is correct, the system locks/unlocks the console as in step 1
If the password in incorrect, the message: “INVALID PASSWORD’ Displays for three seconds. After
it disappears, you can try again.


