24
TAD-M600
1
2
3
4
A
B
C
D
E
F
1
2
3
4
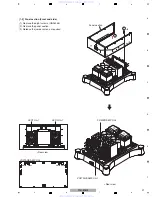
(1) Remove the
V
OLTAGE AMP Unit together with
the plate. (See “
g
V
OLTAGE AMP Unit”.)
(2) Remove the three screws for the K
N
402,
K
N
403, and K
N
404 then remove the cords
(CDE9062, CDE9063, and CDE9069).
(6) Remove the 27 screws from the all soldered
power transistors (Q401 to Q412, Q451 to
Q462, Q491 and Q492) and the posistor
(TH490).
(7) Remove the six screws then remove the
POWER AMP Unit from the heatsink.
Note on reassembly:
When reassembling, align the sheets (C
NN
3122)
squarely beneath the transistors.
• Rear view
• Bottom view
POWER AMP Unit
3
3
3
PROTECTIO
N
Unit
Heatsink
Heatsink
2
2
Q401
Q402 Q404 Q406 Q408 Q410 Q412
Q462 Q460 Q458 Q456 Q454 Q452 TH490
Q491
Q492
Q403 Q405 Q407 Q409 Q411
KN592
KN403
KN402
KN591
CN503
CN502
CN501
Q461 Q459 Q457 Q455 Q453 Q451
4
5
5
5
5
5
5
7
5
5
6
7
7
7
7
7
4
2
KN404
×
14
6
×
13
POWER AMP Unit
POWER AMP Unit
(3) Remove the C
N
501, C
N
502, and C
N
503 from
the
PROTECTIO
N
Unit.
(4) Remove the two screws for the K
N
591 and
K
N
592 from the PROTECTIO
N
unit then
remove the cords (CDE907
8
and CDE9079).
(5) Remove the eight screws then remove the
heatsink from chassis.
www. xiaoyu163. com
QQ 376315150
9
9
2
8
9
4
2
9
8
TEL 13942296513
9
9
2
8
9
4
2
9
8
0
5
1
5
1
3
6
7
3
Q
Q
TEL 13942296513 QQ 376315150 892498299
TEL 13942296513 QQ 376315150 892498299


