


Introduction
Congratulations on the purchase of your new appliance . You have selected a high- quality product .
The operating instructions are part of this product . They contain important information on safety, use
and disposal . Before using the product, familiarise yourself with all operating and safety instructions .
Use this product only as described and only for the specified areas of application . Please also pass
these operating instructions on to any future owner(s) .
Proper use
This appliance is suitable for straight and curved cuts as well as mitre cuts of up to 45° on angular
workpieces made of plastic, wood and light metal . This appliance is exclusively intended for private use
in dry rooms . Observe the information on saw blade types . Any other usage of or modification to the
appliance is deemed to be improper usage and carries the risk of serious personal injury .
The manufacturer accepts no responsibility for damage(s) arising out of usage contrary to the instruc-
tions specified below .
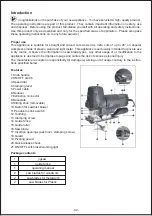
Features
Package contents
Technical details
General Power Tool Safety Warnings
WARNING!
►Read all safety warnings and all instructions. Failure to follow the warnings and instructions may result
in electric shock, fire and/or serious injury .
Save all warnings and instructions for future reference.
The term “power tool” in the warnings refers to your mains-operated (corded) power tool or battery-
operated (cordless) power tool .
1 .
a)
b)
c)
2 .
a)
b)
c)
d)
e)
f)
3 .
a)
b)
c)
d)
e)
f)
g)
4 .
a)
b)
c)
d)
e)
f)
g)
5 .
a)
Safety instructions specifically for jigsaws
■
■
■
■
■
■
■
Work area safety
Keep work area clean and well lit. Cluttered or dark areas invite accidents.
Do not operate power tools in explosive atmospheres, such as in the presence of flam- mable
liquids, gases or dust. Power tools create sparks which may ignite the dust or fumes.
Keep children and bystanders away while operating a power tool. Distractions can cause you to lose
control.
Electrical safety
Power tool plugs must match the outlet. Never modify the plug in any way. Do not use any adapter
plugs with earthed (grounded) power tools. Unmodified plugs and matching outlets will reduce risk
of electric shock.
Avoid body contact with earthed or ground- ed surfaces, such as pipes, radiators, ranges and
refrigerators. There is an increased risk of electric shock if your body is earthed or grounded.
Do not expose power tools to rain or wet conditions. Water entering a power tool will increase the
risk of electric shock.
Do not abuse the cord. Never use the cord for carrying, pulling or unplugging the power tool.
Keep cord away from heat, oil, sharp edges or moving parts. Damaged or entangled cords increase
the risk of electric shock.
When operating a power tool outdoors, use an extension cord suitable for outdoor use. Use of a cord
suitable for outdoor use reduces the risk of electric shock.
If operating a power tool in a damp location is unavoidable, use a residual current device (RCD)
protected supply. Use of an RCD reduces the risk of electric shock.
Personal safety
Stay alert, watch what you are doing and use common sense when operating a power tool. Do not
use a power tool while you are tired or under the influence of drugs, alcohol or medication. A moment
of inattention while operating power tools may result in serious personal injury.
Use personal protective equipment. Always wear eye protection. Protective equipment such as dust
mask, non-skid safety shoes, hard hat, or hearing protection used for appropriate conditions will
reduce personal injuries.
Prevent unintentional starting. Ensure the switch is in the off-position before connecting to power
■
■
■
■
■
■
■
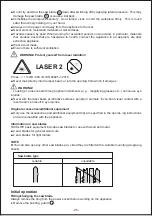
WARNING! Protect yourself from laser radiation!
P max.: < 1 mW•λ: 650 nm•EN 60825-1:2014
■
WARNING!
Looking at a laser beam through optical instruments (e .g . magnifying glasses etc .) can cause eye
injuries .
■
Original accessories/additional equipment
■
Information on saw blades
TACKLIFE basic equipment includes saw blades for use with wood and metal .
■
■
NOTE
►
You can also use any other saw blades pro- vided they are fitted with a suitable mounting (single-lug
shank) .
Initial operation
Fitting/changing the saw blade
Always remove the plug from the power socket before working on the appliance.
♦
source and/or battery pack, picking up or carrying the tool. Carrying power tools with your finger on
the switch or energising power tools that have the switch on invites accidents.
Remove any adjusting key or wrench before turning the power tool on. A wrench or a key left
attached to a rotating part of the power tool may result in personal injury.
Do not overreach. Keep proper footing and balance at all times. This enables better control of the
power tool in unexpected situations.
Dress properly. Do not wear loose clothing or jewellery. Keep your hair, clothing and gloves away
from moving parts. Loose clothes, jewel- lery or long hair can be caught in moving parts.
If devices are provided for the connection of dust extraction and collection facilities, ensure these are
connected and properly used.
Use of dust collection can reduce dust-related hazards.
Power tool use and care
Do not force the power tool. Use the correct power tool for your application. The correct power tool
will do the job better and safer at the rate for which it was designed.
Do not use the power tool if the switch does not turn it on and off. Any power tool that can- not be
controlled with the switch is dangerous and must be repaired.
Disconnect the plug from the power source and/or the battery pack from the power tool before
making any adjustments, changing accessories, or storing power tools. Such preventive safety
measures reduce the risk of starting the power tool accidentally.
Store idle power tools out of the reach of children and do not allow persons unfamiliar with the power
tool or these instructions to operate the power tool. Power tools are dangerous in the hands of
untrained users.
Maintain power tools. Check for misalignment or binding of moving parts, breakage of parts and any
other condition that may affect the power tool’s operation. If damaged, have the power tool repaired
before use. Many accidents are caused by poorly maintained power tools.
Keep cutting tools sharp and clean.
Properly maintained cutting tools with sharp cut- ting edges are less likely to bind and are easier to
control.
Use the power tool, accessories and tool bits etc. in accordance with these instructions, tak- ing into
account the working conditions and the work to be performed. Use of the power tool for operations
different from those intended could result in a hazardous situation.
Service
Have your power tool serviced by a qualified repair person using only identical replace- ment parts.
This will ensure that the safety of the power tool is maintained.
Hold the electric tool by the insulated handles when you are carrying out work during which the
electric tool may come into contact with concealed power cables or its own power cable. Contact
with a live cable may also cause metal parts of the appli- ance to become live and lead to electric
shock.
Keep your hands away from the sawing area . Do not reach underneath the workpiece . Contact with
the saw blade may result in injury.
Keep your hands away from the stroke rod and the quick-release chuck. Contact with these compo-
nents may result in a crushing injury.
Always switch on the electrical power tool before applying it to the workpiece . Otherwise, there is a
risk of a kickback.
When sawing, ensure that the baseplate
⑧
is in contact with the workpiece.
After completing your work, switch the electric tool off and do not pull the saw blade out of the
cut until the tool has come to a standstill . This avoids kickbacks, and allows you to put the tool down
safely.
Only use undamaged saw blades that are in perfect working order . Bent and blunt saw blades can
break or cause a kickback.
LASER 2
♦
♦
♦
■
♦
Fitting the guide fence
The guide fence can be fixed on the left or right of the appliance .
♦
♦
♦
Connecting the sawdust extraction appliance
♦
♦
Fitting the sliding shoe
When working on sensitive surfaces, you can fit the sliding shoe on the baseplate to avoid scratch-
ing the surface .
♦
♦
Operation
Setting the cutting angle
♦
♦
♦
NOTE
►
With a cutting angle of 30 ° / 45 °, the pivoting guard must be removed beforehand! If the baseplate
cannot be locked well by clamping lever , remove the extraction connector,then tighten the clamping
screw with hex key .
Setting the stroke rate
♦
Setting the pendulum stroke
♦
Switching on/off
Switching the appliance on:
Slide the ON/OFF switch forward to the position “I” .
Switching the appliance off:
Slide the ON/OFF switch backward to the position “0” .
Switching the laser/working light on/off
On/off switch:
Press the ON/OFF switch until the required function is active .
LASER and WORKING LIGHT → WORKING LIGHT → LASER → SWITCH OFF
Do not try and slow the saw blade down after switching off by applying lateral pressure . This may
damage the saw blade or cause a kickback .
Immobilise the workpiece securely . Use clamps/ vices to hold the workpiece firmly . This is much
safer than simply holding it in your hand.
Always run the power cord away from the appliance to the rear.
Never work on moistened materials or wet surfaces.
Hazards caused by dust! When working for extended periods on wood and, in particular, materials
that produce dusts that are hazardous to health, connect the appliance to an appropri- ate dust
extraction appliance.
Wear a dust mask.
Ensure there is sufficient ventilation.
Never look directly into the laser beam or into the opening from which it emerges .
Never aim the laser beam at reflective surfaces, people or animals . Even brief visual contact with a
laser beam can result in eye injuries.
Only use the accessories and additional equipment that are specified in the operat- ing instructions
and are compatible with the appliance.
4 saw blades for general wood cuts
2 saw blades for light metals
Remove the pivoting guard .
Saw blade type
suitable
unsuitable
Sawdust blowing function
Switching the sawdust blower on:
♦
Supporting the extraction function:
♦
Maintenance and Cleaning
WARNING! RISK OF INJURY!
Switch the appliance off and remove the power plug before starting any work.
■
■
WARNING!
■
If the mains power cord of the device is dam- aged, it must be replaced with an original wire which is
available at the manufacturer or costumer service .
■
■
■Remove any dirt (e .g . sawdust) . If necessary, clean the saw blade mounting with a brush or blow it
out with compressed air .
Warranty
The warranty provided for this appliance is
2 years from the date of purchase. This appli- ance has been manufactured with care and inspected
meticulously prior to delivery. Please retain your receipt as proof of purchase.
The warranty covers only claims for material and manufacturing defects, not for transport damage, worn
parts or for damage to fragile components, e .g . switches or batteries . This appliance is intended solely
for private use and not for commercial purposes .
The warranty is deemed void if this product has been subjected to improper or inappropriate han- dling,
abuse or modifications that were not carried out by one of our authorised service centres . Your statutory
rights are not restricted in any way by this warranty .
The warranty period is not prolonged by repairs made under the warranty . This also applies to replaced
and repaired parts . Damage and defects present at the time of purchase must be reported immediately
after unpacking, or no later than two days after the date of purchase.
Disposal
Turn the quick-release chuck and hold it in this position.
Press the required saw blade into the quick- release chuck as far as the limit stops.
Release the quick-release chuck – it must return to its initial position.The saw blade is now locked.
WARNING! The saw blade teeth must point forwards at this point (see foldout page)!
Replace the pivoting guard back onto the device.
Undo both the clamping screws on the insertion openings .
Push the guide fence into the insertion openings .
Retighten the two clamping screws.
Push the reducer into the extraction connector until it is secured.
Attach an approved dust and sawdust extractor to the reducer or extraction connector directly.
Mount the sliding shoe onto the baseplate and press it up at the back until it clicks into place
on the baseplate .
To remove the sliding shoe, unfasten it at the rear of the baseplate and slide it off forwards .
Push the clamping lever forward and pull the baseplate to the rear .
Adjust the cutting angle to 0°/15°/30°/45° with the aid of the markings on the baseplate . Push the
baseplate to the front so that the locking pin engages in the toothing .
Push the clamping lever backwards .
Use the speed diall to set the required stroke rate.
You can use the pendulum stroke switch to set the pendulum movement of the saw blade .
You can achieve fine, clean cut edges without pendulum movement (setting “0”) . Switch the pendu-
lum movement off when working on thin workpieces . You can achieve an increasingly fast workrate
with activated pendulum stroke (settings 1–3) .
18
15
15
Slide the sawdust blower switch in the position .
Slide the sawdust blower switch in the position “0” .
The appliance must always be clean, dry and free from oil or grease .
To clean the casing, use a soft dry cloth .
Replace the saw blade as soon as its teeth are blunt and proper sawing is therefore no longer possible.
Clean the appliance after completing your sawing work .
- 05 -


