digicard-AUT User Instructions
Page - 2
digiConnect Windows® Software Installation
digiConnect Installation
2
digicard-AUT hardware
3
digicard-AUT configuration using digiConnect
4-5
Company Card Key Generation (digiCentral)
6
Connection Testing and Authentication
7
Table of contents
Minimum Recommended PC Specification
Processor: Intel P4 1.4GHz, AMD Athlon 1.4 GHz
Memory: 512MB
Hard disk: 40 GB
Video Resolution: 1024 x 768
Operating Systems: Windows 10
Installing digiConnect:
1.
Insert the free USB Flash drive into your PC. Browse to the disk drive
using Windows® Explorer and double-click DigiConnect-Setup.exe.
Alternatively, download the latest version from www.tachosys.com.
2.
Select your desired installation language and then click ‘Next’.
3.
You will receive a welcome message, simply click ‘Next’.
4.
Read the terms of the Licence Agreement then click on the ’I accept the
terms in the Licence agreement’ option and then click ‘Next’. If you
choose to not accept the terms the installation will be terminated.
5.
Choose the folder you wish the software program files to be installed.
The default folder is the standard location for Windows® programs.
6.
Click ‘Install’ to begin the installation. This may take several minutes.
7.
Leave the box labelled ‘Launch digiConnect’ ticked and click ‘Finish’.
8.
If you opted to launch DigiConnect at the end of the installation then
you will be taken to the main options menu to configure your individual
settings.
9.
Upon completion, you will see the DigiConnect icon appear in the Task
Bar and the system tray. You can now remove the USB flash drive.
Important: do not connect the digicard-AUT before commencing the software
installation.
digiConnect Windows® Software - V5.00 onwards
digicard-AUT User Instructions
Page - 3
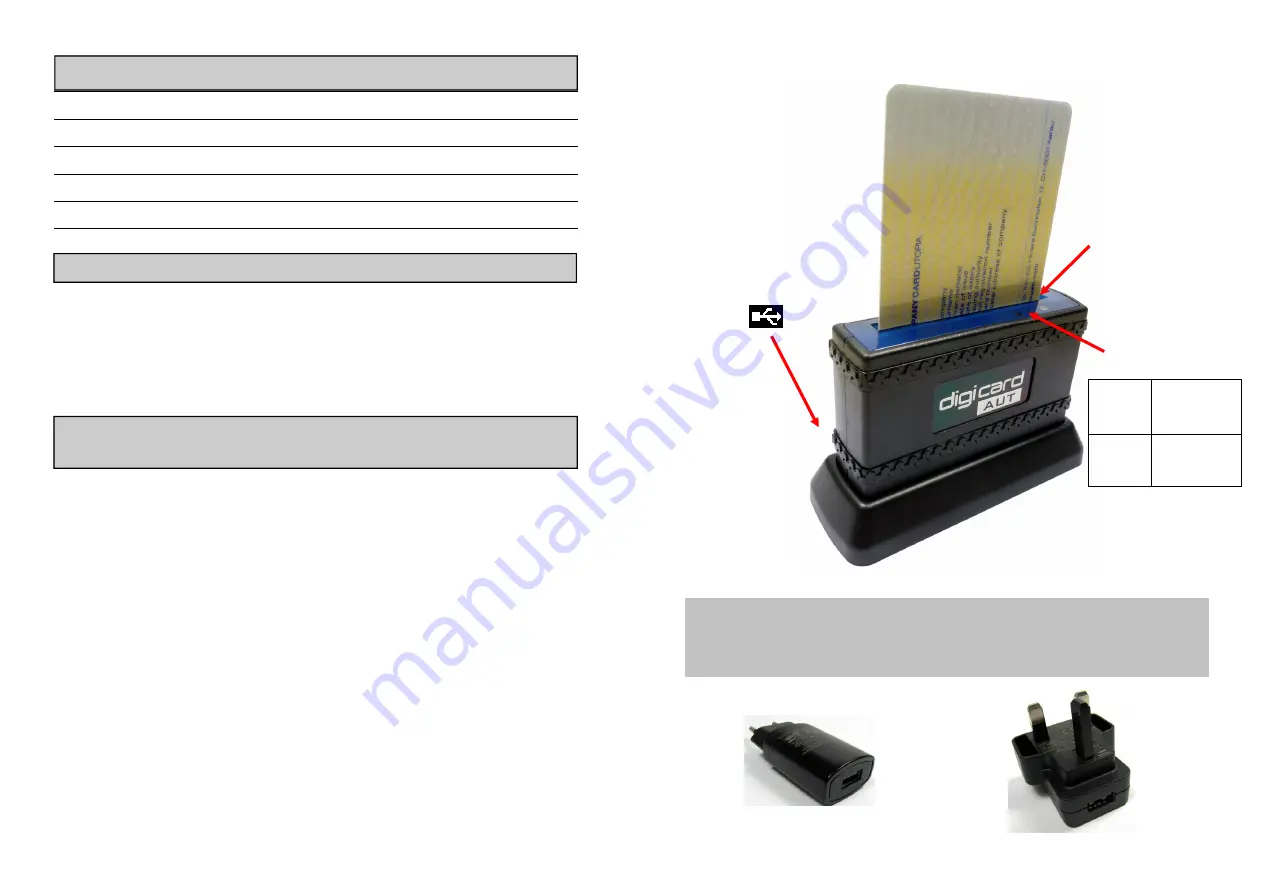
Digicard-AUT Hardware
OR
When plugging into the wall, ensure that you use the 5v USB
power supply provided. Using other USB power supplies may
invalidate your warranty.
USB cable. Connect
to a PC (for
configuration) or
using the supplied
5v USB power
supply for power.
Card slot. Insert
card with chip
facing LED
indicators
LED indicators
RED
/
GREEN
Power and
activity
BLUE
WiFi
Connection
Summary of Contents for Digicard AUT
Page 1: ......


