background image

56 

Pairing the FD 100 Radio Remote Control 


General 


The 

MP 3100 HV

  is  designed  for  use  with  the 

FD 100

  bi-directional  radio 

control  handset.  The 

FD 100

  features  an  integral  full-colour  screen  which 

provides  a  convenient  means  of  controlling  virtually  all  the 

MP 3100 HV`s


functions, even when there is no direct line-of-sight contact with it. The handset 
can  also  display  information  relating  to  the  selected  source  or  the  medium 
currently playing. 


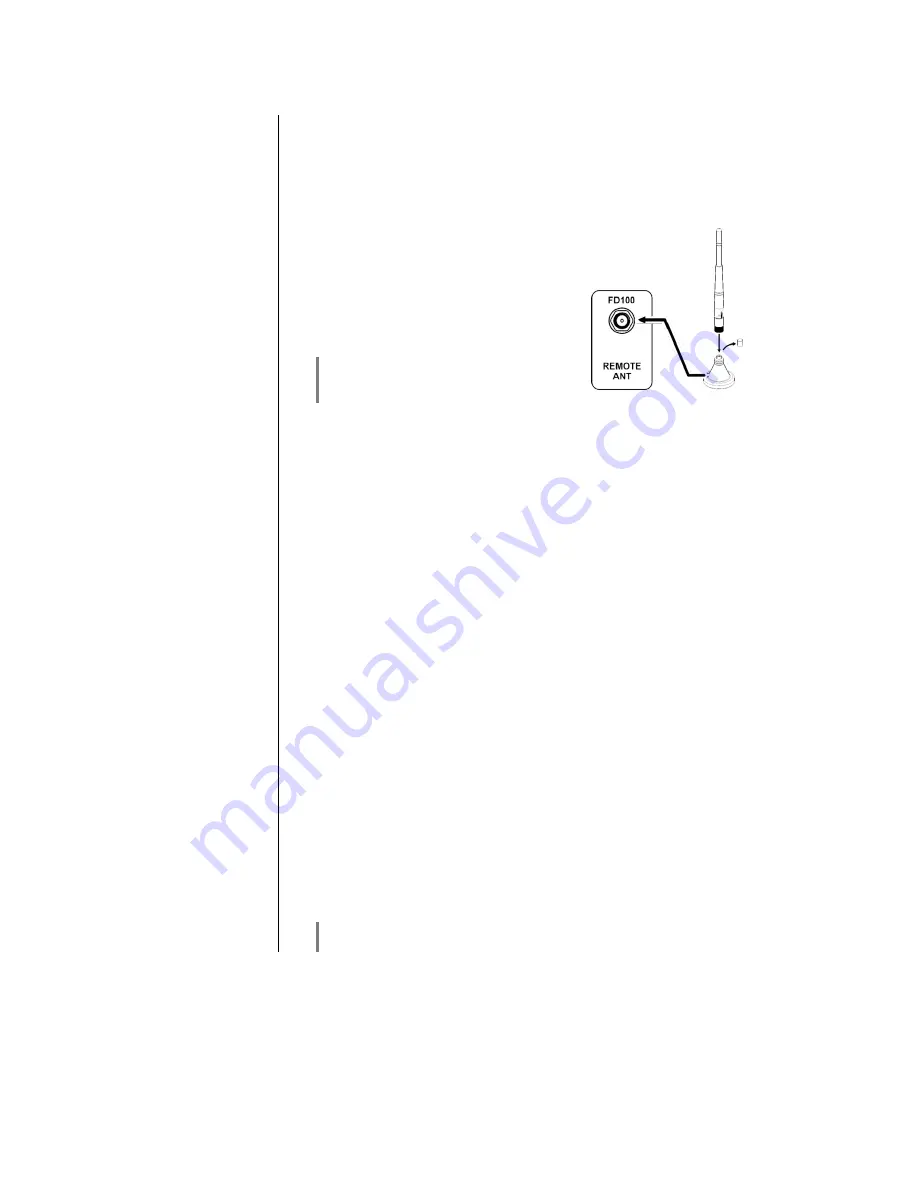
Connecting the radio aerial 


Since  the 

FD 100

  operates  by  a  radio 

link,  an  aerial  must  be  connected  to  the 

MP 3100 HV

.  This  is  plugged  into  the 

socket  on  the 

MP 3100 HV

  marked 

‘REMOTE  ANT’

  (please  see  wiring 

diagram).  The  aerial  should  be  set  up 
free-standing  using  the  magnetic  base 
supplied  in  the  set;  this  ensures 
maximum possible range. 


Please  use  one  of  the  WLAN  aerials 
supplied  in  the  set;  the  aerials  are 
identical. 


Pairing the FD 100 


Before the 

MP 3100 HV

 can be controlled using the FD 100, the remote control 

handset must first be registered to the 

MP 3100 HV

. This process is known as 

pairing, and only has to be carried out once. The procedure is as follows: 

  Briefly  touch  the 

  button  on  the 

MP 3100 HV

  front  panel  to  call  up  the 

menu. Then select the menu item

'FD 100

 pairing'. 

  Activate this selection by pressing the SELECT knob and confirm the paring 

procedure  by  pressing  the  knob  until  the  display  message  changes  to.


'Waiting for FD 100'

   The  pairing  now  function  remains  active  for  thirty  seconds.  Carry  out  the 

following steps within this time. 

  Locate the 

 button on the 

FD 100

 and hold it pressed in to open the 

FD 

100’s 

System Settings menu. 


Now select the ‘Start pairing’ item, and press the 

 button: the remote 

control handset automatically seeks the 

MP 3100 HV

  Once  the  device  is  found,  you  will  see  in  the  display header the on-screen 

message ‘Pairing successful’. At the same time changes the menu entry of 
the

  MP 3100 HV

  to  'Done'.  If  you  wish,  you  can  change  the  name  of  the 

device at this point (e.g. 'Living room'). 

  Confirm the name with the 

 button. 

  For faster access the 

MP 3100 HV

 can also be assigned to a Hotkey; this is 

the next step (see 

FD 100

 operating instructions). 

  Select one - or optionally none - 

of the ‘F’ buttons, and confirm your choice 

by pressing the 

 button. 

  The 

FD 100

 is now paired with the 

MP 3100 HV

, and is ready for use. 


For  detailed  information  on  using  the 

FD 100

  please  refer  to  the  operating 

instructions supplied with the remote control handset. 

Summary of Contents for MP 3100 HV

Page 1: ...Software Version V 1 0 Order No 9103 0531 UK USER MANUAL HV SERIES MP 3100 HV...

Page 2: ...2...

Page 3: ...and PVC in particular in the design of our products Instead we rely upon metals and other non hazardous materials metal components are ideal for recycling and also provide effective electrical screen...

Page 4: ...time to time The update process takes only a few minutes See the chapter entitled Software update for how to update your device via the internet connection We recommend you to check for updates before...

Page 5: ...remote control 21 Operation with controls on the front panel of the device 21 Favourites lists 22 General information 22 Calling up the Favourites list 22 Adding a favourite 22 Erasing a favourite fro...

Page 6: ...er as source 36 Inserting a CD 36 Playing a CD 37 Variations 37 Track Select During playback 37 Playback mode 37 Fast Search 37 Special features with Super Audio CD SACD 38 General information 38 Sett...

Page 7: ...d Ethernet LAN or Power Line LAN connection 54 Setting the Parameters for a Wired Network 54 The Configuration for a WLAN connection 55 Setting the parameters for a wireless network 55 Searching for a...

Page 8: ...ature the DSD format involves a noise floor which rises above the range of human hearing as frequency rises Although this noise floor is not directly audible it does subject the treble units in the lo...

Page 9: ...accuracy since these points are much more widely spaced in comparison with DSD To this end the MP 3100 HV employs a polynomial interpolation process Bezier Spline interpolation developed in house at...

Page 10: ...he button remains dimly lit even in stand by mode to indicate that the MP 3100 HV is ready for use Caution The button is not an isolation switch Certain parts of the machine remain connected to mains...

Page 11: ...rograms Operating buttons Calls up the Favourites list Brief touch Switches the display view from list navigation to the current played music track switches the CD Radio Text on and off Long touch Swi...

Page 12: ...type of music currently being played The basic areas of the screen Display field a shows the currently active source Display field b shows information relating to the piece of music being played The...

Page 13: ...music track Pause indicator Buffer display fullness indicator memory display and data rate indicator if available The higher the data rate the better the quality of reproduction Display of the elapsed...

Page 14: ...12 meters Obstacles like walls or furniture can decrease the operating distance The aerial should be set up free standing using the magnetic base supplied in the set this ensures maximum possible rang...

Page 15: ...Favourites list DISC Activates playback programming Adds a track to the playback program during playback programming Long press Removes a favourite from the Favourites list DISC A Long press erases th...

Page 16: ...firm your choice then adjust the value by rotating the knob After making the adjustment press the SELECT knob again to adopt the new setting You can interrupt the process at any time by touching the b...

Page 17: ...n brightness At this point you can adjust the brightness of the integral screen to suit your personal preference for normal use We recommend that brightness settings 6 and 7 should only be used when t...

Page 18: ...wish to use then confirm your choice with the button Now use the alpha numeric keypad of the FD100 to enter the access data which you have received from your service provider in the lines User and Pa...

Page 19: ...Update package This point displays the currently installed software package Sub point Control Display of the control software version Sub point Gateway Display of the Gateway software version Sub poi...

Page 20: ...terpolator combined with a IIR filter This process produces a result very similar to an analogue system OVS Bezier 4 is a pure Bezier interpolator offering perfect timing and dynamics Please refer to...

Page 21: ...MP 3100 HV The SELECT knob can be used to navigate through lists and menus or to control the Disc player in the same way as the cursor and OK buttons of the FD100 remote In Lists Choose a list or menu...

Page 22: ...the sources listed above Press the button to call up the Favourites list a Here the program location number is displayed within the list Since it is possible to erase individual list items the number...

Page 23: ...he favourite you have just selected Sorting Favourites lists The sequence of items in the Favourites list you have created can be altered in any way you wish This is the procedure for changing the ord...

Page 24: ...s shown in area e d These lines display information which is broadcast by the station e g Radiotext e Display of Stereo Mono f The field strength and therefore the reception quality to be expected fro...

Page 25: ...g the SELECT knob on the front panel opens the list of all stored stations a Use the buttons to select one of the stored stations The station you choose is now displayed in enlarged form Press the or...

Page 26: ...ote by pressing the button or by turning the SOURCE Knob on the front panel of the MP 3100 HV Depending on the frequency band block it may take up to two seconds to switch stations when in DAB mode Di...

Page 27: ...g the SELECT knob on the front panel opens the list of all stored stations a Use the buttons to select one of the stored stations The station you choose is now displayed in enlarged form Press the or...

Page 28: ...lists These lists are controlled using the navigation buttons cursor buttons on the remote control handset or by the SELECT knob on the machine s front panel a Use the buttons to select the desired e...

Page 29: ...y Radio then use the buttons to select the Search item and confirm your choice by pressing the button or while navigating within lists alternatively call up the search function by pressing the blue bu...

Page 30: ...l the available music services as well as Internetradio To select a service use the buttons to navigate to the appropriate line Pressing the button opens the Select list for the corresponding service...

Page 31: ...by briefly pressing the button After a short delay a list appears showing the search results The results list varies from one music service to another Many services allow you to filter the search resu...

Page 32: ...ing the source selection menu on the FD100 remote by pressing the button or by turning the SOURCE Knob on the front panel of the MP 3100 HV Playback The music content to be played is selected with the...

Page 33: ...creen now displays the message Search While this is on the screen enter up to eight letters or numerals using the remote control handset the letters assigned to the numeric buttons are printed below t...

Page 34: ...no USB memory medium is found the screen displays the message No data available Playback The music content to be played is selected with the help of Select lists These lists are controlled using the n...

Page 35: ...letters assigned to the numeric buttons are printed below the buttons To obtain a particular letter press the appropriate button repeatedly until the correct letter appears on the screen Before enter...

Page 36: ...e machine immediately reads the CD s Table of Contents the screen displays the message Reading During this period all button presses are ignored The screen then displays the total number of tracks on...

Page 37: ...the button interrupts playback briefly and after this the desired track is played You can also enter the number of the desired track directly using the numeric buttons on the remote control handset P...

Page 38: ...lay back multi channel discs Setting the preferred layer Your preferred disc layer SACD oder CD can be selected using the button on the FD100 or the button on the MP 3100 HV If necessary briefly press...

Page 39: ...am in the same manner and store them by briefly pressing the button It is also possible to enter the track directly using the numeric buttons instead of using the and buttons After you enter the numbe...

Page 40: ...s the MP 3100 HV is switched on and no device is connected it is always ready to receive In this state the screen displays the message not connected This is the procedure for establishing a connection...

Page 41: ...transfer is normally about 3 to 5 metres but the effective range may be affected by a number of factors To achieve good range and interference free reception there should be no obstacles or persons b...

Page 42: ...e MP 3100 HV accepts digital PCM encoded stereo signals with sampling rates of 44 1 to 384 kHz 32 bit and DSD data with sampling rates of DSD64 DSD128 DSD256 and DSD512 If you wish the MP 3100 HV to c...

Page 43: ...he operating system The installation instructions provide detailed information on how and where the settings are to be changed Notes on software By default the operating systems listed above do not su...

Page 44: ...44...

Page 45: ...es This section describes all those matters which are of fundamental importance when setting up and first using the equipment This information is not relevant in daily use but you should nevertheless...

Page 46: ...l hard discs The storage medium can be formatted with the FAT16 FAT32 NTFS ext2 ext3 or ext4 file system The USB storage medium can be powered directly via the USB port provided that its current drain...

Page 47: ...ice mode Socket for connecting a PC or MAC computer At this input the MP 3100 HV accepts digital PCM stereo signals with sampling rates in the range 44 1 to 384 kSps and digital DSD stereo signals fro...

Page 48: ...bility of the unit is not reduced The unit should be set up in a well ventilated dry site out of direct sunlight and away from radiators The unit must not be located close to heat producing objects or...

Page 49: ...mote devices such as radio and computer systems Our accessory range includes the specially shielded POWER THREE mains cable and the POWER BAR mains filter distribution board which prevent electro magn...

Page 50: ...The device is intended to be connected to mains outlet with protective earth connector Please connect it only with the mains cable supplied to a properly installed mains outlet with protective earth c...

Page 51: ...of the device The serial numbers on the unit and in the original documentation supplied with it in particular the inspection and guarantee certificates must not be removed or modified and must corresp...

Page 52: ...his menu will vary slightly in appearance depending on the type of your network i e whether you have a wired LAN or wireless WLAN network If in the Network Configuration Menu the entry Network IF Mode...

Page 53: ...tring and an IP address At these points an IP address should be entered like a string with separating dots as special characters In this case an automatic check for valid address ranges 0 255 is not c...

Page 54: ...t and special characters IP separating dots must be entered as special characters The parameters illustrated above are only typical values Addresses and settings may require different values for your...

Page 55: ...ching for and Selecting the Network First select the menu point Scan for WLANS and activate it by pressing the button A list of the WLANs found is displayed on the screen Use the buttons to select the...

Page 56: ...llows Briefly touch the button on the MP 3100 HV front panel to call up the menu Then select the menu item FD 100 pairing Activate this selection by pressing the SELECT knob and confirm the paring pro...

Page 57: ...n 0 5 Watt If you intend not to use the device for a long period it should be disconnected from the mains socket i e the mains plug should be withdrawn from the wall socket Automatic power down Energy...

Page 58: ...evice menu appears at this point In this case select the device to be updated by turning the SELECT knob then press the SELECT knob to confirm your choice If the MP 3100 HV is not connected to a PA 3x...

Page 59: ...omplex than the standard method the MP 3100 HV features a high performance digital signal processor DSP which carries out the over sampling process with immense precision 56 bit using special algorith...

Page 60: ...pressive blend of naturalness good dynamics and accuracy Frequency response and transient characteristics of the Bezier interpolator Frequency bandwidth of the analogueue reconstruction filter Normal...

Page 61: ...address house number to the components in the local network This number must not be present more than once in the local network The Device IP mask should always be assigned the address 255 255 255 0 D...

Page 62: ...Clients Many UPnP AV servers also offer functions such as cataloguing and easy identification of media content using criteria such as artiste album name genre etc UPnP AV Network protocol that makes...

Page 63: ...on Cause 2 Reception is poor interference is severe or the field strength signal strength is low Remedy Select only those stations which can be received with a strong signal hiss free and without inte...

Page 64: ...ansmission problems persist a so called Power Line network might be good alternative to establish a good and stable network connection The best safest and most secure network however will always be a...

Page 65: ...or adequate sound quality For good sound quality we recommend high bitrates like 320 kBit s USB Storage device is not recognised Cause 1 The storage device especially USB hard discs without separate p...

Page 66: ...66 Appendix...

Page 67: ...h types of connection are present on the amplifier we recommend the symmetrical option 2 Antenna for the RF remote control FD100 Connecting this antenna is absolutely necessary for operation of the MP...

Page 68: ...P 3100 HV For the use of internet radio a DSL access to the internet is needed For questions regarding setting up your network and internet connection please ask your system administrator or any netwo...

Page 69: ...69 Wiring diagram...

Page 70: ...70 Wiring diagram...

Page 71: ...DBS Stationname PS Programm type PTY Radiotext Rt Bluetooth Standard Codec A2DP Audio AVRCP 1 4 Control aptX MP3 SBC Connections Analogue outputs asymmetric co axial RCA 2 5 Veff 50 Ohm symmetric XLR...

Page 72: ...oise ratio A weighted 116 dB Channel separation 110 dB Power requirement 230 V version 115 V version 1x 220 240 V and 1x 100 240 V 50 60 Hz 1x 110 115 V and 1x 100 240 V 50 60 Hz Power consumption max...

Page 73: ...73...

Page 74: ...elektroakustik GmbH Co KG Herford Deutschland Germany...

Reviews: