background image


  GB 


TOPVEX is equipped with a high efficient rotating heat exchanger. The required supply air 
temperature is therefore normally maintained without use of re-heater battery. On especially 
cold days the built in heating battery (hot water or electric) will automatically be switched on. 
Lamp signal (14) will light up when the heater battery is in operation.  
 
We recommended that the supply air temperature is set as low as possible without causing 
feeling of draught. This gives the ultimate energy and ventilation efficiency.  

 
Filter 

Lamp signal (11) will light up when it is time to change filters. The ventilation unit can still be 
operated, but the efficiency will be reduced if the filter is not replaced. Operation time (6, 9 or 
12 months) between filter changes can be set on the control panel. From factory operation 
time is set to 9 months. To increase or reduce this interval, press buttons (13) and (9) or (13) 
and (10) simultaneously. Setting is confirmed by flashing light in lamp (14) and constant light 
in: 


Lamp (6) for 6 months operation time between filter change 
Lamp (7) for 9 months operation time between filter change 
Lamp (8) for 12 months operation time between filter change.  
 
Reset operation time after having changed the filter (see maintenance, section 1) 
 

Note! The extract filter (B, fig. 2) must be replaced frequently. 
 
Operation from timer 

The unit is equipped with a week timer for automatic day and night operation (reduced 
ventilation). If the building is in use when night operation is in function, override to day 
operation can be obtained by pressing button 13, (fig. 3) on the control panel. The unit 
automatically switches back to operate according to timer settings after 3 hours.  
 

Programming the timer 

A timer (MICRO-MATIC MM7592H) can be found on the TOPVEX-front panel. 
 

1.  Reset the timer by pressing 

 with a pen. 

 
2.  Set current time. Position   

a) Press   until day 1 (Monday) flashes. Cursor 

 under   

b)  Skip to actual day using the 

►◄

 buttons. 

c) Confirm with 

d) Press 

 to set correct time, move to next field using 


e)  After all has been entered the setting is saved by pressing 


3.  Making a program for start and stop times. Cursor 

 under PR.  

a) Press   until day one 1 flashes. 
b)  Chose day or days using 

 followed by 


c)  Set start or stop times like in 2d / c 
d) Press 

 to confirm. Set if the time entered is a start   or a stop   time. (


means impulse.) Press 

 to make the next program. 


6

Summary of Contents for TOPVEX-1000 R

Page 1: ...July 12 TOPVEX 1000 1500 R Compact Air Handling Unit Operating and maintenance instructions GB RU...

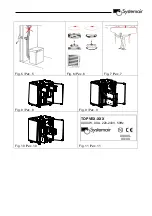
Page 2: ...Fig 1 1 Fig 2 2 B C D E F A G H Fig 3 3 x z Fig 4 4 TOPVEX 1000 R TOPVEX 1500 R x 1180 1480 y 1330 1380 z 750 850...

Page 3: ...Fig 5 5 Fig 6 6 Fig 7 7 Fig 8 8 Fig 9 9 Fig 10 10 TOPVEX XXX XXXXW XXA 220 240V 50Hz XXXXX XX XX Fig 11 11...

Page 4: ...ing rooms 7 Extract louvres in wet rooms 8 Soil vent pipe if installed 9 Flexible ducting 10 Spiro ducting 11 Duct insulation Fig 2 A Mains switch B Extract filter C Connection box D Heat exchanger E...

Page 5: ...anel The units settings is Normal airflow Low at start up Choose Normal airflow High 180V by pressing buttons 13 and 4 simultaneously Setting is confirmed by flashing light in lamp 2 and 3 Normal airf...

Page 6: ...ths operation time between filter change Lamp 8 for 12 months operation time between filter change Reset operation time after having changed the filter see maintenance section 1 Note The extract filte...

Page 7: ...to consider the following 1 The system must be installed according to the mounting instructions 2 Insulate mains supply before service or cleaning of the heat recovery unit 3 Tumble dryer must not be...

Page 8: ...must not be exchanged which will cause the system to be balanced again 5 Checking the fresh air intake fig 6 Leaves and pollution could plug up the air intake grille and reduce the capacity Check the...

Page 9: ...rotating 4 Noise vibrations a Clean fan impellers b Pull the fans out and check that the 2 screws holding the fans are tightened 5 Alarms Lamps flash as follows Light fig 3 a Short circuit or breach i...

Page 10: ...RU 10 10 13 13 13 14 15 1 1 2 4 5 6 7 8 9 10 11 2 D F G TOPVEX 1000R H TOPVEX 1500R TOPVEX Systemair 10...

Page 11: ...RU 3 cde fg hij k 3 4 5 1 2 3 Min 1 Norm 2 180 13 14 2 3 13 5 1 2 Max 3 5 9 10 6 7 8 1 6 2 6 7 3 7 4 7 8 5 8 12 3 11...

Page 12: ...RU TOPVEX 14 11 6 9 12 9 13 9 13 10 14 6 6 7 9 8 12 1 2 13 3 3 MICRO VATIC VV7592H TOPVEX 1 2 a 1 b c d e 3 PR a 1 b c 2 d c d 12...

Page 13: ...RU 4 S W a S W b DDMMYY 5 AUTO on off 6 3 7 28 L 30 1 2 3 5 4 5 TOPVEX 3 4 1 1 2 8 Systemair 13 3 5 14 6 7 8 13...

Page 14: ...RU 2 1 9 3 9 E F 2 4 5 6 6 5 7 1 14...

Page 15: ...RU 2 a b c d e f g 3 a b 2 c d 2 e 4 a b 5 3 a 6 7 8 14 b 210 6 7 8 6 7 8 14 c 6 8 14 11 15...

Reviews: