background image

Start up |

7

5

Start up

Read and follow carefully the installations instruction before start up.

Before stating up the unit check following points with power supply off.

• Check so the unit is placed horizontally

• Check inside the unit and secure that the unit is clean

• Check that all transport protection is removed

• Turn on the power supply

5.1

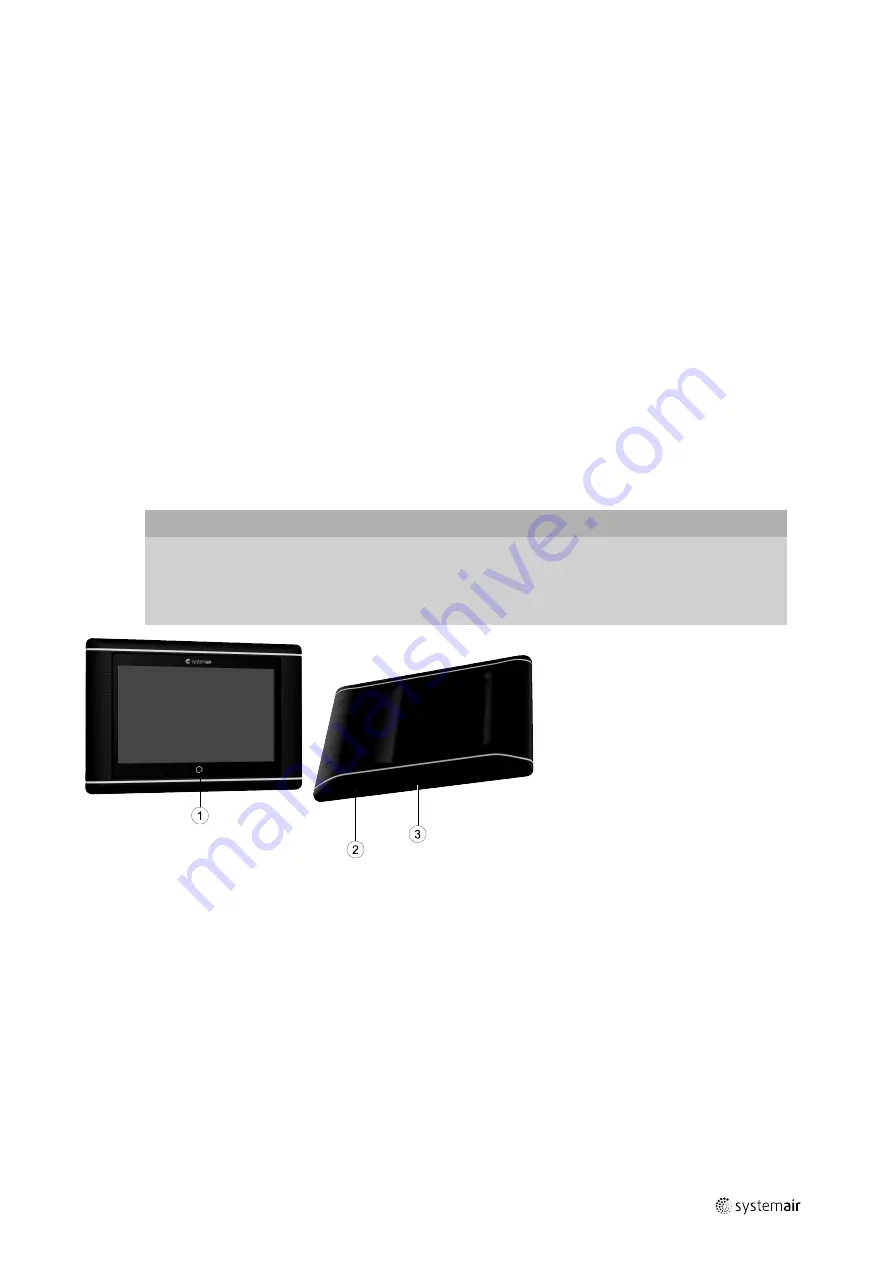
NaviPad

NaviPad is Systemair's user interface with a 7” capacitive touch screen. The user interface provides operation informa-
tion about the connected air handling units and allows you to control all functions. You navigate by pressing the
touchscreen, to activate a function, change setting or by reading values in real time.

After 5 min inactivity the screen activate sleep mode, you return to the screen you left by pressing the touchscreen.
After additional 10 min. inactivity you return to the system overview dashboard (Screen image: System dashboard)
and have to log in again.

Editable text and values are shown in blue and differs depending on user level.

Since the user interface of the air handling unit consists of a web server with web pages it is possible to use a computer
to browse the user interface. Identify the IP address of the air handling unit with NaviPad, see Example 8 and then write
it in the address field of an internet browser.

Important

• The air handling unit and the NaviPad as well as any computer has to be connected on a local network

with the same IP subnet.

• Chrome browser for computer is supported to navigate the web pages of the air handling unit.

• Menus and functions may differ depending on software version running in NaviPad.

Fig. 6 (1) NaviPad button, (2) USB connection, reboot button, (3) power supply and communication

214959 | A004

Summary of Contents for NaviPad

Page 1: ...Document in original language 214959 A004 Air Handling Unit Topvex SC TC Operation and Maintenance Instructions GB...

Page 2: ...Systemair AB All rights reserved E OE Systemair AB reserves the rights to alter their products without notice This also applies to products already ordered as long as it does not affect the previously...

Page 3: ...2 How to replace supply extract air filter 20 7 3 How to clean NaviPad 20 7 4 How to clean the heat exchanger 20 7 5 How to clean the fans 21 7 6 How to clean hot water heating coil 21 7 7 How to cle...

Page 4: ......

Page 5: ...elivered complete tested and ready for being operated Any form of warranty will become null and void in the event that the unit is modified without manufacturer s authorisation Carry out all the plann...

Page 6: ...s on product 3 Warnings signs on product Warning signs located on the air handling units Fig 1 Disconnect all supply circuits before access to terminals Fig 2 Rotating fan during 4 minutes rundown per...

Page 7: ...022 Hygiene standard If an operation stop of the air handling unit for more than 48 hours is planed we advise against using cooling recovery This is to avoid microbial growth in eventual condensation...

Page 8: ...efrosting only for unit with section defrosting 9 Internal electrical cabinet 10 Heating coil EL or HWH HWL 11 Pressure transmitter supply air fan extract air filter 12 Pressure transmitter extract ai...

Page 9: ...or unit with section defrosting 9 Internal electrical cabinet 10 Heating coil EL or HWH HWL 11 Pressure transmitter supply air fan extract air filter 12 Pressure transmitter extract air fan supply air...

Page 10: ...available as an accessory The enclosure class for Access control cabinet is IP44 The dimensions are length 450 mm width 230 mm height 92 5 mm Use one of the three flanges on the control cabinet to in...

Page 11: ...left by pressing the touchscreen After additional 10 min inactivity you return to the system overview dashboard Screen image System dashboard and have to log in again Editable text and values are sho...

Page 12: ...til start up wizard is successfully finished Version PR1 2 1 1 0 128 and later Start up wizard started Scan for air handling units Show air handling units selection menu 0 Numbers of air handling unit...

Page 13: ...ed written a key board will appear at the bottom of the touchscreen 5 1 4 Symbol description Home home page Data and settings Shows operating information and settings Flow diagram A schematic overview...

Page 14: ...m history Service mode log in with 0612 Logged in Full read and write privileges 5 1 6 Log in Log in with service mode using password 0612 Overview Service 0612 Login Step by step 1 Open the log in wi...

Page 15: ...d control Fire Smoke Alarm list 6 1 1 1 Operation overview Value of active signals I O signals and operation mode Temperature Air flow pressure CO2 RH Heating Exchanger Cooler Recirculation 6 1 1 2 In...

Page 16: ...y air 18 C Example show temperature control type set to supply air To change the setpoint press on the current value and change to desired setting in the following pop up menu Confirm with ok Editable...

Page 17: ...igured air handling unit Active sensors and components are visible with values shown in real time When pressing on values or items marked in blue you will be forwarded to related settings and or overv...

Page 18: ...ed on 00 00 24 00 Example 2 Schedule for normal fan speed Time settings Schedule Fan Normal Speed 2020 10 22 Start Stop Start Stop Monday 12 hour clock system 5 00 AM 6 00 PM 12 00 AM 12 00 AM Monday...

Page 19: ...n wizard 2020 10 22 Set up pressure control Set up cooler Set up changeover Exit to configuration menu Complete configuration wizard If the configuration wizard does not cover the desired accessory or...

Page 20: ...No 53 Limit X2 2000 m3 h Limit Y2 150 Pa Name Filter alarm supply air Original name Filter alarm supply air 6 1 6 System information Shows information about the air handling unit installation site co...

Page 21: ...ir handling unit will appear press the button to select the air handling unit to pair it with the NaviPad If there are several air handling units at the same IP subnet a list of available air handling...

Page 22: ...again 6 3 No communication Home Available devices 2020 10 22 Unit name No Communication If the above symbol are shown the communication to the selected air handling unit is lost One reason could be th...

Page 23: ...ce Use protective clothing Beware of hot surface on the heating coil during maintenance and service 7 1 Maintenance intervals Perform maintenance according to the operation and maintenance instruction...

Page 24: ...3 Press on the alarm symbol on the control panel 4 Choose Filter alarm and press acknowledge 7 3 How to clean NaviPad Disconnect the NaviPad power cord Wipe the NaviPad gently with a soft cloth Remov...

Page 25: ...ply air fan standard units with CAV 2 Loosen the two bolts on the rail to remove the fan Fig 7 3 Replace the motor and connect the electric wire and tubes 4 Fastening the motor with the rail and bolts...

Page 26: ...sers and louvres and wash in hot soapy water when necessary Remount them with their original settings and positions in order not to unbalance the system 7 9 Clean the outdoor air intake Clean the air...

Page 27: ...cription 1 Automatic fuse 1 Controls only 2 Automatic fuse 3 Fans only 3 Automatic fuse 3 EL heater only 7 12 How to reset the manual overheat protection EL units Push the red button on the electrical...

Page 28: ...tric wire and the blue and red tubes from the supply air fan standard units with CAV 2 Loosen the two bolts on the rail to remove the fan 3 Replace the motor and connect the electric wire and tubes 4...

Page 29: ...ove the damper rails 5 Rotate the damper and lift in the direction away from the exchanger 6 Lift the damper out from the middle section Caution Do not drag the damper on the exchanger Fig 10 Image sh...

Page 30: ...r beam 6 screws and remove the beam Replace the exchanger Caution Handle the heat exchanger with care The heat exchanger is heavy 9 Push the exchanger out 10 Remove the old exchanger 11 Place the new...

Page 31: ...sten the door beam 12 Fasten the door beams 6 screws on front and 6 screws on the back Fasten the rail holding the exchanger 13 Fasten the bolts holding the rail on the opposite side of the partition...

Page 32: ...the damper on the exchanger 15 Lift the damper with the short end on the rail at the outer beams Observe the small hooks to secure the damper 16 Fasten the damper by fastening the damper rails with th...

Page 33: ...tion i e an earthed wristband must be used Note Note the cable connectors positions before disconnecting them Disconnect all the wired cable connectors 1 from control unit CU27 C Push CU27 C slightly...

Page 34: ...opens Check if diffusers and louvres need cleaning Check diffuser louvre openings Check if fans and exchanger block need cleaning Check if the roof unit or air intake is clogged Check ducts for visibl...

Page 35: ...ifferent alarm levels Class A alarm Needs to be acknowledged Class B alarm Needs to be acknowledged Class C alarm Returns when the cause of the alarm disappear 9 1 Alarm list Note Minimum Operator lev...

Page 36: ...the specification and production number from the type label figure 13 Fig 13 Type label Position Description 1 Item number 2 Production order number 3 Consecutive number 4 Production date 5 Product co...

Page 37: ...trical appliances Part 2 40 Particular requirements for electrical heat pumps air conditioners and dehumidifiers EN 50106 Safety of household and similar appliances Particular rules for routine tests...

Page 38: ...ce documentation See spare parts and documentation at https portal systemair com or use the scannable code on the type label figure 13 If other accessories not included at delivery are in use read the...

Page 39: ...214959 A004...

Page 40: ...Air Handling Unit Operation and Maintenance Instructions 214959 en_GB 2021 05 25 A004 Systemair Sverige AB Industriv gen 3 SE 739 30 Skinnskatteberg Sweden Phone 46 222 440 00 www systemair com...

Reviews: