7
systembuild.com
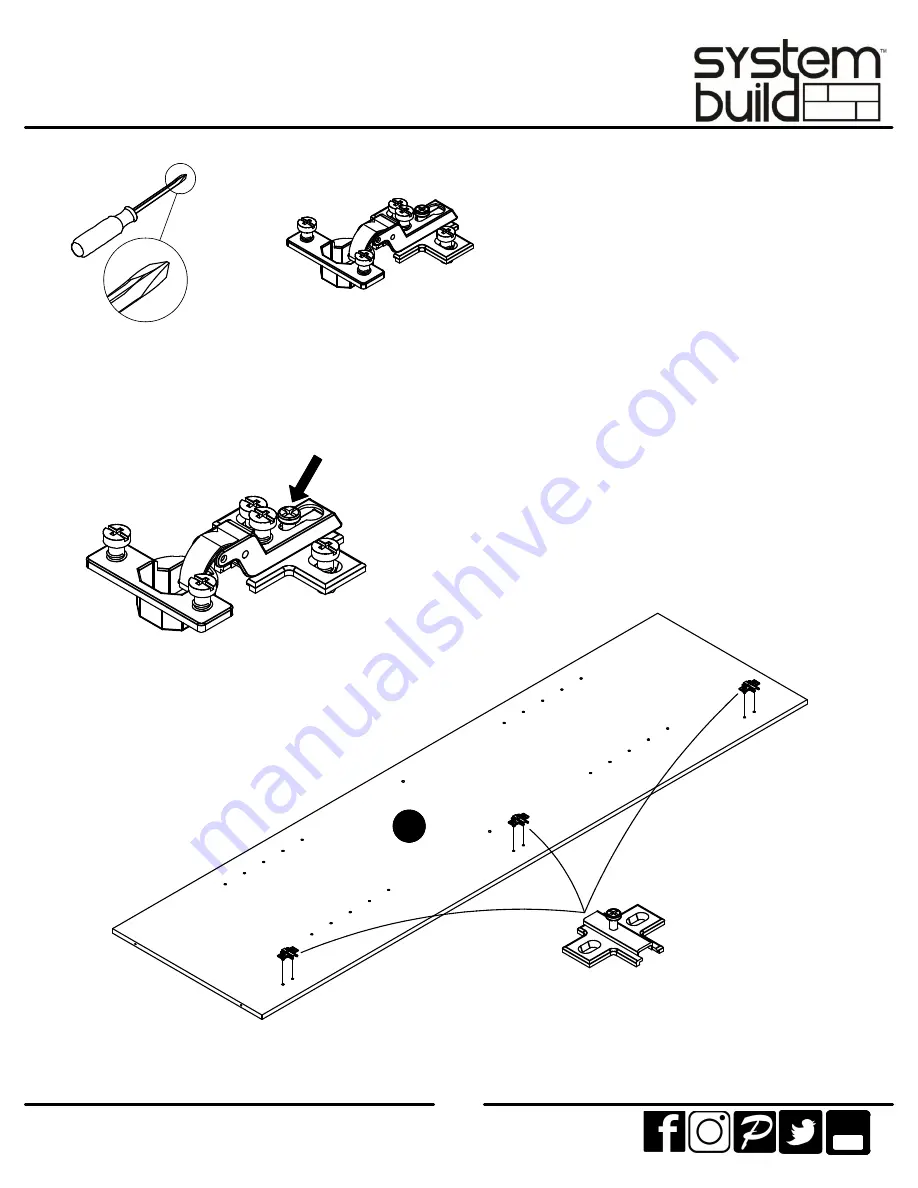
STEP1
Tube
You
Separate hinge by loosening screw as shown.
(x6)
#A65640
A
X2
Page 1: ...TRUCTION BOOKLET CONTAINS IMPORTANT SAFETY INFORMATION PLEASE READ AND KEEP FOR FUTURE REFERENCE WARNING For the latest information on SystemBuild products follow us at Ameriwood Home Tube You Date of...
Page 2: ...and count the parts before attempting assembly Compression dowels are lightly tapped in with a hammer Slides are labeled with a R right and L left for proper placement Make sure to always face the poi...
Page 3: ...ount all your parts and hardware Give yourself enough room for the assembly process Have the following tools Flat Head Screwdriver 2 Phillips Head Screwdriver and Hammer Caution If using a power drill...
Page 4: ...d construction It is not made from wood but is required for the assembly of your unit 2 End Panels 37467056010 top 37467056030 bottom 37467056040 fixed shelf 37467056050 2 Adjustable Shelves 374670560...
Page 5: ...5 systembuild com Board Identification Not actual size A C D E F G H I F This piece is paperboard construction It is not made from wood but is required for the assembly of your unit A...
Page 6: ...A24045 screw cap x2 A11145 1 2 flat head screw x2 A11210 3 4 pan head screw x2 A11195 5 8 pan head screw x8 A80250 shelf support x4 A17300 3 4 machince screw x40 A21110 nail x4 A43100 glide x1 A55015...
Page 7: ...7 systembuild com STEP1 Tube You Separate hinge by loosening screw as shown x6 A65640 A X2...
Page 8: ...fety bracket kit x2 89020 bumper x2 A11195 5 8 pan head screw x4 A43100 glide Attach the bumper to the far side of the top C with two 5 8 screws Attach the safety bracket to the near side of the top C...
Page 9: ...9 systembuild com STEP3 C E A A D All finished edges are to face up After assembly press the screw caps onto the screws x12 A13410 x4 A24045 Tube You finished side raw edges are shaded...
Page 10: ...unit is square Distance from corner to corner must be equal as shown Attach the back panel as shown nailing straight into the raw edges IMPORTANT THE BACK PANEL IS A STRUCTURAL PART OF THIS UNIT AND...
Page 11: ...against the wall Fasten the wall anchor to the wall using option 1 or 2 Option 1 Securely screw into solid area of the wall as shown Option 2 Drill a 3 16 diameter hole 5mm in the wallboard Tap the wa...
Page 12: ...12 systembuild com STEP6 G H F F x8 A80250 x6 A65640 Make sure the lever is in the upper position when the latch is attached to the door x1 A55410 x2 A11210 G Tube You...
Page 13: ...en screw C Turn screw B to move door Tighten screw C Loosen screw A Adjust door Tighten screw A x4 17300 x1 A55015 x2 A52700 x2 A11145 B A C G H optional Attach the doors to the unit and make adjustme...
Page 14: ...ors 1 Close the left door first Extend the barrel of the lock down into the hole in the bottom shelf 2 Close the right door Insert the key into the lock and turn This will position the lock bar behind...
Page 15: ...his certificate applies to compliance of this product with the CPSC Ban on Lead Containing Paint 16 CFR 1303 3 This product is distributed by Dorel Home Furnishings Inc 410 East First Street South Wri...
Page 16: ...and discount codes Quick and easy replacement part service To register your product visit systembuild com Visit your local retailer s website rate your purchased product and leave us some feedback We...
Page 17: ...la colocaci n correcta Aseg rese de que siempre este el punto locaizado en la parte superior de bloqueador de leva este volteadohacia borde exterior Utilizar todos los clavos para el panel de atras y...
Page 18: ...ctamente en los bordes crudos P gina 10 Coloque la unidad de forma vertical y ub quela contra la pared Sujete el anclaje de pared en la pared con la opci n 1 o 2 Opci n 1 Atornille firmemente en algun...
Page 19: ...Este mueble no est aprobado para su uso con un televisor ADVERTENCIA Riesgo de lesionarse no ponga un televisor sobre este mueble Este mueble no cuenta con la certificaci n para usarlo como soporte de...
Page 20: ...oit et d un L gauche pour un bon placement Assurez vous toujours de faire face la pointe situ sur le haut de la Serrure de Came vers le bord ext rieur Utiliser tous les clous fournis pour le panneau a...
Page 21: ...bords bruts Page 10 Relevez l quipement en position verticale et posez le contre un mur Fixez le dispositif d ancrage mural au mur en suivant l option 1 ou 2 Option 1 Vissez fermement dans une partie...
Page 22: ...s graves AVERTISSEMENT Risque de blessure corporelle ne pas placer une t l vision sur ce meuble Ce meuble n est pas approuv pour une utilisation avec une t l vision Page 15 Enregistrez votre produit p...