background image


10

  Chapter 3: Install DSM and Surveillance Station on NVR

Get Your NVR Ready

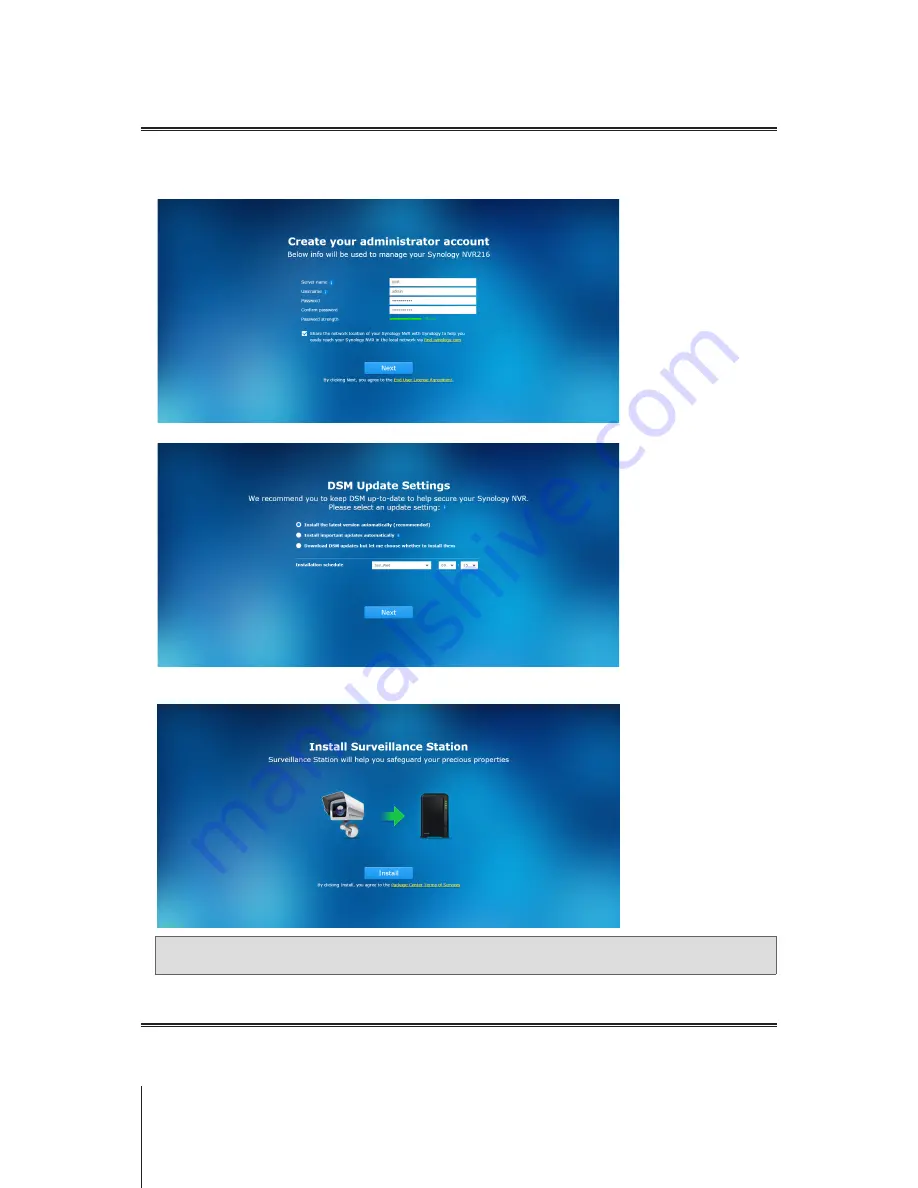
After you finish installing DSM, the system will guide you through the initial configuration of DSM, as well as the installation of 

Surveillance Station. To get your NVR ready, please follow the steps below.

Create an account of DSM by entering 

Server name

Username

, and 

Password

. When you finish, please click 

Next

 to 

continue.

Specify how and when the system will update DSM for your NVR. When you finish, please click 

Next

 to continue.

After you finish the initial configuration of DSM, your NVR is ready to install Surveillance Station. Please click 

Install

 to start 

the installation of Surveillance Station.

Note:

 If the installation of Surveillance Station was not completed, please go to 

Package Center

 in DSM to install 

Surveillance Station

 manually.

Learn More

Congratulations! Your NVR is now ready for action. For more information or online resources about your NVR, please visit 

www.synology.com

.

Summary of Contents for NVR216

Page 1: ...Synology Network Video Recorder NVR216 with Surveillance Station User s Guide ...

Page 2: ...Surveillance Station Add an IP Camera to Surveillance Station 11 Monitor Camera Feeds with Live View 13 Playback Video Recordings with Timeline 18 Manage Archived Video Recordings 18 Authorize User Privileges 19 Discover More Features with Add ons 21 Chapter 5 Setup and Operate Surveillance Station Local Display Connect a Monitor to Your NVR 22 Navigate Local Display Desktop 23 Function Limitation...

Page 3: ...se check the package contents to verify that you have received the items below Also make sure to read the safety instructions carefully to avoid harming yourself or damaging your NVR Note All images below are for illustrative purposes only and may differ from the actual product Package Contents Main unit x 1 AC power cord AC power adapter x 1 RJ 45 LAN cable x 1 Screws for drives x 10 Screws for f...

Page 4: ...ct an HDMI cable here 9 RESET Button 1 Press and hold until you hear a beep sound to restore the default IP address DNS server and password for the admin account 2 Press and hold until you hear a beep sound then press and hold again until you hear three beep sounds to return the NVR to Not Installed status so that DiskStation Manager DSM can be reinstalled 10 eSATA Port Connect to Synology Expansi...

Page 5: ...er cord Wipe with damp paper towels Do not use chemical or aerosol cleaners To prevent the unit from falling over do not place on carts or any unstable surfaces The power cord must plug in to the correct supply voltage Make sure that the supplied AC voltage is correct and stable To remove all electrical current from the device ensure that all power cords are disconnected from the power source Risk...

Page 6: ...portant data before installation Install Drives 1 Push the upper case in the direction as shown below Lift the upper case and set it aside 2 Install drives For 3 5 drives Slide the drive into the drive bay and push it all the way until it s firmly connected to the SATA connector Secure the drive with the screws provided For 2 5 drives a Place the drive in the 2 5 Disk Holder Type C sold separately...

Page 7: ... the Disk Holder with the provided screws 3 Repeat the steps above to install the other drive if you have prepared one 4 The position of drives is as follows Note If you want to create a RAID volume we recommend that all installed drives are of the same size to make the best use of drive capacity 5 Replace the upper case and tighten the screws on the back panel ...

Page 8: ... power adapter to the power port of the NVR Connect the other end to a power outlet 2 Use the LAN cable to connect the NVR to your switch router or hub 3 Press the power button to turn on the NVR Congratulations Your NVR is now online and detectable from a network computer ...

Page 9: ...er of the following into the address bar of your browser a find synology com b nvr 5000 4 Web Assistant will be launched in your web browser It will search for and find the NVR within the local network The status of the NVR should be Not Installed 5 Click Connect to start the setup process and follow the onscreen instructions Note 1 The NVR must be connected to the Internet to install DSM with Web...

Page 10: ...xt to continue 2 Specify how and when the system will update DSM for your NVR When you finish please click Next to continue 3 After you finish the initial configuration of DSM your NVR is ready to install Surveillance Station Please click Install to start the installation of Surveillance Station Note If the installation of Surveillance Station was not completed please go to Package Center in DSM t...

Page 11: ...n Menu Surveillance Station in DSM Add an IP Camera to Surveillance Station With Surveillance Station you can leverage your IP cameras connected to the same local area network as your NVR To add an IP camera to Surveillance Station please do the following 1 Make sure you have powered on your IP camera which was connected to the local area network 2 Go to Surveillance Station Main Menu IP Camera No...

Page 12: ... can click Test Connection to check if your IP camera has been correctly configured Click Finish to complete the procedure You can now operate various network video recording features of Surveillance Station with your IP camera To configure further settings for your IP cameras such as recording live view and event detection settings please refer to corresponding articles under Surveillance Station...

Page 13: ...lus and minus buttons adjust the optical zoom of the selected camera Layout Panel Edit live view layouts or enable disable layout related features here For quick configuration of your camera feed layout please refer to Start Monitoring by Configuring Live View Layout section below Alerts Panel Manage alerts settings or display alerted video clips here For quick configuration of live view analytics...

Page 14: ...s on the Layout Panel 5 Click Save to finish the configuration Get Alerted with Live View Analytics With Alerts feature you can easily choose from several alert events for your IP cameras and track suspicious events intelligently to trigger recording on the fly For more information please refer to Surveillance Station Help Live View Alerts To track events with live view analytics please do the fol...

Page 15: ... customize several preset positions and setup patrol paths composed of a serial concatenation of existing preset positions To setup patrol paths please do the following 1 Go to Surveillance Station Main Menu IP Camera select a PTZ supported camera and click PTZ Control 2 Click the plus button to add a preset position 3 Enter the Name of the newly added preset position and specify the moving Speed ...

Page 16: ... executing if camera supported 9 Add preset positions from All Presets list to Included Presets list Adjust the preset positions sequence by clicking the Up or Down arrow 10 Click Save to finish the patrol settings Now you can switch patrol paths on Patrol Panel To automatically repeat the set up patrol path please do the following 11 Go to Surveillance Station Main Menu Action Rule 12 Click Add t...

Page 17: ...paths Select Action as Patrol Specify the Patrol path you have configured Specify your preferred Loops per cycle and Interval 16 Click Next to continue 17 Determine when the action rule will be active by selecting cells on the grid You can select an entire day by clicking on a day and a specific time by clicking on the hour 18 Click Finish to complete the configuration ...

Page 18: ...it timeline layouts or enable disable layout related features here For basic information on configuring layout please refer to Start Monitoring by Configuring Live View Layout section above 5 Seek Panel Specify the hour minute and second and click Go To to quickly search the specific time in a camera feed You can also launch Smart Search to obtain more accurate search results For more information ...

Page 19: ...privileges of live viewing and playing back and the privileges of editing or viewing for individual e maps live view layouts and more advanced features Note The users that are configured here are different from the Administrator Spectator for Local Display For more information please refer to Chapter 5 Setup and Operate Surveillance Station Local Display Create a User of Spectator Type You can aut...

Page 20: ...tor Spectator from the drop down list Note You can also choose Create a new privilege profile to customize the privileges that you wish to grant to the new user For more information please refer to Surveillance Station Help User List 6 Click Next to continue 7 After checking the profile information click Finish to complete the procedure ...

Page 21: ...d ons CMS in Surveillance Station VisualStation Synology VisualStation is a live view and playback solution designed to supplement and enhance your Surveillance Station configuration With a VisualStation device you can enjoy the rich features of Surveillance Station without the need to constantly keep a computer running To start using your VisualStation feature please go to Surveillance Station Ma...

Page 22: ...tions Note We recommend that the USB 3 0 port is reserved for connection to an external storage device 2 Power on your monitor and login to Surveillance Station Local Display a Choose to login as Administrator or Spectator enter the password and click Sign in b To enter the password if no keyboard is connected to your NVR you can click the keyboard icon to open the on screen keyboard Note Default ...

Page 23: ...nding articles in Surveillance Station Help 3 Certain surveillance features are unavailable in the Local Display environment Please refer to the Function Limitations section below for details 2 Resource Monitor Monitor basic information of your NVR s performances including CPU and RAM usage and data transfer speeds You can determine to show hide the resource monitor in Local Display Options Others...

Page 24: ...ne whether to expand Alert Panel automatically Function Limitations In order to optimize the overall performances of Local Display on your NVR certain functions can only be operated in the Surveillance Station package via a PC For detailed information please see the following Apps Function Limitations Live View 1 Live View Analytics is not supported in Local Display Timeline 1 Timeline layouts in ...

Page 25: ...settings of your NVR You can also configure the settings in DSM Main Menu Control Panel Network Network Interface For more information please refer to DSM Help Control Panel System Regional Options Time Time In the Time tab you can view the current time and configure time settings You can also configure the settings in DSM Main Menu Control Panel Regional Options Time For more information please r...

Page 26: ...crosoft Edge On OS X Safari 7 0 onwards File System Internal ext4 External ext4 ext3 FAT NTFS HFS read only Supported RAID Type Basic JBOD RAID 0 RAID 1 RAID 5 RAID 6 with DX213 Synology Hybrid RAID Up to 2 Disk Fault Tolerance with DX213 Agency Certification FCC Class B CE Class B BSMI Class B Scheduled Power On Off Yes Wake on LAN Yes Language Localization Environment Requirement Line voltage 10...

Page 27: ... Blinking Accessing drive Orange Static Drive error Port disabled1 Off No internal drive Note Model specifications are subject to change without notice Please refer to www synology com for the latest information LED Indicator Table B 27 Appendix 1 Please try to restart your NVR or re insert the drive s and then run the HDD SSD manufacturer s diagnostic tool to check the health status of the drive ...

Page 28: ...ces hosted by Synology Product to any third party for commercial purpose Section 6 Open Source The Software may contain components licensed to Synology under the GNU General Public License GPL Components currently available at http www gnu org licenses gpl html The terms of the GPL will control solely with respect to the GPL Components to the extent that this EULA conflicts with the requirements o...

Page 29: ...and finally by arbitration conducted by three neutral arbitrators in accordance with the procedures of the R O C Arbitration Law and related enforcement rules In such cases the arbitration will be limited solely to the dispute between you and Synology The arbitration or any portion of it will not be consolidated with any other arbitration and will not be conducted on a class wide or class action b...

Page 30: ...during the Warranty Period Synology warrants the Software as set forth in the accompanying end user license agreement provided with the Product if any Synology provides no warranty to Refurbished Product sold as as is or with no warranty on Online Store 2 2 Exclusive Remedy If Customer gives notice of noncompliance with any of the warranties set forth in Section 2 1 within the applicable Warranty ...

Page 31: ...RRANTY WHETHER BASED ON CONTRACT TORT INCLUDING NEGLIGENCE STRICT LIABILITY OR OTHER THEORY EVEN IF SYNOLOGY HAS BEEN ADVISED OF THE POSSIBILITY OF SUCH DAMAGES 3 3 Limitation of Liability SYNOLOGY S AND ITS SUPPLIERS LIABILITY ARISING OUT OF OR RELATING TO THE USE OR INABILITY TO USE THE PRODUCT ANY ACCOMPANYING DOCUMENTATION OR SOFTWARE AND ANY OTHER GOODS OR SERVICES PROVIDED UNDER THIS WARRANT...

Page 32: ...nforcement rules The arbitration shall take place in Taipei Taiwan R O C and the arbitration proceedings shall be conducted in English or if both parties so agree in Mandarin Chinese The arbitration award shall be final and binding on the parties and may be enforced in any court having jurisdiction Nothing in this Section shall be deemed to prohibit or restrict Synology from seeking injunctive rel...

Reviews: