Synology DiskStation DS920+ Hardware Installation Manual Download Page 9


9


Tools and Parts for Component Installation

Please prepare the following tools and parts before setting up your Synology NAS:

•  A screwdriver (only for 2.5" drives)

•  At least one 3.5" or 2.5" SATA drive (please visit 

www.synology.com/compatibility

 for compatible drive 

models) 

Warning:

 If you install a drive that contains data, the system will format the drive and erase all existing data. 

Please back up any important data before installation.

Install Drives

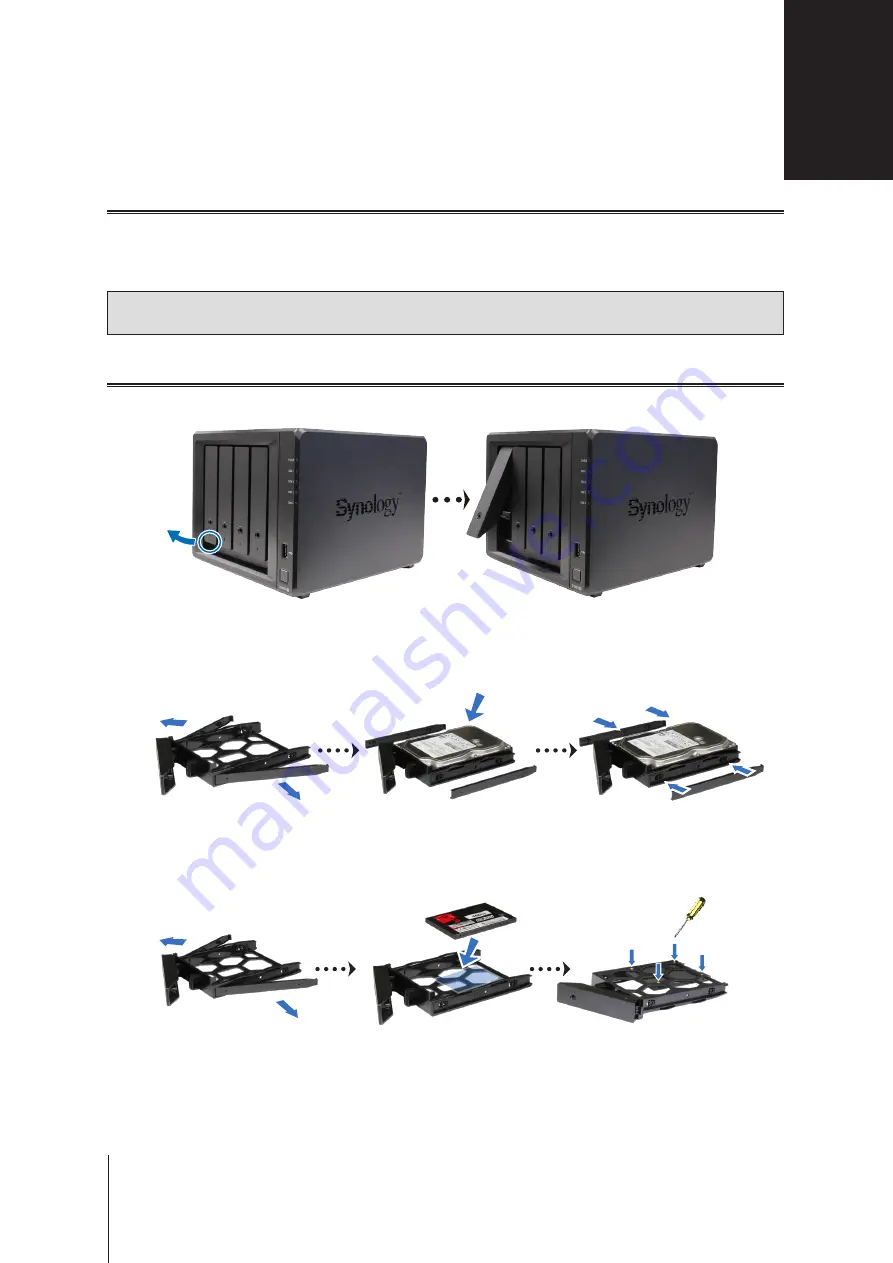
To remove the drive tray, pull on the circled area in the indicated direction as shown in the image below.

Load drives in the drive trays.

•  For 3.5" drives:

 Remove the fastening panels from the sides of the drive tray. Place the drive in the drive 

tray. Then insert the fastening panels to secure the drive in place.

•  For 2.5" drives:

 Remove the fastening panels from the sides of the drive tray and store them in a safe 

place. Place the drive in the area of the drive tray indicated by a blue rectangle below. Turn the tray upside 

down and tighten the screws to secure the drive in place.

Hardware Setup

2

Chapter

Summary of Contents for DiskStation DS920+

Page 1: ...Synology NAS DS920 Hardware Installation Guide...

Page 2: ...structions 8 Chapter 2 Hardware Setup Tools and Parts for Component Installation 9 Install Drives 9 Start Up Your Synology NAS 11 Add a Memory Module to Synology NAS 12 Add an M 2 NVMe SSD to Synology...

Page 3: ...make sure to read the safety instructions carefully to avoid harming yourself or damaging your Synology NAS Note All images below are for illustrative purposes only and may differ from the actual prod...

Page 4: ...cable here 8 RESET Button 1 Press and hold until you hear a beep sound to restore the IP address DNS server and password for the admin account to default 2 Press and hold until you hear a beep then p...

Page 5: ...ack Green Static Network connected Blinking Network active Off No network Rear LAN on lower side of jack Green Static Gigabit connection Orange Static 100 Mbps connection Off 10 Mbps connection No net...

Page 6: ...AID 1 RAID 5 RAID 6 RAID 10 Synology Hybrid RAID 2 Disk Fault Tolerance Agency Certification FCC Class B CE Class B BSMI Class B EAC VCCI CCC RCM RoHS Compliant HDD Hibernation Yes Scheduled Power On...

Page 7: ...ology com compatibility for more information Memory Module Model Name Picture Description D4NESO 2666 4G DDR4 non ECC unbuffered SO DIMM 4GB Spare Parts Visit www synology com products spare_parts if...

Page 8: ...cord Wipe with damp paper towels Do not use chemical or aerosol cleaners To prevent the unit from falling over do not place on carts or any unstable surfaces The power cord must plug in to the correct...

Page 9: ...lation Install Drives 1 To remove the drive tray pull on the circled area in the indicated direction as shown in the image below 2 Load drives in the drive trays For 3 5 drives Remove the fastening pa...

Page 10: ...ntil you hear a click when the tray is locked into place 4 Repeat the steps above to install the other drives you have prepared 5 Drives are numbered as shown below 1 2 3 4 Note If you plan to create...

Page 11: ...r hub 2 Connect one end of the AC power adapter to the power port of your Synology NAS Connect one end of the AC power cord to the AC power adapter and the other to the power outlet 1 2 3 Press the po...

Page 12: ...with the notch on the empty slot Insert the memory module into the slot Make sure that the module is properly inserted b Gently push down the memory module until you hear a click Note Hold the memory...

Page 13: ...the cables and remove the drive trays 2 Push the levers on both sides of the memory module outward The memory module will be released from its slot 3 Hold the memory module by its edges and remove it...

Page 14: ...small gap between the gold connectors of the SSD module with the notch in the empty slot Insert the module into the slot Make sure that the module is properly inserted b Push the lever outward as show...

Page 15: ...gy NAS IP SAN How to diagnose drives health status when receiving bad sector warning How to fix drive failure and retrieve the data from your drives What should I do if my Synology NAS cannot recogniz...

Page 16: ...Assistant will be launched in your web browser It will search for and find the Synology NAS within the local network The status of the DS920 should be Not Installed DS920 5 Click Connect to start the...

Page 17: ...y permitted by applicable law notwithstanding this limitation d adapt modify alter translate or create any derivative works of the Software e remove alter or obscure any copyright notice or other prop...

Page 18: ...roducts Any such transfer or assignment in violation of the foregoing restriction will be void Section 17 Applicable Law Unless expressly prohibited by local law this EULA is governed by and construed...

Page 19: ...s or with no warranty by any stores Without presenting such purchase receipt or invoice the warranty period shall commence on the date of manufacture based on our internal record b Extended Warranty P...

Page 20: ...D TO ANY A IMPLIED WARRANTY OF MERCHANTABILITY OR FITNESS FOR A PARTICULAR PURPOSE OR USE B IMPLIED WARRANTY ARISING FROM COURSE OF PERFORMANCE COURSE OF DEALING OR USAGE OF TRADE C CLAIM OF INFRINGEM...

Page 21: ...prevailing party in any arbitration or legal action occurring within the United States or otherwise shall receive all costs and reasonable attorneys fees including any arbitration fee paid by the prev...

Page 22: ...es with Part 15 of the FCC Rules Operation is subject to the following two conditions 1 this device may not cause harmful interference and 2 this device must accept any interference received including...

Page 23: ...B VCCI B...

Reviews: