background image

Contents

< Part. 1 >  

LCD1U19-12

1.1 Package 

Content 

P.1

1.2 

Structure Diagram & Dimension 

P.1

1.3 Installation 

P.3

1.4 Connection 

P.5

< Part. 2 >  

Specifi cations  /  OSD

2.1 Product 

Specifi cations 

P.7

2.2 

Keyboard  /  Mouse Specifi cations 

P.9

2.3 

On-screen Display Operation ( OSD ) 

P.10

< Part. 3 >  

Options

3.1 

3G / HD / SD-SDI  Broadcast-grade input 

P.12

3.2 

HDMI, S-Video + BNC 

P.13

3.3 

DC Power : 12V / 24V / 48V / 125V 

P.14

< Part. 4 >  

KVM Integration

4.1 LCD1U19-12          P.15

www.RackmountMart.com

Summary of Contents for LCD1U19-12

Page 1: ...7ROO UHH 7HO D PDLO VDOHV 5DFNPRXQW0DUW FRP...

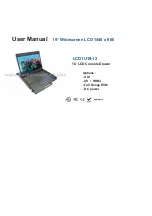
Page 2: ...19 Widescreen LCD 1440 x 900 User Manual 1U LCD Console Drawer Options SDI AV HDMI Full Range KVM DC power LCD1U19 12...

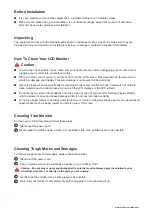
Page 3: ...ssis Opening it yourself could damage the equipment and invalidate its warranty If any part of the equipment becomes damaged or stops functioning have it checked by qualified service personnel What th...

Page 4: ...5 Part 2 Specifications OSD 2 1 Product Specifications P 7 2 2 Keyboard Mouse Specifications P 9 2 3 On screen Display Operation OSD P 10 Part 3 Options 3 1 3G HD SD SDI Broadcast grade input P 12 3...

Page 5: ...d monitor screens can scratch the LCD display or strip o the finish Do not spray any kind of liquid directly onto the screen or case of your monitor Spraying liquids directly onto the screen or case c...

Page 6: ...dule kit Blue Power LED Front USB port for device access USB Hub KVM only Molded front handle 4 3 9 11 4 11 5 5 6 The above package content is only for the single console models It varies with options...

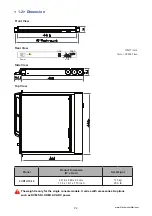
Page 7: ...such as KVM SDI HDMI AV DC power Front View Side View UNIT mm 1mm 0 03937 inch Top View Model Product Dimension W x D x H Net Weight 441 6 x 460 x 44 mm 17 4 x 18 1 x 1 73 inch 11 5 kg 25 3 lb 1 2 Dim...

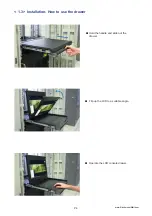
Page 8: ...and right rear mounting brackets into the LCD console drawer Step 1 Step 2 Measure the depth of the front and rear mounting rails Align each rear mounting bracket to a suitable length M6 screw cage n...

Page 9: ...P 4 Hold the handle and slide out the drawer Operate the LCD console drawer Flip up the LCD to a suitable angle 1 3 Installation How to use the drawer www RackmountMart com...

Page 10: ...ng to the LCD console drawer we suggest turning o the power to all devices Apply power to connected devices again only after the LCD console drawer is receiving power The company is not responsible fo...

Page 11: ...nsole drawer we suggest turning o the power to all devices Apply power to connected devices again only after the LCD console drawer is receiving power The company is not responsible for damage caused...

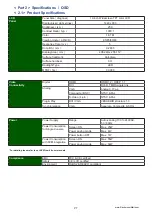
Page 12: ...19 inch Widescreen TFT color LCD Display pixel dots x lines 1440 x 900 Brightness typ 250 Contrast Ratio typ 1000 1 Color 16 7 M Viewing Angle L R U D 85 85 80 80 Response Time ms 5 Dot pitch mm 0 283...

Page 13: ...inear PCM 32 44 1 48 KHz Speaker Dual Stereo Speaker 2 x 2W Environmental Conditions Operating Temperature 0 to 55 C degree Humidity 20 90 non condensing Altitude 16 000 ft Storage Non operating Tempe...

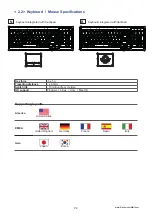
Page 14: ...le time OS support Windows Linux Unix Mac OS 2 2 Keyboard Mouse Specifications Supporting layouts America United States EMEA United Kingdom Germany France Spain Italy Asia Japan Korea www RackmountMar...

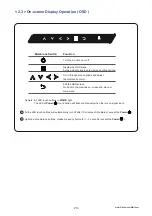
Page 15: ...select screen setting options Turn the monitor on or o Membrane Switch Function Remark All LED touch buttons in WHITE light The LED of Power touch button will flash continuously when there is no signa...

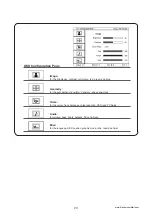
Page 16: ...d blue Geometry for the auto adjust H position V position phase and clock Video for the colour tint sharpness noise reduction DCDi and TV Setup Audio for volume bass treble balance AVL and mute Misc f...

Page 17: ...SDI 1080p 1080i 720p 30 25 24Hz 4 2 2 60 50Hz 4 2 2 60 50Hz 4 2 2 SD SDI 480i 60Hz 4 2 2 ITU R BT 656 576i 50Hz 4 2 2 Max Transmission Distance 75 ohm coaxial cable 3G SDI 150m at 2 97Gb s HD SDI 250m...

Page 18: ...the LCD may display incorrectly on a full screen If so please adjust the display card setting on display size to fix the issue 3 HDMI chassis extension in depth to 480mm 18 9 S Video Composite chassi...

Page 19: ...2V 24V 48V 125V Input rating Input voltage 12 Volt 24 Volt 48 Volt 110 Volt Input range 9 18V 18 36V 36 75V 66 160V Input current No load 50 mA 50 mA 50 mA 35 mA Full load 4950 mA 2450 mA 1220 mA 749...

Page 20: ...2 M84IP2 M164IP2 1 1 0 M82 M162 1 2 0 M83 M163 1 3 0 M84 M164 DVI D KVM Local Remote 12 port 1 0 0 12DVI DB 15 USB Hub KVM Local Remote 8 port 16 port 32 port 1 0 1 H8KVM2IP H16KVM2IP 1 1 0 H8KVM2 H1...

Page 21: ...prior notice and assumes no responsibility for any error which may appear in this publication All brand names logo and registered trademarks are properties of their respective owners www RackmountMar...

Reviews: