background image

FEATURES

Hardware specifications

Auto Head Cleaner

4 Head HiFi Stereo 

Bilingual on-screen menu display selectable in
English or Spanish

181 channel capability PLL frequency synthesizer
tuner with direct station call

(A cable converter box may be necessary to view
scrambled cable channels.)

Automatic functions

Auto power on and off system

Digital Auto Tracking (DTR)

Playback

S-VHS Quasi Playback (SQPB)

(Allows you to view a tape recorded in S-VHS format.)

Auto Repeat

2 Step Picture Search Operation

Index Search 

Time Search

Recording

1 Year, 7 events (including Daily and Weekly
Timer Recording)

OTR (One Touch Recording)

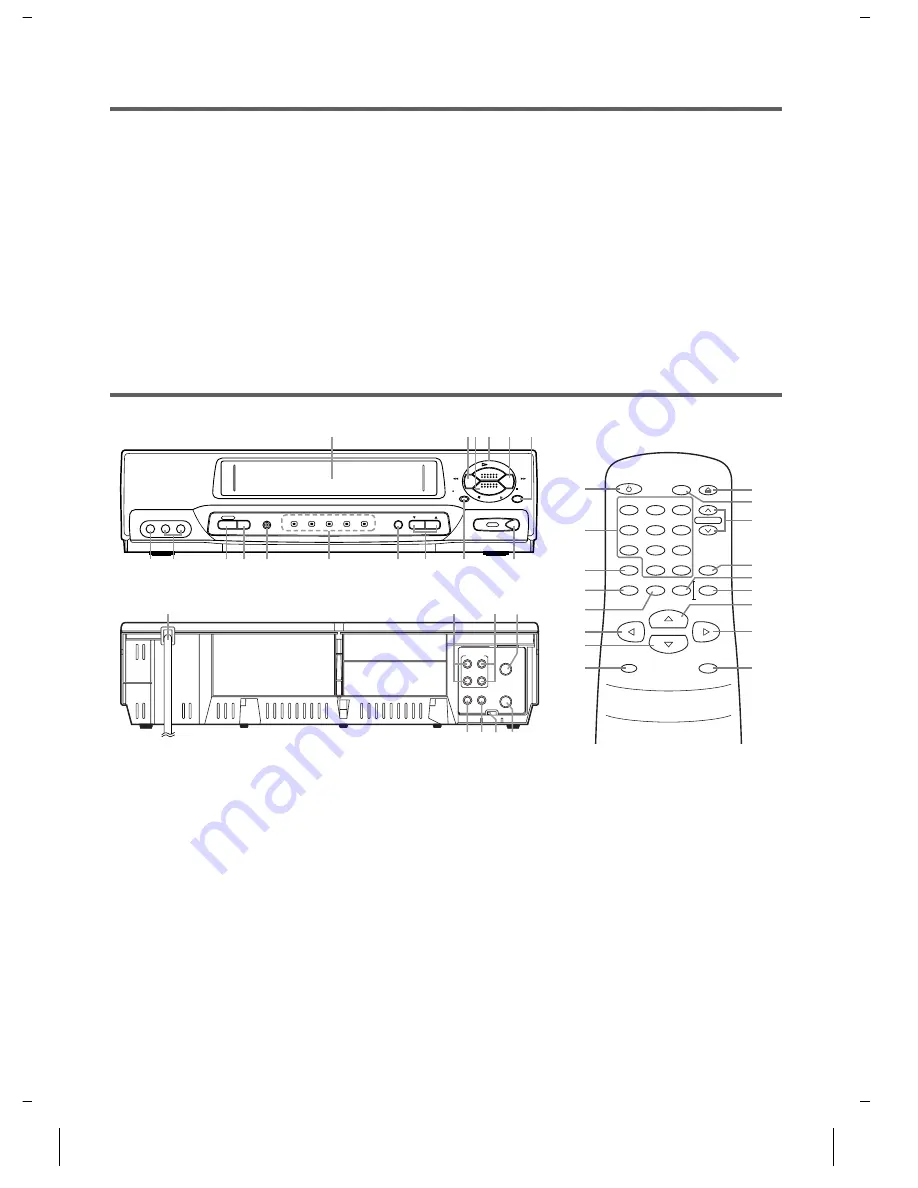
OPERATING CONTROLS AND FUNCTIONS

1.

Cassette Compartment

2.

REW button–

Press to rewind the tape, or to view

the picture rapidly in reverse during the playback
mode. (Rewind Search)
Press to cancel a setting of timer program. Press to
correct digits when setting program (For example:
setting clock or timer program). Press to add or delete
channel numbers during channel preset.

3.

EJECT button–

Press to remove the tape from the

VCR.

STOP button– 

Press to stop the tape motion.

Press to enter digits when setting program (For ex-
ample: setting clock or timer program). Press to se-
lect the setting modes from the on screen menu.

4.

PLAY button–

Press to begin playback.

Press to enter digits when setting program (For ex-
ample: setting clock or timer program).
Press to select the setting modes from the on screen
menu.

5.

F.FWD button–

Press to rapidly advance the tape, or

view the picture rapidly in forward during playback.
(Forward Search)
When setting program (For example: setting clock or
timer program), press to determine your selection
and proceed to the next step you want to input. Press
to determine the setting modes from the on screen
menu. Press to add or delete channel numbers during
channel preset.

POWER

VCR/TV

1

2

3

4

5

6

CHANNEL

7

8

9

MENU

0

+100

SEARCH MODE

DISPLAY SLOW

PLAY

REW

F.FWD

STOP

RECORD

PAUSE/STILL

EXIT

COUNTER

MEMORY

RESET

EJECT

3

20

19

4

8

12

18

5

6

14

15

7

17

13

3

2

16

 REMOTE CONTROL 

ANT

AUDIO

VIDEO

IN

OUT

OUT

IN

CH3 CH4

OUT

L

R

IN

21

22

23 24

25 26

28

27

F.FWD

PAUSE

STILL

REW

CHANNEL

TAPE SPEED

POWER

VIDEO

L  AUDIO  R

VCR/TV

POWER

VCR/TV

TAPE IN

TIMER

REC

PLAY

STOP/EJECT

REC

OTR

MENU

1

2

4

5

6

3

13

14

11

10

9

8

7

12

26 23

 

VCR FRONT PANEL


 

VCR REAR PANEL 


1C31

H7933

- 4 -

EN

Summary of Contents for VR-701

Page 1: ...NERGY STAR Partner our company has determined that this product meets the ENERGY STAR guidelines for energy efficiency ENERGY STAR is a U S registered mark SUPPLIED ACCESSORIES ACCESSORIES PART NO Coa...

Page 2: ...conductors location of antenna discharge unit connection to grounding electrodes and requirements for the ground ing electrode Fig A 14 Lightning Foraddedprotection forthisvideoproductduringalightnin...

Page 3: ...he cassette If you decide to record on the tape again cover the hole with plastic tape REMOTE CONTROL We do not recommend the use of universal remote con trols Not all of the functions may be controll...

Page 4: ...ton Press to stop the tape motion Press to enter digits when setting program For ex ample setting clock or timer program Press to se lect the setting modes from the on screen menu 4 PLAY button Press...

Page 5: ...er than 99 press this button first then press the last two digits To select channel 125 first press 100 button then press 2 and 5 only on the remote control 16 DISPLAY button Press to display the curr...

Page 6: ...input jacks on the front or the back of the VCR 1 When you connect the external source to input jacks on the back of the VCR select L1 position for re cording by pressing the 0 0 1 on the remote contr...

Page 7: ...ton 5 Begin channel preset by pressing the F FWD button once The tuner scans and memorizes allactivechannels in your area The VCR distinguishes be tween standard TV channels and cable channels 6 Afte...

Page 8: ...en press the F FWD button 3 Select AUTO SET UP by pressing the PLAY or STOP button Then press the F FWD button After scanning the tuner stops at the lowest memo rized channel The VCR distinguishes bet...

Page 9: ...utton 3 Begin auto repeat playback by pressing the F FWD button so that ON will appear next to AUTO RE PEAT on the TV screen If the on screen menu still remains press the RE SET EXIT button to exit th...

Page 10: ...hough a program may be broadcast in both stereo and second audio you must select the recording mode in TV STEREO or SAP before you record a broadcast 2 Press the MENU button and select AUDIO OUT by pr...

Page 11: ...program by pressing the REW button during the program number flashes 5 Press the RESET EXIT button to exit 6 Press the POWER button to return to timer stand by mode AVOIDING OVERLAPPING PROGRAMS Ther...

Page 12: ...ING GUIDE If you have followed the instructions contained in this manual and have difficulty in operating your VCR locate the PROBLEM in the left column below Check the corresponding CORRECTIVE ACTION...

Page 13: ...ourself There are no user service able parts inside Turn off unplug the power plug and please call our help line at 1 800 242 7158 to locate an Authorized Service Center CABINET CLEANING Wipe the fron...

Page 14: ...3 Seleccione ENGLISH o ESPA OL Spa nish pulsando el bot n PLAY o STOP Y luego pulse el bot n F FWD 4 Pulse una vez el bot n F FWD El sintonizador explora y memoriza todos los canales activos de su zo...

Page 15: ...la reproducci n s lo en la videograbadora o el modo de c mara lenta P lselo para estabilizar la imagen en el modo de imagen fija cuando sta empieza a vibrar verticalmente 13 Bot n de grabaci n RECORD...

Page 16: ...used by repairs alterations or parts not supplied by FUNAI CORPORATION or damage which results fromaccident misuse abuse mishandling misapplication alteration faulty installation improper maintenance...

Reviews: