background image

– 19 –

EN

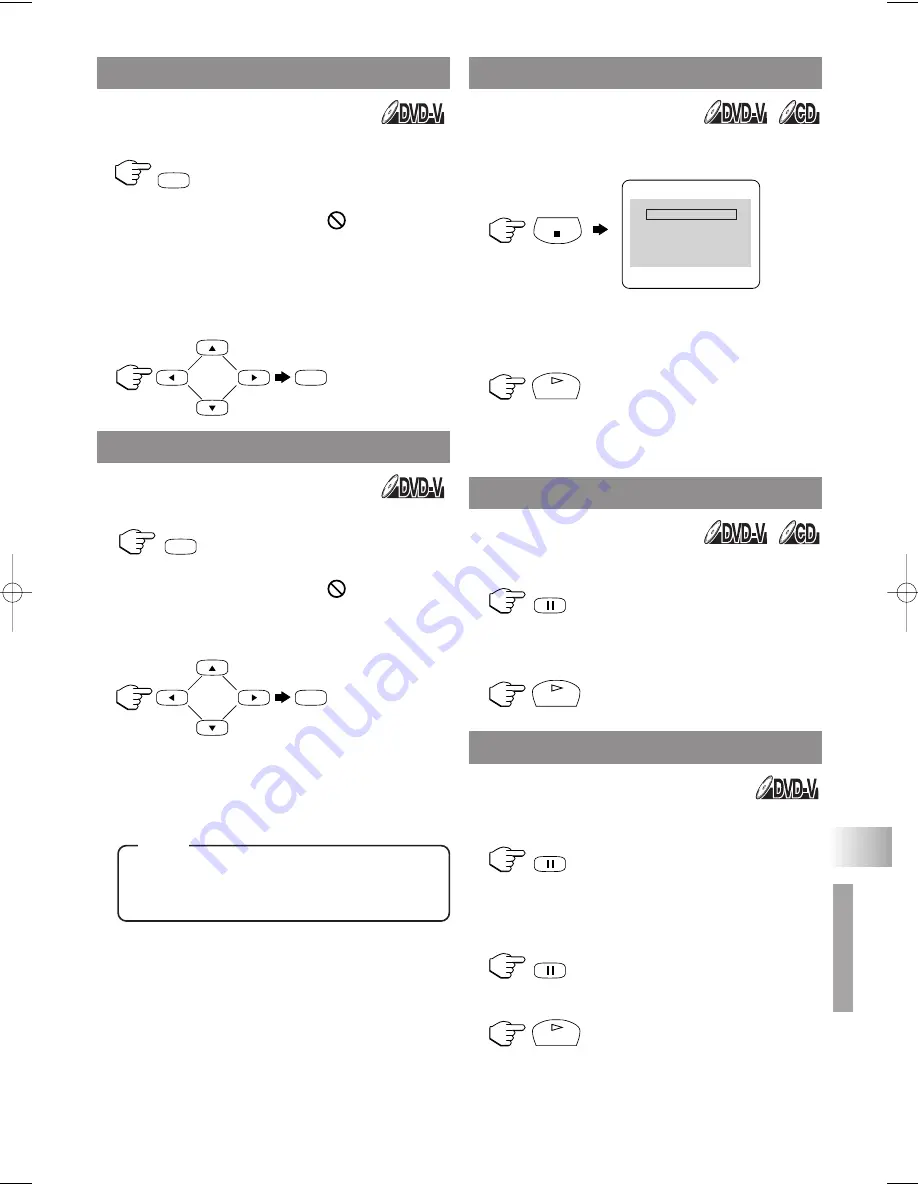
1

Press 

[DISC MENU]

.

The DVD main menu will appear.

If the feature is not available, 

symbol may

appear on the TV screen.

If disc menu is available on the disc, audio lan-
guage, subtitle options, chapters for the title and
other options will appear for selection.

2

Press 

[

K

]

,

[

L

]

,

[

s

]

or

[

B

]

to select an item

and press 

[ENTER]

to confirm selection.

1

Press 

[TITLE]

.

The title menu will appear.

If the feature is not available, 

symbol may

appear on the TV screen.

2

Press 

[

K

]

,

[

L

]

,

[

s

]

or

[

B

]

to select an item

then press 

[ENTER]

to confirm selection.

CALLING UP A MENU SCREEN
DURING PLAYBACK

Press 

[DISC MENU]

to call up the DVD menu or

press 

[TITLE]

to call up the title menu.

Contents of menu and corresponding menu
operations may vary between discs. Refer to
the manual accompanying the disc for details.

1

During playback, press 

[STOP 

C

]

.

Resume message will appear on the TV screen.

2

Press 

[PLAY 

O

]

, playback will resume from

the point at which playback was stopped.

To cancel resume, press 

[STOP 

C

]

twice.

The resume information stays on even when the
power is turned off.

1

During playback, press 

[PAUSE 

F

]

.

Playback will pause and sound will be muted.

2

To continue playback, press 

[PLAY 

O

]

.

1

During playback, press 

[PAUSE 

F

]

.

Playback will pause and sound will be muted.

2

The disc goes forward by one frame each
time 

[PAUSE 

F

]

is pressed.

3

To exit step by step playback, press 

[PLAY

O

]

.

RESUME

PAUSE

TITLE MENU

DISC MENU

DISC

MENU

ENTER

TITLE

ENTER

STOP

PLAY

PLAY

PAUSE

STEP BY STEP PLAYBACK

PAUSE

PAUSE

PLAY

NOTE

Press ’PLAY’ to play from here.
To play the beginning, 
press ’STOP’ first and then ’PLAY’.

Resume ON

DVD SECTION

P

LA

YING A DISC

L3254CE(P17-22).QX3  06.2.9 0:34 PM  Page 19

Summary of Contents for COLOR TV/DVD

Page 1: ...D5 20 inch If you need additional operating assistance after reading this owner s manual or to order replacement accessories please call TOLL FREE 1 800 242 7158 Or visit our WEB SITE at http www Symphonic us ...

Page 2: ...ts and openings in the cabinet and the back or bottom are provided for ventilation and to ensure reliable operation of the unit and to protect it from overheating and these openings must not be blocked or covered The open ings should never be blocked by placing the unit on a bed sofa rug or other similar surface This unit should never be placed near or over a radiator or heat register This unit sh...

Page 3: ...number as yours You should record the number and other vital information here and retain this book as a permanent record of your pur chase to aid identification in case of theft Serial numbers are not kept on file Date of Purchase Dealer Purchase from Dealer Address Dealer Phone No Model No Serial No 14 Lightning For added protection for this unit receiver during a lightning storm or when it is le...

Page 4: ... unplug the power cord immediately and take the unit to our Authorized Service Center for servicing Do not put your fingers or objects into the unit disc slot Do not place anything directly on top of the unit Moisture condensation may occur inside the unit when it is moved from a cold place to a warm place or after heating a cold room or under conditions of high humidity If a DVD is played in a un...

Page 5: ... 17 PLAYING A DISC 18 BASIC PLAYBACK 18 DISC MENU 19 TITLE MENU 19 RESUME 19 PAUSE 19 STEP BY STEP PLAYBACK 19 FAST FORWARD FAST REVERSE 20 SLOW FORWARD SLOW REVERSE 20 ZOOM 20 SEARCH FUNCTION 21 TRACK SEARCH 21 TITLE CHAPTER SEARCH 21 TIME SEARCH 22 MARKER SET UP SCREEN 22 SPECIAL PLAYBACK FUNCTION 23 REPEAT 23 A B REPEAT 23 PROGRAM 24 RANDOM PLAYBACK 24 CHANGING THE SETTINGS 25 SUBTITLE LANGUAGE...

Page 6: ...enus in a desired language You can display DVD menus in a desired lan guage if available on a DVD Screen saver If the screen saver program is set to ON it starts when there is no input from the unit for 5 minutes in stop mode Subtitles in a desired language You can select a desired language for the display subtitles if that language is available on a disc Selecting a camera angle You can select th...

Page 7: ...14 Press to select TV sound mode STEREO SAP MONO For DVD mode P 25 Press to select a desired audio language if available 15 EJECT A button P 18 Press to remove a disc from the unit 16 SELECT button P 11 Press to select the TV mode external input mode or DVD mode 17 CH K L buttons P 11 Press to select memorized channels 18 VOL X Y buttons P 11 Press to control the volume level for the DVD and TV 19...

Page 8: ...tle language FRONT PANEL 31 37 38 39 33 32 34 35 36 INSTALLING THE BATTERIES 1 Open the battery compartment cover by pressing the cover on the remote control unit in the direction of the arrow 2 Insert 2 AA penlight batteries into the bat tery compartment in the direction indicated by the polarity markings 3 Replace the cover BATTERY PRECAUTIONS Be sure to follow the correct polarity as indicated ...

Page 9: ...na ANT DI GI TA L AU DI O OU T C OA XI AL R L Y Pb Pr R L VID EO S V IDE O VID EO 2 CP MP ON EN T AU DIO AU DIO VID EO 1 AN T HE AD PH ON E ANT OUT IN 75 ohm Coaxial Cable Cable Box or Satellite Box Rear of this unit from Cable Company or Satellite Antenna Note to CATV system installer This reminder is provided to call the CATV system installer s attention to Article 820 40 of the NEC that provide...

Page 10: ...TION DI GI TA L AU DI O OU T C OA XI AL R L Y Pb Pr R L VID EO S V IDE O VID EO 2 CP MP ON EN T AU DIO AU DIO VID EO 1 AN T HE AD PH ON E AUDIO VIDEO2 VIDEO1 Audio Cable Video Cassette Recorder ex OUT OUT OUT S Video Cable Video Cable OR R L S VIDEO VIDEO VIDEO1 AUDIO NOTE L Y Pb Pr R COMPONENT VIDEO2 AUDIO Component Video Cable Audio Cable Video Game Video Camera ex OUT OUT Use this connection if...

Page 11: ...ven if you turn off the unit in the DVD mode when you turn it on again it will go into the TV mode TO WATCH CABLE OR SATELLITE CHANNEL If the unit is connected to a cable box or satellite box press CH K L to select CH3 or CH4 according to the output channel setting of the device and select desired channel on that device TO WATCH EXTERNAL INPUT When an external equipment is connected to AUDIO VIDEO...

Page 12: ...cable box or satellite box ADDING DELETING CHANNELS The channels you no longer receive or seldom watch can be deleted from the memory Of course you can add the deleted channel into the memory again 1 Press SETUP then press K or L to point to CHANNEL SET UP 2 Press ENTER then press K or L to point to ADD DELETE CH 3 Press ENTER then press the Number but tons or CH K K L L to select the desired chan...

Page 13: ...ACK LIGHT 2 Press ENTER then press s or B to select to BRIGHT NORMAL or DARK 3 Press SETUP The Sleep Timer function turns off the unit without using POWER after a desired period of time 1 Press SLEEP 2 Press SLEEP repeatedly until the desired sleep time is displayed Each press increases the time by 10 minutes up to 90 minutes After 5 seconds the Sleep Timer setting will disappear automatically If ...

Page 14: ...2 If you select OFF Closed Caption System set ting is canceled 3 Press SETUP to exit the menu Even if there is a power failure of any kind the unit will retain its memory for this feature TO SELECT TV SOUND MODE 1 Press AUDIO repeatedly to select the MTS output mode The output mode changes as described below every time you press AUDIO Second Audio Program SAP Sometimes broadcasters add another cha...

Page 15: ...ect the ratings of TV Y7 TV PG TV 14 or TV MA you will have the option of setting sub rating categories Press K or L to select a rating with sub ratings you wish to block then press ENTER twice Press K or L to select a sub rating then press ENTER to set it to BLOCK or VIEW The blocked sub ratings will appear next to the rating category in the TV RATING menu 15 EN V CHIP SET UP B TV RATING MPAA RAT...

Page 16: ...e is cleared for redoing 5 Press SETUP to exit the menu Your personal access code will be erased and will return to the default 0000 when a power failure occurs or when you turn off the power using a wall switch If you have for gotten the code unplug the power cord for 10 seconds to restore the access code to 0000 1 Press SETUP then press K or L to point to LANGUAGE 2 Press ENTER repeatedly to sel...

Page 17: ...omised 7 You may play back the unfinalized DVD R RW disc recorded in the video format on our brand s DVD recorder However depend ing on the recording status of a disc the disc may not be played back at all or normally the picture or sound may not be smooth etc In this case you need to finalize the disc with the DVD recorder Refer to the manual accompanying the DVD recorder 8 Only the discs recorde...

Page 18: ...n switched to the TV mode the DVD mode shuts down first and then the TV picture and sound appears in about 4 seconds Similarly when POWER is press to turn off in the DVD mode this mode shuts down first and then the unit is turned off may appear at the top right on the TV screen during operation warning that a pro hibited operation has been encountered by the DVD or the disc With DVDs that use titl...

Page 19: ...tions may vary between discs Refer to the manual accompanying the disc for details 1 During playback press STOP C Resume message will appear on the TV screen 2 Press PLAY O playback will resume from the point at which playback was stopped To cancel resume press STOP C twice The resume information stays on even when the power is turned off 1 During playback press PAUSE F Playback will pause and sou...

Page 20: ...the disc Approximate speed is 1 1 16 2 1 8 and 3 1 2 4 To return to normal playback press PLAY O The Zoom function allows you to enlarge the video image and to pan through the enlarged image 1 Press ZOOM during playback Playback will continue 2 Press ZOOM repeatedly to select the required zoom factor ZOOM1 ZOOM2 ZOOM3 or OFF 3 Press K L s or B to move the zoomed picture across the screen 4 To exit...

Page 21: ...p subsequent tracks Press SKIP H to go back to beginning of the cur rent track Press it repeatedly to go to the previous tracks If SKIP H G is pressed while the play back is paused the playback will be paused again after skipping to the next track SKIP H G are not operative when playback is stopped 1 Press SEARCH MODE once for the Chapter search twice for the Title search during play back 2 Within...

Page 22: ... appears in the display 3 When you reach the desired point press ENTER The Title or Track and elapsed playing time will appear in the TV screen 4 To return to the Marker later press SEARCH MODE repeatedly during playback to display the Marker screen Then press s or B to choose the desired marker then press ENTER Operations which erase all Markers Turning off the power Ejecting a disc from the unit...

Page 23: ...int A appears briefly on the TV screen 2 Press A B again at your chosen end point A B appears briefly on the TV screen and the repeat sequence begins 3 To exit the sequence press A B The A B repeat section can only be set within the current title for DVDs or current track for Audio CDs A B repeat is not available with some scenes in DVD To cancel the A point which was set press CLEAR A B repeat pl...

Page 24: ...gram canceled Up to 99 tracks can be entered To erase all tracks in the program at once select ALL CLEAR at the bottom of the list at step 2 If you like to repeat the current track in the program press REPEAT several times until TRACK appears during playback If you like to repeat the entire program press REPEAT several times until ALL appears during playback This function shuffles the playing orde...

Page 25: ... letter language code the code will be displayed every time you change the Subtitle language setting If you choose any other languages will be displayed instead Refer to page 31 The unit allows you to select a language during DVD disc if multi languages are available playback 1 Press AUDIO during playback 2 Press AUDIO repeatedly to select your desired language Pressing AUDIO may not work on some ...

Page 26: ...tch ON or OFF ON Makes the dark parts brighter OFF Shows the original picture as recorded Initial setting 2 Press MODE twice or RETURN to exit The setting will be saved even if the unit is turned off You can enjoy surround sound effect over two speak ers on this unit 1 Press MODE repeatedly during playback then press ENTER to set it 1 2 or OFF 1 Natural effect 2 Emphasized effect OFF Original Soun...

Page 27: ...t playback status Angle icon appears only when avail able on the DVD TT Title Current title number Total titles 1 3 0 00 00 1 23 45 Elapsed time of the current title Remaining time of the current title Current repeat setting appears only when the repeat setting is active C Chapter repeat T Title repeat A B A B repeat T L1 BIT RATE The amount of audio and video data currently being read Layer numbe...

Page 28: ...upported by the disc can be selected 5 Press SETUP to exit the menu Language Setting for Audio and Subtitle are not valid for some discs due to default setting of the disc In this case set them by pressing AUDIO and SUBTITLE Refer to page 25 If you select a language that is not supported by the disc subtitle will automatically be set OFF and the first item of the audio languages will be automatica...

Page 29: ...default OFF Output the original sound When playing disc with copyright Protection If you select OFF copyright protection will be activated and sound will be down sampled at 48kHz DOLBY DIGITAL Set to BITSTREAM when the unit is connected to a Dolby Digital Decoder BITSTREAM Output a Dolby Digital signal default PCM Convert the Dolby Digital to PCM 2 channel stereo 4 Press SETUP to exit the menu PAR...

Page 30: ...eral use prohibited OTHER SETTINGS Follow steps 1 to 2 in the on page 28 3 Press K or L to select the below items then press ENTER ANGLE ICON Press ENTER repeatedly to turn Angle icon ON or OFF The default setting is ON SCREEN SAVER Press ENTER repeatedly to turn Screen Saver ON or OFF The default setting is OFF If you select ON the screen saver program starts when there is no input from the unit ...

Page 31: ...o Croatian 6554 Sesotho 6566 Setswana 6660 Language Code Shona 6560 Sindhi 6550 Singhalese 6555 Siswat 6565 Slovak 6557 Slovenian 6558 Somali 6561 Spanish SPA 5165 Sundanese 6567 Swahili 6569 Swedish SWE 6568 T Tagalog 6658 Tajik 6653 Tamil 6647 Tatar 6666 Telugu 6651 Thai 6654 Tibetan 4861 Tigrinya 6655 Tonga 6661 Tsonga 6665 Turkish TUR 6664 Turkmen 6657 Twi 6669 U Z Ukrainian 6757 Urdu 6764 Uzb...

Page 32: ...a new channel if OK then possible station trouble Is antenna connected to jack on the back of the set If outside antenna is being used check for broken wire Adjust COLOR control Poor Reception on Some Channels Try a new channel if OK then possible station trouble Ghosts in Picture Is antenna connected to jack on the back of the set If outside antenna is being used check for broken wire Check for l...

Page 33: ...PTION mode C1 C2 or Caption OFF PROBLEM CORRECTIVE ACTION Sound OK Picture Poor Try a new channel if OK then possible station trouble Is antenna connected to jack on the back of the set If outside antenna is being used check for broken wire Check for local interference Adjust CONTRAST BRIGHTNESS control Picture OK Sound Poor Try a new channel if OK then possible station trouble Check for local int...

Page 34: ...torted which are not a sign of a malfunction Although pictures may stop for a moment this is not a malfunction Audio or subtitle language The selected language is not available for audio or subtitles on the does not match the set up DVD This is not a malfunction The camera angle cannot be changed The DVD does not contain sequences recorded from different camera angles This is not a malfunction Aud...

Page 35: ...will mar the disc Wipe the disc in a straight line from center to edge Never wipe with a circular motion Do not use detergent or abrasive cleaning agents DISC HANDLING MAINTENANCE LCD 20 inch Television system NTSC M Closed caption system 15 119 FCC Channel coverage VHF 2 13 UHF 14 69 CATV 2 13 A W W 1 W 84 A 5 A 1 5A Tuning System 181 channel frequency synthesized tuning system Channel access Dir...

Page 36: ...flood lightning or other acts of God THIS WARRANTY DOES NOT COVER PACKING MATERIALS ANY ACCESSORIES EXCEPT REMOTE CONTROL ANY COSMETIC PARTS COMPLETE ASSEMBLY PARTS DEMO OR FLOOR MODELS FUNAI CORP AND ITS REPRESENTATIVES OR AGENTS SHALL IN NO EVENT BE LIABLE FOR ANY GENERAL INDIRECT OR CONSEQUENTIAL DAMAGES ARISING OUT OF OR OCCASIONED BY THE USE OF OR THE INABILITY TO USE THIS PRODUCT THIS WARRAN...

Reviews: