background image

3-10

iPOS TC Product Reference Guide

Testing Device Functionality

Tap 

Test 

at the top of the Setup screen to test device functions. 

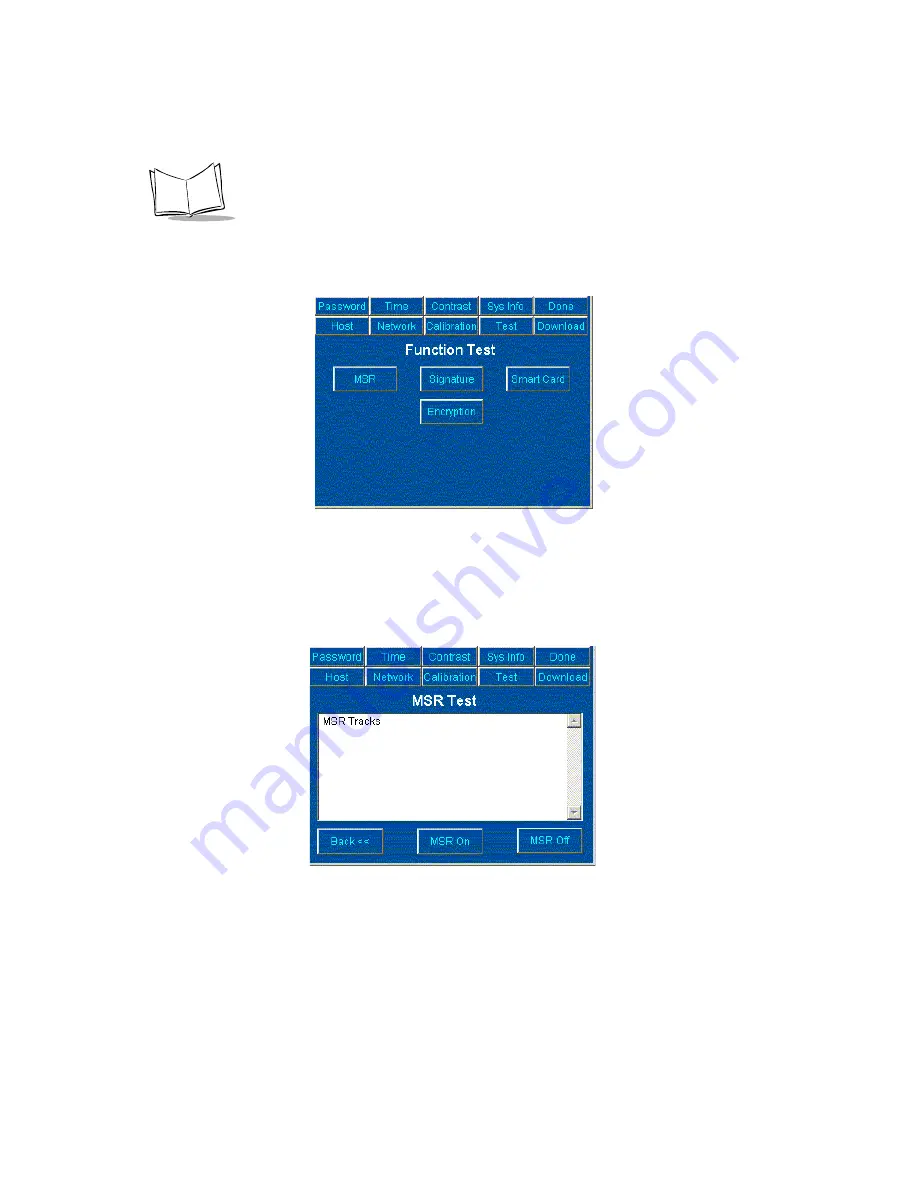
Figure 3-13.  Function Test Screen

Tap the buttons on this screen to test the functionality of the MSR, signature pad, Smart 
Card reader, or the Security Module.

Testing the Magnetic Stripe Reader (MSR)

Tap 

MSR

 on the 

Function Test

 screen to test the functionality of the MSR. 

Figure 3-14.  MSR Screen

Tap the 

MSR On 

button to turn on the MSR reader, and swipe a card through the MSR. 

Track data displays.

Tap 

MSR Off

 to turn off the reader. Tap 

Back 

to return to the 

Function Test

 screen.

Summary of Contents for iPOS TC

Page 1: ...iPOS TC Product Reference Guide...

Page 2: ......

Page 3: ...iPOS TC Product Reference Guide 72 61362 01 Revision A August 2003...

Page 4: ...rk from a licensed program or use a licensed program in a network without written permission from Symbol The user agrees to maintain Symbol s copyright notice on the licensed programs delivered hereun...

Page 5: ...S TC 1 2 System Interface 1 3 POS Host Interface 1 3 LAN Interface 1 3 Dual Channel 1 3 posPortal Transaction Application 1 3 Chapter 2 Setting Up the iPOS TC System Introduction 2 1 Installing the iP...

Page 6: ...te and Time 3 5 Adjusting Contrast 3 6 Viewing System Information 3 6 Changing Host Settings 3 7 Changing IP Configuration Settings 3 8 Calibrating the iPOS TC 3 8 Testing Device Functionality 3 10 Do...

Page 7: ...n overview of the iPOS TC and its transaction application Chapter 2 Setting Up the iPOS TC System describes how to connect the terminal to a host connect peripherals install the screen guard and mount...

Page 8: ...ce Information If you have a problem with your equipment contact the Symbol Support Center If your problem cannot be resolved over the phone you may need to return your equipment for servicing If that...

Page 9: ...stria sterreich Symbol Technologies Austria GmbH Prinz Eugen Strasse 70 2 Haus 1040 Vienna Austria 01 5055794 0 Inside Austria 43 1 5055794 0 Outside Austria Denmark Danmark Symbol Technologies AS Dr...

Page 10: ...Mexico City DF Mexico 5 520 1835 Inside Mexico 52 5 520 1835 Outside Mexico Netherlands Nederland Symbol Technologies Kerkplein 2 7051 CX Postbus 24 7050 AA Varsseveld Netherlands 315 271700 Inside Ne...

Page 11: ...version of this guide go to http www symbol com manuals Sweden Sverige Letter address Symbol Technologies AB Box 1354 S 171 26 SOLNA Sweden Visit shipping address Symbol Technologies AB Solna Strandv...

Page 12: ...x iPOS TC Product Reference Guide...

Page 13: ...promotions Dual channel connectivity features legacy data ports RS 232 RS 485 and USB PCMCIA Type II slot and onboard Ethernet 3 Track Magnetic Stripe Reader MSR for credit and debit card reading pos...

Page 14: ...ts of the iPOS TC The following illustration indicates the parts of the iPOS TC Figure 1 1 Parts of the iPOS TC Touchpad Stylus Magnetic Stripe Reader RS 232 RS 485 Port Setup Button Reset Button PCMC...

Page 15: ...he product label side facing the bottom of the iPOS TC device Dual Channel The iPOS TC also supports Dual Channel capability using an Ethernet or PCMCIA connection and an RS 232 RS 485 or USB connecti...

Page 16: ...1 4 iPOS TC Product Reference Guide...

Page 17: ...C System Introduction This chapter provides information on installing the iPOS TC including connecting to a POS host device installing peripherals installing and replacing the screen guard mounting th...

Page 18: ...onnection Items Connection Cables Parts Required LAN On board Ethernet Ethernet cable PCMCIA PCMCIA card Ethernet cable HDB15 power jack cable if single channel connection or USB dual channel AC power...

Page 19: ...9 pin connector DB9 into a serial port typically COM1 on the POS host device 4 Insert the male connector on the AC power adapter cable into the port on the back of the serial cable s 9 pin connector...

Page 20: ...2 Plug the serial cable s 15 pin connector HDB15 into the serial port on the back of the iPOS TC 3 Plug the SDL connector into one of the following ports on the POS host device 4B 9A 9B or 9E 4 Turn...

Page 21: ...to the USB port on the back of the iPOS TC 3 Insert the other end of the USB cable into the USB port on the POS host device 4 Plug the power jack cable s 15 pin connector HDB15 into the serial port on...

Page 22: ...the HDB15 connector 1 Plug the cable s 15 pin connector HDB15 into the serial port on the back of the iPOS TC 2 Plug one end of the Y cable into a serial port typically COM1 on the POS host device 3 C...

Page 23: ...screen This maintenance extends the operation of the iPOS TC To install the screen guard onto the iPOS TC 1 Disconnect power from the iPOS TC 2 Clean the surface of the terminal and touchscreen using...

Page 24: ...oper adhesion The screen guard can be removed and repositioned in case of misalignment Figure 2 6 Placing Screen Guard on Terminal Replacing the Screen Guard To replace the screen guard carefully remo...

Page 25: ...etop using the following items mounting plate 3 bolts or posts 3 nuts 3 washers To secure the iPOS TC to a tabletop 1 Attach the mounting plate to the table surface using the 3 bolts nuts and washers...

Page 26: ...2 10 iPOS TC Product Reference Guide...

Page 27: ...test device functions such as the card reader and signature pad Using the Setup Program To access the iPOS TC setup program 1 Supply power to the iPOS TC 2 When the message Press SETUP button to run...

Page 28: ...to skip calibration and use the current calibration settings The Password screen appears Figure 3 2 Password Screen 4 A password is required to access the Setup menu Tap Keyboard to open the virtual k...

Page 29: ...d for accessing setup mode Time sets a new system time Contrast changes screen contrast Sys Info displays software version information Host displays host settings Network sets IP configuration informa...

Page 30: ...gure 3 5 Enter Old Password Screen 2 Tap Keyboard on the Enter Old Password screen to open the virtual keyboard 3 Enter the current password password if setting a new password for the first time 4 Tap...

Page 31: ...e iPOS TC 1 Tap Time at the top of the Setup screen The Date and Time screen appears Figure 3 6 Date and Time Screen 2 Use the drop down menus to change the date and time settings The day of the week...

Page 32: ...ange Contrast screen appears Figure 3 7 Change Contrast Screen 2 Tap the left arrow button to decrease contrast or the right arrow button to increase contrast Contrast values range from 0 to 64 3 Tap...

Page 33: ...settings Figure 3 9 Host Settings Screen Use the buttons and drop down menu to change the following host information RS 485 post address default 65 Baud rate default 9600 Host port selection default...

Page 34: ...tion displayed in a text field tap Kbd to the right of the field to open the virtual keyboard and enter the new value 2 Tap the Yes or No button to select or de select DHCP according to system require...

Page 35: ...o skip calibration and use the current calibration settings The Setup screen reappears Setting Default Calibration Settings If tapping the target is ineffective due to incorrect calibration settings p...

Page 36: ...the functionality of the MSR signature pad Smart Card reader or the Security Module Testing the Magnetic Stripe Reader MSR Tap MSR on the Function Test screen to test the functionality of the MSR Fig...

Page 37: ...reen Write on the screen using the stylus Tap Clear to clear the writing from the screen Testing the Smart Card Reader Tap Smart Card on the Function Test screen to test the functionality of the Smart...

Page 38: ...or Master Session encryption methods Figure 3 17 Encryption Test Screen The following options are available on the Encryption Test Screen Select the DUKPT button to enable the DUKPT encryption method...

Page 39: ...ft corner of the screen Tap Back to return to the main Test screen Encryption Key Status Screen Figure 3 18 Encryption Key Status Screen On the Encryption Key Status screen tap the Show Status button...

Page 40: ...on Figure 3 19 Encryption Information Screen To enter the account number PIN and Session Key tap the Kbd buttons next to the respective fields Enter the new encryption information on the soft keypad T...

Page 41: ...manager program e g the iPOS TC IFB Installer see Using the TC IFB Installer on page 3 16 The terminal reboots when the download is complete Select Download security keys and tap Download to download...

Page 42: ...cted directory folder Make sure the Install from PCMCIA check box is not checked then double click the IFB file to install onto the iPOS TC If installing the IFB from a file on a PCMCIA card select th...

Page 43: ...IFB Installer application and save all changes made to the application s settings Click Cancel to terminate the download process and return to the main window Click Cancel again to terminate the appli...

Page 44: ...3 18 iPOS TC Product Reference Guide...

Page 45: ...ution Color 1 4 VGA 320 L x 240 W Touch Pad Resolution 1024 x 1024 x y coordinates 207 Hori x 286 Ver dpi Network Connectivity PCMCIA Type II adapter onboard 10 Base T Ethernet Power Requirements Regu...

Page 46: ...tion applications posPortal Peripherals and Accessories pos TC Software Suite Optional posBuilder posVisual IBM 4690 SDK Operating systems supported DOS Windows 98 2000 and NT 3 51 or higher IBM 4680...

Page 47: ...6 date and time 3 5 encryption 3 12 host 3 7 IP settings 3 8 MSR 3 10 password 3 2 setup program 3 1 signature pad 3 11 smart card reader 3 11 connecting items required 2 2 peripherals 2 6 RS 232 2 3...

Page 48: ...ord 3 4 PCMCIA card 2 2 PCMCIA slot 1 2 peripherals A 2 installing 2 6 PIN encryption A 2 ports ethernet 1 2 RS 232 1 2 RS 485 1 2 USB 1 2 posPortal 1 3 power cable 2 2 power requirements A 1 processo...

Page 49: ...stylus 1 2 Symbol support center vi system information 3 6 T TC IFB installer 3 15 failure 3 16 technical specifications A 1 testing 3 10 encryption 3 12 MSR 3 10 signature pad 3 11 smart card reader...

Page 50: ...Index 4 iPOS TC Product Reference Guide...

Page 51: ...were you with this product before using this manual Did this manual meet your needs If not please explain ___________________________________________________________ _________________________________...

Page 52: ......

Page 53: ......

Page 54: ...2 72 61362 01 Revision A August 2003 Symbol Technologies Inc One Symbol Plaza Holtsville N Y 11742 1300 http www symbol com manuals iPOS TC Product Reference Guide...

Reviews: