


– 35 –
SP
1L25
CONTROLES DEL FUNCIONAMIENTO Y SUS FUNCIONES
DVD
POWER
CHANNEL
PLAY
STOP/EJECT
VIDEO
VCR
AUDIO
REW
OPEN/CLOSE
F.FWD
STOP
PLAY
REC
VCR
DVD
TIMER REC
OUTPUT
DVD
L
R
1
2
3
4
7
6
8
22
21
20
18
17
16
15
14
13
12
11
10
5
9
19
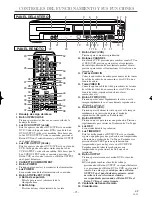
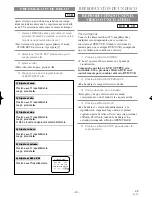
PANEL DELANTERO
PANEL REMOTO
SEARCH
MODE
+
1
2
3
4
5
6
7
8
9
0
10
SPEED
AUDIO
POWER
SKIP/CH.
SLOW
VCR/TV
DISPLAY
PAUSE
PLAY
STOP
RECORD
ENTER
RETURN
TITLE
MENU
SETUP
CLEAR/
C.RESET
ZOOM
MODE
A-B
ANGLE
REPEAT
SUBTITLE
T-SET
DVD
VCR
24
23
25
26
27
28
29
30
31
32
34
35
37
36
33
52
48
49
50
47
51
46
45
43
42
44
39
40
41
38
1.
Bandeja de carga del disco
2.
Botón OPEN/CLOSE
Presione para insertar discos en o removerlos de la
bandeja de disco.
3.
Luz DVD OUTPUT (verde)
Esta luz aparece cuando el DVD/VCR está en modo
DVD. Usted sólo puede mirar DVDs cuando la Luz
DVD OUTPUT verde está encendida. Para hacer que
la Luz DVD OUTPUT verde se encienda, presione el
Botón DVD en el control remoto o el Botón OUTPUT
en el panel delantero.
4.
Luz VCR OUTPUT (Verde)
Esta luz aparece cuando el DVD/VCR está en el modo
VCR. Usted puede sólo mirar cintas cuando la Luz
VCR OUTPUT verde está encendida. Para hacer que la
Luz VCR OUTPUT verde se encienda, presione el
Botón VCR en el control remoto o el Botón OUTPUT
en el panel delantero.
5.
CASSETTE COMPARTMENT
6.
Botón POWER
Presione para conectar y desconectar la alimentación.
7.
Luz POWER
Se enciende cuando la alimentación está conectada.
8.
Botón STOP/EJECT (VCR)
●
Botón de expulsión
Púlselo para sacar el videocasete de la
videograbadora.
●
Botón Stop
Presione detener el movimiento de la cinta.
9.
Botón PLAY (VCR)
Presione para comenzar reproducción.
10.
Botones CHANNEL
En el modo VCR, presione para cambiar canales TV en
el DVD/VCR; presione para ajustar el seguimiento
durante reproducción de movimiento normal o lento;
presione para remover fluctuaciones verticales en una
imagen fija.
11. T
omas AUDIO IN
Conecte aquí cables de audio procedentes de las tomas
de salida de audio de un camcorder, otro VCR o una
fuente de audio.
12.
Toma VIDEO IN
Conecte aquí un cable de videó procedente de la toma
de salida de videó de un camcorder, otro VCR o una
fuente de videó (reproductor de discos láser,
camcorder, etc.).
13.
Botón F.FWD (VCR)
Presione para avanzar rápidamente la cinta o ver la
imagen rápidamente en avance durante reproducción.
(Búsqueda en Avance).
14.
Botón REW (VCR)
Presione para rebobinar la cinta o para ver la imagen
rápidamente en inversión durante el modo de
reproducción.(Búsqueda en Rebobinado).
15.
Botón REC/OTR
Presione una vez para iniciar una grabación. Presione
repetidamente para iniciar un Grabación de Un-Toque.
16.
Luz REC
Se enciende durante la grabación.
17.
Luz TIMER REC
Esta luz brilla cuando el DVD/VCR está en el modo
espera o apagada para una grabación con temporizador
o durante una grabación de Un-Toque, Parpadea si se
presiona Botón T-SET para una grabación con
temporizador, pero no hay cinta en el DVD/VCR.
Parpadea cuando todas las grabaciones con
temporizador o grabaciones de Un-Toque han
terminado.
18.
Botón OUTPUT
Presione para seleccionar el modo DVD o el modo
VCR.
●
Usted puede cambiar el modo de salida ya
presionando el Botón OUTPUT en el panel delantero
o ya presionando el Botón DVD o VCR en el control
remoto. Sin embargo,
si usted presiona el Botón
OUTPUT en el panel delantero primero, usted
necesita volver a seleccionar el modo
correspondiente presionando el Botón DVD o el
Botón VCR en el control remoto.
19.
Ventanilla de Sensor Remoto
20.
Visualización
H9401UD2î
≈
.qx33 03.3.12 3:36 PM Page 35


