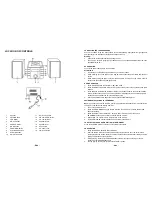

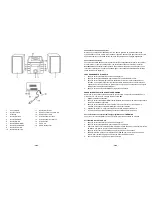


LOCATION OF CONTROLS
1 Speaker
11 SKIP
−
/TU
−
button
2
VOLUME knob
12
CD door OPEN button
3
LCD display
13
CD compartment
4
ON/OFF button
14
Speaker jack R
5 SOURCE
button
15
Speaker jack L
6
MODE button
16
Phones jack
7
PROG/MEM button
17
AC power cord
8
PLAY/PAUSE button
18
FM wire antenna
9
STOP/M
+
button
10
SKIP
+
/TU
+
button
- EN 4 -
CONNECTING THE LOUDSPEAKERS
Connect the cables of the two loudspeakers to the corresponding input
(R)
for the right speaker
and input
(L)
for the left speaker, located at the back of the unit.
Warning:
y
Connect the loudspeakers before powering the unit:
y
The unit may not work properly or get damaged if you use speakers different than the ones
supplied with the unit.
AC OPERATION
Connect the power cable plug to the wall outlet.
ATTENTION
1.
Do not plug or unplug the power cable while you have wet hands;
2.
When planning not to use this unit for a long time, disconnect the power cable from the wall
outlet;
3.
When disconnecting the power cord from the wall outlet, do not pull on the cord in order to
avoid shock risks caused by damaged cable.
RADIO OPERATION
1.
Press SOURCE button to select AM or FM radio mode.
2.
Press the SKIP
+/
TU
+
button or SKIP
−
/
TU
−
button step by step to tune to the desired radio
stations.
3.
Press and hold the SKIP
+/
TU
+
button or SKIP
−
/
TU
−
button to search the next radio station
in the direction of the search. The search operation simply finds stations with strong signals,
Stations with weak signal can only tuned in step by step
4.
Use the VOLUME knob to adjust the volume to the desired listening level.
SAVING RADIO STATIONS IN THE MEMORY
Note :
If you use this unit in the first time, or after plug off the AC/DC adaptor from a wall outlet, the
unit memory number will be starting from P01.
1.
Tune to the desired stations.
2.
Press the PROG/MEM button, the display will show the next memory station number and
flash continuously.
3.
Press the SKIP
+
/TU
+
or SKIP
−
/TU
−
button to select memory number, then press
PROG/MEM button again to store the station into the memory.
4.
Repeat step 1 to 3 to store more radio stations in the memory.
5.
Up to 20 AM and 20 FM radio stations can be stored in the memory.
TO SELECT A STORED RADIO STATION IN THE MEMORY
Press the STOP/M
+
button to skip to the next stored radio station.
CD OPERATION
1.
Press the SOURCE button to select CD mode.
2.
Insert an audio CD disc in the CD compartment and close the CD door, the unit will start
reading the disc, it will show the total number of tracks of the entire disc after reading and start
playing the first track of the entire disc.
3.
During playing, press the PLAY/PAUSE button to temporarily pause playing. To resume,
press the PLAY/PAUSE button again.
4.
To stop playing the disc, simply press the STOP/M+ button
- EN 5 -