background image

– 36 –

EN

01A11

DVD SECTION

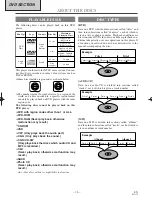
ABOUT THE DISCS

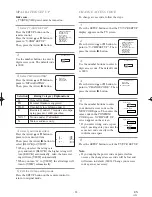
The following discs can be played back on this DVD
player.

This player conforms to the NTSC color system. You can-
not play discs recorded in other color systems such as
PAL or SECAM.

¡

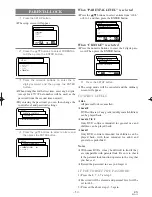
Some discs include region codes as shown below.

¡

The number inside the symbol refers to a region of the
world, and a disc encoded in a specific region format
can only be played back on DVD players with the same
region code.

The following discs cannot be played back on this
DVD player.

¡

DVD with region codes other than 1 or ALL.

¡

DVD-ROM

¡

DVD-RAM (Never play back, otherwise
malfunction may result.)

¡

CD-ROM

¡

VSD

¡

CDV (Only plays back the audio part.)

¡

CD-G (Only plays back the sound.)

¡

CD-R/CD-RW

(Only plays back the discs which audio CD and
MP3 is recorded.)

¡

CD-I

(Never play back, otherwise malfunction may
result.)

¡

SACD

¡

Photo CD

(Never play back, otherwise malfunction may
result.)

Any other discs without compatibility indications

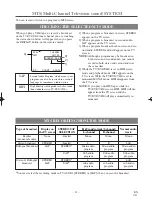
PLAYABLE DISCS

DVD

Video

12 cm

Approx. 4 h 

(single-sided)

Approx. 80 min 

(single-sided)

8 cm

Logo

Maximum 

Playback Time

Contents

Disc Type

Sound 

and 

Pictures

Disc Size

74 min

Approx. 8 h 

(double-sided)

Approx. 160 min 

(double-sided)

12 cm

20 min

8 cm 

(singles)

Audio

CD

Sound

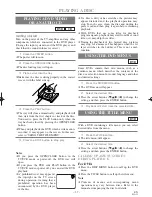
[DVD]

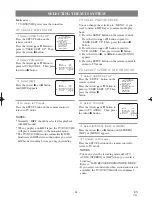
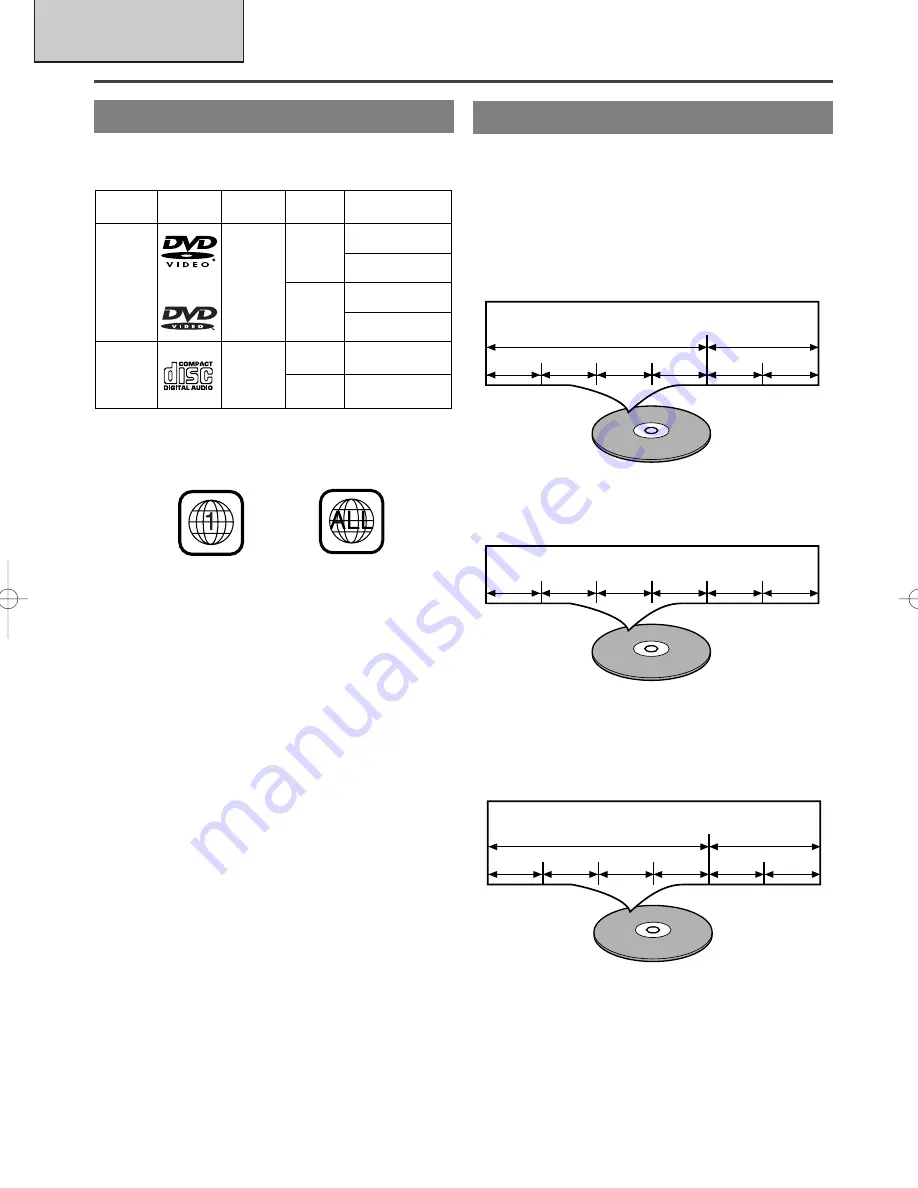
Data on a DVD is divided into sections called "titles", and
then into subsections called "chapters", each of which is
given a title or chapter number. Playback conditions are
preset on some DVD video discs, and these playback con-
ditions take priority over user operations on this player. If
a function you selected do not run as desired, refer to the
manual accompanying the disc.

DISC TYPES

Example

Title 1

Title 2

Chapter 1 Chapter 2

Chapter 1 Chapter 2

Chapter 3 Chapter 4

[AUDIO CD]

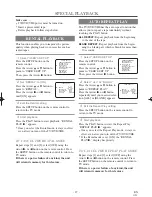
Data on an audio CD is divided into sections called
“tracks”, each of which is given a track number.

Example

Track 1

Track 2

Track 3

Track 4

Track 5

Track 6

[MP3]

Data on a MP3 is divided into sections called "albums",
and then into subsections called "tracks", each of which is
given an album or track number.

Example

Album 1

Album 2

Track 1

Track 2

Track 1

Track 2

Track 3

Track 4

 TD530/601_36-55  02.4.5 6:34 PM  Page 36

Summary of Contents for SRCD223

Page 1: ...y efficiency ENERGY STAR is a U S registered mark If you need additional operating assistance after reading this owner s manual please call TOLL FREE 1 800 968 3429 Please read before using this equipment INSTRUCCIONES EN ESPAÑOL INCLUIDAS This Owner s Manual is made of recycled paper SUPPLIED ACCESSORIES Batteries Remote Control Unit ACCESSORIES 2 AA Batteries NE204UD PART NO ...

Page 2: ...et and the back or bottom are provided for ventilation and to ensure reliable operation of the TV DVD VHS and to protect it from over heating and these openings must not be blocked or cov ered The openings should never be blocked by placing the TV DVD VHS on a bed sofa rug or other similar surface This TV DVD VHS should never be placed near or over a radiator or heat register This TV DVD VHS shoul...

Page 3: ...ring Service Unplug this TV DVD VHS from the wall outlet and refer servicing to qualified service personnel under the following conditions a When the power supply cord or plug is damaged or frayed b If liquid has been spilled or objects have fallen into the TV DVD VHS c If the TV DVD VHS has been exposed to rain or water d If the TV DVD VHS does not operate normally by follow ing the operating ins...

Page 4: ... FCC WARNING This equipment may gener ate or use radio frequency energy Changes or modifications to this equipment may cause harmful interference unless the modifications are expressly approved in the instruction man ual The user could lose the authority to oper ate this equipment if an unauthorized change or modification is made IMPORTANT COPYRIGHT INFORMATION Unauthorized copying broadcasting pu...

Page 5: ...t put your fingers or objects into the TV DVD VHS disc loading tray Do not place anything directly on top of the unit WARNING Moisture condensation may occur inside the unit when it is moved from a cold place to a warm place or after heating a cold room or under conditions of high humidity If a DVD is played in a TV DVD VHS which has moisture it may damage the DVD and TV DVD VHS Therefore when the...

Page 6: ...AL RECORDING 30 SKIPPING UNWANTED SCENES DURING RECORDING 30 OTR One Touch Recording 31 COPYING A VIDEO CASSETTE Requires a VCR or camcorder 31 C TIMER 32 AUTOMATIC TIMER RECORDING 32 TIMER PROGRAM EXTENSION 33 HINTS FOR AUTOMATIC TIMER RECORDING 34 AUTO RETURN 34 SLEEP TIMER 34 C ON SCREEN DISPLAY 35 C CABLE CHANNEL DESIGNATIONS 35 DVD SECTION C ABOUT THE DISCS 36 PLAYABLE DISCS 36 DISC TYPES 36 ...

Page 7: ...nt playback tape speeds SP LP SLP Two different recording tape speeds SP SLP Auto Head Cleaner Automatically cleans video heads as you insert or remove a cassette Zero Return The tape returns to counter of 0 00 00 by rewinding or fast forwarding Still Freeze the picture at any time for close viewing of a particular scene Digital Auto Tracking DTR Automatically adjusts the tracking for each tape yo...

Page 8: ... the TV screen using the remote control Sleep timer Allows you to have the TV DVD VHS automatically turn off at a desired time DTS Digital Theater System You can enjoy 5 1channel surround system developed by the Digital Theater System co which reproduces the orig inal sound as truthfully as possible Search Chapter search Search for the chapter designated by user is possible Title search Search for...

Page 9: ...uring playback mode Forward Search 16 STOP EJECT button TV VCR P 28 Press to stop the tape motion Press in the Stop mode to remove tape from the unit 17 Remote sensor window 18 HEADPHONE jack To connect headphone not supplied for personal listening 19 VIDEO input jack Connect to the video output jack of a video camera or VCR REMOTE CONTROL Fig 2 1 POWER button TV VCR P 15 DVD P 37 Press to turn th...

Page 10: ...it the TV menu or DVD setup mode 29 TITLE button DVD P 37 Displays the title menu 30 CLEAR button Resets a setting 31 MODE button DVD P 41 Activates program playback or random playback mode 32 SEARCH MODE button DVD P 39 Press to locate a desired point 33 AUDIO button DVD P 44 Press to select a desired audio language or sound mode 34 SUBTITLE button DVD P 45 Press to select a desired subtitle lang...

Page 11: ...ecording NOTE This unit will ONLY record and view the same channel VHF UHF SEPARATE ANTENNAS In some areas it will be necessary to use an outdoor antenna Antenna Cable Connections Continued on the Next Page ANT L AUDIO OUT R COAXIAL 1 ANT IN OUT or VHF UHF Antenna Not supplied VHF UHF Combiner Not supplied Flat twin lead cable UHF Antenna Not supplied VHF Antenna Not supplied From Cable System 75 ...

Page 12: ...l be connected to the grounding sys tem of the building as close to the point of cable entry as practical CONNECTIONS TO FRONT A V JACKS When you watch a program recorded on an another source VCR or video camera use the audio video input jacks on the front of the TV DVD VHS Connect the audio video output jacks of another source to the AUDIO L R and VIDEO jacks of this TV DVD VHS Then press the CHA...

Page 13: ...ents before making any connections and refer to the owners manual of the audio system for further installation and operational instructions Using industry standard audio patch cords connect one end to the Coaxial Digital Audio Out jack on the rear of the TV DVD VCR and the other to the Coaxial Digital Input on the audio system Then select the Coaxial Digital Audio Input on the Audio System to list...

Page 14: ...ital decoder and set Dolby Digital to on for audio output in the setup mode If output DTS audio connect to a DTS decoder and set DTS to ON for audio output in the setup mode If played a disc indicated MPEG audio connect to a MPEG decoder and set MPEG to ON for audio output in the setup mode Unless connected to a Dolby Digital decoder a DTS decoder or a MPEG decoder set Dolby Digital DTS or MPEG to...

Page 15: ...ter scanning The tuner stops on the lowest memorized channel If you want to recall the selected channels you can select the desired channel directly with the remote control number buttons or CHANNEL K or L DELETING OR ADDING CHANNEL The channels you no longer receive or seldom watch can be deleted from the memory Of course you can add the deleted channel into the memory again 1 Select CHANNEL SET ...

Page 16: ...cally will advance one hour in April then reverse one hour in October When Daylight Saving Time is ON the clock will change automatically as follows First Sunday of April At 2 AM the clock imme diately changes to 3 AM Any timer programming you have set to occur between 2 AM and 3 AM will not record Last Sunday of October At 2 AM the clock immediately changes to 1 AM Make sure Press the POWER butto...

Page 17: ...he SETUP button on the remote control Press the Arrow K or L button to point to SETTING CLOCK Then press the Arrow B button 2 Set AUTO CLOCK to ON Press the Arrow B or s button repeatedly until ON appears 3 Enter the channel number for the PBS station Press the Arrow K or L button to point to AUTO CLOCK CH Then press the Arrow B or s but ton until the channel number for your local PBS station appe...

Page 18: ...nds are not displayed they begin counting from 00 when you press the SETUP button on the remote control Use this feature to synchronize the clock with the correct time NOTE When unplugging the AC cord or if there is a power failure for more than 30 seconds you may have to reset the clock TO CHANGE CLOCK SETTING If you want to change the clock 1 Follow steps 1 and 2 2 Select where you want to chang...

Page 19: ...contrast contrast COLOR to pale to brilliant TINT to purple to green SHARPNESS to soft to clear PICTURE CONTROL The TV DVD VHS s picture controls BRIGHT CONTRAST COLOR TINT and SHARPNESS are preset to factory specifications Although they are usually the best you may need to make some further adjustments for a natural looking image NOTES Procedures must be followed within 5 seconds or the Picture C...

Page 20: ...isplays a black box on the TV screen this means that the TV DVD VHS is set to the TEXT mode To clear screen select CAPTION1 CAPTION2 or OFF Make sure TV DVD VHS power must be turned on 1 Select CAPTION Press the SETUP button on the remote control Press the Arrow K or L button to point to CAPTION 2 Select your desired caption menu Press the Arrow B or s button until your desired caption menu appear...

Page 21: ...en under 14 TV MA Mature audience only When you select the rating category and turn it BLOCK the higher rating will turn BLOCK automatically Also the lower rating will turn VIEW automatically When you turn TV Y to VIEW the all ratings will turn to VIEW automatically TV VCR SETUP TIMER PROGRAMMING SETTING CLOCK CHANNEL SET UP USER S SET UP B V CHIP SET UP LANGUAGE ENGLISH CAPTION OFF ZERO RETURN TI...

Page 22: ... B V CHIP SET UP LANGUAGE ENGLISH CAPTION OFF ZERO RETURN TIME SEARCH INDEX SEARCH V CHIP SET UP TV RATING B MPAA RATING CHANGE CODE G VIEW PG VIEW PG 13 VIEW B R BLOCK NC 17 BLOCK X BLOCK ACCESS CODE _ _ _ _ CHANGE ACCESS CODE To change access code follow the steps 1 Press the SETUP button so that the TV VCR SETUP display appears on the TV screen 2 Press the Arrow K or L button to point to V CHIP...

Page 23: ...screen While the TV DVD VHS is set in monaural MONO mode HIFI disappears from the TV screen NOTE If you play non HIFI tapes while the TV DVD VHS is set in HIFI HIFI will dis appear from the TV screen and the TV DVD VHS will play automatically in monaural MTS RECORDING MONITOR MODE Type of broadcast Display on STEREO SAP Hi Fi audio track 2 channel Normal audio the TV screen SELECTION L channel R c...

Page 24: ... appears 4 To return to TV mode Press the SETUP button on the remote control to return to TV mode NOTES You must select the recording mode either TV AUDIO STEREO or SAP when you record a broadcast Refer to MTS RECORDING MONITOR MODE If you select second audio when second audio is not available the TV DVD VHS will record normal audio TV VCR SETUP TIMER PROGRAMMING SETTING CLOCK CHANNEL SET UP B USE...

Page 25: ... VHS wait until the tape has warmed to room temperature and the moisture has evaporated Avoid extreme heat high humidity and magnetic fields Do not tamper with the cassette mechanism Do not touch the tape with your fingers INSERTING A CASSETTE Insert the cassette in the direction as shown Push in gently but continuously on the center back of the cassette until it is drawn into the TV DVD VHS The T...

Page 26: ... a tape In this mode the sound will be muted 1 You may view a video tape at a high speed in either a forward or reverse direction by pressing the F FWD or REW button in the SP LP SLP modes NOTE If you press the F FWD or REW button on the front panel in the DVD mode the VCR forward or reverse will start Please press the STOP EJECT button once to stop it twice to eject it 2 Press it again and the TV...

Page 27: ...o a blank part which is blank for more than 10 seconds 1 Select USER S SET UP Press the SETUP button on the remote control Press the Arrow K or L button to point to USER S SET UP Then press the Arrow B button 2 Select ALL or BLANK Press the Arrow K or L button to point to REPEAT PLAY Press the Arrow B or s button repeatedly until your desired selec tion ALL or BLANK appears 3 Exit the Repeat Play ...

Page 28: ...s function will not operate in recording mode This function is not operative when a cassette tape is not inserted in the TV DVD VHS In the example below To watch a program after 2 hour 50 minutes from the present position in either direction 1 Insert a tape 2 Select TIME SEARCH mode Press the SETUP button on the remote control Press the Arrow K or L button to point to TIME SEARCH Then press the Ar...

Page 29: ... beginning of desired program NOTE Every time an index signal is skipped the number in the program indicator decreases by one 4 After Index Search When the preset program is reached the TV DVD VHS will start playback automatically A video cassette must be inserted in the TV DVD VHS for this function to work The number of Index Searches can be set up to 20 This function will not operate in the reco...

Page 30: ...cted to a cable box or satellite box the TV DVD VHS must be on CH3 or CH4 then the channel to be recorded must be selected on the cable box or satellite box 2 Select the tape speed Press the SPEED button to select the desired tape speed SP SLP 3 Begin recording Press the RECORD button 4 Stop recording Press the STOP button when recording is completed NORMAL RECORDING Press the PAUSE button to tem ...

Page 31: ...s the SPEED button to select the desired tape speed SP SLP 3 Begin OTR Press the REC OTR button on the TV DVD VHS as many times as needed The recording length will be determined by the number of times you press the REC OTR button Each addition al push will increase the recording time by 30 min utes It is set up to 8 hours OTR One Touch Recording Push es Display Recording length 1 push normal recor...

Page 32: ... 9 00AM 10 00AM Program 3 9 30AM 12 00PM 11 00AM Recording Sequence Recording period is SHADED pressing the Arrow K button And press the Arrow B button If you have not yet set the clock MANUAL CLOCK SET appears If so follow stops 3 to 8 on page 18 Then set the timer recording 2 Select your desired program position 1 8 Press the Arrow K or L button to select the desired program position Then press ...

Page 33: ... Press the SETUP button on the remote control to return to TV mode While recording is in progress 1 Press POWER button 2 Press the STOP EJECT button on the TV DVD VHS 5 Set beginning hour Press the Arrow K or L button until the desired hour appears Example 7 PM for 7 30PM Then press the Arrow B button 6 Set beginning minute Press the Arrow K or L button until the desired minute appears Example 30 ...

Page 34: ...O RETURN to ON Press the Arrow K or L button to point to AUTO RETURN Press the Arrow B or s button until ON appears 3 Auto Return will begin When all the timer recordings are completed the TV DVD VHS will rewind to the beginning of the recorded program s NOTE If you press the POWER button while tape is rewinding the Auto Return will stop 4 Watch the recorded program Press the PLAY button TO CANCEL...

Page 35: ... number combinations Please check with your local cable company The following is a chart of common cable channel designations TV Display TV Display TV Display TV Display TV Display TV Display TV Display TV Display CATV channel TV Display W 80 W 81 W 82 W 83 W 84 W 65 W 66 W 67 W 68 W 69 W 70 W 71 W 72 W 73 W 74 W 75 W 76 W 77 W 78 W 79 W 55 W 56 W 57 W 58 A 4 A 3 A 2 A 1 W 59 W 60 W 61 W 62 W 63 W...

Page 36: ...cations PLAYABLE DISCS DVD Video 12 cm Approx 4 h single sided Approx 80 min single sided 8 cm Logo Maximum Playback Time Contents Disc Type Sound and Pictures Disc Size 74 min Approx 8 h double sided Approx 160 min double sided 12 cm 20 min 8 cm singles Audio CD Sound DVD Data on a DVD is divided into sections called titles and then into subsections called chapters each of which is given a title ...

Page 37: ...E button When you playback the DVD which a title menu is recorded it may appear on the screen In this case refer to USING THE TITLE MENU 5 Press the STOP button to stop play CD DVD Notes If you press the OPEN CLOSE button in the TV VCR mode or power off the DVD tray will open If you press the DVD side PLAY button in the TV VCR mode or power off you can start the DVD playback A prohibited icon may ...

Page 38: ...ss the PAUSE button during playback Playback will pause with sound muted 2 Press the PLAY button to resume playback CD DVD F B STEPPING THROUGH FRAMES 1 Press the PAUSE STILL button while play back is paused The next picture frame is dis played with sound muted each time the button is pressed 2 Press the PLAY button to resume playback DVD F B RESUMING PLAYBACK FROM THE POINT WHERE PLAYBACK STOPPED...

Page 39: ... numeric buttons to set the desired time count Example 1 hour 23 minutes and 30 seconds 1 2 3 3 0 Notes In the case of DVD Time Search in Title is effec tive But Time Search in Chapter is ineffective In the case of CD Time Search in Track is effective But Time Search in the entire disc is ineffective Playback from a desired time count is not available with some discs or if the unit is in stop mode...

Page 40: ... the current track is played back repeatedly Notes Repeat playback is not available with some discs The REPEAT setting will be cleared when moving to other title chapter or track Repeat playback is not function during A B repeat playback A B REPEAT You can define a section to be played back repeatedly 1 Press the A B REPEAT button during playback The starting point A will then be selected 2 Press ...

Page 41: ...ntered Playback from a desired track and random playback are not available during program playback Program settings are cleared when the power is turned off or the disc loading tray is opened Press the MODE button to check the programmed setting 02 05 07 04 10 14 06 15 21 08 20 28 10 25 35 12 30 42 11 34 49 16 40 58 18 45 63 01 03 _ PROGRAM TIME 2 07 43 1 1 RANDOM MODE EXIT RETURN START PLAY DELET...

Page 42: ...not available during random playback CD RANDOM EXIT MODE START PLAY 1 Insert an MP3 file recorded disc The MP3 menu screen shows up Folders are referred to as ALBUMS and files are referred to as TRACKS appears at the beginning of the album name MP3 PLAYING AN MP3 DISC If all the TRACKS cannot be displayed at once on the screen L appears to go to the next page If there is a previous page K appears ...

Page 43: ...e displayed at once on the screen L appears to go to the next page 3 When the disc has been programmed press the PLAY button Programmed play starts Notes Press the CLEAR button and the last programmed entry will be deleted Press the RETURN button and the STOP screen will show up with the program contents in memory The program setting will be cancelled when the power is turned off or the disc tray ...

Page 44: ...e disc does not have an audio source in that language The audio language resets to the one which has been selected in the setup mode every time the power is turned on or discs are replaced If that language is not available on a disc a language defined by the disc is selected The screen display will disappear after about 5 seconds If you use DIGITAL AUDIO OUT jack the sound mode of audio CDs can no...

Page 45: ...anguage resets to the one which has been selected in the setup mode every time the power is turned on or discs are replaced If that language is not available on a disc a language defined by the disc is selected DVD CHANGING THE CAMERA ANGLE Multi Angle Pictures The DVD player has a function which allows you to select the desired camera angle 1 Press the ANGLE button during playback If the disc con...

Page 46: ...apter BIT RATE BIT RATE indicator will appear BIT RATE shows the quantity of information which is recorded in DVD C L0 Layer number L0 Layer 0 is playing back L1 Layer 1 is playing back Current Repeat setting C Chapter repeat T Title repeat A B A B repeat It appears when the layered disc is playing back For audio CDs 1 Press the DISPLAY button during playback TR 4 12 0 03 21 0 02 15 TR Track Curre...

Page 47: ... canceled and the ordinary screen will appear Note Be sure to press the SETUP button or the setting will not work Language Setting for Audio and Subtitle is not avail able with some discs Then use the Audio and Subtitle button Details are on pages 44 and 45 You can also select the item by pressing the numbers which displayed with the item When you change the setup items press the STOP button if yo...

Page 48: ... ICON ON 3 AUTO POWER OFF ON 4 BACKGROUND BLACK SET UP DISPLAY CONTROLS SET UP DISPLAY CONTROLS 1 TV MODE 4 3 LETTERBOX 2 ANGLE ICON ON 3 AUTO POWER OFF ON 4 BACKGROUND BLACK 1 LANGUAGE 2 DISPLAY 3 AUDIO 4 PARENTAL SET UP 4 Press the K L buttons to select a desired item and then press the ENTER button 5 Press the SETUP button The setup mode will be canceled and the ordinary screen will appear Note...

Page 49: ...and then press the ENTER button When playing a disc with copyright protection If you select 96KHz copyright protection will be activated and no sound will come out If you select AUTO sound will be down sampled at 48KHz 4 Press the SETUP button The setup mode will be canceled and the ordinary screen will appear AUDIO SETTINGS 1 LANGUAGE 2 DISPLAY 3 AUDIO 4 PARENTAL SET UP EXIT SETUP CANCEL RETURN S...

Page 50: ... intended for adult and general use prohibited Notes With some DVDs it may be difficult to find if they are compatible with parental lock Be sure to check if the parental lock function operates in the way that you have set Record the password in case you forget it IF YOU FORGET THE PASSWORD 1 Press the 4 7 3 7 at step 3 Password will be cleared and parental level will be set to ALL 2 Proceed the a...

Page 51: ...6 77 78 79 80 81 82 83 84 85 86 87 88 89 90 91 92 93 94 95 96 97 98 99 100 101 102 103 104 105 106 107 108 109 110 111 112 113 114 115 116 117 118 119 120 121 122 123 124 125 126 127 128 129 130 131 132 133 134 135 136 No Language Country code Latvian Lettish Malagasy Maori Macedonian Malayalam Mongolian Moldavian Marathi Malay Maltese Burmese Nauru Nepali Dutch DUT Norwegian NOR Occitan Afan Orom...

Page 52: ...icture If outside antenna is being used check for broken wire Check for local interference No Color Try a new channel if OK then possible station trouble Is antenna connected to terminal on the back of the set If outside antenna is being used check for broken wire Adjust COLOR control Poor Reception on Some Channels Try a new channel if OK then possible station trouble Ghosts in Picture Is antenna...

Page 53: ...show Broadcasters may at times use a time compression process to speed as being closed captioned but none up the actual program so that additional advertising time can be of the captions were displayed given Since the decoder cannot read the compressed information captions will be lost My prerecorded video tape does not The video tape was either an illegal copy or the tape duplicating show any cap...

Page 54: ...directly to the TV Immediately after playing There are some cases where pictures may be press fast forward or in reverse slightly distorted which are not a sign of a Distorted picture The 1st layer is switching to the malfunction 2nd layer when playing a two Although pictures may stop for a moment layered disc this is not a malfunction Audio or subtitle The selected language is not No malfunction ...

Page 55: ...er to read the instructions included with the video head cleaner before use Clean video heads only when problems occur SERVICING Should your TV DVD become inoperative do not try to correct the problem by yourself There are no user serviceable parts inside Turn off unplug the power cord and please call our help line at 1 800 968 3429 to locate an Authorized Service Center IF THE LASER OPTICAL PICKU...

Page 56: ...W PEAK EIAJ Designs and specifications are subject to change without notice and without our legal obligation If there is a discrepancy between languages the default language will be English TV VCR DVD GENERAL SPECIFICATIONS ELECTRICAL SPECIFICATIONS Sound output 2 speakers 1W 8 ohm OTHER SPECIFICATIONS Terminals Antenna input VHF UHF CATV 75 ohm unbalanced F type Video input RCA connector 1 Audio ...

Page 57: ... 57 EN 01A11 MEMO ...

Page 58: ... durante el modo del DVD 9 Botón SELECT Púlselo para cambiar a un modo de televisor modo de entrada externa o modo de DVD 10 Indicador del televisor la videograbadora TV VCR Parpadea durante el modo del televisor la videograbadora 11 Botones CHANNEL K L Púlselo para seleccionar el canal memorizado Púlselo para cambiar a un modo de televisor cuando modo de DVD 12 Indicador de grabación RECORD Parpa...

Page 59: ...y verde desde un ángulo diferente la secuencia que está siendo reproducida 37 Botón A B REPEAT Repite la reproducción de una sección seleccionada 38 Botón RETURN Para volver a la operación anterior 39 Botón ENTER Púlselo para establecer un ajuste 40 Botones de flechas Modo de televisor Púlselo para seleccionar un modo de ajuste desde el menú que aparece en la pantalla del televisor Púlselo para se...

Page 60: ...a figura 7 de la página 13 Consulte la figura 6 de la página 13 CONEXIÓN A UN SISTEMA ESTÉREO Para DVD MODO DE ENTRADA EXTERNA Consulte la figura 5 de la página 12 ANTENAS SEPARADAS DE VHF UHF En algunas áreas será necesario utilizar una antena exterior TELEVISIÓN POR CABLE SIN CAJA DE CONVERTIDOR DECODIFICADOR Utilice esta conexión si su sistema de televisión por cable se conecta directamente a s...

Page 61: ...olby Digital o DTS desde su toma de salida de audio digital COAXIAL Conectando el reproductor a un decodificador Dolby Digital o DTS usted podrá disfrutar de un ambiente más convincente y real con un sonido ambiental potente y de alta calidad de tipo profesional tal como el que se oye en salas de cine Utilice cables digitales coaxiales de venta en el com ercio para las conexiones de audio NOTAS As...

Page 62: ...os usted podrá seleccionar directamente el canal deseado con los botones numerados del mando a distancia o con los botones CHANNEL K o L PREPARACIÓN DE CANALES POR PRIMERA VEZ TV SECTION PREPARACIÓN PARA LA UTILIZACIÓN Cerciórese La alimentación del televisor videograbadora deberá estar conectada En el ejemplo de abajo el reloj va a ajustarse así FECHA 1 de mayo de 2001 HORA 5 40 PM 1 Pulse el bot...

Page 63: ...Ponga un disco en la bandeja Asegúrese de que el disco esté correctamente asen tado en el hueco correcto con el lado de la etiqueta hacia arriba 4 Pulse el botón PLAY La bandeja se cerrará automáticamente y la repro ducción empezará desde el primer capítulo o pista del disco Necesitará pulsar el botón PLAY sólo cuando la bandeja haya sido cerrada pulsando el botón OPEN CLOSE Cuando reproduzca un D...

Page 64: ... HOME SM Anytime day or night 1 800 469 4663 www sears com To bring in products such as vacuums lawn equipment and electronics for repair call for the location of your nearest Sears Parts Repair Center 1 800 488 1222 Anytime day or night www sears com For the replacement parts accessories and owner s manuals that you need to do it yourself call Sears PartsDirect SM 1 800 366 PART 6 a m 11 p m CST ...

Reviews: