background image

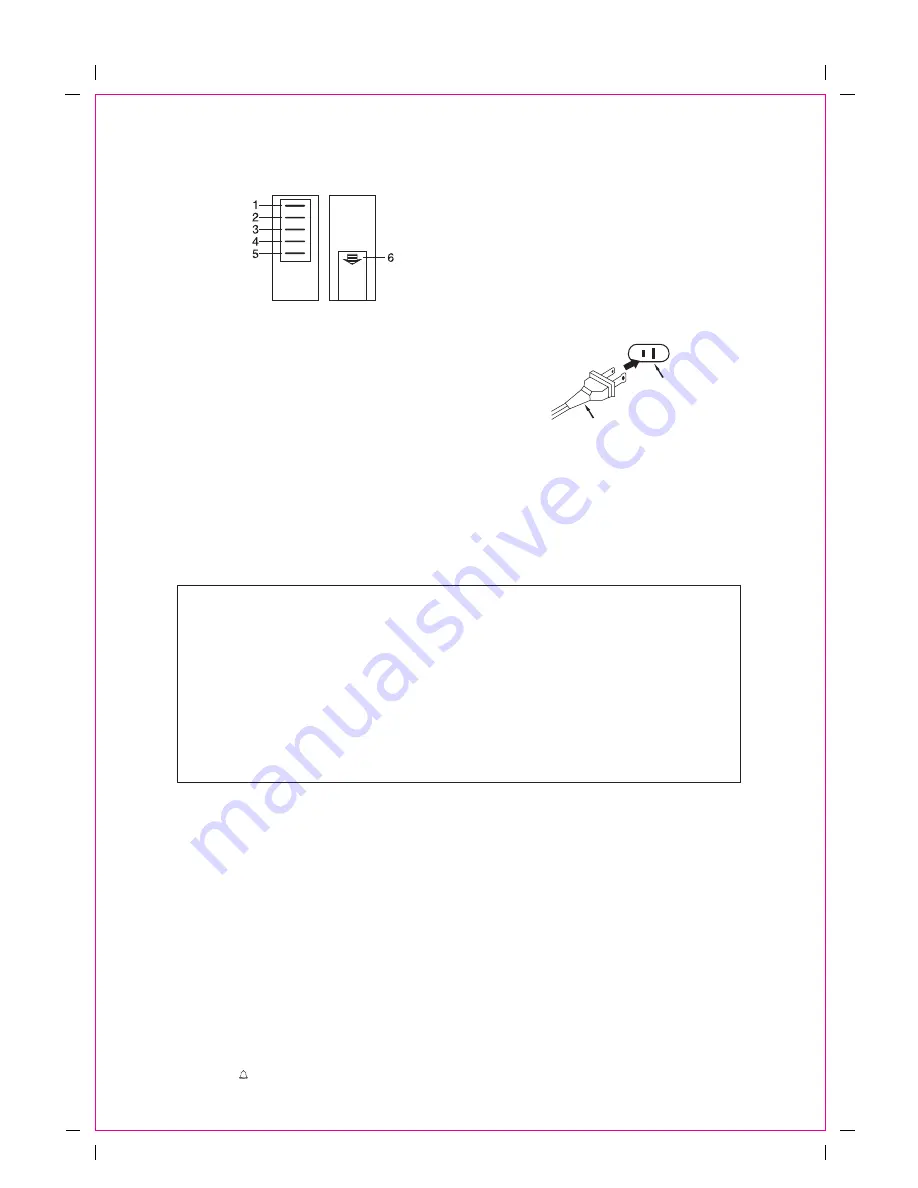
REMOTE CONTROL

1. Play/ Pause button

2. Skip/search forward button

3. Skip/search backward button

4. Repeat One/All tracks button

5. Stop button

6. Battery compartment

SRCD114P I_M (eng) ƒ • A5 • 13 July 2011 • AT

6

AC Outlet

AC Plug

Plug the AC line cord into AC 120V 60Hz power outlet.

The unit in now working and the display figures will blink

to show you it is not set correctly.
NOTE: The AC plug supplies with the unit are polarized to

help minimize the possibility of electric shock. If the AC plug does

not fit into a non polarized AC outlet, do not file or cut the wide blade. It is the user’s

responsibility to have an electrician replaces the obsolete outlet.
If the AC cord is disconnected or if there is a power failure, this electronic clock is designed

to continue operating internally (without showing the on the display) with 2 x "AA" size

batteries (not included).

Batteries Installation:

1. Press the tab on the battery door then lift it up.

2. Install 2 x "AA" size batteries (not included) into the battery compartment as the polarity marking inside.

3. Replace the battery door.

Unit power supply (mains 120V/60Hz)

BATTERY PRECAUTIONS

Follow these precautions when using a battery in this device:

1. Use only the size and type of batteries specified.

2. Be sure to follow the correct polarity when installing the batteries as indicated in the battery 

compartment. Reversed batteries may cause damage to the device.

3. Do not mix different types of batteries together (e.g. Alkaline and Carbon-zinc) or old 

batteries with fresh ones.

4. If the batteries in the device are consumed or the device is not to be used for a long period 

of time, remove the batteries to prevent damage or injury from possible battery leakage.

5. Do not try to recharge batteries not intended to be recharged; they can overheat and rupture. 

(Follow battery manufacturerís directions.)

6. Do not dispose of batteries in fire, batteries may explode or leak.

7. Clean the battery contacts and also those of the device prior to battery installation.

BATTERY BACKUP:

Two 1.5V “AA” batteries (not included) may be installed as a backup option to maintain the time if electrical power 
fails. In the event of a power outage, the time will not appear on the clock LCD Display, however the clock will 
continue to operate and the actual time will be maintained. The Clock LCD Display and other functions will resume 
once electrical power is restored if used the backup battery .The backup battery should be replaced as needed; 
Remove the battery if the clock is not used or stored for long periods of time.

TO SET THE CLOCK TIME

Connect the AC power cord to a wall outlet. Make sure that it is in “Power off” mode. 
1.  While pressing and holding the TIME.SET BUTTON, press the HOUR BUTTON to set desired hour.
2.  While Pressing and holding the TIME.SET BUTTON, press the MINUTE BUTTON to set desired minute.

TO SET ALARM FUNCTION

1.  Power off the unit and enter into “POWER OFF” mode. While pressing and holding the AL.SET BUTTON, 

press the HOUR BUTTON to set desired alarm hour.

2.  While pressing and holding the AL.SET BUTTON, press the MIN BUTTON to set desired alarm minute.
3.  After setting the alarm time as your desired, remember to press AL.ON/OFF button to turn on the alarm function. 

(alarm sign “


” will show on LCD display)

Summary of Contents for SRCD114P

Page 1: ...CLOCK AM FM STEREO RADIO ALARM FUNCTION WAKE TO RADIO CD PLAYER OR BUZZER AC POWER SUPPLY WITH CLOCK BATTERY BACKUP STEREO HEADPHONE JACK BEFORE OPERATING THIS PRODUCT READ UNDERSTAND AND FOLLOW THESE INSTRUCTIONS Be sure to save this booklet for future reference SRCD114P I_M eng A5 11 July 2011 AT ...

Page 2: ...ul interference in a residential installation This equipment generates uses and can radiate radio frequency energy and if not installed and used in accordance with the instructions may cause harmful interference to radio communications However there is no guarantee that interference will not occur in a particular installation If this equipment does cause harmful interference to radio or television...

Page 3: ...t 9 Do not defeat the safety purpose of the polarized or grounding type plug A polarized plug has two blades with one wider than the other A grounding type plug has two blades and a third grounding prong The wide blade or the third prong are provided for your safety If the provided plug does not fit into your outlet consult an electrician for replacement of the obsolete outlet 10 Protect the power...

Page 4: ...etion of any service or repairs to this product ask the service technician to perform safety checks to determine that the product is in proper operation condition 23 Wall or ceiling mounting The product should be mounted to a wall or ceiling only as recommended by the manufacturer 24 Damage requiring service Unplug this product from the wall outlet and refer service to qualified service personnel ...

Page 5: ...ON 23 AUX INPUT JACK 24 HEADPHONE JACK 25 RIGHT SPEAKER JACK 26 LEFT SPEAKER JACK 27 BATTERY COMPARTMENT 28 FM ANTENNA 29 SPEAKERS 30 POWER CORD 31 REMOTE SENSOR 1 FUNCTION SELECTOR BUZZ CD RADIO AUX 2 BAND SWTICH FM ST FM MO AM 3 TUNING KNOB 4 CD DOOR 5 CD REVERSE BUTTON REW 6 CD PROGRAM BUTTON 7 CD REPEAT BUTTON 8 CD PLAY PAUSE BUTTON 9 CD FAST FORWARD BUTTON F FWD 10 CD STOP BUTTON 11 CD RANDOM...

Page 6: ... the batteries in the device are consumed or the device is not to be used for a long period of time remove the batteries to prevent damage or injury from possible battery leakage 5 Do not try to recharge batteries not intended to be recharged they can overheat and rupture Follow battery manufacturerís directions 6 Do not dispose of batteries in fire batteries may explode or leak 7 Clean the batter...

Page 7: ...sappear on the LCD Display ADJUST VOLUME Press VOL button to increase the volume Press VOL button to decrease the volume RADIO OPERATION 1 Select the Function Switch BUZZ CD ALARM AUX to RADIO position 2 Select the Band Switch FM ST FM MO AM to desired band 3 Press the POWER ON OFF BUTTON to switch Power on 4 Rotate the Tuning Control Knob to the desired radio station Note For better AM reception ...

Page 8: ... button to resume press again 8 Press the STOP BUTTON to STOP play RANDOM PLAY In CD stop mode Press the RANDOM BUTTON once RAND will appear on LCD Display Press PLAY PAUSE BUTTON this will enable random tracks play REVERSE FORWARD 1 The CD Reverse REW and CD Forward F FWD Buttons can be used to jump to a different track number or to scan disc tracks at high speed 2 Press the CD Reverse Skip Butto...

Page 9: ...F FWD buttons to hear next program track Note After all of the programmed tracks have played the CD player will return to the stop mode 7 To clear the programmed tracks from memory press STOP two times AUX INPUT JACK 1 Press POWER button to turn on the unit 2 Connect the AUX connect wire from the out jack of your Personal Player such as portable MP3 player to the AUX input jack 3 Press the FUNCTIO...

Page 10: ...storted on AM or FM Location or direction no good for radio reception Remove or turn the unit to a new location or direction for better radio reception CD Player CD Skips Disc is dirty or badly scratched or pickup lens is dirty If CD is dirty clean as care and maintenance section If badly scratched CD cannot be played Try another discs If lens is dirty clean with camera brush blower CD will not pl...

Reviews: