background image

20

ES

A

JUSTE OPCIONAL

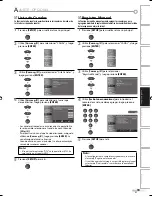
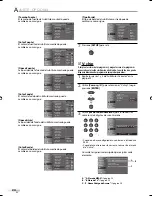
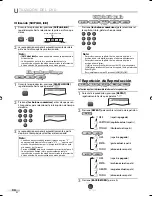
Confirmación de la Antena

Esta función le permite comprobar la intensidad de la señal de cada canal.

1

Presione 

[SETUP]

 para visualizar el menú principal.


2

Utilice 

[Cursor 

/

 L

]

 para seleccionar “CANAL” y luego 

presione 

[ENTER]

.


3

Utilice 

[Cursor 

/

  L

]

 para seleccionar “Antena”, y luego 

presione 

[ENTER]

.


Canal

Canal

Autoscan

Lista Canales

Registro Manual

Antena

4

Utilice 

[los botones numéricos]

 o 

[CH 

/

 L

]

 para 

seleccionar el canal respecto del cual desea comprobar 
la intensidad de la señal.


Antena

Antena

Atrás

Cambia Ca

11

CH

Ahora

Pico

Si el canal está ajustado a una entrada externa, no puede 
confirmar el estado de la antena.


Antena

Antena

Atrás

Cambia Ca

Video1

CH

Indicador disponible sólo para 
señal antena.


5

Presione 

[SETUP]

 para salir.


5

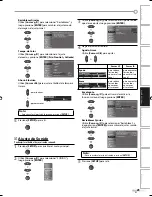
Ajuste de Imagen

Puede ajustar el brillo, el contraste, el color, el matiz y la nitidez.

1

Presione 

[SETUP]

 para visualizar el menú principal.


2

Utilice 

[Cursor 

/

 L

]

 para seleccionar “IMAGEN”, y 

luego presione 

[ENTER]

.


3

Utilice 

[Cursor 

/

 L

]

 para seleccionar el elemento que 

desea ajustar, luego presione 

[ENTER]

.


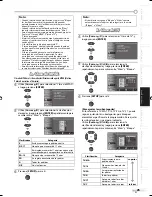
Imagen

Imagen

Modo de Imagen

 Claridad

 Contraste

 Color

 Matiz

 Nitidez

Restablecer Ajustes

Tempe. de Color

Ahorro Eléctrico

Dinámico

30

Neutral

Off

60

36

0

0

4

Ajuste la calidad de imagen.

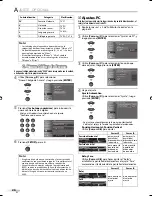
Modo de Imagen

Utilice 

[Cursor 

/

 L

]

 para seleccionar el ajuste deseado, 

y presione 

[ENTER]

. (

Normal

Dinámico

Cine

 y 

Noticia

)


Imagen

Imagen

Modo de Imagen

 Claridad

 Contraste

 Color

 Matiz

 Nitidez

Restablecer Ajustes

Tempe. de Color

Ahorro Eléctrico

Normal

Dinámico

Cine

Noticia

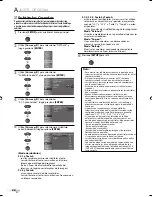
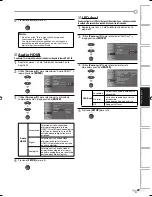
Claridad, Contraste, Color, Matiz, Nitidez

Utilice 

[Cursor 

/

 B

]

 para ajustar.

o

Cursor 

s

Cursor 

B

Claridad

Ajuste

Claridad

30

Mover

Entre

ENTER

para reducir el 
brillo

para aumentar 
el brillo

Contraste

Ajuste

Mover

Entre

ENTER

Contraste

60

para reducir el 
contraste

para aumentar 
el contraste

Color

Ajuste

Color

36

Mover

Entre

ENTER

para reducir el 
color

para dar más 
brillo al color

Matiz

ENTER

Ajuste

Mover

Entre

Matiz

0

para agregar 
rojo

para agregar 
verde

Nitidez

Ajuste

Mover

Entre

ENTER

Nitidez

0

para suavizar

para aclarar

5

A74GCUE_LD370SS8 M2_ES.indb   20

A74GCUE_LD370SS8 M2_ES.indb   20

2008/04/04   16:24:24

2008/04/04   16:24:24

Summary of Contents for LD370SS8 M

Page 1: ...g LCDTV built in DVD Player Owner s Manual LD370SS8 M2 TO RECEIVE DIGITAL ANALOG SIGNAL YOU MUST CONNECT ANTENNA HIGH DEFINITION TELEVISION 2008 Funai Electric Co Ltd IF YOU NEED ADDITIONAL ASSISTANCE WITH SETUP OR OPERATING AFTER READING OWNER S MANUAL PLEASE CALL TOLL FREE 1 800 968 3429 OR VISIT OUR WEB SITE AT http www sylvania ce com ...

Page 2: ...e to insert the plug fully into the outlet try reversing the plug If the plug should still fail to fit contact your electrician to replace your obsolete outlet Do not defeat the safety purpose of the polarized plug 12 POWER CORD PROTECTION Power supply cords should be routed so that they are not likely to be walked on or pinched by items placed upon or against them paying particular attention to c...

Page 3: ...etween the equipment and receiver 3 Connect the equipment into an outlet on a circuit different from that to which the receiver is connected 4 Consult the dealer or an experienced radio TV technician for help This Class B digital apparatus complies with Canadian ICES 003 Cet appareil numérique de la classe B est conforme à la norme NMB 003 du Canada Note to CATV system installer This reminder is p...

Page 4: ... on a carpet because this will block the ventilation holes Install the unit in a horizontal position Avoid locations subject to strong vibration Do not place the unit near strong magnetic fields Avoid moving the unit to locations where temperature differences are extreme Be sure to unplug the AC power cord from the outlet before carrying the unit TO AVOID THE HAZARDS OF ELECTRICAL SHOCK AND FIRE D...

Page 5: ...by Digital multi channel surround sound when you connect the unit to your Dolby Digital decoder Still Fast Slow Step Playback Various playback modes are available including still pictures fast forward reverse slow motion and step frames DVD Menus in a Desired Language You can display DVD menus in a desired language if available on a DVD video Screen Saver If there is no operation for 5 minutes the...

Page 6: ... Features 5 RemoteControlFunction 7 InstallingtheBatteries 7 ControlPanel 8 RearPanel 8 CONNECTION BasicConnection 9 ExternalDeviceConnection 10 TV Functions INITIAL SETTING InitialSetup 13 MainMenu 13 AutoChannelScan 14 LanguageSelection 14 WATCHING TV ChannelSelection 15 VolumeAdjustment 15 StillMode 15 SleepTimer 15 SwitchingEachMode 16 SwitchingAudioMode 16 ScreenInformation 17 TVScreenDisplay...

Page 7: ...ress to call up the file list MP3 JPEG 14 MODE button p35 Press to call up the folder list on a disc when DUAL PLAYBACK is ON MP3 JPEG Press to arrange the playing order or play randomly CD MP3 JPEG Press to set black level DVD VCD and virtual surround DVD CD VCD MP3 on or off 15 SEARCH MODE button p33 Press to search chapter title DVD time DVD CD VCD or track file CD VCD MP3 JPEG 16 SUBTITLE butt...

Page 8: ...PC IN jack p12 VGA cable connection for PC 13 HDMI IN jacks p10 HDMI connection for an HDMI device 14 AUDIO IN jacks p10 RCA audio cable connection for a DVI device For HDMI 1 IN jack only 15 AUDIO OUT jacks p12 RCA audio cable connection for an external device Use analog audio input jacks of an external device 16 DIGITAL AUDIO OUT COAXIAL jack p12 Digital audio coaxial cable connection for a deco...

Page 9: ...nna input jack before moving the unit If you use an antenna to receive analog TV it should also work for DTV reception Outdoor or attic antennas will be more effective than settop versions To easily switch your reception source between antenna and cable install an antenna selector If you connect to the cable system directly contact the CATV installer Connection to Cable Box or Satellite Box Connec...

Page 10: ...compliant with EIA CEA 861 861B Audio signals are converted from digital to analog for this connection Component Video Cable Connection Component video connection offers better picture quality for video devices connected to the unit Use a component video cable to connect the unit to external video devices equipped with component video output jacks If you connect to the unit s COMPONENT 1 or COMPON...

Page 11: ...ime the S video connection will have priority Video Connection Video connection offers standard picture quality for video devices connected to the unit If you connect to the unit s VIDEO 1 or VIDEO 2 input jack connect RCA audio cables to the audio L R jacks of VIDEO 1 or VIDEO 2 accordingly When the audio jack of the video device is monaural connect the RCA audio cable to the audio L input jack C...

Page 12: ...quipped with a PC IN jack If you connect this unit to your PC you can use this unit as a computer monitor Note Please purchase the VGA that has a ferrite core Cables not included Please purchase the necessary cables at your local store e g Stereo system e g Dolby Digital decoder RCA audio cable To AUDIO OUT jack digital audio coaxial cable To DIGITAL AUDIO OUT jack rear of this unit e g PC To moni...

Page 13: ...TV installer If you press POWER or SETUP during auto channel scan this setting will be canceled The initial auto channel scan function can be executed for either Air or Cable only once When you change the connection Air Cable set auto channel scan again Refer to page 14 You can cancel or exit the initial auto channel scan menu by pressing SETUP If there is no signal input from the antenna terminal...

Page 14: ...connected select Air When connected to CATV select Cable Scanning and memorizing of channels start automatically Now the system is scanning for channels please wait Exit SETUP 72 Analog channels 10ch Digital channels 6ch When the scanning and memorizing are completed the lowest memorized channel will be displayed Note If you connect the cable system directly contact the CATV installer If you press...

Page 15: ... Use VOL X Y to adjust the audio volume Volume 20 The volume bar will be displayed at the bottom of the TV screen when adjusting the volume The volume bar display will automatically disappear in a few seconds Press MUTE to turn off and on the sound Mute Mute is displayed on the TV screen for a few seconds Press MUTE again or VOL X Y to recover the original volume Still Mode You can freeze the imag...

Page 16: ...jack on the unit select HDMI2 To use the PC IN jack on the unit select PC 5 Switching Audio Mode This section describes how to switch the audio language TV 1 Press AUDIO to display the currently selected audio mode While receiving an MTS broadcast press repeatedly to cycle through the available audio channel 6 SAP STEREO When all audio are available SAP STEREO SAP MONO SAP STEREO When stereo and m...

Page 17: ...ide added to broadcasting information is displayed Maximum display of 4 lines 4 channel number 5 audio language Refer to Switching Audio Mode on page 16 6 effective scanning lines and scan mode 7 program format 8 program aspect ratio 9 program rating 10CC not available if CC is set to Off 6 1 English 1 2 TV PG DLSV 1080i 1080i 16 9 16 9 HD HD CC CC A Day of Memories A Day of Memories KABC KABC A q...

Page 18: ...splay the picture with its center at the original size and the edges stretched horizontally 5 For 16 9 video signal Full Display a 16 9 picture at its original size Zoom Display a 16 9 picture at its maximum size without changing its horizontal and vertical ratio Cinema Display a vertically stretched picture Expand Display a horizontally stretched picture For PC input signal Sidebar Display a prop...

Page 19: ...he channel display lightens When you remove a major channel its minor channels are removed as well Note The channel with the DTV indicated on the display is ATSC Otherwise the channel is NTSC 5 Press SETUP to exit 5 Manual Register The manual register function lets you add the channels that were not added by the auto channel scan due to the reception condition at the initial setting 1 Press SETUP ...

Page 20: ...to select PICTURE then press ENTER 3 Use Cursor K L to select the item you want to adjust then press ENTER Picture Picture Picture Mode Brightness Contrast Color Tint Sharpness Reset Settings Color Temp Energy Saving Dynamic 30 Neutral Off 60 36 0 0 4 Adjust the picture quality Picture Mode Use Cursor K L to select the desired setting then press ENTER Standard Dynamic Movie and News Picture Pictur...

Page 21: ...an adjust treble bass and surround 1 Press SETUP to display the main menu 2 Use Cursor K L to select SOUND then press ENTER 5 3 Use Cursor K L to select the sound type you want to adjust then press ENTER Sound Sound Treble Bass Surround Reset Settings 0 0 Off 4 Adjust the sound setting Treble Bass Use Cursor s B to adjust Cursor s Cursor B Treble ENTER Adjust Treble Move Enter 0 to decrease higher...

Page 22: ...op on mode Once characters are stored in memory they are displayed all at once Roll up mode Displays the characters continuously by scrolling max 4 lines 6 Press SETUP to exit Note To show the closed caption on your TV screen broadcast signal must contain the closed caption data Not all TV programs and commercials have the closed caption or all types of the closed caption Captions and texts may no...

Page 23: ...n change the style of CC such as font color or size etc 1 Repeat steps 1 and 2 in Closed Caption on page 22 5 5 2 Use Cursor K L to select Closed Caption then press ENTER Detail Detail Auto Closed Caption V chip PC Settings HDMI1 Audio Blue LED Power on 3 Use Cursor K L to select CC Style then press ENTER Closed Caption Closed Caption Off Off Conventional CC DTV CC CC Style 4 Use Cursor K L to sel...

Page 24: ...or Edge Color Edge Type Font Size Back Opacity Edge Color Edge color of the displayed caption can be switched as below CC Style CC Style White Black Red Green Blue Yellow Magenta Cyan Closed Caption User Setting Font Style Font Size Font Opacity Back Color Back Opacity Edge Type Font Color Edge Color Edge Type Edge type of the displayed caption can be switched as below CC Style CC Style Raised Dep...

Page 25: ...ip V chip 5 Use Cursor K L to select the desired rating then press ENTER repeatedly to switch between View and Block Select View Block Back BACK ENTER X NC 17 R PG 13 PG G NR V chip V chip Rating Category X Mature audience only NC 17 No one under 17 admitted R Restricted under 17 requires accompanying parent or adult guardian PG 13 Unsuitable for children under 13 PG Parental guidance suggested G ...

Page 26: ...or 10 seconds to restore the password to 0000 PC Settings This function lets you adjust the PC screen position clock and phase during PC input 1 Repeat steps 1 and 2 in Closed Caption on page 22 2 Use Cursor K L to select PC Settings then press ENTER Detail Detail Power on Auto Closed Caption V chip PC Settings HDMI1 Audio Blue LED 3 Use Cursor K L to select the setting you want to adjust then pre...

Page 27: ... device to the audio sources Digital audio input signal will have priority Digital Select if you have connected digital device to the HDMI 1 IN jack for digital audio input signal Analog Select if you have connected analog device to the analog audio jacks for analog audio input signal 4 Press SETUP to exit 5 Blue LED You can set the blue LED on the front panel to light up when the unit is turned o...

Page 28: ...in the video mode and finalized can be played back Unfinalized discs cannot be played back Depending on the recording status of a disc the disc may not be played back at all or the picture or sound may not be smooth etc 9 If the recorded portion of the disc is too small less than 55 mm across it may not play back properly 10 Do not glue paper or put stickers on to the disc These may damage the dis...

Page 29: ...vailable on the DVD Press DISC MENU and use Cursor K L s B to select an item then press ENTER or PLAY B Note Menu operations may vary depending on the disc Refer to the manual accompanying the disc for more details Cancelling the PBC for playback of a video CD 1 Insert a video CD Playback will start automatically 2 Press STOP C 3 Enter track number of your choice with the Number buttons 4 PBC is n...

Page 30: ...rge 2 Press ZOOM repeatedly to change the zoom factor 2x or 4x 5 5 5 3 Once a desired zoom factor is set use Cursor K L s B to slide the zoomed picture across the TV screen 4 Press ZOOM repeatedly to exit zoom mode Note Zoom function does not work while the disc menu is displayed 4x zoom is not available on some discs Only 2x zoom is available on video CD and JPEG files Zoom function is also avail...

Page 31: ...ed in variable bit rate VBR the unit may not display the actual elapsed time Constant bit rate 32 kbps 320 kbps Applicable JPEG file Remarks Normal playback Upper limit 6 300 x 5 100 dots Lower limit 32 x 32 dots File size Max 7 MB A JPEG image that extends beyond the TV screen is reduced so that it will be displayed within the TV screen Dual playback Upper limit 5 000 x 5 000 dots Lower limit 32 ...

Page 32: ...der See page 42 on how to set DUAL PLAYBACK ON or OFF 1 Press STOP C then press MODE folder name 4 folder name 1 folder name 3 folder name 2 folder name 1 DISC NAME FOLDER LIST FOLDER ENTER PLAY ALL 1 1 2 Use Cursor K L to select a desired folder from the folder list then press ENTER or PLAY B or or 5 5 Note To cancel folder playback press MODE again at step 1 If you press FWD D or REV E during fo...

Page 33: ...repeatedly until a desired chapter or title will be selected or CH 1 CH 2 CH 3 CH 4 SKIP H SKIP G SKIP H SKIP G TT 1 TT 2 TT 3 TT 4 2 Playback will start automatically from the chapter or title you selected Note SKIP H G are not available when playback is stopped Chapter or title search can only be performed during playback or when the unit has kept the resume information It cannot be performed in...

Page 34: ...ect input at step 2 Time search can only be performed during playback or when the unit has kept the resume information It cannot be performed in the stop mode Direct Search Direct Search DVD CD VCD w o PBC MP3 JPEG Press the Number buttons to select your desired chapter title track file Note To select a single digit chapter title track file number press the number directly To select double digit c...

Page 35: ...her screens Use Cursor K L to go on to the next previous pages Repeat this step until you have selected all the tracks files you wish to play back in the program or PROGRAM ENTER PLAY CLEAR CD DA TOTAL 0 08 22 1 1 3 3 T 15 3 18 T 16 4 24 ALL CLEAR T 4 3 58 T 16 4 24 T 16 4 24 Up to 99 tracks files can be ordered If 8 or more tracks files were in a program use SKIPH G to see all the tracks files Wh...

Page 36: ...aying back CH Chapter current chapter number total chapters elapsed time of the current chapter remaining time of the current chapter current playback status appears only when multi angle is available on the DVD TT Title current title number total titles elapsed time of the current title remaining time of the current title TR Track current track number total tracks elapsed time of the current trac...

Page 37: ...the desired language appears 1 ENG Dolby D 3 2 1ch 48k 3 5 Each time you press AUDIO the audio language changes as example below ENG English audio SPA Spanish audio FRE French audio Note Some discs will only allow you to change the audio setting from the disc menu Refer to the manual accompanying the discs for details If your language is not shown after pressing AUDIO several times the disc may no...

Page 38: ...to something other than STEREO Refer to Stereo Sound Mode Turn down the level or select OFF if the sound is distorted Marker Setup Marker Setup DVD CD VCD w o PBC Thisfeatureallowsyoutoassignaspecificpointonadisctobecalledbacklater To set a marker 1 During playback press SEARCH MODE repeatedly until appears e g DVD 2 Use Cursor s B to select an available marker within 30 seconds 3 When the playbac...

Page 39: ...sired subtitle language LANGUAGE ENTER OFF ENGLISH FRENCH SPANISH GERMAN ITALIAN SWEDISH SUBTITLE DISC MENU 1 Default ENGLISH Select the desired language in DVD menu LANGUAGE ENTER ENGLISH FRENCH SPANISH GERMAN ITALIAN SWEDISH DUTCH DISC MENU Note To change the on screen language call up LANGUAGE from the main menu and set the desired language Refer to Language Selection on page 14 1 Language opti...

Page 40: ...format AUDIO ENTER DRC ON DOWN SAMPLING ON DOLBY DIGITAL BITSTREAM ON Compress the range between soft and loud sounds OFF No effects original sound 5 DOWN SAMPLING Default ON Set DOWN SAMPLING This function is available only on digital outputting of a disc recorded in 96kHz AUDIO ENTER DRC ON DOWN SAMPLING ON DOLBY DIGITAL BITSTREAM ON When outputting in 48kHz OFF When outputting the original soun...

Page 41: ... select the PARENTAL LEVEL then press ENTER PARENTAL ENTER PARENTAL LEVEL ALL PASSWORD CHANGE 5 6 Use Cursor K L to select the desired item then press ENTER PARENTAL ENTER ALL 8 ADULT 7 NC 17 6 R 5 PGR 4 PG13 3 PG PARENTAL LEVEL PARENTAL LEVEL ALL All parental locks are cancelled 8 ADULT All ratings adult general children can be played back 7 NC 17 2 G Only DVD intended for general use and childre...

Page 42: ...AME or FIELD based on the date characteristics of the pictures 5 FIELD The picture in the still mode will be stabilized FRAME The picture in the still mode will be highly defined OTHERS ENTER ANGLE ICON ON STILL MODE AUTO AUTO POWER OFF ON PROGRESSIVE OFF DUAL PLAYBACK OFF SLIDE SHOW 5sec AUTO POWER OFF Default ON Set to ON to turn this unit off automatically after 20 minutes of no use OTHERS ENTE...

Page 43: ...Portuguese POR 6266 Quechua 6367 Rhaeto Romance 6459 Romanian RUM 6461 Russian RUS 6467 S Samoan 6559 Sangho 6553 Sanskrit 6547 Scots Gaelic 5350 Serbian 6564 Serbo Croatian 6554 Sesotho 6566 Setswana 6660 Shona 6560 Sindhi 6550 Singhalese 6555 Siswat 6565 Slovak 6557 Slovenian 6558 Somali 6561 Spanish SPA 5165 Sundanese 6567 Swahili 6569 Swedish SWE 6568 T Tagalog 6658 Tajik 6653 Tamil 6647 Tatar...

Page 44: ...pliances may affect picture quality View other TV channels The problem might be limited to the broadcasting station Picture blurred When the outside antenna is used check the wire condition and connection View other TV channels The problem might be limited to the broadcasting station Ghosts in picture Check the antenna or cable connection to the main unit When the outside antenna is used check the...

Page 45: ...to insert advertisement The closed caption decoder cannot read the information of the shortened program No caption is displayed when playing the cassette tape containing captions The cassette tape may be illegally copied or the caption signal might not have been read during copying Black box is displayed in the screen The text mode is selected for caption Select CC1 CC2 CC3 CC4 or Off D V D Comple...

Page 46: ...hat allows access to parental control features PBC playback control An interactive software which has the selectable images or information in the menu screen to playback video CD Region Code Regions associate discs and players with particular areas of the world This unit will only play back discs that have compatible region codes You can find the region code of your unit by looking on the rear pan...

Page 47: ... LCD 37 inches wide XGA panel 1 366 x 768 pixels Dimensions H 28 1 inches 713mm W 37 4 inches 950mm D 10 3 inches 260mm Weight 45 0 lbs 20 4kg Designs and specifications are subject to change without notice and without our legal obligation If there is a discrepancy between languages the default language will be English 5 If you subscribe to cableTV the channels are displayed as 1 135 Cable compani...

Page 48: ...TS COMPLETE ASSEMBLY PARTS DEMO OR FLOOR MODELS FUNAI CORP AND ITS REPRESENTATIVES OR AGENTS SHALL IN NO EVENT BE LIABLE FOR ANY GENERAL INDIRECT OR CONSEQUENTIAL DAMAGES ARISING OUT OF OR OCCASIONED BY THE USE OF OR THE INABILITY TO USE THIS PRODUCT THIS WARRANTY IS MADE IN LIEU OF ALL OTHER WARRANTIES EXPRESS OR IMPLIED AND OF ALL OTHER LIABILITIES ON THE PART OF FUNAI ALL OTHER WARRANTIES INCLU...

Page 49: ...oductor DVD Incorporado Manual del Usuario LD370SS8 M2 SI NECESITA AYUDA ADICIONAL CON LA INSTALACIÓN O CON EL FUNCIONAMIENTO DESPUÉS DE LEER EL MANUAL DEL USUARIO LLAME ALTELÉFONO GRATUITO 1 800 968 3429 OVISITE NUESTRO SITIOWEB EN http www sylvania ce com PARA RECIBIR LA SEÑAL DIGITAL ANALÓGICA DEBE CONECTAR LA ANTENA HIGH DEFINITION TELEVISION Discos de 5 pulgadas solamente 2008 Funai Electric ...

Page 50: ...que resulte improbable que nadie los pise o que queden pinzados por elementos colocados encima o contra ellos prestando especial atención a enchufes de los cables sus tomas de corriente y su punto de salida del aparato 13 PUESTAATIERRADEANTENAEXTERIOR Si hay una antena exterior o un sistema de cable conectado al televisor asegúrese de que la antena o el sistema de cable está puesto a tierra de man...

Page 51: ...o de aquel en el que está conectado el receptor 4 Solicitar la ayuda del distribuidor o de un técnico experimentado de radio televisión Este aparato digital Clase B es conforme con la norma canadiense ICES 003 Nota para el instalador del sistema CATV Esta recordatorio se facilita para llamar la atención del instalador del sistema CATV sobre el Artículo 820 40 de la NEC que proporciona pautas para ...

Page 52: ...INCENDIO No manipule el cable de alimentación con las manos húmedas No tire del cable de alimentación para desconectarlo de una toma de CA Agárrelo por el enchufe Si por accidente se derrama agua sobre la unidad desenchufe inmediatamente el cable de alimentación y lleve la unidad a nuestro centro de servicio autorizado para su reparación No coloque ningún objeto directamente encima de la unidad AD...

Page 53: ... audio digital coaxial Sonido Dolby Digital Disfrute del sonido surround multicanal Dolby Digital cuando conecte la unidad a su decodificador Dolby Digital Imagen Fija Avance Rápido Cámara Lenta Reproducción Paso a Paso Se encuentran disponibles varios modos de reproducción incluyendo imágenes fijas avance retroceso rápido cámara lenta y paso a paso Menús DVD en un Idioma Deseado Puede visualizar ...

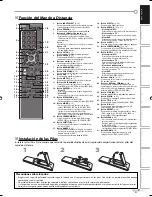
Page 54: ...as 5 FuncióndelMandoaDistancia 7 InstalacióndelasPilas 7 PaneldeControl 8 PanelTrasero 8 CONEXIÓN ConexiónBásica 9 ConexióndeDispositivoExterno 10 Funciones del TV AJUSTE INICIAL ConfiguraciónInicial 13 MenúPrincipal 13 ExploraciónAutomáticadeCanales 14 SeleccióndeIdioma 14 PARA VER LA TELEVISIÓN SeleccióndeCanal 15 AjustedeVolumen 15 ModoFijo 15 TemporizadordeApagado 15 ParaCambiarentreCadaModo 1...

Page 55: ...s archivos MP3 JPEG 14 Botón MODE p 35 Presione para activar lista de carpeta de un disco cuando REPROD DOBLE está en ON MP3 JPEG Presione para establecer el orden de reproducción o reproducir aleatoriamente CD MP3 JPEG Presione para activar o desactivar el nivel de negro DVD VCD y el envolvente virtual DVD CD VCD MP3 15 Botón SEARCH MODE p 33 Presione para buscar capítulo título DVD tiempo DVD CD...

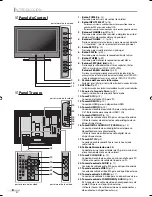
Page 56: ...p 10 Conexión HDMI para un dispositivo HDMI 14 Tomas AUDIO IN p 10 Conexión de cable de audio RCA para un dispositivo DVI Solamente para conector HDMI 1 IN 15 Tomas AUDIO OUT p 12 Conexión de cable de audio RCA para un dispositivo externo Utilice las tomas de entrada de audio analógico de un dispositivo externo 16 Toma DIGITAL AUDIO OUT COAXIAL p 12 Conexión de cable de audio digital coaxial para ...

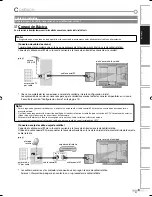
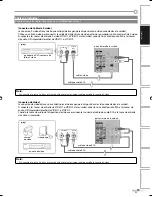
Page 57: ...ada de antena antes de mover la unidad Si utiliza una antena para recibir televisión analógica ésta debería funcionar también para recepción de DTV Las antenas de exterior tejado serán más eficaces que las de versiones de sobremesa Para cambiar fácilmente su fuente de recepción entre antena y cable instale un selector de antena Si se conecta directamente al sistema de cable póngase en contacto con...

Page 58: ...no es compatible con la norma EIA CEA 861 861B Las señales de audio se convierten de digitales a analógicas para esta conexión Conexión de Cable de Vídeo en Componentes La conexión de vídeo en componentes ofrece una mejor calidad de imagen para dispositivos de vídeo conectados a la unidad Utilice un cable de vídeo en componentes para conectar la unidad a dispositivos de vídeo externos equipados co...

Page 59: ...dad la conexión S video Conexión de Vídeo La conexión de vídeo ofrece una calidad normal de imagen para dispositivos de vídeo conectados a la unidad Si conecta a las tomas de entrada de VIDEO 1 o VIDEO 2 de la unidad conecte un cable de audio RCA a las tomas de audio L R izquierda derecha de VIDEO 1 o VIDEO 2 Cuando la toma de audio del dispositivo de vídeo sea monoaural conecte el cable de audio ...

Page 60: ...ma PC IN Si conecta la unidad a su ordenador puede utilizarlo como monitor Nota Por favor compre el VGA que tenga el núcleo de ferrita Cables no incluidos Deberá adquirir los cables necesarios en su establecimiento local p ej Sistema estéreo p ej decodificador Dolby Digital cable de audio RCA Hacia toma AUDIO OUT cable coaxial de audio digital Hacia toma DIGITAL AUDIO OUT parte trasera de la unida...

Page 61: ...anales este ajuste se cancelará La función de exploración automática inicial de canales puede ejecutarse para Aire o Cable solamente una vez Al cambiar la conexión aire cable establezca de nuevo la exploración automática de canales Consulte la página 14 Puede cancelar o salir del menú de exploración automática de canales presionando SETUP Si no hay entrada de señal desde el terminal de antena y no...

Page 62: ...able O ANT IN 5 Cuando la antena aérea esté conectada seleccione Aire Cuando se conecte a un CATV seleccione Cable Comienza automáticamente la exploración y la memorización de los canales Sistema escanea canales espere Salir SETUP 72 Canales analógicos 10ca Canales digitales 6ca Cuando la exploración y la memorización han finalizado se muestra el canal memorizado más bajo Nota Si se conecta direct...

Page 63: ...ostrará en la parte inferior de la pantalla del televisor cuando ajuste el volumen La barra de volumen desaparecerá automáticamente dentro de unos segundos Presione MUTE para activar y desactivar el sonido Mudo Mudo silencio aparece en la pantalla del televisor durante unos segundos Presione nuevamente MUTE o utilice VOL X Y para recuperar el volumen original Modo Fijo Puede congelar la imagen mos...

Page 64: ...eccione HDMI1 Para utilizar la toma HDMI 2 IN en la unidad seleccione HDMI2 Para utilizar la toma PC IN en la unidad seleccione PC 5 Para Cambiar el Modo de Audio En esta sección se describe cómo cambiar el idioma de audio TV 1 Presione AUDIO para mostrar por pantalla el modo de audio actualmente seleccionado Durante la recepción de una emisión MTS presione repetidamente para recorrer los canales ...

Page 65: ...da a la información de emisión Se muestra un máximo de 4 líneas 4 número de canal 5 idioma de audio Consulte la sección Para Cambiar el Modo de Audio en la página 16 6 líneas de exploración efectivas y modo de exploración 7 formato de programa 8 relación de aspecto del programa 9 clasificación del programa 10CC opción no disponible cuando el CC está ajustado en Apagado 6 1 Inglés 1 2 TV PG DLSV 10...

Page 66: ... imagen se muestra con su centro en tamaño original y los extremos se extienden horizontalmente 5 Para señal de vídeo 16 9 Total Visualización de una imagen 16 9 en su tamaño original Zoom Visualización de una imagen 16 9 en su mayor tamaño sin modificar el aspecto horizontal o vertical Cine Visualización de una imagen que se extiende verticalmente Amplía Visualización de una imagen que se extiend...

Page 67: ...anal se ilumina Cuando elimina un canal principal se eliminan también sus canales menores conexos Nota El canal con la indicación DTV en la pantalla es ATSC En caso contrario el canal es NTSC 5 Presione SETUP para salir 5 Registro Manual La función de registro manual permite agregar los canales que no se agregaron mediante la exploración automática de canales debido al estado de la recepción en el...

Page 68: ...ara seleccionar IMAGEN y luego presione ENTER 3 Utilice Cursor K L para seleccionar el elemento que desea ajustar luego presione ENTER Imagen Imagen Modo de Imagen Claridad Contraste Color Matiz Nitidez Restablecer Ajustes Tempe de Color Ahorro Eléctrico Dinámico 30 Neutral Off 60 36 0 0 4 Ajuste la calidad de imagen Modo de Imagen Utilice Cursor K L para seleccionar el ajuste deseado y presione E...

Page 69: ...SETUP para visualizar el menú principal 2 Utilice Cursor K L para seleccionar SONIDO y luego presione ENTER 5 3 Utilice Cursor K L para seleccionar el tipo de sonido que desea ajustar luego presione ENTER Sonido Sonido Agudo Grave Envolvente Restablecer Ajustes 0 0 Off 4 Haga el ajuste del sonido Agudo Grave Utilice Cursor s B para ajustar o Cursor s Cursor B Agudo ENTER Ajuste Agudo 0 Mover Entre...

Page 70: ...lmacenados en memoria se muestran todos a la vez Modo Roll up Muestra los caracteres continuadamente mediante desplazamiento de líneas máximo 4 líneas 6 Presione SETUP para salir Nota Para mostrar los subtítulos cerrados en la pantalla de su televisor la señal de emisión debe contener los datos de los subtítulos cerrados No todos los programas y anuncios de TV contienen subtítulos cerrados o todo ...

Page 71: ...fuente color o tamaño etc 1 Repita los pasos 1 y 2 de Subtítulos Cerrados en la página 22 5 5 2 Utilice Cursor K L para seleccionar Subtítulo Cerrado y luego presione ENTER Detalle Detalle Automático Subtítulo Cerrado V chip Ajustes de PC Audio HDMI1 LED Azul Encendido 3 Utilice Cursor K L para seleccionar Estilo S C y luego presione ENTER Subtítulo Cerrado Subtítulo Cerrado Off Off S C Convencion...

Page 72: ...año Fuente Opaco Atrás Color Borde El color del borde del subtítulo mostrado puede cambiarse como sigue Blanco Negro Rojo Verde Azul Amarillo Magenta Cyan Estilo S C Estilo S C Subtítulo Cerrado Config Usuarid Estilo Fuente Color Fuente Opaco Fuente Color Fondo Tipo Borde Tamaño Fuente Opaco Atrás Color Borde Tipo Borde El tipo de borde del subtítulo mostrado puede cambiarse como sigue Elevado Hun...

Page 73: ...eccionar la clasificación deseada y luego presione ENTER repetidamente para cambiar entre Mirar y Bloque BACK ENTER X NC 17 R PG 13 PG G NR Seleccionar Mirar Bloque Atrás V chip V chip Clasificación Categoría X Exclusivamente para público adulto NC 17 No apto para menores de 17 años R Restringido menores de 17 años tienen que estar acompañados por un progenitor o un tutor adulto PG 13 No apto niño...

Page 74: ...dos para restaurar la contraseña en 0000 Ajustes PC Esta función le permite ajustar la posición de la pantalla del ordenador el reloj y la fase durante la entrada PC 1 Repita los pasos 1 y 2 de Subtítulos Cerrados en la página 22 2 Utilice Cursor K L para seleccionar Ajustes de PC y luego presione ENTER Detalle Detalle Automático Subtítulo Cerrado V chip Ajustes de PC Audio HDMI1 LED Azul Encendid...

Page 75: ...es de audio La señal de entrada de audio digital tendrá la prioridad Digital Seleccione si se ha conectado el dispositivo digital a la toma HDMI 1 IN para señales de entrada de audio digitales Analógica Seleccione si se ha conectado el dispositivo analógico a las tomas de audio analógicas para señales de entrada de audio analógicas 4 Presione SETUP para salir 5 LED Azul Puede configurar el LED azu...

Page 76: ...scos sin finalizar no se pueden reproducir Dependiendo del estado de la grabación de un disco éste puede que no se reproduzca en absoluto la imagen y el sonido no sean adecuados etc 9 Si la parte grabada del disco es demasiado pequeña menos de 55 mm a lo ancho puede que el disco no se reproduzca correctamente 10 No pegue papel ni ponga pegatinas en el disco Éstos pueden dañar el disco y la unidad ...

Page 77: ...eleccionar un elemento y a continuación presione ENTER o PLAY B Nota Las operaciones del menú pueden cambiar dependiendo del disco Consulte el manual entregado con el disco para más detalles Cancelación de PBC para reproducción de un CD de vídeo 1 Introduzca un CD de vídeo La reproducción empezará automáticamente 2 Presione STOP C 3 Introduzca del número de la pista de su elección con los botones ...

Page 78: ...petidamente para cambiar el factor necesario de zoom 2x o 4x 5 5 5 3 Una vez esté configurado el factor deseado de zoom utilice Cursor K L s B para desplazar la imagen acercada por la pantalla del televisor 4 Presione ZOOM repetidamente para salir del modo zoom Nota La función zoom no funciona mientras se muestra el menú del disco El zoom 4x no está disponible en algunos discos Sólo el zoom 2x est...

Page 79: ...isualice el tiempo transcurrido realmente Velocidad de bits constante 32 kbps 320 kbps Archivo JPEG aplicable Observaciones Reproducción normal Límite superior 6 300 x 5 100 puntos Límite inferior 32 x 32 puntos Tamaño de archivo Máx 7 MB Una imagen JPEG que se sale de la pantalla del televisor se reduce para que se muestre dentro de la pantalla del televisor Reproducción doble Límite superior 5 0...

Page 80: ...cómo configurar REPROD DOBLE ON o OFF 1 Presione STOP C y después presione MODE folder name 4 folder name 1 folder name 3 folder name 2 folder name 1 DISC NAME LISTA DE CARPETA FOLDER ENTER PLAY TODO 1 1 2 Utilice Cursor K L para seleccionar la carpeta deseada de la lista de carpetas y luego presione ENTER o PLAY B o o 5 5 Nota Para cancelar la reproducción de carpeta presione MODE de nuevo en el ...

Page 81: ...ítulo o título deseado o CH 1 CH 2 CH 3 CH 4 SKIP H SKIP G SKIP H SKIP G TT 1 TT 2 TT 3 TT 4 2 La reproducción comenzará automáticamente desde el capítulo o título que haya seleccionado Nota SKIP H G no están disponibles cuando la reproducción está detenida La búsqueda de capítulo o título sólo se puede realizar durante la reproducción o cuando la unidad ha conservado la información de reanudación...

Page 82: ... incorrectas del paso 2 La búsqueda de tiempo sólo se puede realizar durante la reproducción o cuando la unidad ha conservado la información de reanudación No puede realizarse en modo parada Dirija la Búsqueda Dirija la Búsqueda DVD CD VCD w o PBC MP3 JPEG Presione los botones numéricos para seleccionar el la capítulo título pista archivo deseada Nota Para seleccionar un capítulo título o número d...

Page 83: ...enarla Puede haber pistas o archivos adicionales en otras pantallas Utilice Cursor K L para ir a las páginas siguientes anteriores Repita este paso hasta que haya seleccionado todas las pistas o los archivos que quiera reproducir de la programación o PROGRAMA ENTER PLAY CLEAR CD DA TOTAL 0 08 22 1 1 3 3 T 15 3 18 T 16 4 24 BORRA TODO T 4 3 58 T 16 4 24 T 16 4 24 Se pueden ordenar hasta 99 pistas o...

Page 84: ...úmero de capítulo actual capítulos totales tiempo transcurrido del capítulo actual tiempo restante del capítulo actual estado actual de reproducción sólo aparece cuando la función de varios ángulos está disponible en el DVD TT Título números actuales de títulos títulos totales tiempo transcurrido del título actual tiempo restante del título actual TR Pista número de pista actual pistas totales tie...

Page 85: ...seado 1 ENG Dolby D 3 2 1ch 48k 3 5 Cada vez que presiona AUDIO el idioma del sonido cambia como se indica en el ejemplo siguiente ENG audio en inglés SPA audio en español FRE audio en francés Nota Algunos discos le permiten cambiar la configuración de sonido el menú del disco Consulte el manual entregado con el disco para más detalles Si no se muestra su idioma después de presionar AUDIO varias v...

Page 86: ...e el nivel de sonido o seleccione OFF si se distorsiona el sonido Puesta de Marcador Puesta de Marcador DVD CD VCD w o PBC Esta característica le permite poner un punto específico en un disco que será llamado posteriormente Para establecer un marcador 1 Durante la reproducción presione SEARCH MODE repetidamente hasta que aparezca p ej DVD 2 Utilice el Cursor s B para seleccionar un marcador dispon...

Page 87: ...N ITALIANO SUECO IDIOMA ENTER SUBTÍTULO OFFINGLÉS FRANCÉS ESPAÑOL ALEMÁN ITALIANO SUECO MENÚ DE DISCO 1 Predeterminado INGLÉS Seleccione el idioma deseado en el menú del DVD IDIOMA ENTER INGLÉS FRANCÉS ESPAÑOL ALEMÁN ITALIANO SUECO HOLANDÉS MENÚ DE DISCO Nota Para cambiar el idioma que se muestra en la pantalla seleccione IDIOMA en el menú principal y establezca el idioma que desee Consulte la sec...

Page 88: ... el formato Dolby Digital AUDIO ENTER DRC ON SUB MUESTREO ON DOLBY DIGITAL BITSTREAM ON Comprime la gama entre los sonidos suaves y altos OFF Sin efectos sonido original 5 SUB MUESTREO Predeterminado ON Establezca SUB MUESTREO Esta función sólo se encuentra disponible en la salida digital de un disco grabado en 96 kHz AUDIO ENTER DRC ON SUB MUESTREO ON DOLBY DIGITAL BITSTREAM ON Cuando se da salid...

Page 89: ...a 4737 5 Utilice Cursor K L para seleccionar NIVEL PATERNO y luego presione ENTER PATERNO ENTER NIVELPATERNO TODO CAMB CONTRAS 5 6 Utilice Cursor K L para seleccionar el elemento deseado y presione ENTER PATERNO ENTER TODO 8 ADULTO 7 NC 7 6 R 5 PGR 4 PG13 3 PG NIVELPATERNO NIVEL PATERNO TODO Todos los bloqueos paternales están cancelados 8 ADULTO Se pueden reproducir programas de todas las calific...

Page 90: ...te la mejor configuración de resolución CUADRO o IMAGEN basada en las características de fecha de las imágenes 5 IMAGEN La imagen del modo vista fija se estabilizará CUADRO La imagen del modo vista fija tendrá definición alta OTROS ENTER ICONO DE ÁNGULO ON MODO VISTA FIJA AUTO AUTO APAGATO ON PROGRESIVO OFF REPROD DOBLE OFF VISTA MINIAT 5sec AUTO APAGATO Predeterminado ON Configúrelo a ON para apa...

Page 91: ...rsa 5247 Polaco POL 6258 Portugués POR 6266 Quechua 6367 Rhaeto Romance 6459 Rumano RUM 6461 Ruso RUS 6467 S Samoano 6559 Sangho 6553 Sánscrito 6547 Gaélico escocés 5350 Serbio 6564 Serbocroata 6554 Sesotho 6566 Setswana 6660 Shona 6560 Sindhi 6550 Singalés 6555 Siswat 6565 Eslovaco 6557 Esloveno 6558 Somalí 6561 Español SPA 5165 Sundanés 6567 Swahili 6569 Sueco SWE 6568 T Tagalo 6658 Tajik 6653 T...

Page 92: ... de la imagen Vea otros canales de televisión El problema podría limitarse a una emisora Imagen borrosa Cuando se utilice la antena exterior compruebe el estado del cable y de la conexión Vea otros canales de televisión El problema podría limitarse a una emisora Imágenes fantasmas en la imagen Compruebe la conexión de antena o de cable con la unidad principal Cuando se utilice la antena exterior c...

Page 93: ...el programa para insertar publicidad El decodificador de subtítulos cerrados no puede leer la información del programa acortado No aparece ningún subtítulo cuando se reproduce una cinta de vídeo con subtítulos Es posible que la cinta de vídeo se haya copiado ilegalmente o que la señal de subtítulos no se haya leído durante la copia Aparece un recuadro negro en la pantalla Se ha seleccionado el mod...

Page 94: ...tancia y mire en el visor de la cámara digital Si la luz infrarroja aparece en la cámara el mando a distancia funciona Mantenimiento 5 ATSC Acrónimo de Advanced Television Systems Committee Comité de sistemas avanzados de televisión y el nombre de unas normas de emisión digital Código de Región Las regiones asocian los discos y los reproductores con áreas concretas del mundo Esta unidad sólo repro...

Page 95: ...equisitos de potencia 120V AC 10 60 Hz 0 5 Consumo de potencia máximo 230W LCD Panel XGA de 37 pulgadas de ancho 1 366 x 768 píxeles Dimensions Altura 28 1 pulgadas 713 mm Ancho 37 4 pulgadas 950 mm Profundidad 10 3 pulgadas 260 mm Peso 45 0 libras 20 4 kg Los diseños y las especificaciones pueden ser objeto de modificaciones sin previo aviso y sin obligaciones legales por nuestra parte Si se prod...

Page 96: ... DEMOSTRACIÓN O DE TALLER FUNAI CORP Y SUS REPRESENTANTES O AGENTES NO SERÁN EN NINGÚN CASO CONSIDERADOS RESPONSABLES DE DAÑOS GENERALES INDIRECTOS O CONSECUENCIALES RESULTANTES DE O PROVOCADOS POR EL USO O LA IMPOSIBILIDAD DE USO DE ESTE PRODUCTO ESTA GARANTÍA SUSTITUYE A CUALQUIER OTRA GARANTÍA EXPRESA O IMPLÍCITA Y CUALQUIER OTRA RESPONSABILIDAD CIVIL POR PARTE DE FUNAI CUALQUIER OTRA GARANTÍA ...

Reviews: