background image

13

EN

I

NITIAL SETTING

WATCHING TV

INTRODUCTION

CONNECTION

INITIAL SETTING

OPTIONAL SETTING

TROUBLESHOOTING

INFORMATION

Initial Setup

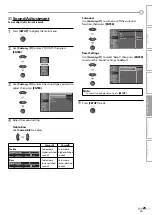
This section will guide you through the unit’s initial setting which includes 
selecting a language for your on-screen menu and auto channel scan, 
which automatically scans and memorizes viewable channels.

Before you begin:

Make sure if the unit is connected to antenna or cable.

1

After making all the necessary connections, press 

[POWER]

 to turn on the unit.


This operation may take a few moments.

2

Use 

[Cursor 

/

 L

]

 to select the on-screen language 

from the choices on the right side of the TV screen. 
(English / Español / Français)


Initial Setup

Initial Setup

Select the language for setup display.

Elija el idioma de ajuste.

Sélectionner langue écran config.

Select

Enter

Exit

SETUP

Español

Français

ENTER

English

“Initial Setup” menu on step 3 will be displayed in the 
selected language after you press 

[ENTER]

.

3

Use 

[Cursor 

/

 L

]

 to select “Air” for TV channels or 

“Cable” for CATV channels, then press 

[ENTER]

.


Initial Setup

Initial Setup

Air

Cable

Select

Enter

Exit

SETUP

Back

BACK

ENTER

Make sure the antenna is connected to "ANT.IN" jack.
Select the destination of "ANT.IN" jack.  

Air

Cable

Or

ANT.IN

Scanning and memorizing of channels start 
automatically.


Initial Setup

Initial Setup

Now the system is scanning for channels,please wait.

Exit

SETUP

5%

Analog channels

1ch

Digital channels

0ch

When the scanning and memorizing are completed, 
the lowest memorized channel in the broadcasting 
will be displayed.

5

Note:

•  If you connect the cable system directly, contact the CATV 

installer.

•  If you press 

[POWER]

 or 

[SETUP]

 during auto channel 

scan, this setting will be canceled.

•  The initial auto channel scan function can be executed 

for either “Air” or “Cable” only once. When you change the 
connection (Air/Cable), set auto channel scan again. (Refer 
to page 14.)

•  You can cancel or exit the initial auto channel scan menu 

by pressing 

[SETUP]

.

•  If there is no signal input from the antenna terminal and 

no operation for several seconds after you turn on the unit, 
“Helpful Hints” appears. Follow the instructions listed on 
the TV screen.

No channel is registered.
Press and hold "ENTER" key on the remote control for 3 seconds.
Contact support hotline provided on manual or back of unit.

Sin canal registrado.
Pulse durante 3 segundos la tecla "ENTER" en el control remoto.
Llame teléfono de apoyo en manual o atrás de TV.

Pas de chaîne consign.
Enfoncez "ENTER" 3 secondes sur la télécommande.
Contacter numero d'urgence dans manuel ou arrière appareil.

2-2

These operations are accessible by remote control. Some may also be accessible by controls on the main unit.

Summary of Contents for LC260SS8

Page 1: ...ner s Manual LC260SS8 IF YOU NEED ADDITIONAL ASSISTANCE WITH SETUP OR OPERATING AFTER READING OWNER S MANUAL PLEASE CALL TOLL FREE 1 800 968 3429 OR VISIT OUR WEB SITE AT http www SylvaniaConsumerElec...

Page 2: ...lar surface This TV should never be placed near or over a radiator or heat register This TV should not be placed in a built in installation such as a bookcase or rack unless proper ventilation is prov...

Page 3: ...ET POUSSER JUSQU AU FOND FCC WARNING This equipment may generate or use radio frequency energy Changes or modifications to this equipment may cause harmful interference unless the modifications are e...

Page 4: ...tification in case of theft LOCATION For safe operation and satisfactory performance of the unit keep the following in mind when selecting a place for its installation Shield it from direct sunlight a...

Page 5: ...or stored in any storage medium in any form or for any purpose without the express prior written consent of Funai Furthermore any unauthorized commercial distribution of this manual or any revision he...

Page 6: ...t the audio mode 13 STILL button p17 Press to pause screen image 14 SCREEN MODE button p20 Press to select aspect ratio available for the TV screen 15 INFO button p19 Digital Mode DTV Press to display...

Page 7: ...og audio input jacks of an external device 5 DIGITAL AUDIO OUT COAXIAL jack p11 Digital audio coaxial cable connection for a decoder or an audio receiver Use digital audio input jack of an external de...

Page 8: ...receive analog TV it should also work for DTV reception Outdoor or attic antennas will be more effective than settop versions To easily switch your reception source between antenna and cable install...

Page 9: ...select Bitstream etc This TV only accepts signals compliant with EIA861 HDMI DVI Connection If your video device has a DVI output jack connect using a HDMI DVI conversion cable DVI OUT AUDIO OUT R L...

Page 10: ...offers good picture quality for video devices connected to the unit Use an S video cable to connect the unit to external video devices equipped with S video output jack If you connect to the unit s VI...

Page 11: ...S VIDEO VIDEO R L COMPONENT 2 AUDIO Y R AUDIO OUT R L VIDEO OUT Note If you connect to the S video jack and the video jack at the same time the S video connection will have priority Audio Output Conn...

Page 12: ...unit as a computer monitor Note Please purchase the VGA that has a ferrite core Cables not included Please purchase the necessary cables at your local store e g PC To audio line out jack To PC IN jack...

Page 13: ...and memorizing of channels start automatically Initial Setup Initial Setup Now the system is scanning for channels please wait Exit SETUP 5 Analog channels 1ch Digital channels 0ch When the scanning...

Page 14: ...UAGE You can change the language English Spanish French displayed on the main menu Refer to Language Selection on page 15 5 Auto Channel Scan If you switch wires e g between antenna and CATV or if you...

Page 15: ...sor K L to select English then press ENTER Press SETUP to exit the main menu With regard only to the digital channel even after the scanning is complete if you unplug the AC power cord before turning...

Page 16: ...rogram per major channel since digital broadcasting technology distinguishes between multiple channels broadcast by a single network 18 00 18 30 19 00 19 30 20 00 20 30 Note No Signal will appear on t...

Page 17: ...trol to the DTV ATSC and TV NTSC or to access an external device when they are connected to the unit Press INPUT SELECT or CH K repeatedly to cycle through the input modes or Video1 Video2 Component1...

Page 18: ...is available MONO STEREO Outputs stereo audio SAP Outputs second audio program MONO Outputs mono audio The current mode will automatically disappear in a few seconds 5 DTV 1 Press AUDIO to display the...

Page 19: ...rogram guide The program guide added to broadcasting information is displayed Maximum display of 4 lines 4 channel number 5 audio language Refer to Switching Audio Mode on page 18 6 effective scanning...

Page 20: ...play the picture with its center at the original size and the edges stretched horizontally 5 For 16 9 video signal Full Display a 16 9 picture at its original size Zoom Display a 16 9 picture at its m...

Page 21: ...me until shut off Sleep 120min You can set your unit to turn off after a set period of time from 30 to 120 minutes Each press of SLEEP will increase the time by 30 minutes After set up the sleep timer...

Page 22: ...ve then press ENTER Channel List Channel List DTV 8 DTV 8 9 9 DTV 48 DTV 48 58 58 DTV 6 DTV 6 27 DTV 67 Ch Select Watch Skip Back BACK ENTER Highlight channels for Ch Up Down key selection The channel...

Page 23: ...Autoscan function Register Ch Change 11 Back BACK 5 Press SETUP to exit Note If set up completes successfully Registered to the Channel List is displayed If external input is used it is not possible...

Page 24: ...Enter ENTER to decrease brightness to increase brightness Contrast Adjust Move Enter ENTER Contrast 60 to decrease contrast to increase contrast Color Adjust Move Enter ENTER Color 36 to decrease col...

Page 25: ...just Cursor s Cursor B Treble ENTER Adjust Treble Move Enter 0 to decrease higher pitched sounds to increase higher pitched sounds Bass ENTER Adjust Bass Move Enter 0 to decrease lower pitched sounds...

Page 26: ...Once characters are stored in memory they are displayed all at once Roll up mode Displays the characters continuously by scrolling max 4 lines 6 Press SETUP to exit Note To show the closed caption on...

Page 27: ...ed Caption V chip PC Settings HDMI1 Audio 4 Use Cursor K L to select DTV CC then press ENTER Closed Caption Closed Caption Off Off Conventional CC DTV CC CC Style 5 5 Use Cursor K L to select the desi...

Page 28: ...ENTER CC Style CC Style Off Font Style Font Size Font Color Font Opacity Back Color Back Opacity Edge Color Edge Type User Setting Closed Caption On 7 Use Cursor K L to select an item then press ENTER...

Page 29: ...ue Yellow Magenta Cyan Closed Caption User Setting Font Style Font Size Font Color Font Opacity Back Opacity Edge Color Edge Type Back Color Back Opacity Background opacity of the displayed caption ca...

Page 30: ...B TV Rating D page 31 C C New Password D page 32 Note When you select a rating and set it to Block the higher ratings will be blocked automatically The lower ratings will be available for viewing When...

Page 31: ...sted G General audience NR No rating 7 Press SETUP to exit Note Changing the category to Block or View automatically changes all its sub ratings to the same Block or View B TV Rating B TV Rating 5 Use...

Page 32: ...ll its sub ratings to the same Block or View C New Password C New Password Although the default code 0000 is supplied with the unit you can set your own password 5 Use Cursor K L to select New Passwor...

Page 33: ...ts the position clock and phase of the picture element The Horizontal Vertical position clock and phase of the PC screen are automatically adjusted Horizontal Position Vertical Position Use Cursor s B...

Page 34: ...t the desired sound input then press ENTER Detail Detail Closed Caption Auto Digital Analog V chip PC settings HDMI1 Audio HDMI1 Audio Auto Select if you have connected both digital device to the HDMI...

Page 35: ...trical interference from nearby appliances may affect picture quality View other TV channels The problem might be limited to the broadcasting station Picture blurred When the outside antenna is used c...

Page 36: ...e broadcast Captions are not entirely displayed or captions are delayed behind the dialogue Captions that are delayed a few seconds behind the actual dialogue are common for live broadcasts Most capti...

Page 37: ...ntrol is working Maintenance 5 ATSC Acronym that stands for Advanced Television Systems Committee and the name of the digital broadcasting standards Aspect Ratio The width of a TV screen relative to i...

Page 38: ...m With stand W 27 4 inches 696mm H 21 9 inches 555mm D 10 3 inches 260mm Weight 28 7 lbs 13 0kg 5 If you subscribe to cableTV the channels are displayed as 1 135 Cable companies often designate channe...

Page 39: ...EN MEMO 39...

Page 40: ...E ASSEMBLY PARTS DEMO OR FLOOR MODELS FUNAI CORP AND ITS REPRESENTATIVES OR AGENTS SHALL IN NO EVENT BE LIABLE FOR ANY GENERAL INDIRECT OR CONSEQUENTIAL DAMAGES ARISING OUT OF OR OCCASIONED BY THE USE...

Page 41: ...as Manual del usuario LC260SS8 SI NECESITA AYUDA ADICIONAL CON LA INSTALACI N O CON EL FUNCIONAMIENTO DESPU S DE LEER EL MANUAL DEL USUARIO LLAME ALTEL FONO GRATUITO 1 800 968 3429 O VISITE NUESTRO SI...

Page 42: ...debe colocarse en una instalaci n empotrada por ejemplo una librer a o estanter a a menos que se facilite la ventilaci n adecuada o que se hayan seguido las instrucciones del fabricante 10 FUENTES DE...

Page 43: ...dores emisores de calor Precauciones LA L MPARA DE LA PANTALLA LCD CONTIENE MERCURIO SE DEBE TIRARLA DE ACUERDO A LA NORMATIVA LOCAL O LA LEY FEDERAL CUIDADO PARA EVITAR LA DESCARGA EL CTRICA HAGA COI...

Page 44: ...bo UBICACI N Para un funcionamiento seguro y un rendimiento satisfactorio de la unidad tenga en cuenta lo siguiente a la hora de seleccionar un lugar para su instalaci n Debe protegerlo de la luz sola...

Page 45: ...enamiento en ning n soporte de almacenamiento en forma alguna o con fin alguno sin la autorizaci n expresa y previa por escrito de Funai Adem s toda distribuci n comercial no autorizada de este manual...

Page 46: ...ot n STILL p 17 Presione para detener moment neamente la imagen 14 Bot n SCREEN MODE p 20 Presione para seleccionar las relaciones de aspecto disponibles para la pantalla del televisor 15 Bot n INFO p...

Page 47: ...ispositivo externo Utilice las tomas de entrada de audio anal gico de un dispositivo externo 5 Toma DIGITAL AUDIO OUT COAXIAL p 11 Conexi n de cable de audio digital coaxial para un decodificador o re...

Page 48: ...elevisi n anal gica sta deber a funcionar tambi n para recepci n de DTV Las antenas de exterior tejado ser n m s eficaces que las de versiones de sobremesa Para cambiar f cilmente su fuente de recepci...

Page 49: ...Bitstream Secuencia de bits etc Esta unidad solamente acepta se ales compatibles con la norma EIA861 Conexi n HDMI DVI Si su dispositivo de v deo tiene una toma de salida DVI con ctelo utilizando un c...

Page 50: ...ece una buena calidad de imagen para dispositivos de v deo conectados a la unidad Utilice un cable S video para conectar la unidad a dispositivos de v deo externos equipados con toma de salida S video...

Page 51: ...Pb Pr L AUDIO S VIDEO VIDEO R L COMPONENT 2 AUDIO Y R AUDIO OUT R L VIDEO OUT Nota Si se conecta a la toma S video y a la toma de v deo al mismo tiempo tendr prioridad la conexi n S video Conexi n de...

Page 52: ...r compre el VGA que tenga el n cleo de ferrita Cables no incluidos Deber adquirir los cables necesarios en su establecimiento local p ej PC Hacia la toma monitor Hacia toma de salida de l nea de audio...

Page 53: ...te la exploraci n y la memorizaci n de los canales Ajuste Inicial Ajuste Inicial Sistema escanea canales espere Salir SETUP 5 Canales anal gicos 1ca Canales digitales 0ca Cuando la exploraci n y la me...

Page 54: ...ra la toma HDMI Consulte la secci n Audio HDMI en la p gina 34 IDIOMA Puede cambiar el idioma Ingl s Espa ol Franc s visualizado en el men principal Consulte la secci n Selecci n de Idioma en la p gin...

Page 55: ...R para seleccionar Espa ol Presione SETUP para eliminar el men principal Solamente con respecto al canal digital incluso despu s de finalizar la exploraci n si desenchufa el cable de alimentaci n de C...

Page 56: ...canal mayor dado que la tecnolog a de emisi n digital distingue entre m ltiples canales emitidos por una determinada red 18 00 18 30 19 00 19 30 20 00 20 30 Nota Aparecer Sin Se al en la pantalla del...

Page 57: ...cederaundispositivo externoconelmandoadistanciacuandoest nconectadosalaunidad Presione INPUT SELECT o CH K varias veces para pasar a trav s de todos los modos de entrada o Video1 Video2 Component1 Com...

Page 58: ...ando nicamente el modo de audio mono est disponible MONO EST REO Emite audio en est reo SAP Emite un segundo programa de audio MONO Emite audio en mono El modo actual desaparecer autom ticamente en de...

Page 59: ...muestra la gu a de programas a adida a la informaci n de emisi n Se muestra un m ximo de 4 l neas 4 n mero de canal 5 idioma de audio Consulte la secci n Para Cambiar el Modo de Audio en la p gina 18...

Page 60: ...imagen se muestra con su centro en tama o original y los extremos se extienden horizontalmente 5 Para se al de v deo 16 9 Total Visualizaci n de una imagen 16 9 en su tama o original Zoom Visualizaci...

Page 61: ...l apagado Reposar 120min Puede preparar su unidad para que se apague despu s de transcurrir un per odo de tiempo de 30 a 120 minutos Cada presi n de SLEEP aumentar el tiempo en 30 minutos Despu s del...

Page 62: ...liminar luego presione ENTER Lista Canales Lista Canales DTV 8 DTV 8 9 9 DTV 48 DTV 48 58 58 DTV 6 DTV 6 27 DTV 67 Selecci n Ca Ver Saltar Atr s BACK ENTER Subraye canales para selecci n Ch Up Down Lo...

Page 63: ...i n Autoscan Registra Cambia Ca 11 Atr s BACK 5 Presione SETUP para salir Nota Si la configuraci n se completa correctamente se muestra el mensaje Registro en lista canales Si se utiliza una se al ext...

Page 64: ...para aumentar el brillo Contraste Ajuste Mover Entre ENTER Contraste 60 para reducir el contraste para aumentar el contraste Color Ajuste Color 36 Mover Entre ENTER para reducir el color para dar m s...

Page 65: ...uste Agudo 0 Mover Entre para reducir los sonidos con m s altura tonal para aumentar los sonidos con m s altura tonal Grave ENTER Ajuste Grave 0 Mover Entre para reducir los sonidos con menos altura t...

Page 66: ...en memoria se muestran todos a la vez Modo Roll up Muestra los caracteres continuadamente mediante desplazamiento de l neas m ximo 4 l neas 6 Presione SETUP para salir Nota Para mostrar los subt tulos...

Page 67: ...t tulo Cerrado V chip Ajustes de PC Audio HDMI1 4 Utilice Cursor K L para seleccionar S C DTV y luego presione ENTER Subt tulo Cerrado Subt tulo Cerrado Off Off S C Convencional S C DTV Estilo S C 5 5...

Page 68: ...o S C Estilo S C Subt tulo Cerrado Off Estilo Fuente Tama o Fuente Color Fuente Opaco Fuente Color Fondo Opaco Atr s Color Borde Tipo Borde Config Usuarid On 7 Utilice Cursor K L para seleccionar un e...

Page 69: ...Cerrado Config Usuarid Estilo Fuente Color Fuente Opaco Fuente Color Borde Tipo Borde Tama o Fuente Estilo S C Estilo S C Opaco Atr s Color Fondo Opaco Atr s La opacidad de fondo del subt tulo mostrad...

Page 70: ...a 31 C C Nueva C digo de Acceso D p gina 32 Nota Cuando seleccione una clasificaci n y la ajuste en Bloque las clasificaciones m s altas quedar n bloqueadas autom ticamente Las clasificaciones m s baj...

Page 71: ...G Todos los p blicos NR Sin clasificaci n 7 Presione SETUP para salir Nota Al cambiar la categor a a Bloque o Mirar cambia autom ticamente todas sus subcategor as a lo mismo Bloque o Mirar B Clase de...

Page 72: ...de Acceso C Nueva C digo de Acceso Aunque el c digo predeterminado 0000 viene incorporado con la unidad usted puede ajustar su propia contrase a 5 Utilice Cursor K L para seleccionar Nuevo C digo de...

Page 73: ...elemento de la imagen Se ajustan autom ticamente la posici n Horizontal Vertical el reloj y la fase de la pantalla del ordenador Posici n Horizontal Posici n Vertical Utilice Cursor s B para ajustar...

Page 74: ...ido deseada y luego presione ENTER Detalle Detalle Subt tulo Cerrado Autom tico Digital Anal gico V chip Ajustes de PC Audio HDMI1 Audio HDMI1 Autom tico Seleccione si se ha conectado el dispositivo d...

Page 75: ...os cercanos puede afectar a la calidad de la imagen Vea otros canales de televisi n El problema podr a limitarse a una emisora Imagen borrosa Cuando se utilice la antena exterior compruebe el estado d...

Page 76: ...recto Los subt tulos no se muestran enteros o aparecen retrasados con respecto al di logo Los subt tulos que se retrasan unos segundos con respecto al di logo real son habituales en las emisiones en d...

Page 77: ...SC Acr nimo de Advanced Television Systems Committee Comit de sistemas avanzados de televisi n y el nombre de unas normas de emisi n digital Contrase a Un n mero almacenado de 4 d gitos que permite el...

Page 78: ...nes Sin soporte Ancho 27 4 pulg 696mm Altura 20 3 pulg 515mm Profundidad 5 0 pulg 126 5mm Con soporte Ancho 27 4 pulg 696mm Altura 21 9 pulg 555mm Profundidad 10 3 pulg 260mm Peso 28 7 lbs 13 0kg 5 Si...

Page 79: ...39 ES MEMO...

Page 80: ...N O DE TALLER FUNAI CORP Y SUS REPRESENTANTES O AGENTES NO SER N EN NING N CASO CONSIDERADOS RESPONSABLES DE DA OS GENERALES INDIRECTOS O CONSECUENCIALES RESULTANTES DE O PROVOCADOS POR EL USO O LA I...

Reviews: