background image

31

EN

DVD-RW

DVD-RW

Video

DVD-RW

DVD-RW

VR

DVD-R

DVD-R

VCR

VCR

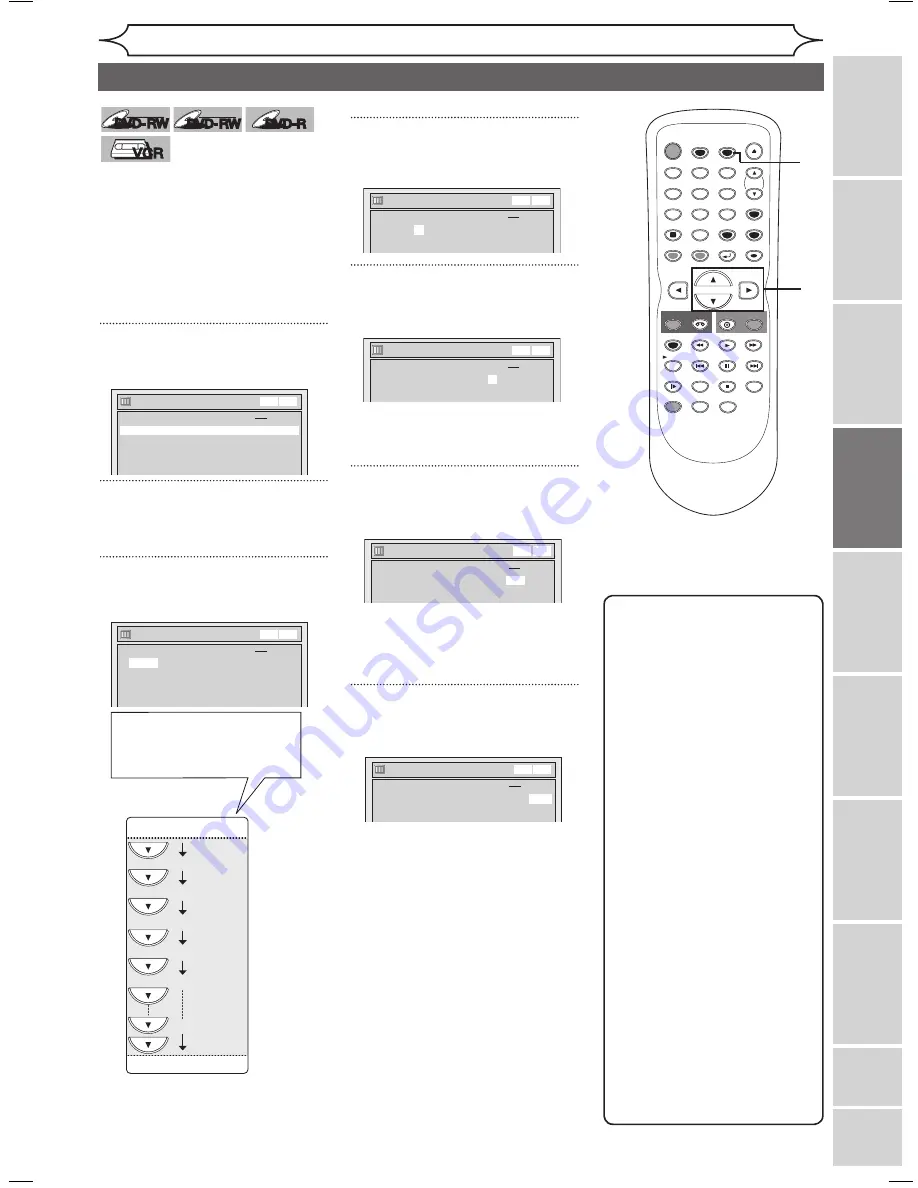
You can program the unit to record 
up to 8 programs within a month in 
advance. Daily or weekly program 
recordings are also available.
•  Be sure to set the clock before 

programming a timer recording.

•  Insert a recordable disc or a 

videotape with a record tab.

1

Press [TIMER PROG.].
Timer Programming list will appear.

2

Using [

K

 / 

L

], select a program 

number. Press [ENTER].

3

Using [

K

 / 

L

], enter the Date. 

Press [

B

].

4

Using [

K

 / 

L

], enter the Start 

and End. Press [

B

].

5

Using [

K

 / 

L

], select the channel 

number to record. Press [

B

].

To record from external input, 
select L1 or L2.

6

Using [

K

 / 

L

], select a recording 

media. Press [

B

].

•  To record on a videotape, select 

VCR.

•  To record on a disc, select DVD.

7

Using [

K

 / 

L

], select a recording 

speed. 

Refer to “Recording speed” on 
page 5 for DVD or page 75 for 
VCR.

XXXX (cont’d)

Recording

Recording

Playing 

discs

Editing

Before 

you 

start

Connections

Getting 

started

Changing 

the 

Setup 

menu

VCR 

functions

Others

E

sp

ol

Timer Recording

Note

•  If you have not set the 

clock yet:

  A clock setting window will 

appear instead of the Timer 

Programming list at step 1. 

Continue with step  in “Auto 

Clock Setting” on page  

or “Manual Clock Setting” on 

page 3 before setting a timer 

programming.

•  Press

 [

{

 / 

B

] to move the 

cursor to the left and the right 

on the Timer Programming list.

•  After step 9, you can use the 

other component (VCR or 

DVD) which is not currently 

programmed by turning the 

power on. Note that the 

programmed device will 

start to capture the selected 

channel  minutes before the 

start time and at the moment, 

if the other device still stays in 

recording, recording pause or 

OTR mode turning a different 

channel, the current mode will 

be canceled and you cannot 

change the channel. When 

both devices capture the same 

channel, the current mode 

continues to function.

STOP

POWER

T-SET

TIMER PROG.

SKIP

SKIP

OPEN/CLOSE

SPACE

1

2

3

4

5

6

7

8

0

9

CH

VIDEO/TV

SLOW

PAUSE

.@/:

ABC

DEF

GHI

JKL

MNO

PQRS

REC/OTR

DISPLAY

TUV

WXYZ

DVD

REC/OTR

REC SPEED

ZOOM

SEARCH

VCR

SETUP

CM SKIP

RETURN

MENU/LIST

TOP MENU

DUBBING

x1.3/0.8

CLEAR

ENTER

PLAY

AUDIO

1

2

3

4

5

7

6

Timer Programming

2.     ---
3.     ---

1.

    ---

4.     ---
5.     ---
6.     ---
7.     ---
8.     ---

Date

Start

End

CH

Speed

DVD
VCR

VCR DVD

JAN/01 12:57AM 1:57AM

8

DVD

1H

When pressing 

[

L

] at the 

current date, The Date will 
change as follows.

Daily

MON-SAT

JAN/01

JAN/31

MON-FRI

SAT

FRI

SUN

e.g. January 1st

Timer Programming

2.     ---
3.     ---

1.

    ---

4.     ---
5.     ---
6.     ---
7.     ---
8.     ---

Date

Start

End

CH

Speed

DVD
VCR

VCR DVD

    ---

Timer Programming

2.     ---
3.     ---

1.

    ---

4.     ---
5.     ---
6.     ---
7.     ---
8.     ---

Date

Start

End

CH

Speed

DVD
VCR

VCR DVD

JAN/01

--:--

--:--

L1

DVD

Timer Programming

2.     ---
3.     ---

1.

    ---

4.     ---
5.     ---
6.     ---
7.     ---
8.     ---

Date

Start

End

CH

Speed

DVD
VCR

VCR DVD

JAN/01 12:57AM

--:--

L1

DVD

Timer Programming

2.     ---
3.     ---

1.

    ---

4.     ---
5.     ---
6.     ---
7.     ---
8.     ---

Date

Start

End

CH

Speed

DVD
VCR

VCR DVD

JAN/01 12:57AM 1:57AM

8

DVD

Timer Programming

2.     ---
3.     ---

1.

    ---

4.     ---
5.     ---
6.     ---
7.     ---
8.     ---

Date

Start

End

CH

Speed

DVD
VCR

VCR DVD

JAN/01 12:57AM 1:57AM

8

DVD

DVR91VG_E9A11UD_015.indd   31

006/0/17   13:9:07

Summary of Contents for DVR91VG

Page 1: ...efore you use this unit you need to complete connections Refer to Connections on pages 14 16 To record a program easily refer to Easy DVD recording on pages 17 18 after connections are completed You CANNOT record on any copyright protected DVD disc with this unit INSTRUCCIONES EN ESPAÑOL INCLUIDAS Owner s Manual DVD Recorder with Video Cassette Recorder Supplied Accessory Note Connect this unit di...

Page 2: ...es cause harmful interference to radio or television reception which can be determined by turning the equipment off and on the user is encouraged to try to correct the interference by one or more of the following measures 1 Reorient or relocate the receiving antenna 2 Increase the separation between the equipment and receiver 3 Connect the equipment into an outlet on a circuit different from that ...

Page 3: ...n to cords at plugs convenience receptacles and the point where they exit from the appliance 13 Outdoor Antenna Grounding If an outside antenna or cable system is connected to the product be sure the antenna or cable system is grounded so as to provide some protection against voltage surges and built up static charges Article 810 of the National Electrical Code ANSI NFPA No 70 provides information...

Page 4: ... in the picture In case of picture problems with 5 5 progressive scan output it is recommended that the user switch the connection to the standard definition output If there are questions regarding your TV set compatibility with this 5 5p DVD recorder please contact our customer service center Installation Location For safety and optimum performance of this unit Install the unit in a horizontal an...

Page 5: ...d on the video heads after a long period of use or the usage of rental or worn tapes can cause this problem If a streaky or snowy picture appears during playback the video heads in the unit may need to be cleaned 1 Please visit your local Audio Video store and purchase a good quality VHS Video Head Cleaner If a Video Head Cleaner does not solve the problem please call our help line mentioned on th...

Page 6: ...ions 83 Specifications 83 Español 84 Limited Warranty Back Cover Before you start 2 Precautions 2 Table of contents 6 Features 7 Functional overview 8 Installing batteries in the remote control 10 Using a remote control 10 The VCR DVD recorder switching 10 Setup menus 11 Display menu 12 Connections 14 Connection to a TV 14 Connection to a cable box or satellite box 15 Connection to an Audio System...

Page 7: ... You can easily find the part you want to watch using the Index search Time search functions An index mark will be assigned at the beginning of each recordings you make For Time search function you can go to a specific point on a videotape by entering the exact amount of time you wish to skip Editing DVD mode Deleting titles You can delete titles which you do not need anymore Making your own Playl...

Page 8: ...pidly in forward during playback Forward Search 21 REW E button VCR Press to rewind the videotape or to view the picture rapidly in reverse during the playback mode Rewind Search 22 Remote control sensor DVD VCR Receive signals from your remote control so that you can control the unit from a distance Rear Panel ANTENNA IN IN AUDIO OUT S VIDEO S VIDEO AUDIO OUT DIGITAL AUDIO OUT COAXIAL COMPONENT V...

Page 9: ...1 Bx1 3 0 8 button DVD During playback press to playback in a slightly faster slower speed with keeping the audio quality 12 SKIP H button DVD During playback press to skip to the previous chapter or track Or when playback is paused press to play back in reverse step by step 13 SLOW button VCR During playback press to view the videotape in slow motion 14 CM SKIP button DVD During playback press to...

Page 10: ... environmental protection that apply in your country or area Do not recharge short circuit heat burn or disassemble batteries 2 1 3 2 1 3 Because this product is a combination of a VCR and a DVD recorder you must select first which component you wish to operate with OUTPUT SELECT DUBBING OPEN CLOSE POWER REW F FWD PLAY VCR VCR OUTPUT SELECT DVD STOP PLAY L CHANNEL K RECORD STOP EJECT DVD VIDEO REC...

Page 11: ...st the channel setting of the unit as you prefer 7 Disc CD Playback Mode When a DVD Video disc commercially available or a new DVD R disc is inserted into the unit you cannot select Disc CD Playback Mode is available only when an Audio CD disc is inserted into the unit 1 Format DVD RW only Allows you to erase all of the recorded content on the disc The disc will be completely blank Erased content ...

Page 12: ...LAY to display the On Screen display 1 Indicates current video status 2 Indicates the current time 3 Indicates a current channel number and an audio status of the program 4 Indicates a recording or playing speed 5 Indicates a Tape Counter 6 Audio status of the current videotape Functional overview cont d Note This is an example screen only for explanation Displayed items will change depending on t...

Page 13: ...D is on the disc tray Appears when a DVD disc is on the disc tray Appears when the Timer Recording is proceeding in DVD Appears when DVD is in the Timer Recording standby mode Flashes when a program cannot be performed for some reasons Appears when a DVD R disc is on the disc tray Appears when a DVD RW disc is on the disc tray Appears when the Timer Recording is proceeding in VCR Appears when VCR ...

Page 14: ...g the connection Method 1 and 2 while Progressive Scan is activated they are in Interlace mode ANTENNA IN IN AUDIO OUT S VIDEO S VIDEO AUDIO OUT DIGITAL AUDIO OUT COAXIAL COMPONENT VIDEO OUT IN VIDEO OUT L Y OUT PB CB PR CR L R L R R OUT DVD VCR DVD IN ANTENNA IN IN AUDIO OUT S VIDEO S VIDEO AUDIO OUT DIGITAL AUDIO OUT COAXIAL COMPONENT VIDEO OUT IN VIDEO OUT L Y OUT PB CB PR CR L R L R R OUT DVD ...

Page 15: ... channel 3 or 4 the same channel as the output channel of the cable box or satellite box If noise appears on the TV screen press VIDEO TV on the remote control If you use the channel 4 you will need to change this unit s RF output to channel 4 Refer to RF output switch on page 81 2 At the TV select channel 3 or 4 the same channel as you have selected at step 1 3 At the cable box or satellite box s...

Page 16: ...al decoder you can enjoy high quality Dolby Digital Multi channel surround sound as heard in the movie theaters The audio source on a disc in a Dolby Digital Multi channel surround format cannot be recorded as digital sound by an MD or DAT deck Playing back a DVD using incorrect settings may generate noise distortion and may also damage the speakers To complete these settings refer to pages 71 72 ...

Page 17: ...KL MNO PQRS REC OTR DISPLAY TUV WXYZ DVD REC OTR REC SPEED ZOOM SEARCH VCR SETUP CM SKIP RETURN MENU LIST TOP MENU DUBBING x1 3 0 8 CLEAR ENTER PLAY AUDIO Open the disc tray 3 Step 1 Choose a disc type There are several types of recordable DVD discs to choose from Choose a recordable DVD disc type based on your playing recording editing require ments See DVD disc types at the bottom of this page f...

Page 18: ... any information on the disc Discs recorded in VR mode can still be edited after finalization Step 6 Stop the recording Step 3 Select the recording speed Step 5 Record on DVD disc Step 4 Select the desired channel Getting started Easy DVD recording cont d XP 0 58 CH 12 I Track 1 Track 2 Track 3 Track 4 Track 5 Start Rec Stop Start Stop Rec Start Rec Stop Rec Title 1 Title 2 Chapter 1 Chapter 1 Cha...

Page 19: ...t number For example 117 press 1 1 7 You must precede single digit channel numbers with a zero For example 02 03 04 and so on You can select the line input mode L1 or L2 To select L1 by pressing 0 0 1 To select L2 by pressing 0 0 2 Details are on pages 34 35 5 Turn on this unit for the first time you need to follow these steps 1 Press POWER 2 Turn the TV on Select the input to which the unit is co...

Page 20: ...ing CH K L to move through the channels only in the channel memory Press the Number buttons to select a channel number directly 5 Using K L select Add or Delete Press ENTER The channel number will be added or deleted from the channel memory Then the next channel number will appear so that you can continue adding or deleting channels 6 Press SETUP to exit Getting started Channel setting cont d STOP...

Page 21: ...k an appropriate setting You can only play back the disc in second audio if a TV program is available in second audio and you set TV Audio Select to SAP STOP POWER T SET TIMER PROG SKIP SKIP OPEN CLOSE SPACE 1 2 3 4 5 6 7 8 0 9 CH VIDEO TV SLOW PAUSE ABC DEF GHI JKL MNO PQRS REC OTR DISPLAY TUV WXYZ DVD REC OTR REC SPEED ZOOM SEARCH VCR SETUP CM SKIP RETURN MENU LIST TOP MENU DUBBING x1 3 0 8 CLEA...

Page 22: ...ock Setting on page 23 Auto Clock Setting Make sure The antenna Cable TV connections are correct If this unit is connected to a Cable Box or Satellite Box select the local PBS station on them to set the clock automatically 1 Press SETUP 2 Using K L select Clock Press ENTER Clock menu will appear 3 Using K L select Auto Clock Setting Press ENTER Option window will appear The default setting is Auto...

Page 23: ...TURN MENU LIST TOP MENU DUBBING x1 3 0 8 CLEAR ENTER PLAY AUDIO 1 2 3 4 5 7 Manual Clock Setting 1 Press SETUP 2 Using K L select Clock Press ENTER 3 Using K L select Clock Setting Press ENTER Clock Setting menu will appear Press ENTER again Default date will appear 4 Using K L enter the date month day year Press B to move the cursor 5 Using K L enter the time hour minute Press B A cursor will mov...

Page 24: ...OOM SEARCH VCR SETUP CM SKIP RETURN MENU LIST TOP MENU DUBBING x1 3 0 8 CLEAR ENTER PLAY AUDIO 1 2 3 4 5 STOP POWER T SET TIMER PROG SKIP SKIP OPEN CLOSE SPACE 1 2 3 4 5 6 7 8 0 9 CH VIDEO TV SLOW PAUSE ABC DEF GHI JKL MNO PQRS REC OTR DISPLAY TUV WXYZ DVD REC OTR REC SPEED ZOOM SEARCH VCR SETUP CM SKIP RETURN MENU LIST TOP MENU DUBBING x1 3 0 8 CLEAR ENTER PLAY AUDIO 1 2 3 4 5 Daylight Saving Tim...

Page 25: ...discs Editing Before you start Connections Getting started Changing the Setup menu VCR functions Others Español Information on DVD recording Note This recorder cannot record on CD RW or CD R discs DVD RW R and CD RW R discs recorded on a personal computer or a DVD or CD recorder may not be played back if the disc is damaged or dirty or if there is dirt of condensation on the player s lens If you r...

Page 26: ...n DVD RW R Video mode is finalized the Title menu will be created automatically Finalize discs recorded on this unit in order to play them back on other DVD players Information on DVD recording cont d What is CPRM This is a format used to record copy once programs By recording coded data on the area of DVD discs that ordinary writing software cannot write it prevents copy once programs from being ...

Page 27: ...P SKIP OPEN CLOSE SPACE 1 2 3 4 5 6 7 8 0 9 CH VIDEO TV SLOW PAUSE ABC DEF GHI JKL MNO PQRS REC OTR DISPLAY TUV WXYZ DVD REC OTR REC SPEED ZOOM SEARCH VCR SETUP CM SKIP RETURN MENU LIST TOP MENU DUBBING x1 3 0 8 CLEAR ENTER PLAY AUDIO 1 2 3 4 5 6 Choosing the recording format of a blank disc DVD RW DVD RW Video DVD RW DVD RW VR When inserting a blank disc the unit automatically starts to initializ...

Page 28: ...SPLAY TUV WXYZ DVD REC OTR REC SPEED ZOOM SEARCH VCR SETUP CM SKIP RETURN MENU LIST TOP MENU DUBBING x1 3 0 8 CLEAR ENTER PLAY AUDIO 1 2 3 4 5 Formatting 100 Reformatting a disc This operation may take a while to be completed Format Format Mode Video mode Start Formatting 90 Format Format mode Video mode Start Are you sure Yes No DVD RW DVD RW Video DVD RW DVD RW VR You can set a specified time fo...

Page 29: ...2 3 4 5 6 7 8 0 9 CH VIDEO TV SLOW PAUSE ABC DEF GHI JKL MNO PQRS REC OTR DISPLAY TUV WXYZ DVD REC OTR REC SPEED ZOOM SEARCH VCR SETUP CM SKIP RETURN MENU LIST TOP MENU DUBBING x1 3 0 8 CLEAR ENTER PLAY AUDIO 7 5 7 8 6 DVD RW DVD RW Video DVD RW DVD RW VR DVD R DVD R Follow steps below to record TV programs 1 Press POWER Press DVD Turn on the TV and be sure to select the input to which the unit is...

Page 30: ...WXYZ DVD REC OTR REC SPEED ZOOM SEARCH VCR SETUP CM SKIP RETURN MENU LIST TOP MENU DUBBING x1 3 0 8 CLEAR ENTER PLAY AUDIO 4 3 2 4 DVD RW DVD RW Video DVD RW DVD RW VR DVD R DVD R This is a simple way to set the recording time in blocks of 30 minutes Check that the disc has enough space for the time you set After finishing the recording the recorder automatically goes into standby First 1 Turn on ...

Page 31: ...er Programming list After step 9 you can use the other component VCR or DVD which is not currently programmed by turning the power on Note that the programmed device will start to capture the selected channel 2 minutes before the start time and at the moment if the other device still stays in recording recording pause or OTR mode turning a different channel the current mode will be canceled and yo...

Page 32: ...RN MENU LIST TOP MENU DUBBING x1 3 0 8 CLEAR ENTER PLAY AUDIO 9 STOP POWER T SET TIMER PROG SKIP SKIP OPEN CLOSE SPACE 1 2 3 4 5 6 7 8 0 9 CH VIDEO TV SLOW PAUSE ABC DEF GHI JKL MNO PQRS REC OTR DISPLAY TUV WXYZ DVD REC OTR REC SPEED ZOOM SEARCH VCR SETUP CM SKIP RETURN MENU LIST TOP MENU DUBBING x1 3 0 8 CLEAR ENTER PLAY AUDIO 6 4 2 5 1 A program with the error number is grayed out and asterisked...

Page 33: ...round the Timer starting time as the unit attempts to record Please insert a recordable disc If a videotape with a record tab is not in the cassette compartment or there is no videotape in the compartment the VCR indicator on the front panel flashes and timer recording cannot be performed Please insert a recordable videotape If you press POWER and turn on the unit while either DVD or VCR is in tim...

Page 34: ... OUT DVD VCR DVD IN To LINE 2 IN To LINE 1 IN S VIDEO DVD VCR IN Another source VCR camcorder etc S Video cable VIDEO S VIDEO AUDIO R L VIDEO S VIDEO AUDIO R L OUTPUT OUTPUT IN AUDIO OUT IN VIDEO OUT L R DVD VCR Audio cable Video cable S Video cable Audio cable Video cable or or VIDEO S VIDEO L AUDIO R Settings for an external source Select Video L2 Front S Video In L1 Rear Video In VCR DVD Select...

Page 35: ...en select Yes XXXX cont d Recording Recording Playing discs Editing Before you start Connections Getting started Changing the Setup menu VCR functions Others Español Settings for an external source cont d STOP POWER T SET TIMER PROG SKIP SKIP OPEN CLOSE SPACE 1 2 3 4 5 6 7 8 0 9 CH VIDEO TV SLOW PAUSE ABC DEF GHI JKL MNO PQRS REC OTR DISPLAY TUV WXYZ DVD REC OTR REC SPEED ZOOM SEARCH VCR SETUP CM ...

Page 36: ...VD players Finalizing may take several minutes up to an hour It can take up to 15 minutes for a disc recorded in Video mode and 60 minutes for a disc recorded in VR mode A shorter recording period on the disc will require a longer time period for finalization Do not unplug the power cord during finalization Details are on pages 25 26 1 Press SETUP 2 Using K L select Disc Press ENTER Disc menu will...

Page 37: ... 1 2 4 3 5 DVD RW DVD RW Video DVD R DVD R You can finalize discs automatically using Auto Finalize function This function automatically finalizes discs after all Timer Recordings are completed and when the disc space runs out 1 Press SETUP 2 Using K L select Recording Press ENTER Recording menu will appear 3 Using K L select Auto Finalize Press ENTER Auto Finalize menu will appear 4 Using K L sel...

Page 38: ... Press SETUP 2 Using K L select Recording Press ENTER Recording menu will appear 3 Using K L select Dubbing Mode Press ENTER Option window will appear Note For VCR to DVD duplication After starting VCR to DVD duplication the picture may be distorted because of the auto tracking function This is not a malfunction Be advised to playback the videotape until the picture is stabilized then set the star...

Page 39: ...Press Make sure to select a recording speed using REC SPEED Press 6 Press PLAY B Then press PAUSE F at the point you wish to start recording Since it takes about a few seconds before the actual dubbing begins please allow extra 5 seconds when selecting the starting point 7 Press DUBBING VCR to DVD duplication will start 8 Press STOP C to stop the recording Dubbing Mode DVD VCR VCR DVD VCR DVD VCR ...

Page 40: ...des This unit has been designed to play back DVD discs with Region One 1 DVDs must be labeled for ALL regions or for Region 1 You cannot play back DVDs labeled for other regions Look for the symbols below on your DVDs If these region symbols are not on your DVD you cannot play back the DVD on this unit The number inside the globe refers to region of the world A DVD labeled for a specific region ca...

Page 41: ...thers Español Playing discs Basic playback Note For DVD R Video mode and DVD RW Video mode discs which are already finalized a title list will be displayed instead of thumbnails You can resume playback from the point you stopped playback Resume playback Refer to page 44 for details about resume playback Some discs may start playback automatically You can also start playback by pressing PLAY B in s...

Page 42: ...tically STOP POWER T SET TIMER PROG SKIP SKIP OPEN CLOSE SPACE 1 2 3 4 5 6 7 8 0 9 CH VIDEO TV SLOW PAUSE ABC DEF GHI JKL MNO PQRS REC OTR DISPLAY TUV WXYZ DVD REC OTR REC SPEED ZOOM SEARCH VCR SETUP CM SKIP RETURN MENU LIST TOP MENU DUBBING x1 3 0 8 CLEAR ENTER PLAY AUDIO 2 2 3 2 1 STOP POWER T SET TIMER PROG SKIP SKIP OPEN CLOSE SPACE 1 2 3 4 5 6 7 8 0 9 CH VIDEO TV SLOW PAUSE ABC DEF GHI JKL MN...

Page 43: ...he disc for details STOP POWER T SET TIMER PROG SKIP SKIP OPEN CLOSE SPACE 1 2 3 4 5 6 7 8 0 9 CH VIDEO TV SLOW PAUSE ABC DEF GHI JKL MNO PQRS REC OTR DISPLAY TUV WXYZ DVD REC OTR REC SPEED ZOOM SEARCH VCR SETUP CM SKIP RETURN MENU LIST TOP MENU DUBBING x1 3 0 8 CLEAR ENTER PLAY AUDIO 2 2 3 2 1 Playing back discs using the Title menu Press TOP MENU The Title menu will appear If the feature is not ...

Page 44: ...pear Resume ON 2 Press PLAY B Within a few seconds playback will resume from the point at which it stopped last You can resume playback at the same point even if you turn off the unit To cancel resuming and start disc playback from the beginning press STOP C again while the play is stopped Fast forward Fast reverse 1 During playback press D or E Every time you press D or E approximate speed will b...

Page 45: ...g REV g FWD g FWD g FWD g FWD g FWD g Step by step playback DVD V DVD V DVD V DVD V DVD RW DVD RW Video DVD RW DVD RW VR DVD R DVD R 1 During playback press PAUSE F Playback will be paused and sound will be muted 2 Press SKIP G repeatedly The playback will advance one frame or step at a time when you press SKIP G The sound will be muted To play step by step backward Press SKIP H repeatedly Every t...

Page 46: ... 0 8 CLEAR ENTER PLAY AUDIO 2 3 4 Zoom Marker Setup DVD V DVD V DVD V DVD V DVD RW DVD RW Video DVD RW DVD RW VR DVD R DVD R CD CD This feature allows you to assign a specific point on a disc to be called back later 1 During playback press DISPLAY The display menu will appear 2 Using B select Press ENTER Marker Setup menu will appear DVD Video Audio CD 3 Using K L select a desired marker number Wh...

Page 47: ...ter a desired title number to search Press ENTER Title search will start Chapter Press B to move to the number next to for chapter Using K L or the Number buttons enter a desired chapter num ber to search Press ENTER Chapter search will start Title Chapter search DVD V DVD V DVD V DVD V DVD RW DVD RW Video DVD RW DVD RW VR DVD R DVD R Using SKIP H G 1 During playback press SKIP G to skip the curre...

Page 48: ...R T SET TIMER PROG SKIP SKIP OPEN CLOSE SPACE 1 2 3 4 5 6 7 8 0 9 CH VIDEO TV SLOW PAUSE ABC DEF GHI JKL MNO PQRS REC OTR DISPLAY TUV WXYZ DVD REC OTR REC SPEED ZOOM SEARCH VCR SETUP CM SKIP RETURN MENU LIST TOP MENU DUBBING x1 3 0 8 CLEAR ENTER PLAY AUDIO 1 2 3 Note During CD playback you can enter a track number directly using the Number buttons for track search without displaying the menu excep...

Page 49: ... the current title for DVDs or current track for Audio CDs To cancel the repeat playback select OFF at step 2 The repeat setting will be also cleared when you stop playback Note To cancel random play press STOP C twice during random play Playmode OFF appears on the screen STOP POWER T SET TIMER PROG SKIP SKIP OPEN CLOSE SPACE 1 2 3 4 5 6 7 8 0 9 CH VIDEO TV SLOW PAUSE ABC DEF GHI JKL MNO PQRS REC ...

Page 50: ...UBBING x1 3 0 8 CLEAR ENTER PLAY AUDIO 3 1 2 Program play CD CD You can program a playback sequence in your desired order 1 Press SETUP 2 Using K L select CD Playback Mode Press ENTER CD Playback Mode menu will appear 3 Using K L select Program Play Press ENTER Program Play list will appear 4 Using K L or the Number buttons select a desired track Press ENTER or B A cursor will move to next 5 Press...

Page 51: ...it CANNOT record in both stereo and SAP Secondary Audio Program at the same time STOP POWER T SET TIMER PROG SKIP SKIP OPEN CLOSE SPACE 1 2 3 4 5 6 7 8 0 9 CH VIDEO TV SLOW PAUSE ABC DEF GHI JKL MNO PQRS REC OTR DISPLAY TUV WXYZ DVD REC OTR REC SPEED ZOOM SEARCH VCR SETUP CM SKIP RETURN MENU LIST TOP MENU DUBBING x1 3 0 8 CLEAR ENTER PLAY AUDIO 3 2 Switching audio soundtrack Switching virtual surr...

Page 52: ... x1 3 0 8 CLEAR ENTER PLAY AUDIO 3 1 2 Switching camera angles Visual Noise Reduction DVD V DVD V DVD V DVD V DVD RW DVD RW Video DVD RW DVD RW VR DVD R DVD R 1 During playback press DISPLAY The Display menu will appear 2 Using B select Press ENTER Noise Reduction menu will appear 3 Using K L select a desired option Press ENTER Your setting will be activated This function reduces visual noise When...

Page 53: ...you can edit from Original menu or Playlist menu which is created from the original Editing Original titles The following items can be used to edit the Original titles Deleting titles Refer to page 57 Setting titles to protect Refer to page 58 Releasing titles from protecting Refer to page 59 Editing Playlists You can create a Playlist from Original titles so that you can edit as you prefer withou...

Page 54: ...1 Press TOP MENU Title List will appear 2 Using K L B select the desired title Press ENTER Option window will appear 3 Using K L select Edit Press ENTER Edit menu will appear You cannot select Chapter Mark when a DVD R disc is inserted into the unit Chapter Mark does not work on the title less than 5 minutes 4 Using K L select Title Delete Press ENTER Confirmation window will appear 5 Using K L se...

Page 55: ... REC OTR REC SPEED ZOOM SEARCH VCR SETUP CM SKIP RETURN MENU LIST TOP MENU DUBBING x1 3 0 8 CLEAR ENTER PLAY AUDIO 3 2 4 1 2 Putting names on titles This operation may take a while to be completed Title List Edit Title Name a b c A B C 1 2 3 JAN 1 06 1 00AM CH12 XP 0 00 59 6 Title List Edit Title Name No Yes MY FAVORITE 6 0 00 59 Title List Edit Title Name a b c A B C 1 2 3 M 0 00 59 6 Press ABC D...

Page 56: ...Editing discs in Video mode cont d Note You cannot select a chapter mark interval that exceeds the length of a title The interval of chapter marks may be slightly longer or shorter than the one specified at step 2 A chapter marker may be delayed according to the recording content STOP POWER T SET TIMER PROG SKIP SKIP OPEN CLOSE SPACE 1 2 3 4 5 6 7 8 0 9 CH VIDEO TV SLOW PAUSE ABC DEF GHI JKL MNO P...

Page 57: ...ed that the titles once deleted cannot be recovered First 1 Press TOP MENU and then press MENU LIST to change Playlist to Original Original list will appear 2 Using K L B select the desired title Press ENTER Option window will appear 3 Using K L select Edit Press ENTER Original menu will appear 4 Using K L select Title Delete Press ENTER Confirmation window will appear 5 Using K L select Yes Press...

Page 58: ... to display the Original menu Using K L select Protect Press ENTER Option window will appear 2 Confirm the indication OFF ON Press ENTER The protect icon will appear on the title in the Original list 3 After this operation is com pleted press RETURN and then RETURN or STOP C to exit Data will be written onto the disc momentarily To protect a whole disc DVD RW VR mode Only Select Disc Protect ON OF...

Page 59: ...momentarily xxxx Editing Recording Playing discs Editing Before you start Connections Getting started Changing the Setup menu VCR functions Others Español Editing discs in VR mode Original cont d STOP POWER T SET TIMER PROG SKIP SKIP OPEN CLOSE SPACE 1 2 3 4 5 6 7 8 0 9 CH VIDEO TV SLOW PAUSE ABC DEF GHI JKL MNO PQRS REC OTR DISPLAY TUV WXYZ DVD REC OTR REC SPEED ZOOM SEARCH VCR SETUP CM SKIP RETU...

Page 60: ... ENTER Option window will appear 3 Using K L select Edit Press ENTER Playlist menu will appear 4 Using K L select Title Delete Press ENTER Confirmation window will appear 5 Using K L select Yes Press ENTER After that Are you sure will appear so that select Yes with K L and then press ENTER Title will be deleted 6 After this operation is com pleted press RETURN or STOP C to exit Data will be writte...

Page 61: ...NTER PLAY AUDIO 3 1 2 1 Dividing a title DVD RW DVD RW VR You can divide a title into two new titles First 1 Follow steps 1 to 3 on page 60 to display the Playlist menu Using K L select Title Dividing Use SKIP H G E D PLAY B and PAUSE F to decide the point at which you will divide the title Press ENTER Confirmation window will appear 2 Using K L select Yes Press ENTER The title will be divided int...

Page 62: ...0 8 CLEAR ENTER PLAY AUDIO 4 1 2 3 Combining titles DVD RW DVD RW VR You can combine two titles into a single title First 1 Follow steps 1 to 3 on page 60 to display the Playlist menu Using K L select Title Combining Press ENTER Title Combining setting window will appear Selected title grays out and the frame of the next title becomes yellow 2 Using K L s B select another title to combine Press EN...

Page 63: ... 60 to display the Playlist Next to the final title Add New Title Delete Playlist menu is shown Using K L s B select Add New Title Press ENTER 2 Using K L s B select a desired title Press ENTER The added title will appear as the final title 3 After this operation is completed press RETURN or STOP C to exit Data will be written onto the disc momentarily Adding titles to a Playlist DVD RW DVD RW VR ...

Page 64: ...o that select Yes with K L and then press ENTER Playlist Part of a title will be deleted 8 After this operation is com pleted press RETURN and then RETURN or STOP C to exit Data will be written onto the disc momentarily Deleting parts of titles Note When a scene is deleted from an Original the scene on the Playlist will be also deleted Original titles once edited will not remain as recorded origin...

Page 65: ...RETURN and then RETURN or STOP C to exit Data will be written onto the disc momentarily Putting names on titles This operation may take a while to be completed Playlist Edit Title Name a b c A B C 1 2 3 JAN 1 06 1 00AM CH12 XP 0 00 59 3 Playlist Edit Title Name No Yes Wait for a moment 3 MY FAVORITE Playlist Edit Title Name a b c A B C 1 2 3 0 00 59 3 M Press ABC DEF GHI JKL MNO PQRS TUV WXYZ spac...

Page 66: ...ow will appear Playlist Add Playlist Delete You cannot delete the first chapter of each title 4 Using K L select Yes Press ENTER When you select Add at step 3 a new chapter marker will be created at the point you have decided Playlist Add When you select Delete at step 3 the chapter marker you have selected will be deleted Playlist Delete 5 After this operation is completed press RETURN twice and ...

Page 67: ...nail It helps you remember the contents of the title during playback The default setting chooses the first scene of each title as the thumbnail First 1 Follow steps 1 to 3 on page 64 to display Original or Playlist menu 2 Use SKIP H G E D PLAY B and PAUSE F to decide the picture you want to select as a thumbnail Using K L select Index Picture Press ENTER Confirmation window will appear Playlist 3 ...

Page 68: ...creen Display Angle Icon ON OFF Set the display or undisplay of multi angle icon in a case the DVD in playback mode contains multi angle scene Screen Saver OFF 5 minutes 10 minutes Set the time to work the screen saver on the screen FL Dimmer Auto Bright Dark Set the brightness of the front panel display 3 Audio setting Pages 71 72 Digital Out PCM 48kHz 96kHz Set whether the sound recorded in 96kH...

Page 69: ...rench Spanish Other English DVD Language Audio English French Spanish Other Original DVD Disc Menu Language Default English Set the language for Disc Menu Audio Language Default Original Set the Audio language 1 Press SETUP 2 Using K L select Playback Press ENTER Playback menu will appear 3 Using K L select Language Press ENTER Language menu will appear 4 Using K L select a desired item Press ENTE...

Page 70: ...IO 1 2 3 5 Press SETUP to exit Display setting 1 Press SETUP 2 Using K L select Display Press ENTER Display menu will appear 3 Using K L select a desired item Press ENTER Press STOP C if you are playing back a disc Display Angle Icon ON Screen Saver FL Dimmer 10 minutes Bright OSD Language English VCR DVD Using K L select a language Press ENTER Your setting will be activated OSD Language Default E...

Page 71: ...F GHI JKL MNO PQRS REC OTR DISPLAY TUV WXYZ DVD REC OTR REC SPEED ZOOM SEARCH VCR SETUP CM SKIP RETURN MENU LIST TOP MENU DUBBING x1 3 0 8 CLEAR ENTER PLAY AUDIO 4 Using K L select a setting Press ENTER Option window will appear Proceed to step A or B Settings for PCM Default 48kHz A Digital Out PCM 96kHz 48kHz DVD Note Dynamic Range Control function is available only on the discs which are record...

Page 72: ... loud sounds Audio Digital Out Dynamic Range Control ON DVD Progressive Default OFF This unit is compatible with the Progressive Scan System The feature provides you with the higher definition images than the traditional output system does To utilize this feature you must set Progressive Scan mode to ON 1 Press SETUP 2 Using K L select Playback Press OK Playback menu will appear 3 Using K L select...

Page 73: ... 3 Using K L select Parental Lock Press ENTER 4 Using K L select the desired level Press ENTER Press STOP C if you are playing a disc 4 Video setting cont d 1 Press SETUP 2 Using K L select Playback Press ENTER Playback menu will appear 3 Using K L select Video Press ENTER 4 Using K L select Still Mode Press ENTER 5 Using K L select a setting Press ENTER Your setting will be activated Auto Optimum...

Page 74: ...OWER T SET TIMER PROG SKIP SKIP OPEN CLOSE SPACE 1 2 3 4 5 6 7 8 0 9 CH VIDEO TV SLOW PAUSE ABC DEF GHI JKL MNO PQRS REC OTR DISPLAY TUV WXYZ DVD REC OTR REC SPEED ZOOM SEARCH VCR SETUP CM SKIP RETURN MENU LIST TOP MENU DUBBING x1 3 0 8 CLEAR ENTER PLAY AUDIO 5 Playback Video Audio Parental Lock All Language DVD Parental Lock Default All Set the Parental Lock level Using K L change the parental le...

Page 75: ...ly stop recording or to resume it press PAUSE F After the unit has been in Pause mode for 5 minutes it will stop automatically to protect the videotape and the video head from damage 2 Press STOP C when the recording is completed Note To view one channel while recording another 1 While you are recording on the unit press VIDEO TV 2 At the cable box or satellite box select the channel you want to v...

Page 76: ...d an index mark is written on the videotape You can make the index mark up to 20 Note The remaining recording time will appear on the display panel during a One touch Timer Recording Press DISPLAY to see it on the TV screen You cannot pause a One touch Timer Recording If OTR is finished in VCR during playback or REC mode in DVD the VCR will be in STOP mode and the DVD keeps the current mode Unlike...

Page 77: ...ol Other operations Note Still Slow Pause mode will be automatically canceled after 5 minutes to prevent damage to the videotape and the video head To return to playback from the Picture Search Still Slow mode press PLAY B Search cont d HIFI Your Selection Type of recorded tape non Hi Fi tapes Hi Fi tapes recorded in Hi Fi stereo Hi Fi tapes recorded second audio program Hi Fi tapes recorded main ...

Page 78: ...cture quality Disconnect the playback equipment in question and connect it directly to your TV There is no sound Re connect all connections securely The connecting cord is damaged Check the connections to the amplifier input The input source setting on the amplifier is incorrect The unit is in pause mode or in Slow forward Slow reverse play The unit is in fast forward or fast reverse mode The chan...

Page 79: ... for a moment when the 1st layer switches to the 2nd layer This is not a malfunction The disc does not start playback from the beginning Resume play was activated page 44 Press STOP C twice You have inserted a disc whose Title menu or DVD menu automatically appears on the TV screen when it is first insert The unit starts playing back the disc automatically The DVD Video features an auto playback f...

Page 80: ...patible with CPRM Recording Error This disc is protected and not recordable You are trying to record on to the protected disc which is set in the Disc menu Release the disc protect setting in the Disc menu page 35 Recording Error Disc is full No area for new recording You are trying to record onto the disc which has no space for recording Insert the recordable disc with enough recording space Symp...

Page 81: ...conds RF on CH3 RF on CH4 3 seconds 3 seconds 3 seconds Error message Cause Solution Recording Error You cannot record more than 99 titles on one disc The maximum is 99 You are trying to record onto the disc on which the number of recording titles comes up to the maximum 99 Delete unnecessary titles pages 54 57 Recording Error You cannot record more than 999 chapters on one disc The maximum is 999...

Page 82: ... play back discs that have compatible region codes You can find the region code of your unit by looking at the rear panel Some discs are com patible with more than one region or all regions Sampling frequency The rate which sound is measured by a specified interval to turn it into digital audio data The numbers of sampling in one second defines as sampling fre quency The higher the rate the better...

Page 83: ... format Sampling frequency Compression format 13 5MHz MPEG Recordable discs DVD Rewritable DVD Recordable Audio recording format Sampling frequency Compression format 48kHz Dolby Digital Tuner Receivable channels RF Converter Built in VHF converter VHF UHF CATV 2 13ch 14 69ch C1 C125ch Converter output VHF channel 3 or 4 Input Output Video input Input level Jacks Input 1 rear 2 front 1 Vp p 75W RC...

Page 84: ...ta Para más detalles sobre las funciones anteriores y las limitaciones implícitas lea las explicaciones en este manual DVD R DVD R Más adecuado Puede utilizar Algunas funciones son limitadas No puede utilizar o Paso 2 Coloque un disco en blanco STOP POWER T SET TIMER PROG SKIP SKIP OPEN CLOSE SPACE 1 2 3 4 5 6 7 8 0 9 CH VIDEO TV SLOW PAUSE ABC DEF GHI JKL MNO PQRS REC OTR DISPLAY TUV WXYZ DVD REC...

Page 85: ... indicado y empiece a reproducir inmediatamente El contenido grabado se puede acceder fácilmente con un simple procedimiento de elegir un título en un capítulo en la pantalla del menú Qué son títulos y capítulos El contenido de un disco DVD se divide gen eralmente en títulos Los títulos pueden dividirse a su vez en capítulos Sugerencia 2 Edite el disco grabado La edición de discos es fácil Esta un...

Page 86: ...ara detener la reproducción 6 Presione STOP C EJECT A en el panel frontal de la unidad para expulsar la cinta Nota Cuando se coloca una cinta sin la lengüeta de grabación la unidad empezará a reproducir automáticamente El seguimiento se ajustará automáticamente para la reproducción Para ajustar manualmente el seguimiento presione CHANNEL L K en el panel frontal de la unidad o los botones CH K L en...

Page 87: ...n el mando a distancia Velocidad de grabación Se selecciona Estéreo o SAP 1 Presione REC OTR VCR para empezar la grabación Para detener temporalmente la grabación o continuarla presione PAUSE F Después de que la unidad haya estado en el modo de pausa durante 5 minutos se detendrá automáticamente para proteger al cinta y el cabezal de video contra cambios 2 Presione STOP C cuando se complete la gra...

Page 88: ...ts of God THIS WARRANTY DOES NOT COVER PACKING MATERIALS ANY ACCESSORIES EXCEPT REMOTE CONTROL ANY COSMETIC PARTS COMPLETE ASSEMBLY PARTS DEMO OR FLOOR MODELS FUNAI CORP AND ITS REPRESENTATIVES OR AGENTS SHALL IN NO EVENT BE LIABLE FOR ANY GENERAL INDIRECT OR CONSEQUENTIAL DAMAGES ARISING OUT OF OR OCCASIONED BY THE USE OF OR THE INABILITY TO USE THIS PRODUCT THIS WARRANTY IS MADE IN LIEU OF ALL O...

Page 89: ...ark of DVD Format Logo Licensing Corporation 1 Turn on the TV and the unit in the first time Initial Setting will appear Using K L select your desired language for the OSD Then press ENTER to go to next step 2 Press ENTER on Channel Preset The unit will start getting channels available in your area IDVD R RW discs can be played back only on this unit 3 Clock Setting menu will appear Press ENTER tw...

Page 90: ...SKIP RETURN MENU LIST TOP MENU DUBBING x1 3 0 8 CLEAR ENTER PLAY AUDIO STOP POWER T SET TIMER PROG SKIP SKIP OPEN CLOSE SPACE 1 2 3 4 5 6 7 8 0 9 CH VIDEO TV SLOW PAUSE ABC DEF GHI JKL MNO PQRS REC OTR DISPLAY TUV WXYZ DVD REC OTR REC SPEED ZOOM SEARCH VCR SETUP CM SKIP RETURN MENU LIST TOP MENU DUBBING x1 3 0 8 CLEAR ENTER PLAY AUDIO STOP POWER T SET TIMER PROG SKIP SKIP OPEN CLOSE SPACE 1 2 3 4 ...

Reviews: