background image

1-12-1

D6N_SC

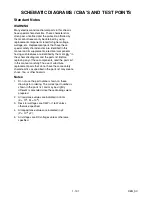
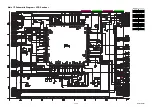
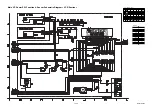
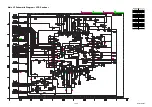
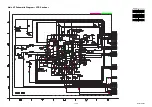
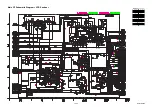
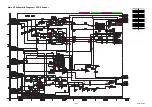
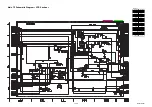
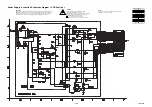
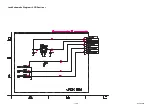
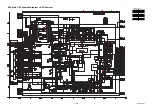
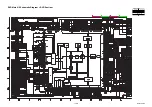
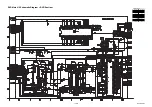
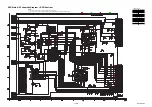
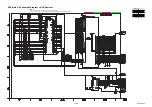
SCHEMATIC DIAGRAMS / CBA’S AND TEST POINTS

Standard Notes

WARNING

Many electrical and mechanical parts in this chassis 
have special characteristics. These characteristics 
often pass unnoticed and the protection afforded by 
them cannot necessarily be obtained by using 
replacement components rated for higher voltage, 
wattage, etc. Replacement parts that have these 
special safety characteristics are identified in this 
manual and its supplements; electrical components 
having such features are identified by the mark “

#

” in 

the schematic diagram and the parts list. Before 
replacing any of these components, read the parts list 
in this manual carefully. The use of substitute 
replacement parts that do not have the same safety 
characteristics as specified in the parts list may create 
shock, fire, or other hazards.

Notes:

1. Do not use the part number shown on these 

drawings for ordering. The correct part number is 
shown in the parts list, and may be slightly 
different or amended since these drawings were 
prepared.

2. All resistance values are indicated in ohms 

(K = 10

3

, M = 10

6

).

3. Resistor wattages are 1/4W or 1/6W unless 

otherwise specified.

4. All capacitance values are indicated in 

µ

(P = 10

-6


µ

F).

5. All voltages are DC voltages unless otherwise 

specified.

Summary of Contents for DVR90VF

Page 1: ...aration for Servicing I Adjustment Procedures I Schematic Diagrams I CBA s I Exploded Views I Parts List When servicing the deck mechanism refer to MK14 Deck Mechanism Section Deck Mechanism Part No N...

Page 2: ...proper service methods may damage the equipment It also is important to understand that these CAUTIONS and NOTICES ARE NOT EXHAUSTIVE Funai could not possibly know evaluate and advice the service trad...

Page 3: ...VCR 1 8 1 Firmware Renewal Mode 1 9 1 Function Indicator Symbols 1 10 1 Block Diagrams 1 11 1 Schematic Diagrams CBA s and Test Points 1 12 1 Waveforms 1 13 1 Wiring Diagram VCR Section 1 14 1 Wiring...

Page 4: ...e W O Burst 1 4 Video Color S N AM R P dB 37 41 SP Mode 1 5 Video Color S N PM R P dB 30 36 SP Mode 1 6 Resolution PB Line 230 245 SP Mode 2 Servo 2 1 Jitter Low sec 0 07 0 12 SP Mode 2 2 Wow Flutter...

Page 5: ...Component Output Y Luminance 75 ohm load Vp p 1 0 Cb Chrominance 75 ohm load Vp p 0 7 Cr Chrominance 75 ohm load Vp p 0 7 2 AUDIO 2 1 Output Level Vrms 2 0 2 2 Frequency Response DVD VIDEO LPCM fs 48k...

Page 6: ...y from the pickup lens when the diode is turned on Do not look directly at the laser beam CAUTION Use of controls and adjustments or doing procedures other than those specified herein may result in ha...

Page 7: ...especially 1 Wires covered with PVC tubing 2 Double insulated wires 3 High voltage leads D Use specified insulating materials for hazardous live parts Note especially 1 Insulation tape 2 PVC tubing 3...

Page 8: ...ongs and externally exposed accessible parts RF terminals antenna terminals video and audio input and output terminals microphone jacks earphone jacks etc is lower than or equal to the specified value...

Page 9: ...achine then apply hot air to the Flat Pack IC about 5 to 6 seconds Fig S 1 1 2 Remove the flat pack IC with tweezers while applying the hot air 3 Bottom of the flat pack IC is fixed with glue to the C...

Page 10: ...by one using a sharp pin or wire to which solder will not adhere iron wire When heating the pins use a fine tip soldering iron or a hot air desoldering machine Fig S 1 4 3 Bottom of the flat pack IC i...

Page 11: ...s Fig S 1 6 Note When using a soldering iron care must be taken to ensure that the flat pack IC is not being held by glue When the flat pack IC is removed from the CBA handle it gently because it may...

Page 12: ...ed to remove any static electricity that may be charged on the body 2 Ground for Workbench Be sure to place a conductive sheet or copper plate with proper grounding 1 M on the workbench or other surfa...

Page 13: ...nto the Deck Mechanism Assembly and press the PLAY button The tape will be loaded into the Deck Mechanism Assembly Make sure the power is on connect TP502 S INH to GND This will stop the function of T...

Page 14: ...Front Bracket D2 2 S 2 S 3 Shield Plate 4 Radiation Sheet D2 5 Jack Bracket D3 2 S 4 6 Jack CBA D3 Jack Earth Plate 7 DVD Mechanism DVD Main CBA Assembly D4 2 S 5A 2 S 5B CN2204 CN201 1 Top Cover 2 F...

Page 15: ...installing the Deck Assembly be sure to place the pin of LD SW on Main CBA as shown in Fig D8 Then install the Deck Assembly while aligning the hole of Cam Gear with the pin of LD SW the shaft of Cam...

Page 16: ...N101 S 8 8 Rear Panel Unit Fig D6 S 11 S 11 S 9 S 9 AC Cord Earth Plate Hook S 9 S 10 12 Rear Panel 9 Power Supply CBA 11 PCB Holder 10 DC Fan Motor Fig D7 S 13 S 13 S 13 S 14 S 15 S 16 S 14 S 14 S 14...

Page 17: ...ue stripe 18 Main CBA SW512 LD SW From FE Head BOTTOM VIEW Lead connections of Deck Assembly and Main CBA Desolder From Capstan Motor Assembly Printing side Desolder From Cylinder Assembly From ACE He...

Page 18: ...1 6 5 E9601DC Fig D9 19 Deck Pedestal 20 Front Bracket R S 19 S 19 S 20...

Page 19: ...do not touch white resin part as shown below When rotating the gear be not damaged with the gear 1 Remove the Top Cover 2 Rotate the gear in the direction of the arrow with a hand as shown below View...

Page 20: ...VD Main Assembly Then remove the DVD Mechanism Unit 2 Remove two screws and remove the Insulating Plate 3 Release two Locking Tabs and lift up one side of the Clamper Assembly 4 Release two Locking Ta...

Page 21: ...0 001 50 V Div F Range DC AC 20 MHz 2 Alignment Tape FL8A Head Switching Position Adjustment Purpose To determine the Head Switching position during playback Symptom of Misadjustment May cause Head Sw...

Page 22: ...s initializing When the initializing is completed the DVD recorder exits the Version display mode and turns off the power automatically To move into the Normal mode from the Version display mode press...

Page 23: ...the screen XX is displayed on the VFD The appearance shown in 1 of Fig d is described as follows Fig a Version Up Mode Screen Firmware Version differ depending on the models and indication is one exam...

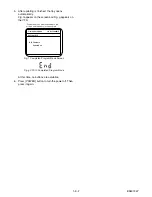
Page 24: ...e VFD At this time no buttons are available 6 Press POWER button to turn the power off Then press it again Fig f Completed Program Mode Screen Firmware Version differ depending on the models and indic...

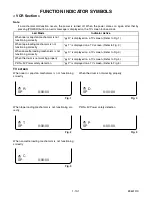
Page 25: ...rking properly P ON 5V Power safety detection Led Mode Indicator Active When reel or capstan mechanism is not functioning correctly A R is displayed on a TV screen Refer to Fig 1 When tape loading mec...

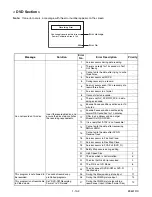
Page 26: ...0 minutes 12 Differ in an address and do not get StreamID of RDI VIDEO 13 It is a reply that ATAPI is not readable 14 Cannot write the data after recovering SMALL VMGI 15 Cannot write the data after D...

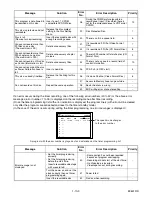
Page 27: ...unnecessary chapter markers 33 There is 999 number of total chapter VR Format Disc 9 You cannot record on this disc as Control Information is full Delete unnecessary titles 34 There is not a space to...

Page 28: ...SDA YCA CS YCA SCL 19 YCA SDA 20 YCA CS 21 YCA SCL YCA SDA YCA CS TO VIDEO BLOCK DIAGRAM TO VIDEO OUTPUT SELECT BLOCK DIAGRAM TO VIDEO INPUT SELECT BLOCK DIAGRAM TO AUDIO INPUT OUTPUT SELECT BLOCK DI...

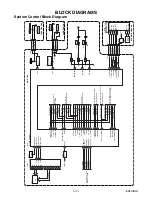
Page 29: ...T 34 DECK ASSEMBLY END S T REEL T REEL ST S ST S Q504 Q503 Q506 SW POINT AL 5V VR501 TP506 TP505 END S TP507 SW511 REC SW LD SW 87 AL 12V AL 5V AL 5V SW512 AL 18V P ON 5V 1 MODE SW AL 5V D555 S LED 5...

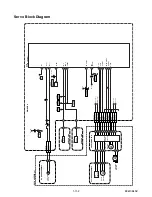
Page 30: ...CK ML BCK DATA LRCK SYSCLK E20 H18 K18 H19 G19 W17 T20 N19 M19 V4 W14 V3 U20 H20 G20 F20 P19 VIDEO Y I P VIDEO C VIDEO Cb Pb VIDEO Cr Pr VIDEO Y CVBS VIDEO C IC202 FLASH MEMORY D A D A D A D A AUDIO I...

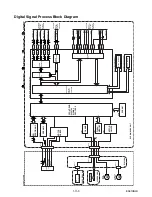
Page 31: ...OCK DIAGRAM VCR VIDEO DVD VIDEO DUB VCR DVD TO SYSTEM CONTROL BLOCK DIAGRAM CYLINDER ASSEMBLY RF SW RF SW 59 V ENV H A SW H A COMP H A COMP TP302 VIDEO L 2 HEAD VIDEO R 2 HEAD TP301 C PB D V SYNC C SY...

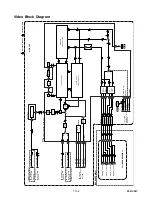
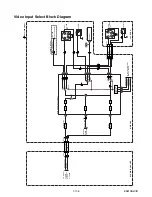
Page 32: ...1 JK804 TU900 TUNER UNIT JK806 S VIDEO IN2 3 4 2 1 Y C VIDEO IN2 JK803 13 17 19 15 8 10 12 2 21 4 18 CN1609 CN1605 22 23 24 VIDEO SW2 TO SYSTEM CONTROL BLOCK DIAGRAM VIDEO SW3 JACK CBA VIDEO OUT CONTR...

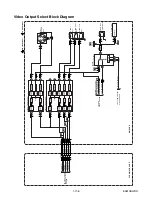
Page 33: ...R 8 VIDEO Cb Pb OUT VIDEO Y OUT VIDEO Cr Pr OUT JK1403 VIDEO OUT COMPOSITE JK751 TP751 V OUT 3 TO DIGITAL SIGNAL PROCESS BLOCK DIAGRAM DVD VIDEO DUB SW CTL PB EE VIDEO TO SYSTEM CONTROL BLOCK DIAGRAM...

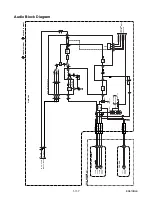
Page 34: ...C AUDIO PROCESS 76 80 78 TUNER LINE 1 LINE 2 4 AUDIO PB REC CN504 3 AUDIO COM 1 AE H 2 AE H FE H AUDIO HEAD AUDIO ERASE HEAD AC HEAD ASSEMBLY FE HEAD DECK ASSEMBLY 1 FE H 2 FE H GND CN501 MAIN CBA PB...

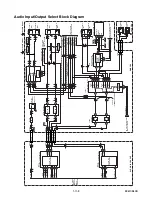
Page 35: ...PROCESS BLOCK DIAGRAM TU900 TUNER UNIT MTS SAP AUDIO SIGNAL PROCESS OP AMP AUDIO D A CONVERTER OP AMP 15 AUDIO IN 2 21 30 29 1 7 2 6 AUDIO INPUT SELECT VCR PB IC800 3 13 24 27 4 2 5 11 1 12 15 14 MUTE...

Page 36: ...LINE L OUT MOD AUDIO LINE R OUT N A IN Hi Fi H SW AUDIO MUTE H D REC H NORMAL L IIC BUS SDA IIC BUS SCL MAIN CBA Hi Fi AUDIO R 7 Hi Fi COM 8 Hi Fi AUDIO L 9 CN253 IC451 MTS SAP Hi Fi AUDIO PROCESS Hi...

Page 37: ...031 P ON 3 3V EV 2 4V DVD P ON 5V P ON 11V 9V REG SW 5V SW 5V SW 11V FAN CONT1 FAN LOCK Q107 Q108 FAN CONTROL Q104 Q105 Q057 SW 5V 3 3V REG IC1503 2 5V REG IC1504 P ON 2 5V P DOWN H REG CONT SWITCHING...

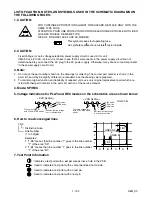
Page 38: ...k in the schematic diagram and the parts list Before replacing any of these components read the parts list in this manual carefully The use of substitute replacement parts that do not have the same sa...

Page 39: ...original replacement parts which are listed with their part numbers in the parts list section of the service manual 4 Mode SP REC 5 Voltage indications for PLAY and REC modes on the schematics are as...

Page 40: ...atic Diagram VCR Section E9610SCM1 MAIN 1 7 Ref No Position IC501 C 3 Q501 D 1 Q506 A 3 Q509 D 1 Q510 C 1 CN501 A 4 CN502 F 4 CN504 A 4 VR501 B 4 TP505 A 3 TP513 B 4 IC CONNECTORS TRANSISTORS VARIABLE...

Page 41: ...SCAN SEP W CD T C 7G 6G 5G 4G 3G 2G 1G a b c d e f g c d e f g g c d e f g c d e f g c d e f g c d e f g h h i a b a b a b a b a b FIP501 MATRIX CHART REPEAT PM REC VCD VCR DVD R XP SP LP EP SLP P SC...

Page 42: ...n 3 7 Schematic Diagram VCR Section E9610SCM3 MAIN 3 7 Ref No Position IC301 O 2 Q301 Q 3 Q302 Q 4 Q303 Q 4 Q421 N 1 Q422 N 1 Q425 N 1 Q426 N 1 CN253 M 4 TP301 P 1 TP302 O 4 CONNECTOR TEST POINTS TRAN...

Page 43: ...1 12 6 Main 4 7 Schematic Diagram VCR Section E9610SCM4 MAIN 4 7 Ref No Position IC451 T 2 Q428 S 3 Q429 S 2 Q430 S 4 Q432 S 3 TP452 V 3 IC TRANSISTORS TEST POINTS...

Page 44: ...12 7 Main 5 7 Schematic Diagram VCR Section E9610SCM5 MAIN 5 7 Ref No Position IC800 AA 2 IC803 BB 1 IC805 Y 2 IC900 Z 3 Q1303 AA 1 Q1304 AA 1 Q1305 AA 1 CN201 CC 3 CN1609 X 1 CONNECTORS TRANSISTORS I...

Page 45: ...matic Diagram VCR Section E9610SCM6 MAIN 6 7 Ref No Position IC804 EE 1 IC1404 FF 4 IC1405 FF 4 IC1406 FF 2 Q391 GG 2 Q804 FF 1 Q805 FF 1 Q806 FF 1 Q1351 GG 1 TP751 HH 4 TP753 HH 4 TP754 HH 4 ICS TRAN...

Page 46: ...on E9610SCM7 MAIN 7 7 Ref No Position IC1503 MM 4 IC1504 MM 3 Q052 LL 2 Q055 KK 2 Q056 KK 2 Q057 KK 1 Q101 NN 3 Q102 NN 2 Q103 NN 2 Q104 LL 2 Q105 LL 1 Q107 MM 2 Q108 MM 2 Q205 MM 3 CN101 JJ 4 CN102 O...

Page 47: ...the power supply circuit to fail Ce symbole repr sente un fusible fusion rapide CAUTION For continued protection against fire hazard replace only with the same type fuse ATTENTION Pour une protection...

Page 48: ...1 12 11 Jack Schematic Diagram VCR Section E9610SCJK...

Page 49: ...1 12 12 DVD Main 1 6 Schematic Diagram DVD Section E9610SCD1 DVD MAIN 1 6 Ref No Position IC101 C 3 IC102 B 4 Q402 B 1 Q403 B 1 CN101 A 3 CONNECTOR TRANSISTORS ICS...

Page 50: ...1 12 13 DVD Main 2 6 Schematic Diagram DVD Section E9610SCD2 DVD MAIN 2 6 Ref No Position IC201 H 4 CN201 L 3 CONNECTORS IC...

Page 51: ...1 12 14 DVD Main 3 6 Schematic Diagram DVD Section E9610SCD3 DVD MAIN 3 6 Ref No Position IC202 Q 2 IC204 P 4 IC401 N 2 IC402 P 2 IC410 Q 3 CN202 R 4 CN401 M 2 ICS CONNECTORS...

Page 52: ...pins shown are different from that of IC601 itself 2 IC601 is shown as IC601 1 6 through IC601 6 6 in DVD Main Schematic Diagram Section DVD MAIN 4 6 Ref No Position IC601 1 6 T 4 IC601 2 6 S 2 IC901...

Page 53: ...SCD5 NOTE 1 The order of pins shown are different from that of IC601 itself 2 IC601 is shown as IC601 1 6 through IC601 6 6 in DVD Main Schematic Diagram Section DVD MAIN 5 6 Ref No Position IC601 3 6...

Page 54: ...CD6 NOTE 1 The order of pins shown are different from that of IC601 itself 2 IC601 is shown as IC601 1 6 through IC601 6 6 in DVD Main Schematic Diagram Section DVD MAIN 6 6 Ref No Position IC501 II 1...

Page 55: ...SENSOR CBA START SENSOR SW P VR501 CTL TP513 RF SW TP302 WF2 C PB TP301 WF3 V OUT TP751 WF1 TO SENSOR CBA END SENSOR S INH TP502 BE9610F01011A Main CBA Top View Sensor CBA Top View BHB300F01014A BHB3...

Page 56: ...11 WF12 PIN 11 OF TU900 WF13 PIN 12 OF TU900 WF14 PIN 18 OF TU900 WF15 PIN 2 OF IC1406 WF6 PIN 17 OF CN201 PIN 3 OF CN201 WF8 PIN 5 OF CN201 WF7 WF9 PIN 9 OF CN201 WF5 PIN 7 OF CN201 WF4 PIN 1 OF CN22...

Page 57: ...nnect the AC plug to the AC power supply Otherwise it may cause some components in the power supply circuit to fail NOTE The voltage for parts in hot circuit is measured using hot GND as a common term...

Page 58: ...ircuit are not defective before you connect the AC plug to the AC power supply Otherwise it may cause some components in the power supply circuit to fail NOTE The voltage for parts in hot circuit is m...

Page 59: ...iew Jack CBA Bottom View Function CBA Top View Function CBA Bottom View Power SW CBA Top View Power SW CBA Bottom View BE9610F01011D BE9610F01011C BE9610F01011B Junction CBA Top View Junction CBA Bott...

Page 60: ...in 2 of IC1406 VIDEO CVBS 0 5V 20 s WF14 Pin 12 of TU900 WF13 Pin 11 of TU900 WF15 Pin 18 of TU900 NOTE Input COLOR BAR SIGNAL WITH 1KHz AUDIO SIGNAL WF3 WF1 UPPER WF2 WF2 LOWER TP751 TP302 UPPER LOWE...

Page 61: ...1 5V GND GND AL 4V F1 F2 POW P 1 2 3 4 5 6 7 8 9 1 1 2 2 3 4 5 6 1 2 3 4 5 6 7 8 9 10 11 12 1 2 3 4 5 6 7 1 2 3 4 5 6 7 8 9 8 9 3 3 5 9 12 15 1 2 4 6 7 8 10 11 13 14 16 17 18 POWER SUPPLY CBA AC CORD...

Page 62: ...LDEN2 40 LDEN1 13 VCC1 FOCUS ACTUATOR TRACKING ACTUATOR TILT ACTUATOR DVD CD LASER DIODE DRIVE PDIC FPDIC CD LD DVD LD TRAY OPEN SLED SENSOR SPINDLE MOTOR 1 2 3 AUDIO L OUT 17 GND 18 DVD AUDIO MUTE 1...

Page 63: ...0 V 5 00 V CL 0 00 V 0 25 V 0 00 V SB 1 06 V 1 50 V 1 21 V TL 0 66 V 1 05 V 0 91 V FB 1 99 V 2 60 V 2 17 V SF 1 51 V 1 98 V 1 80 V SM 3 20 V 3 75 V 3 40 V AU 0 26 V 0 65 V 0 44 V AL 4 51 V 5 00 V 5 00...

Page 64: ...e Fig 1 23 RF SW F AD Internal Signal C DRIVE PB CTL 32 C F R 99 H A SW 98 C ROTA The first rise of RF SW after a rise in F AD signal Acceleration Detection T1 AT H Z H L L Stop detection T2 ST Slow T...

Page 65: ...Internal Signal C DRIVE PB CTL 32 C F R 99 H A SW 98 C ROTA H Z H L L STILL STILL AT ST BL Stop detection T2 Acceleration Detection T1 Slow Tracking Value Reversal Limit Value FRAME ADVANCE The first...

Page 66: ...REV LD REV LD REV 0 2S 0 5S PIN NO CL EJ SS SS AU AU TL LD SW CL SS LM FWD M REV C DRIVE Z ON ON C F R DRUM ROTATION P ON L A MUTE H D REC H D PB PAUSE SLOW AU AL AL AU SF SM EJ AU RS SF SM TL FB AL S...

Page 67: ...EJECT STOP A LD REV FF LD REV LD REV LD FWD LD FWD LD FWD LD FWD LD FWD LD FWD LD FWD REC PAUSE REC REC REW LD REV LD REV LD REV LD REV LD REV LD REV LD REV PAUSE REC or PAUSE STOP EJECT STOP EJECT ST...

Page 68: ...se Rezero 2 INNER SW open Is Timer ET1 passed INNER SW open Is Timer ET4 passed Is slit S5 passed Is Timer ET3 passed Is Timer ET1 passed Retry OK Is slit S1 passed Is not slit passed Is Timer ET2 pas...

Page 69: ...0d S1 300 12c T1 0 1 s ET1 5 0 s V1 4 5 V 022 S2 3300 ce4 T2 3 0 s ET2 5 0 s V2 2 2 V 010 S3 3935 f5f T3 3 0 s ET3 3 0 s V3 2 4 V 013 S4 0 000 T4 0 1 s ET4 3 0 s V4 6 0 V 030 S5 3000 bb8 T5 0 1 s SLED...

Page 70: ...ay close Push close SLED INNER SW Timer close open Tray insersion direction Tray ejection direction S5 V3 V4 S4 ET3 ET4 SLED Encoder pulse S5 T3 V3 V4 ET4 Push Close INNER SW close open Tray insersion...

Page 71: ...n is pressed after the S5 passage It starts opening after making closing complete once SLED open Tray insersion direction close INNER SW Timer T2 Rezero 1 ET4 V3 V4 SLED INNER SW open Rezero 2 Tray in...

Page 72: ...etry frequency V1 1st time retry 6 v 2nd time retry 7 v 3rd time retry 8 v 4th time retry 9 v 5th time retry 9 v 6th time retry 9 v SLED Tray ejection direction S1 V1 V2 6v open Tray insersion directi...

Page 73: ...Control Clock 20 OUT YCA DATA YCA IC Control Data 21 OUT YCA CS YCA IC Control Chip Select 22 IN REC SAF SW Recording Safety SW Detect With Record tab L With out Record tab H 23 OUT RF SW Video Head...

Page 74: ...d Control Signal 76 OUT CTL Amp Output Control Signal for Test Point 77 OUT POWER LED Power LED Signal Output 78 IN Hi Fi NOR IN Audio Mode Input HiFi L Normal H Pin No IN OUT Signal Name Function 79...

Page 75: ...Not Used 4 N U Not Used 5 VSS GND 6 VDD Power Supply 7 OUT a Segment Output 8 OUT b 9 OUT c 10 OUT d 11 OUT e 12 IN f 13 IN g 14 OUT h 15 VEE Pull Down Level 16 OUT i Segment Output 17 OUT 7G Grid Ou...

Page 76: ...17 16 1 LA71205M MPB E Note A Anode K Cathode E Emitter C Collector B Base R Reference S Source G Gate D Drain KRA103M KRC103M KTA1267 GR Y KTC3193 Y KTC3199 BL Y KTA1266 Y KTC3198 Y KTC3203 Y 2SC326...

Page 77: ...2B20 2L033 2B31 2L033 2B17 2L045 2L045 2B19 2B14 A2 2L033 2L033 2L033 C 2L111 2L110 2B9 2B9 2L022 2L021 2L054 2L052 W001 2L017 2L017 2L017 2L017 2L017 2B1 2L014 2L061 2L015 E E D 2L015 2B11 A34 2B13 A...

Page 78: ...1 18 2 E9610PEX Packing S1 A14 S2 S2 S2 Unit S3 Some Ref Numbers are not in sequence X1 X22 X4 X20 X5 X2 X3 S2...

Page 79: ...P E9610UD 1VM320888 2L011 SCREW C TIGHT M3X5 BIND HEAD GBCC3050 2L013 SCREW S TIGHT M3X6 BIND HEAD GBMS3060 2L014 SCREW S TIGHT M3X6 BIND HEAD GBMS3060 2L015 SCREW S TIGHT M3X5 BIND HEAD GBMS3050 2L01...

Page 80: ...CHIP CERAMIC CAP 1608 B K 1 F 10V CHD1AK30B105 C313 ELECTROLYTIC CAP 1 F 50V M H7 CE1JMAVSL1R0 C314 CHIP CERAMIC CAP 1608 B K 1 F 10V CHD1AK30B105 C315 CHIP CERAMIC CAP 1608 B K 1 F 10V CHD1AK30B105 C...

Page 81: ...B K 4700pF 50V CHD1JK30B472 C527 CHIP CERAMIC CAP 1608 B K 0 047 F 50V CHD1JK30B473 C529 CHIP CERAMIC CAP 1608 B K 0 022 F 50V CHD1JK30B223 Ref No Mark Description Part No C530 ELECTROLYTIC CAP 1 F 5...

Page 82: ...8 B K 0 01 F 50V CHD1JK30B103 C1532 ELECTROLYTIC CAP 22 F 6 3V M H7 CE0KMAVSL220 C1535 CHIP CERAMIC CAP 1608 B K 0 01 F 50V CHD1JK30B103 Ref No Mark Description Part No C1536 ELECTROLYTIC CAP 22 F 6 3...

Page 83: ...HIP RES 1 10W F 820 RRXAFR5H0821 R073 CARBON RES 1 4W J 10k RCX4JATZ0103 R075 CARBON RES 1 6W J 4 7k RCX6JATZ0472 R092 CARBON RES 1 4W J 8 2k RCX4JATZ0822 R095 CARBON RES 1 4W J 8 2k RCX4JATZ0822 R097...

Page 84: ...R544 CHIP RES 1608 1 10W J 18k RRXAJR5Z0183 R545 CHIP RES 1608 1 10W J 10k RRXAJR5Z0103 Ref No Mark Description Part No R546 CHIP RES 1608 1 10W J 10k RRXAJR5Z0103 R547 CARBON RES 1 6W J 1k RCX6JATZ0...

Page 85: ...RES 1608 1 10W J 75 RRXAJR5Z0750 R1409 CHIP RES 1608 1 10W F 200 RRXAFR5H0201 R1421 CHIP RES 1608 1 10W F 220 RRXAFR5H0221 R1422 CHIP RES 1608 1 10W J 5 1k RRXAJR5Z0512 R1441 CHIP RES 1608 1 10W F 200...

Page 86: ...IC CAP 22 F 50V M CE1JMASDL220 C027 ELECTROLYTIC CAP 3300 F 6 3V SL CE0KMZADL332 C028 ELECTROLYTIC CAP 1000 F 6 3V M CE0KMASDL102 C029 ELECTROLYTIC CAP 100 F 10V M H7 CE1AMAVSL101 C030 CHIP CERAMIC CA...

Page 87: ...029 CARBON RES 1 6W J 150k RCX6JATZ0154 R1032 CARBON RES 1 6W G 390 RCX6GATZ0391 R1034 CARBON RES 1 4W J 680k RCX4JATZ0684 R1036 CARBON RES 1 6W J 100k RCX6JATZ0104 R1037 CHIP RES 1608 1 10W J 10k RRX...

Page 88: ...DVR90VF E9610UD 2005 04 01...

Reviews: