background image

– 6 –

EN

Setup

R

L

AUDIO OUT

COAXIAL R

L

DIGITAL AUDIO OUT

Stereo system

COAXIAL

AUDIO OUT

COAXIAL

R

L

DIGITAL AUDIO OUT

AUDIO

DVD player

Method 1

Analog audio
input jacks

Digital audio
input jack

(Analog)
AUDIO OUT

DIGITAL
AUDIO OUT

Method 2

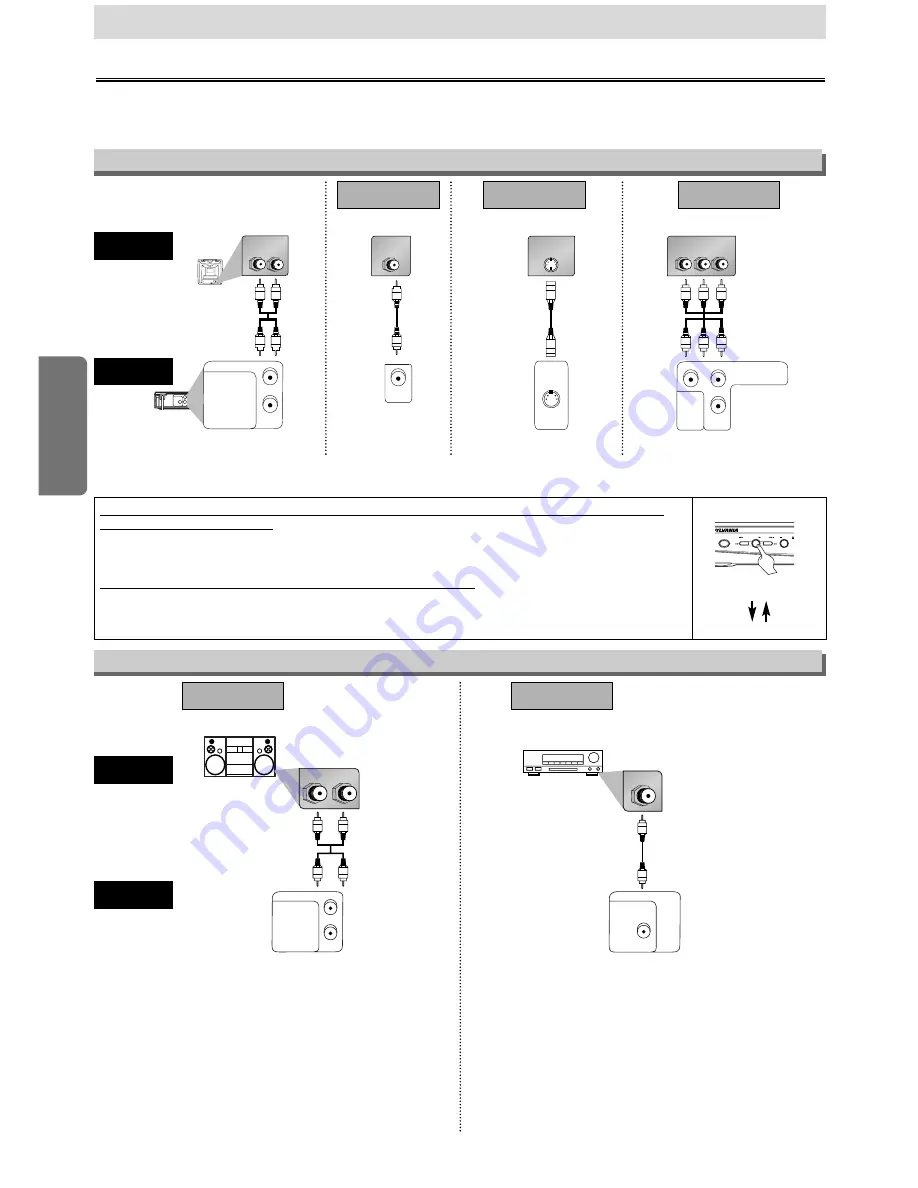
Connection to an Audio System

Audio cable

(supplied)

Audio Coaxial

Digital cable

(commercially

available)

Note

• If output is Dolby Digital encoded audio, connect to a Dolby

Digital decoder, and set “DOLBY DIGITAL” to “ON” in the
AUDIO menu. (Refer to pages 14-15)

• The audio source on a disc in a Dolby Digital 5.1 channel

surround format cannot be recorded as digital sound by an
MD or DAT deck.

• Unless connected to a Dolby Digital decoder, set “DOLBY

DIGITAL” to “OFF” in the AUDIO menu. Playing a DVD
using incorrect settings may genarate noise distortion, and
may also damage the speakers. (Refer to pages 14-15)

• Set “DOLBY DIGITAL” to “OFF” in the AUDIO menu for con-

necting to an MD deck or DAT deck. (Refer to pages 14-15)

Dolby Digital decoder,

MD deck or DAT deck

AUDIO OUT

COAXIAL

R

L

Y

S-VIDEO

OUT

COMPONENT

VIDEO OUT

C

R

/P

R

DIGITAL AUDIO OUT

VIDEO

OUT

C

B

/P

B

R

L

AUDIO OUT

COAXIAL

R

L

DIGITAL AUDIO OUT

AUDIO IN

VIDEO IN

VIDEO

OUT

S-VIDEO IN

S-VIDEO

OUT

CR

CB

Y

COMPONENT

VIDEO IN

Y

COMPONENT

VIDEO OUT

C

R

/P

R

VIDEO

OUT

C

B

/P

B

(Analog) AUDIO OUT

VIDEO OUT

TV

Method 1

Good picture

Basic Audio

Method 2

Method 3

Better picture

Best picture

S-VIDEO OUT

COMPONENT VIDEO OUT

Video

cable

(supplied)

Audio cable

(supplied)

S-Video 

cable

(commercially

available)

Component

Video cables

(commercially

available)

Note

• Connect this unit directly to the TV. If the A/V cables are connected to a VCR, pictures may be distorted due to the copy protection system.

DVD player

Connection to a TV

Connections

If your TV has AUDIO/VIDEO input jacks, see the following instructions. If not, see
the section “Before using your DVD player” on the front page.

Setup

If your TV is compatible with progressive scanning (480p) and you want to enjoy
that high quality picture;

You must select the connection Method 3 above and progressive scanning mode. To set the mode,
press and hold the PLAY button on the front panel for more than 5 seconds, so that “P.SCAN” will
appear on the display of this unit.

If your TV is not compatible with progressive scanning;

Use this unit in interlace mode. Make sure that no “P.SCAN” is on the display of this unit. If not, press
and hold the PLAY button on this unit for more than 5 seconds, so that “P.SCAN” on the display of
this unit will disappear.

POWER

SKIP

SKIP

PLAY

STOP

more than 5 seconds

[Interlace mode]

[Progressive scanning mode]

[DVD]

Summary of Contents for DVL700E

Page 1: ...PARENTAL Setting 16 To return the All Selections of SET UP except for PARENTAL to the Default Setting 16 Information Troubleshooting Guide 17 Specifications 18 Language List 18 Limited Warranty 18 Es...

Page 2: ...quipment does cause harmful interference to radio or television reception which can be determined by turning the equipment off and on the user is encouraged to try to correct the interference by one o...

Page 3: ...of the polarized plug 13 Power Cord Protection Power supply cords should be routed so that they are not likely to be walked on or pinched by items placed upon or against them paying particular attent...

Page 4: ...llation Location About Copyright Consumers should note that not all high definition television sets are fully compatible with this product and may cause artifacts to be displayed in the picture In cas...

Page 5: ...them back Even if they are played back the sound or video quality will be compromised DVD Video 1 2 4 6 1 2 3 4 5 6 1 2 3 4 5 6 4 6 4 5 6 or DVD R DVD RW DVD R DVD RW Audio CD CD R CD RW Digital video...

Page 6: ...OUT CR CB Y COMPONENT VIDEO IN Y COMPONENT VIDEO OUT CR PR VIDEO OUT CB PB Analog AUDIO OUT VIDEO OUT TV Method 1 Good picture Basic Audio Method 2 Method 3 Better picture Best picture S VIDEO OUT COM...

Page 7: ...through the coaxial digital audio in jack of a decoder or audio receiver POWER SKIP SKIP PLAY STOP OPEN CLOSE Lights up when the inserted disc is being played back Displays a type of the disc which i...

Page 8: ...d backward through a disc To begin slow forward reverse playback during the pause mode To search forward backward through a disc To call up the MP3 menu MP3 To advance playback one frame at a time To...

Page 9: ...button Resume message will appear on the TV screen Press the PLAY button play back will resume from the point at which playback was stopped To cancel resume press the STOP button one more time during...

Page 10: ...TT Title Current title number Total titles Current repeat setting appears only when the repeat setting is active C Chapter repeat T Title repeat A B A B repeat TR Track Current track number Total trac...

Page 11: ...ly until this screen appears For single digit tracks 1 9 press a single number e g track 3 press 3 To play track 26 press 10 2 6 of the Number buttons Using the SEARCH Using the SEARCH MODE MODE b but...

Page 12: ...r power is turned off To repeat the current track in the program press the REPEAT but ton repeatedly until TRACK appears during playback To repeat the entire program press the REPEAT button repeatedly...

Page 13: ...ng CD playback CD CD CD 1 1 STEREO AUDIO PLAY Each time you press the AUDIO button Stereo Sound mode Camera Angle This unit allows you to select a subtitle language if available during DVD play back D...

Page 14: ...CK ENTER ENTER ENTER SETUP SETUP PARENTAL PASSWORD Please enter a 4 digit password SETUP AUDIO DRC DOWN SAMPLING DOLBY DIGITAL ON ON ON SETUP DISPLAY TV ASPECT STILL MODE ANGLE ICON AUTO POWER OFF PAN...

Page 15: ...his unit STILL MODE Select AUTO usually If you select FIELD pictures in the still mode will be stabi lized although they will be coarse due to little amount of data If you select FRAME pic tures in th...

Page 16: ...e played back Levels 7 to 2 Only DVD softwares intended for general use and chil dren can be played back Level 1 Only DVD softwares intended for children can be played back with those intended for adu...

Page 17: ...The player does not respond to Aim the remote control directly at the sensor on the front of the player the remote control Reduce the distance to the player Replace the batteries in the remote control...

Page 18: ...ship as follows DURATION PARTS FUNAI CORP will provide parts to replace defective parts without charge for one 1 year from the date of original retail purchase Two 2 years for Picture Tube Certain par...

Page 19: ...reproducir repetidamente una canci n o disco Disco compacto Para reproducir repetidamente una canci n grupo o disco MP3 Para activar desactivar el nivel del negro Para activar desactivar el ambiental...

Page 20: ...ay a track group or disc repeatedly MP3 To set black level on off To set virtual surround on off To arrange the playing order or play randomly To set virtual surround on off To call up the Menu on a d...

Reviews: