background image

– 31 –

EN

1L25

Language options are not available with some discs.
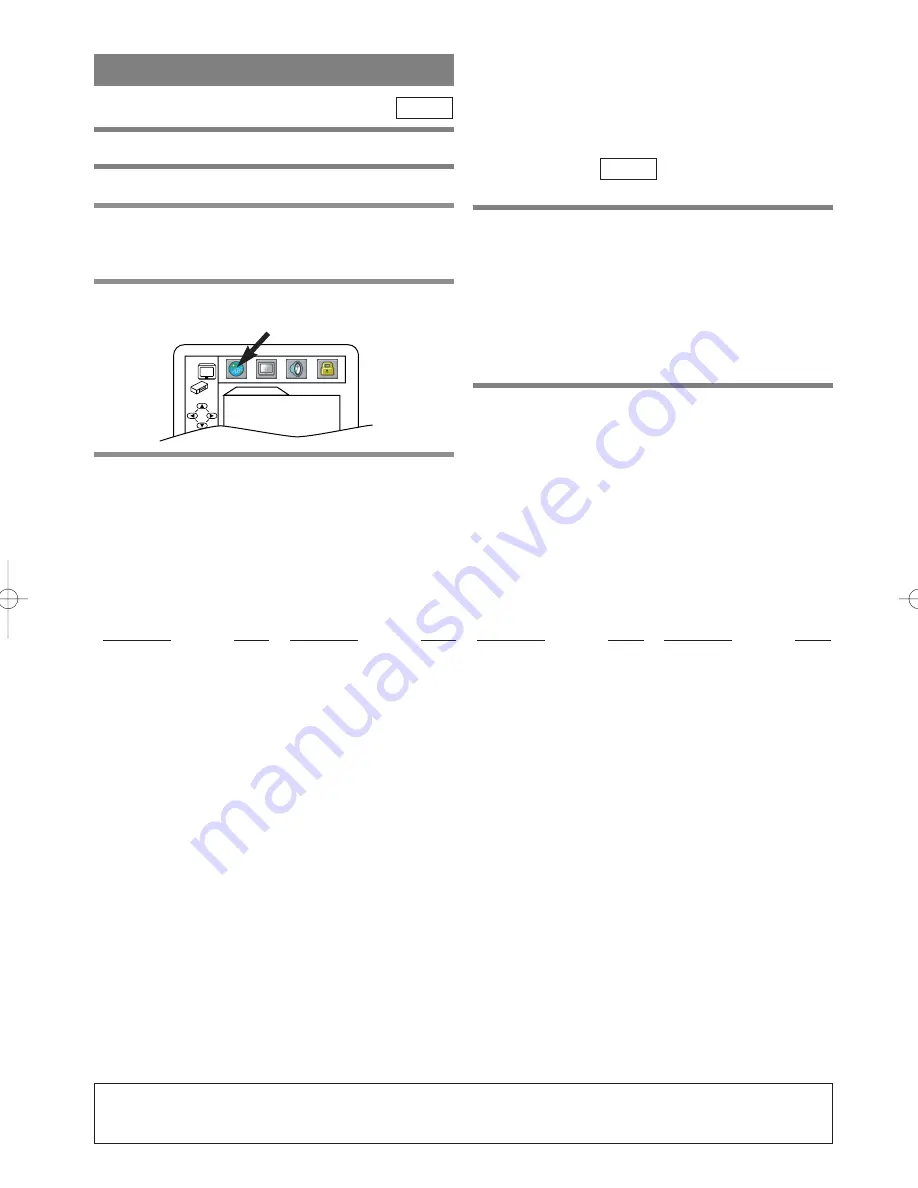
1   

Press SETUP in STOP mode.

2   

Press 

B

to select CUSTOM, then press

ENTER.

¡

CUSTOM mode will appear.

3   

Press Arrow (

s

/

B

) to select LANGUAGE,

then press ENTER to confirm.

4   

Press Arrow (

K

/

L

) to select the next items,

then press ENTER.

¡

If you want to return to LANGUAGE SETTING

MENU, press Arrow(

s

).

DVD-V

LANGUAGE SETTING

LANGUAGE

AUDIO

ORIGINAL

SUBTITLE

OFF

DISC MENU

ENGLISH

PLAYER MENU

ENGLISH

A-B

Abkhazian

4748

Afar

4747

Afrikaans

4752

Albanian

6563

Amharic

4759

Arabic

4764

Armenian

5471

Assamese

4765

Aymara

4771

Azerbaijani

4772

Bashkir

4847

Basque

5167

Bengali;Bangla

4860

Bhutani

5072

Bihari

4854

Bislama

4855

Breton

4864

Bulgarian

4853

Burmese

5971

Byelorussian

4851

C-E

Cambodian

5759

Catalan

4947

Chinese [CHI]

7254

Corsican

4961

Croatian

5464

Czech

4965

Danish [DAN]

5047

Dutch [DUT]

6058

English [ENG]

5160

Esperanto

5161

Estonian

5166

F-H

Faroese

5261

Fiji

5256

Finnish [FIN]

5255

French [FRE]

5264

Frisian

5271

Galician

5358

Georgian

5747

German [GER]

5051

Greek [GRE]

5158

Greenlandic

5758

Guarani

5360

Gujarati

5367

Hausa

5447

Hebrew

5569

Hindi

5455

Hungarian [HUN]

5467

I-K

Icelandic [ICE]

5565

Indonesian

5560

Interlingua

5547

Interlingue

5551

Inupiak

5557

Irish [IRI]

5347

Italian [ITA]

5566

Japanese [JPN]

5647

Javanese

5669

Kannada

5760

Kashmiri

5765

Kazakh

5757

Kinyarwanda

6469

Kirghiz

5771

Kirundi

6460

Korean [KOR]

5761

Kurdish

5767

L-N

Laothian

5861

Latin

5847

Latvian;Lettish

5868

Lingala

5860

Lithuanian

5866

Macedonian

5957

Malagasy

5953

Malay

5965

Malayalam

5958

Maltese

5966

Maori

5955

Marathi

5964

Moldavian

5961

Mongolian

5960

Nauru

6047

Nepali

6051

Norwegian [NOR]

6061

O-R

Occitan

6149

Oriya

6164

Oromo(Afan)

6159

Panjabi

6247

Pashto;Pushto

6265

Persian

5247

Polish

6258

Portuguese [POR]

6266

Quechua

6367

Rhaeto-Romance

6459

Romanian [RUM]

6461

Russian [RUS]

6467

S

Samoan

6559

Sangho

6553

Sanskrit

6547

Scots Gaelic

5350

Serbian

6564

Serbo-Croatian

6554

Sesotho

6566

Setswana

6660

Shona

6560

Sindhi

6550

Singhalese

6555

Siswat

6565

Slovak

6557

Slovenian

6558

Somali

6561

Spanish [SPA]

5165

Sundanese

6567

Swahili

6569

Swedish [SWE]

6568

T

Tagalog

6658

Tajik

6653

Tamil

6647

Tatar

6666

Telugu

6651

Thai

6654

Tibetan

4861

Tigrinya

6655

Tonga

6661

Tsonga

6665

Turkish [TUR]

6664

Turkmen

6657

Twi

6669

U-Z

Ukrainian

6757

Urdu

6764

Uzbek

6772

Vietnamese

6855

Volapuk

6861

Welsh

4971

Wolof

6961

Xhosa

7054

Yiddish

5655

Yoruba

7161

Zulu

7267

Language

Code

Language

Code

Language

Code

Language

Code

If you choose a Language that has a 3 letter language code, the code will be displayed every time you change
the Audio or Subtitle language setting on page 27. If you choose any other languages, ‘---’ will be displayed
instead. (3 letter language code is written in bracket.)

AUDIO:

¡

Sets the audio language.

SUBTITLE:

¡

Sets the subtitle language.

DISC MENU:

¡

Sets the language for DVD menu.

PLAYER MENU:

¡

Sets the language for the On-screen display.

5   

Press Arrow (

K

/

L

) to select a setting, then

press ENTER.

¡

If OTHER is selected on the AUDIO, SUBTITLE or
DISC MENU screen, press four-digit number to
enter the code for the desired language. (Refer to the
language code list below.)

¡

Only the languages supported by the disc can be
selected.

6   

Press SETUP to exit.

Note

¡

Language Setting for Audio and Subtitle is not avail
able with some discs. Then use the AUDIO and the
SUBTITLE button. Details are on page 27.

QUICK

 H9400UD(EN)2î

.qx33  03.2.18 5:48 PM  Page 31

Summary of Contents for DVC860D

Page 1: ...800 968 3429 or visit our web site at http www funai corp com Please read before using this equipment DVD POWER CHANNEL PLAY STOP EJECT VIDEO VCR AUDIO REW OPEN CLOSE F FWD STOP PLAY REC VCR DVD TIME...

Page 2: ...essly approved in the instruction manual The user could lose the authority to operate this equipment if an unauthorized change or modification is made CAUTION TO PREVENT ELECTRIC SHOCK MATCH WIDE BLAD...

Page 3: ...Outdoor Antenna Grounding If an outside antenna or cable system is connected to the video product be sure the anten na or cable system is grounded so as to provide some pro tection against voltage su...

Page 4: ...s are prohibited This product incorporates copyright protection technology that is protected by method claims of certain U S patents and other intellectual property rights owned by Macrovision Corpora...

Page 5: ...PE COUNTER 22 INDICE CONTROLES DEL FUNCIONAMIENTO Y SUS FUNCIONES 35 CAMBIO DE VCR DVD 38 CONEXIONES 39 DVD VCR A CONEXI N DE TV 39 CANAL DE SALIDA DE RF 39 CONECTANDO A UN TV 39 CONECTANDO A UN TV QU...

Page 6: ...ty PLL frequency synthesiz er tuner with direct station call A cable converter box may be necessary to view scram bled cable channels Automatic functions Auto power on system Automatically turns the V...

Page 7: ...COMBINATION UNIT DVD with region codes other than 1 or ALL DVD ROM DVD RAM Never play back otherwise malfunc tion may result CD ROM VSD CDV Only plays back the audio part CD G Only plays back the sou...

Page 8: ...f 7 POWER Light This light appears when the power is on 8 STOP EJECT Button VCR EJECT Button Press to remove the tape from the VCR STOP Button Press to stop the tape motion 9 PLAY Button VCR page 18 P...

Page 9: ...9 Press once to start a recording 31 MENU Button DVD mode page 23 Press to display the menu of the Disc VCR mode page 17 Press to access the VCR menu 32 TITLE Button page 23 33 SETUP Button pages 28 3...

Page 10: ...onitor video recordings or to watch TV using the VCR tuner TV Position To watch TV or to view one program while recording another 51 SKIP CH Buttons DVD mode Press to skip Chapters or Tracks VCR mode...

Page 11: ...d remaining time for OTR No disc inserted or playing DVD menu Tray open Tray closed Loading the Disc 1 Open the battery compartment cover 2 Insert two AA batteries with each one oriented correctly 3 C...

Page 12: ...TITLE T SET DVD VCR DVD POWER CHANNEL PLAY STOP EJECT VIDEO VCR AUDIO REW OPEN CLOSE F FWD STOP PLAY REC VCR DVD TIMER REC OUTPUT DVD L R VCR DVD TIM OUTPUT OUTPUT button DVD OUTPUT Light VCR OUTPUT L...

Page 13: ...r is provided to call the CATV system installer s attention to Article 820 40 of the NEC that pro vides guidelines for proper grounding and in particular specifies that the cable ground should be conn...

Page 14: ...IO OUT DVD Y Cb L Cr R L ANT IN ANT OUT R L R DIGITAL AUDIO OUT COAXIAL To COAXIAL DIGITAL AUDIO INPUT jack To COAXIAL DIGITAL AUDIO OUT jack Stereo Receiver Amplifier equipped with digital input jack...

Page 15: ...O IN VIDEO OUT VIDEO IN L R L R Fig 5 Manufactured under license from Dolby Laboratories Dolby and the double D symbol are trademarks of Dolby Laboratories If the output is Dolby Digital audio connect...

Page 16: ...r cable to the VCR first Then connect the DVD VCR power plug to a standard AC outlet 2 Turn on the TV and set the TV to channel 3 If noise appears change the RF output channel of the VCR to channel 4...

Page 17: ...2 Select LANGUAGE SELECT by pressing K or L Then press B 3 Select ENGLISH FRANCAIS or ESPA OL by pressing K or L Then press CLEAR C RESET If you accidentally select Spanish or French and need English...

Page 18: ...he detail 3 Begin playback by pressing PLAY Tracking adjustment will be done automatically Digital Tracking function when you start playback To adjust the tracking manually press SKIP CH on the remote...

Page 19: ...Press STOP when the recording is completed Note When you wish to watch another program while recording select desired channel on your TV If noise appears press VCR TV This is not possible when using...

Page 20: ...or the desired channel number Then press B 2 Set the frequency of the recording For once Press K or L to point to ONCE For daily Monday Friday Press K or L to point to DAILY For weekly Press K or L to...

Page 21: ...MODE Type of broadcast Hi Fi audio track 2 channel Normal audio track Regular monaural audio None Mono Stereo broadcast STEREO L R Bilingual broadcast SAP Main audio program Sub audio program Stereo...

Page 22: ...he beginning After rewinding finishes the VCR will eject the tape and switch itself off The VCR will not rewind the tape automatically dur ing timer recording or One Touch Recording REAL TIME TAPE COU...

Page 23: ...If disc menu is available on the disc audio language subtitle options chapters for the title and other options will appear for selec tion 4 Press Arrow L K s B to select an item and ENTER to confirm s...

Page 24: ...k while disc menu is shown x4 zoom is not available on some discs DVD V Using SKIP H G During playback press SKIP G to move the next track Press it repeatedly to skip subsequent tracks Press SKIP H to...

Page 25: ...begins 3 To exit the sequence press REPEAT A B Notes The repeat A B section can only be set within the current title for DVDs or current track for audio CDs Repeat A B is not available with some scene...

Page 26: ...ning of the listed tracks Press TITLE to return to the first item 2 Press STOP to stop playback MP3 MP3 PLAYBACK Notes Folders are known as Groups files are known as Tracks MP3 files are accompanied b...

Page 27: ...ayback 1 Press SUBTITLE during playback 2 Press SUBTITLE repeatedly to select your desired subtitle language The subtitle language will be displayed on the dis play bar at the top of the screen 3 To t...

Page 28: ...ceed your settings with a password or playback will stop This feature allows you to prevent discs with alterna tive scenes from being played by your children DVD V PARENTAL LEVEL Parental Level allows...

Page 29: ...er or select AC at step 2 and press ENTER will erase all Markers To clear a marker using Arrow s B position the cursor on to the marker number to be cleared and press CLEAR You can mark up to 10 point...

Page 30: ...ess SETUP in STOP mode 2 Press B to select CUSTOM then press ENTER CUSTOM mode will appear 3 Press Arrow s B to select DISPLAY then press ENTER to confirm 4 Press Arrow K L to select the below items t...

Page 31: ...ian 5961 Mongolian 5960 Nauru 6047 Nepali 6051 Norwegian NOR 6061 O R Occitan 6149 Oriya 6164 Oromo Afan 6159 Panjabi 6247 Pashto Pushto 6265 Persian 5247 Polish 6258 Portuguese POR 6266 Quechua 6367...

Page 32: ...n set it to the TV position by pressing VCR TV Video or color fades in and out You cannot copy a copyrighted video tape You are experiencing copy guard protection when making a copy of a video tape Ca...

Page 33: ...ISC HANDLING Use discs which have the following logos on them Optical audio digital discs Handle the discs so that fingerprints and dust do not adhere to the surfaces of the discs Always store the dis...

Page 34: ...HF Channel 3 or 4 Power source 120 V AC 10 60 Hz 0 5 Power consumption 24 W standby 7 0 W Operating temperature 5 C to 40 C Dimensions W 17 1 8 435 mm H 4 99 mm D 8 7 10 218 mm Weight 8 8 lbs 3 7 kg D...

Page 35: ...NNEL En el modo VCR presione para cambiar canales TV en el DVD VCR presione para ajustar el seguimiento durante reproducci n de movimiento normal o lento presione para remover fluctuaciones verticales...

Page 36: ...imagen reproducida DVD 35 Bot n MODE Activa modo de reproducci n de programa o reproducci n aleatoria cuando se reproducen CDs o MP3 Ajusta Nivel de negro SONIDO VIRTUAL SURROUND 36 Bot n SUBTITLE Pr...

Page 37: ...ara ver un programa de TV o para ver un programa mientras se graba otro Posici n de TV Utilice para mirar TV cambiando canales en el TV o para mirar un programa mientras graba otro 51 Botones SKIP CH...

Page 38: ...T DVD VCR DVD POWER CHANNEL PLAY STOP EJECT VIDEO VCR AUDIO REW OPEN CLOSE F FWD STOP PLAY REC VCR DVD TIMER REC OUTPUT DVD L R VCR DVD TIM OUTPUT Bot n OUTPUT Luz DVD OUTPUT Luz VCR OUTPUT Bot n DVD...

Page 39: ...cci n CONEXIONES CONEXION A UN AMPLIFICADOR ESTERO EQUIPADO CON TOMAS DE ENTRADA DIGITAL COMO UNA PLATINA DE MINIDIS COS O UNA PLATINA DE CINTAS AUDIODIGITALES Por favor vea la Fig 4 en la p gina 14 p...

Page 40: ...idamente Luego presione B 5 Ajuste el minuto Presione o o p repetidamente Luego presione B 6 Ajuste el AM o PM Presione o o prepetidamente REPRODUCIENDO UN DVD VIDEO O UN CD AUDIO Para empezar Conecte...

Page 41: ...41 EN 1L25 MEMO...

Page 42: ...42 EN 1L25 MEMO...

Page 43: ...43 EN 1L25 MEMO...

Page 44: ...ion improper maintenance commercial use such as hotel rental or office use of this product or damage which results from fire flood lightning or other acts of God THIS WARRANTY DOES NOT COVER PACKING M...

Reviews: