


DVD
Functions
EN
– 17 –
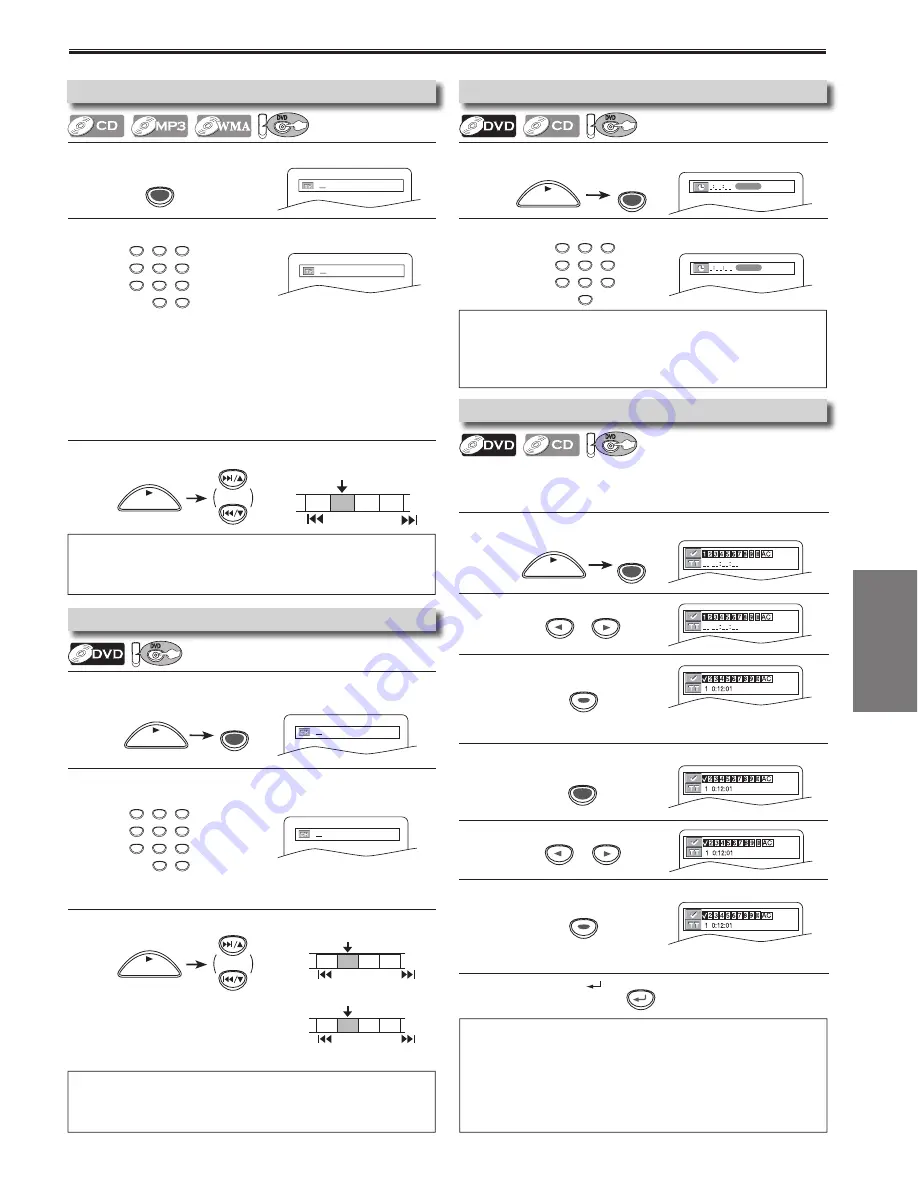
1
Press
[RETURN
].
1
Press
[SEARCH MODE]
repeatedly until the marker display
appears.
2
Select the marker.
3
Press
[ENTER]
at the desired marker.
1
Press
[SKIP/CH.
G
/
o
,
H
/
p
]
during playback.
1
Press
[SEARCH MODE]
repeatedly until the marker display
appears.
2
Select a marker.
3
Press
[ENTER].
1
Press
[SEARCH MODE]
repeatedly until the Time Search
display appears.
2
Select a desired disc time by using
the
Number buttons
within 0
seconds.
1
Press
[SKIP/CH.
G
/
o
,
H
/
p
]
during playback.
1
Press
[SEARCH MODE]
once for the Chapter Search.
Press
[SEARCH MODE]
twice for the Title Search.
2
Select title/chapter number by using
the Number buttons
within 0 seconds.
1
Press
[SEARCH MODE]
.
2
Select track number by using
the Number buttons
within 0 seconds.
Search Functions
1:29:00
TOTAL
1
2
3
4
5
6
7
8
9
0
To return to the marker later
To exit the marker screen
/29
/29
/12
/12
1
2
3
4
5
6
7
8
9
0
+10
1
2
3
4
5
6
7
8
9
0
+10
TR 1 TR 2 TR TR 4
Current Track
(TR)
SKIP
SKIP
Using [SKIP/CH.
G
/
o
,
H
/
p
]
PLAY
STOP
SKIP/CH.
CH 1 CH 2 CH CH 4
Current Chapter
(CH)
or
SKIP
TT 1 TT2 TT TT4
Current Title
(TT)
SKIP
SKIP
SKIP
Using [SKIP/CH.
G
/
o
,
H
/
p
]
1:29:00
TOTAL
Hint
• When there is no need to enter a number, “0” appears automatically.
For example, “0: 0_: _ _” appears in the Time Search display if the total time of
the title or track is less than 10 minutes.
• Press
[CLEAR/C.RESET]
to erase the incorrect input at step 2.
Hint
• The Marker display will disappear in about 0 seconds when there is no output.
• To clear a marker, select the marker to be cleared at step 2 in the section
“To set a marker” or “To return to the marker later” and then press
[CLEAR/C.RESET]
.
• Opening the disc tray or turning off the power will erase all markers.
• Selecting “AC” at step 2 in the section “To set a marker” or “To return to the
marker later” will also erase all markers.
SEARCH
MODE
SEARCH
MODE
or
or
ENTER
ENTER
ENTER
ENTER
RETURN
• For the disc with less than 10 tracks, press the track number directly.
• For discs with more than 10 but less than 99 tracks, to play single-digit track,
press
[0]
first, then the track number (e.g. for track , press
[0], [3]
). To play a
double-digit track, press the track number.
• For discs with more than 100 tracks, to play a single or a double-digit track,
press
[0]
first, then the track number (e.g. for track , press
[0], [0], [3]
, and for
track 26, press
[0], [2], [6]
). To play a triple-digit track, press the track number.
SEARCH
MODE
PLAY
STOP
(If the disc has no chapters)
Hint
•
[+10]
can also bring the Track search display, except for the disc with less than
10 tracks. For such a disc, track search can be done by just pressing the track
number.
SEARCH
MODE
PLAY
STOP
SEARCH MODE does not work during Programmed or Random Playback.
SEARCH
MODE
PLAY
STOP
PLAY
STOP
SKIP/CH.
Using Track Search
DVD
Using Time Search
DVD
Marker Setup
DVD
This feature allows you to assign a specific point on a disc to be
called back later.
To set a marker
Hint
• Depending on the disc being played, this function can also be performed by
directly entering the desired chapter number with
the Number buttons
. Refer
to the manual accompanying the disc.
Using Title / Chapter Search
DVD
DVC840G_E8A02UD.indd 17
2006/01/12 1:08:10


