background image

– 25 –

EN

DVD SECTION

S

PECIAL PLA

YB

A

CK FUNCTION

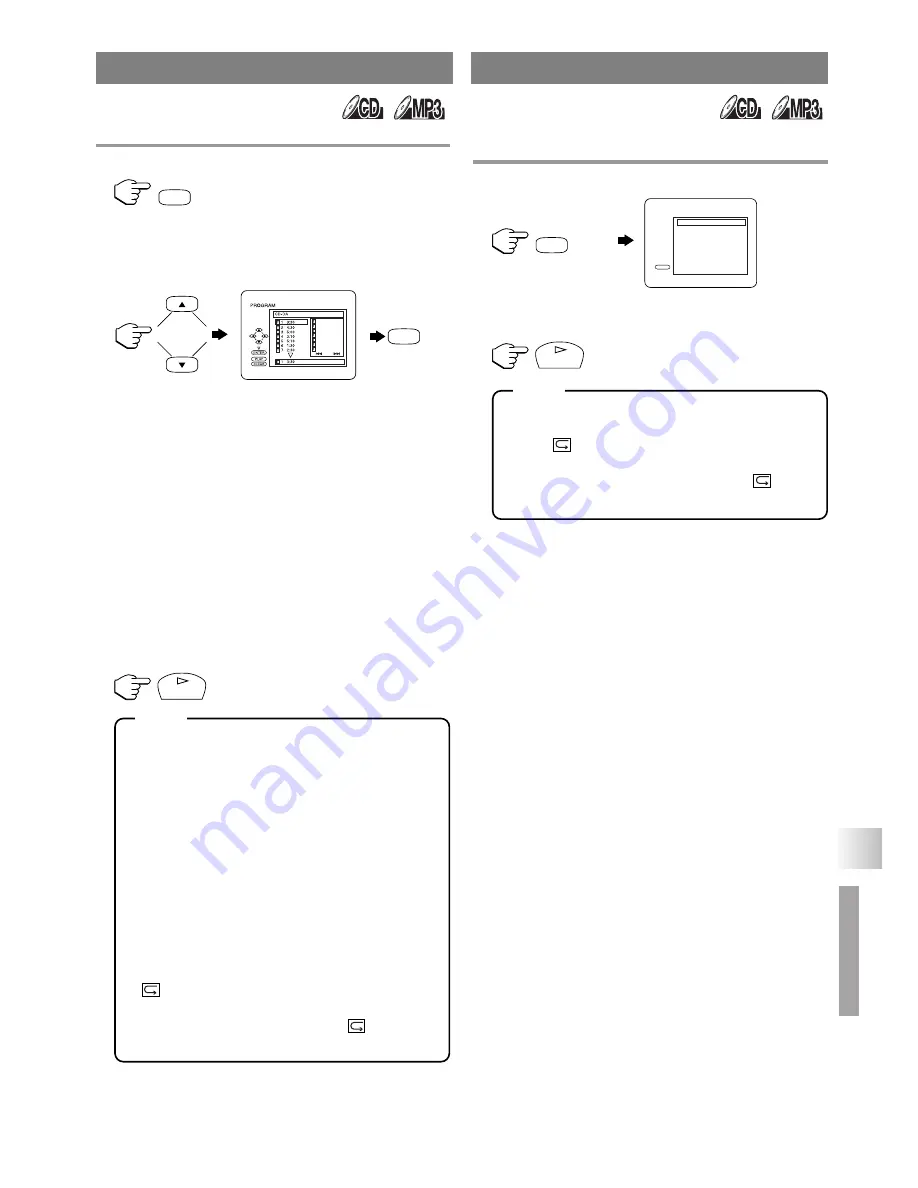
You may determine the order in which tracks will play.

1

In stop mode, press 

[MODE]

.

The 

“PROGRAM”

screen will appear.

2

Press 

[

]

or 

[

]

to select a track, then press

[ENTER].

Press 

[CLEAR]

to erase the most recently

entered track.

If the entire Program cannot be displayed at
once on a screen, 

G

appears to go to the next

page and 

H

appears to go back to the previ-

ous page.

While an MP3 folder is open:

Press 

[

B

]

when you want to go to the next 

hierarchy.

Press 

[

s

]

when you want to go back to the 

previous hierarchy.

3

Repeat step 

2

until you have selected all the

tracks you want to play in the program.

4

Press 

[PLAY 

O

]

to play the programmed tracks.

While the program is being played back,
pressing 

[STOP

C

]

works as follows.

Press 

[STOP

C

]

once and then 

[PLAY

O

]

again, playback will restart from the point where

[STOP

C

]

was pressed (MP3: from the begin-

ning of the current track). (Program continued)

Press 

[STOP

C

]

twice and then 

[PLAY

O

]

again, playback will restart from the track in
the usual way. (Program canceled)

Up to 99 tracks can be entered.

To erase all tracks in the program at once, select

“ALL CLEAR”

at the bottom of the list at step 

2

.

If you like to repeat the current track in the
program, press 

[REPEAT]

several times until

TRACK”

appears during playback. If you

like to repeat the entire program press

[REPEAT]

several times until 

ALL”

appears during playback.

This function shuffles the playing order of tracks
instead of playback in the sequence.

1

In stop mode, press 

[MODE]

twice.

“RANDOM”

screen appears.

2

Press 

[PLAY

O

]

to start random playback.

If you like to repeat the current track in the ran-
dom selection, press 

[REPEAT]

several times

until 

TRACK”

appears during playback. If

you like to repeat the entire random selection
press 

[REPEAT]

several times until 

ALL”

appears during playback.

PROGRAM

MODE

ENTER

TOTAL

1/4

2/3

1     3:30
5     5:10
10   4:20
11   3:00
12   3:20
17   4:10
22   2:50

1:03:30

PLAY

NOTE

RANDOM PLAYBACK

twice

MODE

PLAY

CD-DA                       TOTAL 0:45:55

RANDOM PROGRAM

- - no indication - -

RANDOM

PLAY

NOTE

Summary of Contents for 6620 LDF

Page 1: ...6620 20 MENU SELECT CHANNEL VOLUME POWER EJECT PLAY STOP ...

Page 2: ...facturer or sold with the unit Any mounting of the appliance should follow the man ufacturer s instructions and should use a mounting accessory recommended by the manufacturer An appliance and cart combination should be moved with care Quick stops exces sive force and uneven surfaces may cause the appliance and cart combination to overturn 8 AMEUBLES Cet appareil ne doit être placé que sur un meub...

Page 3: ...power line surges 15 Power Lines An outside antenna system should not be located in the vicinity of overhead power lines or other electric light or power circuits or where it can fall into such power lines or circuits When installing an outside antenna system extreme care should be taken to keep from touching such power lines or circuits as contact with them might be fatal 16 Overloading Do not ov...

Page 4: ... relocate the receiving antenna 2 Increase the separation between the equipment and receiver 3 Connect the equipment into an outlet on a circuit differ ent from that to which the receiver is connected 4 Consult the dealer or an experienced radio TV techni cian for help LASER SAFETY This unit employs a laser Only a qualified service person should remove the cover or attempt to service this device d...

Page 5: ...lled on your unit unplug the power cord immediately and take the unit to our Authorized Service Center for servicing Do not put your fingers or objects into the unit disc slot Do not place anything directly on top of the unit Moisture condensation may occur inside the unit when it is moved from a cold place to a warm place or after heating a cold room or under conditions of high humidity If a DVD ...

Page 6: ...DISCS 18 PLAYING A DISC 19 BASIC PLAYBACK 19 DISC MENU 20 TITLE MENU 20 RESUME 20 PAUSE 20 STEP BY STEP PLAYBACK 20 FAST FORWARD FAST REVERSE 21 SLOW FORWARD SLOW REVERSE 21 ZOOM 21 SEARCH FUNCTION 22 TRACK SEARCH 22 TITLE CHAPTER SEARCH 22 TIME SEARCH 23 MARKER SETUP SCREEN 23 SPECIAL PLAYBACK FUNCTION 24 REPEAT 24 A B REPEAT 24 PROGRAM 25 RANDOM PLAYBACK 25 CHANGING THE SETTINGS 26 SUBTITLE LANG...

Page 7: ...d order DVD menus in a desired language You can display DVD menus in a desired lan guage if available on a DVD Screen saver If the screen saver program is set to ON it starts when there is no input from the unit for 5 minutes in stop mode Subtitles in a desired language You can select a desired language for the display subtitles if that language is available on a disc Selecting a camera angle You ...

Page 8: ... mode STEREO SAP MONO For DVD mode P 26 Press to select a desired audio language if available 15 EJECT A button P 19 Press to remove a disc from the unit 16 SELECT button P 12 Press to select the TV mode external input mode or DVD mode 17 CH K L buttons P 12 Press to select memorized channels 18 VOL X Y buttons P 12 Press to control the volume level for the DVD and TV 19 MUTE button P 12 Press to ...

Page 9: ...VOLUME POWER EJECT PLAY STOP 31 33 34 35 32 36 37 39 38 MENU SELECT CHANNEL VOLUME POWER EJECT PLAY STOP INSTALLING THE BATTERIES 1 Open the battery compartment cover by pressing the cover on the remote unit in the direction of the arrow 2 Insert 2 AA penlight batteries into the bat tery compartment in the direction indicated by the polarity markings 3 Replace the cover BATTERY PRECAUTIONS Be sure...

Page 10: ...nnna ANT DI GI TA L AU DI O OU T C OA XI AL R L Y Pb Pr R L VID EO S V IDE O VID EO 2 CP MP ON EN T AU DIO AU DIO VID EO 1 AN T HE AD PH ON E ANT OUT IN 75 ohm Coaxial Cable Cable Box or Satellite Box Rear of this unit from Cable Company or Satellite Antenna For CATV system installer This reminder is provided to call the CATV system installer s attention to Article 820 40 of the NEC that provides ...

Page 11: ...TION DI GI TA L AU DI O OU T C OA XI AL R L Y Pb Pr R L VID EO S V IDE O VID EO 2 CP MP ON EN T AU DIO AU DIO VID EO 1 AN T HE AD PH ON E AUDIO VIDEO2 VIDEO1 Audio Cable Video Cassette Recorder ex OUT OUT OUT S Video Cable Video Cable OR R L S VIDEO VIDEO VIDEO1 AUDIO NOTE L Y Pb Pr R COMPONENT VIDEO2 AUDIO Component Video Cable Audio Cable Video Game Video Camera ex OUT OUT Use this connection if...

Page 12: ...he unit in the DVD mode when you turn it on again it will go into the TV mode TO WATCH CABLE OR SATELLITE CHANNEL If the unit is connected to a cable box or satellite box press CH K L to select CH3 or CH4 according to the output channel setting of the device and select desired channel on that device TO WATCH EXTERNAL INPUT When an external equipment is connected to the front AUDIO VIDEO input jack...

Page 13: ...lite box ADDING DELETING CHANNELS The channels you no longer receive or seldom watch can be deleted from the memory Of course you can add the deleted channel into the memory again 1 Press SETUP then press K or L to point to CHANNEL SET UP 2 Press ENTER then press K or L to point to ADD DELETE CH 3 Press ENTER then press the Number but tons or CH K K L L to select the desired channel number 4 Press...

Page 14: ...or L to point to BACK LIGHT 2 Press ENTER then press s or B to select to BRIGHT NORMAL or DARK 3 Press SETUP The Sleep Timer function turns off the unit without using POWER after a desired period of time 1 Press SLEEP 2 Press SLEEP repeatedly until the desired sleep time is displayed Each press increases the time by 10 minutes up to 90 minutes After 5 seconds the Sleep Timer setting will disappear...

Page 15: ...losed Caption System set ting is cancelled 3 Press SETUP to exit the menu Even if there is a power failure of any kind the unit will retain its memory for this feature TO SELECT TV SOUND MODE 1 Press AUDIO repeatedly to select the MTS output mode The output mode changes as described below every time you press AUDIO Second Audio Program SAP Sometimes broadcasters add another channel of audio to the...

Page 16: ...g 5 When you select the ratings of TV Y7 TV PG TV 14 or TV MA you will have the option of setting sub rating categories Press K or L to select a rating with sub ratings you wish to block then press ENTER twice Press K or L to select a sub rating then press ENTER to set it to BLOCK or VIEW The blocked sub ratings will appear next to the rating category in the TV RATING menu 16 EN V CHIP SET UP B TV...

Page 17: ...ng 5 Press SETUP to exit the menu Your personal access code will be erased and will return to the default 0000 when a power failure occurs or when you turn off the power using a wall switch If you have for gotten the code unplug the power cord for 10 seconds to restore the access code to 0000 1 Press SETUP then press K or L to point to LANGUAGE 2 Press ENTER repeatedly to select ENGLISH ESPAÑOL Sp...

Page 18: ...d DVD R RW disc recorded in the video format on our brand s DVD recorder However depend ing on the recording status of a disc the disc may not be played back at all or normally the picture or sound may not be smooth etc In this case you need to finalize the disc with the DVD recorder Refer to the manual accompanying the DVD recorder 8 Only the discs recorded in the video format and finalized can b...

Page 19: ...pens when the 1st layer switches to the 2nd layer This is not a malfunction MP3 PLAYBACK 1 In stop mode press DISC MENU then press K K or L L to select the desired group or track If a group is selected press B or ENTER to go on to the track selection screen Press s to go back to previous screen except for the top page If a track is selected press ENTER to start playing tracks Starting from the one...

Page 20: ...e manual accompanying the disc for details 1 During playback press STOP C Example DVD or Audio CD Resume message will appear on the TV screen 2 Press PLAY O playback will resume from the point at which playback was stopped To cancel resume press STOP C twice For MP3 playback will resume from the begin ning of the current track The resume information stays on even when the power is turned off 1 Dur...

Page 21: ...ate speed is 1 1 16 2 1 8 and 3 1 2 4 To return to normal playback press PLAY O The Zoom function allows you to enlarge the video image and to pan through the enlarged image 1 Press ZOOM during playback Playback will continue 2 Press ZOOM repeatedly to select the required zoom factor ZOOM1 ZOOM2 ZOOM3 or OFF 3 Press K L s or B to move the zoomed picture across the screen 4 To exit zoom mode press ...

Page 22: ... Press it repeatedly to skip subsequent tracks Press SKIP H to go back to beginning of the cur rent track Press it repeatedly to go to the previous tracks If SKIP H G is pressed while the play back is paused the playback will be paused again after skipping to the next track SKIP H G are not operative when playback is stopped 1 Press SEARCH MODE once for the Chapter search twice for the Title searc...

Page 23: ...e display 3 When you reach the desired point press ENTER The Title or Track and elapsed playing time will appear in the TV screen 4 To return to the Marker later press SEARCH MODE repeatedly during playback to display the Marker screen Then press s or B to choose the desired marker then press ENTER Operations which erase all Markers Turning off the power Ejecting a disc from the unit Pressing SELE...

Page 24: ...ving to other track or group 1 Press A B at your chosen starting point A appears briefly on the TV screen 2 Press A B again at your chosen end point A B appears briefly on the TV screen and the repeat sequence begins 3 To exit the sequence press A B The A B repeat section can only be set within the current title for DVDs or current track for Audio CDs A B repeat is not available with some scenes i...

Page 25: ...m continued Press STOP C twice and then PLAY O again playback will restart from the track in the usual way Program canceled Up to 99 tracks can be entered To erase all tracks in the program at once select ALL CLEAR at the bottom of the list at step 2 If you like to repeat the current track in the program press REPEAT several times until TRACK appears during playback If you like to repeat the entir...

Page 26: ... choose a language that has a 3 letter language code the code will be displayed every time you change the Subtitle language setting If you choose any other languages will be displayed instead Refer to page 29 The unit allows you to select a language during DVD disc if multi languages are available playback 1 Press AUDIO during playback 2 Press AUDIO repeatedly to select your desired language Press...

Page 27: ...N Makes the dark parts brighter OFF Shows the original picture as recorded Initial setting 2 Press MODE twice or RETURN to exit The setting will be saved even if the unit is turned off You can enjoy surround sound effect over two speak ers on this unit 1 Press MODE repeatedly during playback then press ENTER to set it 1 2 or OFF 1 Natural effect 2 Emphasized effect OFF Original Sound 2 Press MODE ...

Page 28: ...urrent playback status Angle icon appears only when avail able on the DVD TT Title Current title number Total titles 1 3 0 00 00 1 23 45 Elapsed time of the current title Remaining time of the current title Current repeat setting appears only when the repeat setting is active C Chapter repeat T Title repeat A B A B repeat T L1 BIT RATE The amount of audio and video data currently being read Layer ...

Page 29: ...E or DISC MENU screen press four digit number to enter the code for the desired language Only the languages supported by the disc can be selected 5 Press SETUP to exit the menu Language Setting for Audio and Subtitle are not valid for some discs due to default setting of the disc In this case set them by pressing AUDIO and SUBTITLE Refer to page 26 If you select a language that is not supported by...

Page 30: ...in the on page 29 3 Press K or L to select the below items then press ENTER DRC Dynamic Range Control To compress the range of soft to loud sound The default setting is ON DOWN SAMPLING ON Output in 48 kHz default OFF Output the original sound When playing disc with copyright Protection If you select OFF copyright protection will be activated and sound will be down sampled at 48kHz DOLBY DIGITAL S...

Page 31: ...ith parental lock Be sure to check if the parental lock function operates in the way that you have set Record the password in case you forget it CONTROL LEVELS ALL All parental lock is cancelled Level 8 DVD software of any grade adult general children can be played back Levels 7 to 2 Only DVD software intended for general use and children can be played back Level 1 Only DVD software intended for c...

Page 32: ...TIALIZE menu appears 2 Press K or L to select INITIALIZE then press ENTER 3 Press K or L to select YES then press ENTER twice All the settings except for PARENTAL and menu language will be cleared To cancel the initialization select NO 4 Press SETUP to exit the menu 32 INITIALIZE SETUP QUICK CUSTOM INITIALIZE SETUP INITIALIZE Initialize NO YES ENTER PAUSE MENU RETURN TITLE SETUP DISPLAY SETUP ENTE...

Page 33: ...y a new channel if OK then possible station trouble Is antenna connected to jack on the back of the set If outside antenna is being used check for broken wire Adjust COLOR control Poor Reception on Some Channels Try a new channel if OK then possible station trouble Ghosts in Picture Is antenna connected to jack on the back of the set If outside antenna is being used check for broken wire Check for...

Page 34: ... compressed information and captions will be lost Black box in the TV screen You are in TEXT mode Select a CAPTION mode C1 C2 or Caption OFF PROBLEM CORRECTIVE ACTION Sound OK Picture Poor Try a new channel if OK then possible station trouble Is antenna connected to jack on the back of the set If outside antenna is being used check for broken wire Check for local interference Adjust CONTRAST BRIGH...

Page 35: ...torted which are not a sign of a malfunction Although pictures may stop for a moment this is not a malfunction Audio or subtitle language The selected language is not available for audio or subtitles on the does not match the set up DVD This is not a malfunction The camera angle cannot be changed The DVD does not contain sequences recorded from different camera angles This is not a malfunction Aud...

Page 36: ...ter IF THE LASER OPTICAL PICKUP UNIT IS DIRTY If the unit still does not perform properly when it is operated while referring to the relevant sections and to TROUBLESHOOTING GUIDE in this Owner s Manual the laser optical pickup unit may be dirty Consult your dealer or an Authorized Service Center for inspection and cleaning of the laser optical pickup unit Handle the discs so that fingerprints and...

Page 37: ...DVD GENERAL SPECIFICATIONS ELECTRICAL SPECIFICATIONS Sound output 2 speakers 1W 8 ohm OTHER SPECIFICATIONS Terminals Antenna input VHF UHF CATV 75 ohm unbalanced F type S Video input Mini DIN 4 pin jack Video input RCA connector 1 Audio L R input RCA connector 4 Component video input One pin jack Y 1Vpp 75 ohm Two pin jacks Pr Pb 700mVpp 75 ohm Coaxial digital audio output One pin jack 500mmVpp 75...

Page 38: ...isualizar la pantalla de ajuste del nivel del negro o la pantalla de sonido envolvente durante la reproducción 13 Botón SEARCH MODE Presione para localizar un punto deseado 14 Botón AUDIO Para modo TV Presione para seleccionar el modo de sonido de TV ESTEREO SAP MONO Para modo DVD Presione para seleccionar un idioma de audio deseado si está disponible 15 Botón EJECT A Presione para extraer un disc...

Page 39: ...ustar los ítems del menú 26 Botón RETURN Presione para volver a la pantalla anterior en el menú de configuración 27 Botón A B Presione para repetir la reproducción de una sec ción seleccionada 28 Botón ANGLE Presione para cambiar el ángulo de la cámara y ver la secuencia que se está reproduciendo desde un ángulo diferente si existe 29 Botón REPEAT Repite la reproducción del disco título capítulo g...

Page 40: ...V IDE O VID EO 2 CP MP ON EN T AU DIO AU DIO VID EO 1 AN T HE AD PH ON E ANT SALIDA ENTRADA Cable coaxial de 75 ohmios desde Compañia de Cable o Antena de Satélite Caja de convertidor o caja de satélite Parte posterior de este unidad Para el instalador de sistemas CATV Esta nota tiene la finalidad de llamar la atención del instalador de sistemas CATV para que tenga en cuenta el Artículo 820 40 de ...

Page 41: ...ocar daños a los altavoces Consulte la página 30 NOTA Si su propio equipo es monofónico sólo tiene una toma de audio conecte el cable de audio a la toma AUDIO L de esta unidad Si conecta la toma VIDEO y la toma S VIDEO simultáneamente se da prioridad a la S VIDEO Puede conectar esta unidad a su equipo de audio vídeo Asegúrese de apagar todos los componentes del sistema antes de conectar otro compo...

Page 42: ...a CH K L en el modo DVD puede cambiar los canales del televisor Incluso si apaga la unidad en el modo DVD cuando vuelve a encenderlo se pondrá en el modo TV PARA VER UN CANAL POR CABLE O SATÉLITE Si la unidad está conectada a una caja de convertidor o caja de satélite presione CH K L para selec cionar CH3 o CH4 según el ajuste de canal de salida del aparato y seleccione en él el canal deseado PARA...

Page 43: ...gramación de canales memorizados NO es necesaria cuando la unidad está conec tada a una caja de convertidor o caja de satélite Sólo tiene que seleccionar el canal para caja de convertidor o entrada de satélite ej CH3 de la unidad y a continuación selec cione el canal que desee en la caja de conver tidor o la caja de satélite 1 Presione SETUP y a continuación presione K o L para seleccionar el LANG...

Page 44: ...la reproducción puede empezar desde el segundo título y puede omitir estos títulos Durante la reproducción de un disco de dos capas las imágenes pueden detenerse durante un rato Esto ocurre cuando la 1ª capa cambia a la 2ª No se trata de una anomalía REPRODUCCIÓN DE MP3 1 En el modo de parada presione DISC MENU y precione K K o L L para seleccionar el grupo o pista que desee Si ha selecciona un gr...

Page 45: ...ucción se reanudará desde el principio de la pista actual La información de reanudación permanece acti vada incluso cuando apaga el interruptor princi pal REANUDACIÓN MENÚ DE DISCO DISC MENU ENTER STOP PLAY Presione PLAY para reproducir desde aquí Para reproducir desde el inicio primero presione STOP y luego PLAY REANUDACIÓN ACTIVADA Las carpetas se conocen como grupos los archivos como pistas Los...

Page 46: ... 46 ES MEMO ...

Page 47: ... 47 ES MEMO ...

Page 48: ...r maintenance commercial use such as hotel rental or office use of this product or damage which results from fire flood lightning or other acts of God THIS WARRANTY DOES NOT COVER PACKING MATERIALS ANY ACCESSORIES EXCEPT REMOTE CONTROL ANY COSMETIC PARTS COMPLETE ASSEMBLY PARTS DEMO OR FLOOR MODELS FUNAI CORP AND ITS REPRESENTATIVES OR AGENTS SHALL IN NO EVENT BE LIABLE FOR ANY GENERAL INDIRECT OR...

Reviews: