background image

- 29 -

EN

9J27

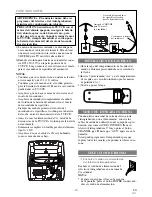
CONEXION DE LA ANTENA BIPOLAR

1. Introduzca la varilla de la antena bipolar (

incluído

)

en el orificio destinado para la antena, en la parte
trasera de la TV/VCR.

2. Conecte el cable bifilar plano de la antena bipolar

al adaptador de acoplo (

incluído

) de 300/75 ohm.

3. Enchufe el adaptador de acoplo al terminal ANT de

la TV/VCR, como lo muestra el dibujo.

Para obtener una mejor recepción, extienda la antena
de varilla y regule su longitud y posición. (Evite
tocar su parte superior mientras hace los ajustes.)

NOTAS:

Si es difícil obtener una buena recepción

con la antena de interiores, se recomienda usar una
antena de exteriores. Antes de instalar una antena de
exteriores al aparato, se debe desconectar la antena
de interiores.

ANTENA COMBINADA DE VHF/UHF

Una antena de combinación de 75 ohm para
VHF/UHF puede ser conectada al terminal ANT.

ANTENAS SEPARADAS DE VHF/UHF

En algunos lugares será necesario utilizar una antena
exterior.

CABLE SIN CONVERTIDOR/DESCODIFI-
CADOR

Utilice esta conexión si su sistema de televisión por
cable se conecta directamente a su
televisor/videograbadora sin convertidor.Utilizando
esta conexión usted podrá:
1)Utilizar el mando a distancia del

televisor/videograbadora para seleccionar canales.

2)Programar uno o más canales sin codificar para

realizar la grabación automática con temporizador.

NOTA:

Con esta unidad SÓLO se podrá grabar y ver

un mismo canal al mismo tiempo

.

CABLE CON CONVERTIDOR/DESCODI-
FICADOR O CONVERTIDOR DE EMI-
SIONES VÍA SATÉLITE

Si su servicio de televisión por cable le suministra un
convertidor, o si usted utiliza un sistema de emisiones
vía satélite, usted podrá utilizar las conexiones básicas.
Utilizando estas conexiones, usted también podrá
grabar canales codificados. Sin embargo, la selección
de los canales deberá hacerse con el convertidor de
televisión por cable con el convertidor de emisiones
vía satélite. Esto significa que los canales no podrán
ser cambiados con el mando a distancia del televi-
sor/videograbadora. La grabación inatendida se limita
a un canal cada vez.

PARA GRABAR UN CANAL
CODIFICADO/DESCODIFICADO

1. Ajuste el selector de canales del

televisor/videograbadora al canal de salida del con-
vertidor de televisión por cable o del convertidor
de emisiones vía satélite. (Ej.: CA3)

2. Seleccione el canal que desee grabar de su conver-

tidor de televisión por cable o del convertidor de
emisiones vía satélite.

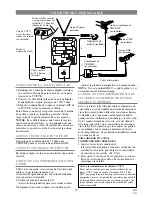
CONEXIONES DE ANTENA/CABLE

IN

OUT

ANT.

Antena Dipolar
(incluído)

Antena combinada de
VHF/UHF
(no incluído)

Combinador de

VHF/UHF
(no incluído)

Cable bifilar plano

Antena UHF
(no incluído)

Antena VHF
(no incluído)

Desde el 
sistema de Cable

Cable coaxial
de 75 ohm (no
incluído)

Caja de CATV
o caja de emi-
siones vía satélite
(no incluído)

Desde el cable coaxial
o caja de emisiones vía
satélite de 75 ohm del
sistema de Cable

o

o

o

o

Aviso a los instaladores de sistemas CATV:

Este aviso se incluye para que los instaladores de sis-
temas CATV tenga en cuenta el Artículo 820-40 del
NEC, que proporciona consejos para hacer una conexión
apropiada a tierra y, en particular, especifica que el cable
de tierra deberá conectarse a un sistema de puesta a tier-
ra del edificio tan cerca del punto de entrada del cable
como sea posible.

Adaptador de
acoplo (

incluído

)

Summary of Contents for 6309CE

Page 1: ...energy efficiency ENERGY STAR is a U S registered mark If you need additional assistance for set up or operating after reading owner s manual please call TOLL FREE 1 800 968 3429 Or visit our WEB SIT...

Page 2: ...inet and the back or bottom are provided for ventilation and to ensure reliable operation of the TV VCR and to protect it from overheat ing and these openings must not be blocked or covered The openin...

Page 3: ...age Requiring Service Unplug this TV VCR from the wall outlet and refer servicing to qualified service per sonnel under the following conditions a When the power supply cord or plug is damaged or fray...

Page 4: ...ields Avoid moving TV VCR to locations where temper ature differences are extreme Do not handle the power cord with wet hands Do not pull on the power cord when disconnecting it from an AC wall outlet...

Page 5: ...OGRAM 15 GAME MODE 15 DEGAUSSING 15 PICTURE CONTROL 15 C PLAYBACK 16 NORMAL PLAYBACK 16 AUTO REPEAT PLAYBACK 16 SEARCH 17 STILL PICTURE 17 NOISE CANCEL in the Still mode 18 VERTICAL HOLD CONTROL 18 TR...

Page 6: ...lows you to repeat the playing of a tape indefinitely without pressing the PLAY button Time search Let you set the TV VCR to advance the tape by entering the desired playback time you want to skip OTR...

Page 7: ...ind Search s button Press to select a mode from a particular menu for example LANGUAGE or USER S SET UP 8 PLAY button Press to begin playback K button Press to select setting modes from the on screen...

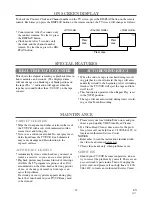
Page 8: ...o display the main menu on the TV screen 17 DISPLAY button Display the counter or the cur rent channel number and current time on the TV screen See page 24 18 SPEED button Press to choose the desired...

Page 9: ...e to CATV system installer This reminder is provided to call the CATV system installer s attention to Article 820 40 of the NEC that provides guidelines for proper grounding and in particular specifie...

Page 10: ...lways unplug the car battery from the cigarette lighter socket before you unplug it from the TV VCR You must disconnect the car battery cord from the TV VCR before you can use the AC power Be sure to...

Page 11: ...AUTO CLOCK CH 02 B MANUAL CLOCK SET D S T OFF M E N U TIMER PROGRAMMING PICTURE CONTROL B SETTING CLOCK CHANNEL SET UP USER S SET UP LANGUAGE ENGLISH ZERO RETURN TIME SEARCH MANUAL CLOCK SET MONTH DA...

Page 12: ...ed year appears Example 2004 Then press the F FWD B button 6 Select the hour Press the PLAY K or STOP L but ton until your desired hour appears Example 5 PM Then press the F FWD B button 7 Select the...

Page 13: ...aylight Saving Time is ON the clock will change automatically as follows First Sunday of April At 2 AM the clock imme diately changes to 3 AM Any timer programming you have set to occur between 2 AM a...

Page 14: ...l s has been deleted or added press the CHANNEL K or L button Added channel Light blue Deleted channel Light red CHANNEL SET UP Make sure Press the POWER button to turn on the TV VCR 1 Select CHANNEL...

Page 15: ...L The TV VCR s picture controls BRIGHT CON TRAST COLOR TINT and SHARPNESS are preset to factory specifications Although they are usually the best you may need to make some further adjustments for a na...

Page 16: ...ORRECT Window WRONG The TV VCR has the auto repeat function that allows you to repeat a tape indefinitely without touching the PLAY button ALL REPEAT Repeat playback from the beginning to the end of t...

Page 17: ...ning point at which you want to review 2 Reset the counter to 0 00 00 Press the COUNTER RESET button repeatedly 3 Begin recording or playback Press the RECORD or PLAY button Press the STOP button when...

Page 18: ...recorded in the SLP mode If the tape was originally recorded in the SP or LP mode the still picture may revert to black and white in addition to the noise bars This is normal In the Pause Still mode...

Page 19: ...Make sure TV VCR power must be turned on Insert a cassette tape with its erase prevention tab in place If necessary rewind or fast forward the tape to the point at which you want to begin recording N...

Page 20: ...once recording Press the PLAY K up button until the desired date appears Example 7 05 for July 5th Then press the F FWD B but ton TIMER RECORDING 9 00AM 10 00AM 12 00PM Program 1 10 00AM 11 00AM Progr...

Page 21: ...her program repeat steps 2 to 10 Press the MENU button on the remote control to return to original mode 11 Set the timer Press the POWER button to set automatic timer recording The TIMER REC indicator...

Page 22: ...n to point to USER S SET UP Then press the F FWD B button 2 Set AUTO RETURN to ON Press the PLAY K or STOP L but ton to point to AUTO RETURN Press the F FWD B or REW s button until ON appears Then pre...

Page 23: ...E UP SLEEP button twice then press the MENU button on the remote control to exit the sleep timer setting You can make copies of video tapes made by friends or relatives for your enjoyment Connect your...

Page 24: ...o correct the problem by yourself There are no user serviceable parts inside Turn off unplug the power cord and please call our help line at 1 800 968 3429 to locate an Authorized Service Center ON SC...

Page 25: ...the timer recording is set correctly Make sure the power is off Make sure the TV VCR clock is set correctly Cannot go into Record mode Make sure the tape has an erase prevention tab If need cover the...

Page 26: ...els with letters or letter number combinations Please check with your local cable company The following is a chart of common cable channel designations TV Display TV Display TV Display TV Display TV D...

Page 27: ...o para ajustar el reloj o para establecer un programa de temporizador p lselo para determinar su elecci n y vaya al paso siguiente que quiera introducir P lselo para determinar los modos de ajuste des...

Page 28: ...elo para visu alizar el men principal en la pantalla del televisor 17 Bot n del visualizador DISPLAY Visualiza el contador o el n mero del canal actual y la hora actual en la pantalla del televisor 18...

Page 29: ...n por cable le suministra un convertidor o si usted utiliza un sistema de emisiones v a sat lite usted podr utilizar las conexiones b sicas Utilizando estas conexiones usted tambi n podr grabar canal...

Page 30: ...ecargue la bater a del veh culo aprox cada 4 horas de uso para evitar que sta se agote Cuando termine de usar la TV VCR siempre desenchufe el cord n para la bater a del autom vil del z calo del encend...

Page 31: ...MENU en el mando a distancia Aunque los segundos no se visualizan stos empiezan a contar desde 00 cuando se pulsa MENU en el mando a distancia Utilice esta fun ci n para sincronizar el reloj con la h...

Page 32: ...commercial use such as hotel rental or office use of this product or damage which results from fire flood lightning or other acts of God THIS WARRANTY DOES NOT COVER PACKING MATERIALS ANY ACCESSORIES...

Reviews: