background image

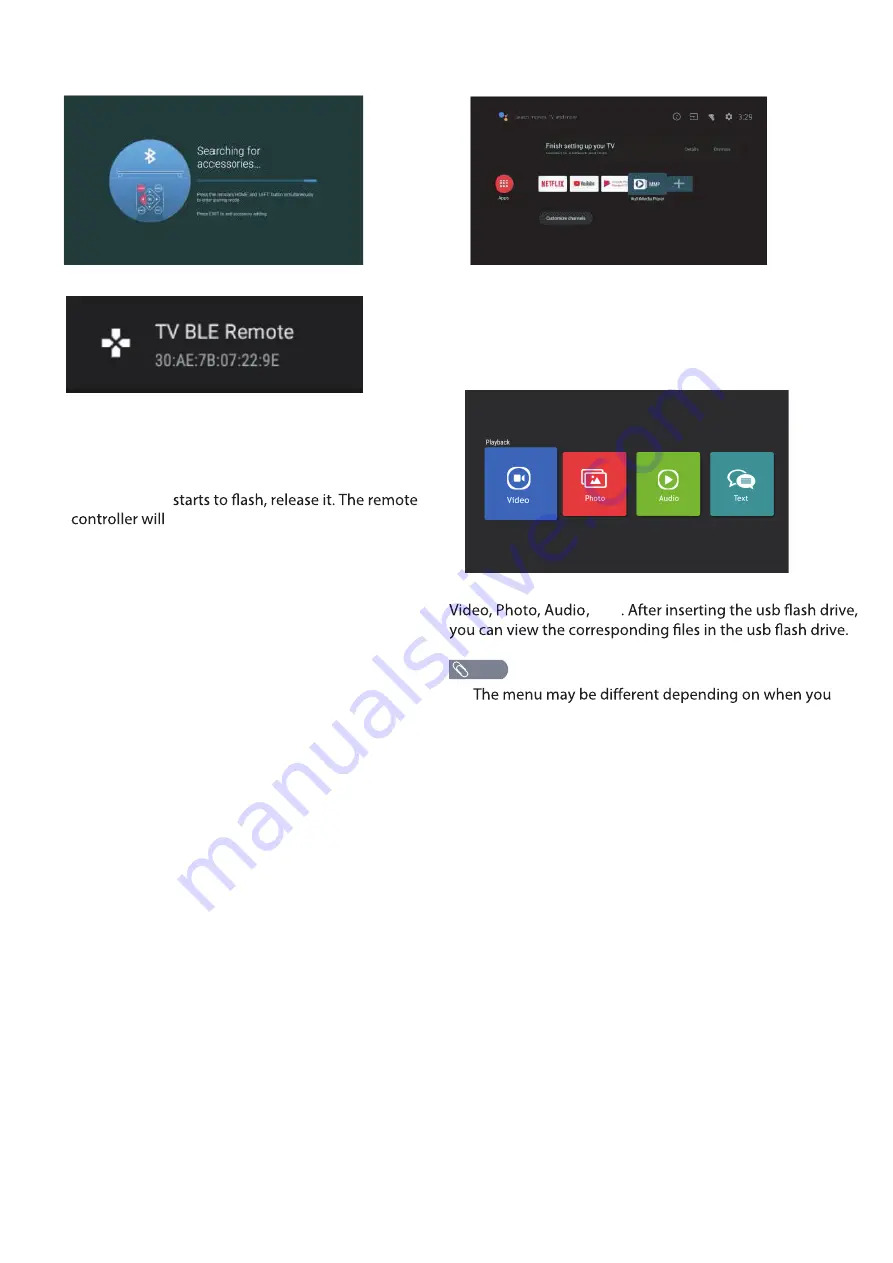
In this menu,you can pair Bluetooth devices.

1.Press the "

HOME

" and "

LEFT

" buttons at the

bottom of the remote control for 5 seconds.

2.When the LED

send the pairing signal to the TV and 

display the information of the remote control on 

 the right side of the screen. 

3.Press the 

OK

 button to display the 

5.

pairing.

If the paired is displayed, the connection is

successful.

4.If the couldn't pair appears, the connection  fails.

Wait 30 seconds and then press the "

HOME

" and

"

LEFT

" buttons at the bottom of the remote control

for 5 seconds to repeat the previous steps.
Press 

BACK or EXIT 

button return to the previous

menu.

REMOTE&ACCESSORIES

ADD AND USE OF MULTI MEDIA PLAYER

1. In the HOME interface, select the + icon in the APP

column to add the application, and click OK. Press up 

and down to select the MultiMediaPlayer application, 

and click OK to add it to the HOME interface.

2. Select OK key to enter Multi Media Player and display

Text

purchased the TV.

NOTE

Summary of Contents for 058465814779

Page 1: ...SL431AN 43 ANDROID TV Sylvania is a registered trademark of OSRAM SYLVANIA INC used under license USER S MANUAL ...

Page 2: ...PRECAUTIONS AND REMINDERS IMPORTANT SAFETY INSTRUCTIONS BUTTON CONTROL AND PERIPHERAL CONNECTION OPERATING INSTRUCTIONS SPECIFICATIONS TROUBLESHOOTIN WARRANTY CARD G TABLE OF CONTENTS ...

Page 3: ...IMPORTANT SAFETY INSTRUCTIONS Stand screws set x1 ...

Page 4: ...PRECAUTIONS AND REMINDERS If you are going to clean the product Unplug the TV use soft fabric no water never chemicals ...

Page 5: ...IMPORTANT INFORMATION ...

Page 6: ...ATTACTHING OR REMOVING THE STAND ...

Page 7: ...200mm 200mm 200mm x 200mm IDENTIFYING FRONT AND REAR PANEL ...

Page 8: ......

Page 9: ...CONNECTION SUGGESTIONS ...

Page 10: ......

Page 11: ......

Page 12: ...OPTICAL OPTICAL Optical OPTICAL OPTICAL OPTICAL ...

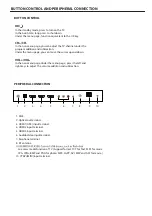
Page 13: ... can move the cursor up and down 3 HDMI1 ARC input terminal 2 Optical out terminal 1 RJ45 7 Earphone terminal 5 HDMI3 input terminal 4 HDMI2 input terminal 8 RF antenna 6 Audio Video input terminal 2 3 4 5 1 6 7 8 9 10 10 YPbPr MINI input terminal to access media function of TV Support format TXT for Text MP3 for music JPG JPEG BMP and PNG for photo MP4 3GPP AVI MKV and ASF for movie OK In the sta...

Page 14: ...18 19 48 30 31 34 0F 4E 0A 4D 47 4A 49 4B 06 03 53 40 41 5C 12 45 51 0B 08 5B 42 1D 1F 5D 5E 5F 02 09 35 1B 07 Format NEC Hex coding 20DF Hex coding info 1 2abc def jkl tuv ghi pqrs mno wxyz 3 4 5 6 7 8 OK 9 INFO CC MTS MENU HOME SOURCE P MODE S MODE BACK VOL CH EXIT 0 VUDU ...

Page 15: ...imeshift mode forward Press to pause in multimedia mode Timeshift mode Pause Press to stop multimedia playback REC Timeshift mode stop SOURCE Press to open the input source list NETFLIX YouTube Press to enter the NETFLIX Press to enter the YouTube Press to enter the VUDU Google Play Press to enter the Google Play Press to enter the google assistant or start a voice search HOME INFO Press to displa...

Page 16: ...an select the desired source Open the google assistant or start a voice search Among the applications installed on the TV the icons for the favourite applications are shown inside here Favourite applications can be added deleted changed its order by users Apps Click to jump to Apps screen where all the installed applications are listed Inputs Icon to select an input source Network Interent Setting...

Page 17: ...es then press Enter button to enter Customize Channel List Press Customize Channel List then press Enter button to enter Channel Installation Mode Press Channel Installation Mode then press Enter button to enter Optional Antenna Cable Multi Audio Press button to select then press Enterbutton to enter Optional English Espanol Francais Parental Controls Press Enter Channels Blocked Press Program Res...

Page 18: ...Press button to select the Automatic date time then press OK button to enter the sub menu Press button to select the option Set date then press OK button to enter the sub menu Press button to select the option Set time then press OK button to enter the sub menu Press button to select the option Set time zone TIMER Press button to select the option then press OK button to choose ON OFF ONCE Power O...

Page 19: ...se ON OFF Press button to select the option then press OK button to enter the sub menu Press button to select the 120 minutes 150 minutes 180 minutes 210 minutes Press button to select the option then press OK button to enter the 15 minutes 30 minutes 60 minutes 240 minutes option then press OK button to enter the sub menu Press button to select the PICTURE button to enter the sub menu Optional us...

Page 20: ...hen press OK button to enter the sub menu Optional user Standard Vivid Sports Movie Music News Auto Volume Control Press button to select the option then press OK button to choose ON OFF Downmix Mode Press button to select the option then press OK button to enter the sub menu Optional Stereo Surround Reset to Default Reset all settings to the factory defaults STORAGE Removable Storage Press button...

Page 21: ...sub menu Press button to select the Screen saver SCREEN SAVER option then press OK button to enter the sub menu Press button to select the Location status the option then press OK button to choose ON OFF Press button to select Usage diagnostics USAGE DIAGNOSTICS LOCATION Put device to sleep Press button to select the option then press OK button to enter the sub menu Optional 30 minutes 1 hour 3 ho...

Page 22: ...e couldn t pair appears the connection fails Wait 30 seconds and then press the HOME and LEFT buttons at the bottom of the remote control for 5 seconds to repeat the previous steps Press BACK or EXIT button return to the previous menu REMOTE ACCESSORIES ADD AND USE OF MULTI MEDIA PLAYER 1 In the HOME interface select the icon in the APP column to add the application and click OK Press up and down ...

Page 23: ...HOW DO I CLEAN THE TV ...

Page 24: ...43inches 1920x1080 3000 1 M N MTS 220 8W 8W 74W 100 240V 50 60Hz SPECIFICATIONS 22 HDMI HDCP1 4 Input ...

Page 25: ...x 1080i 28 13 33 75 50 59 94 60 1080p 1920 x 1080p 56 25 67 5 50 59 94 60 COMPONENT VIDEO YPbPr INPUT Mode Resolution Horizontal Frequency KHz Vertical Frequency Hz 480i 720 x480i 15 73 59 94 60 576i 720 x 576i 15 63 50 480p 720 x480p 31 47 59 94 60 576p 720 x 576p 31 26 50 720p 1280 x 720p 37 50 44 96 50 59 94 60 1080i 1920 x 1080i 28 13 33 75 50 59 94 60 Due to continuous product development spe...

Page 26: ...aptions control Some TEXT modes could block the screen Good picture but no sound Increase the volume level by pressing the VOL button on the remote control or on the TV side control panel Press the MUTE Good sound but poor color Adjust the contrast color and brightness settings Poor picture Poor picture quality may occur when an activated S VHS camera or camcorder is connected to your TV and other...

Page 27: ...FCC COMPLIANCE STATEMENT ...

Page 28: ...consumer purchaser or gift recipient Keep the original sales receipt as proof of purchase is required to make a warranty claim This warranty is void if the product is used for other than single family household use or subjected to any voltage and waveform other than as on the specified rating on the label e g 120V 60Hz We exclude all claims for special incidental and consequential damages caused b...

Reviews: