

User Manual
Art.Nr. 193 1xx2 / 194 1MS2
IR
-
EASY
/
IR
-
EASY
USB
English
General
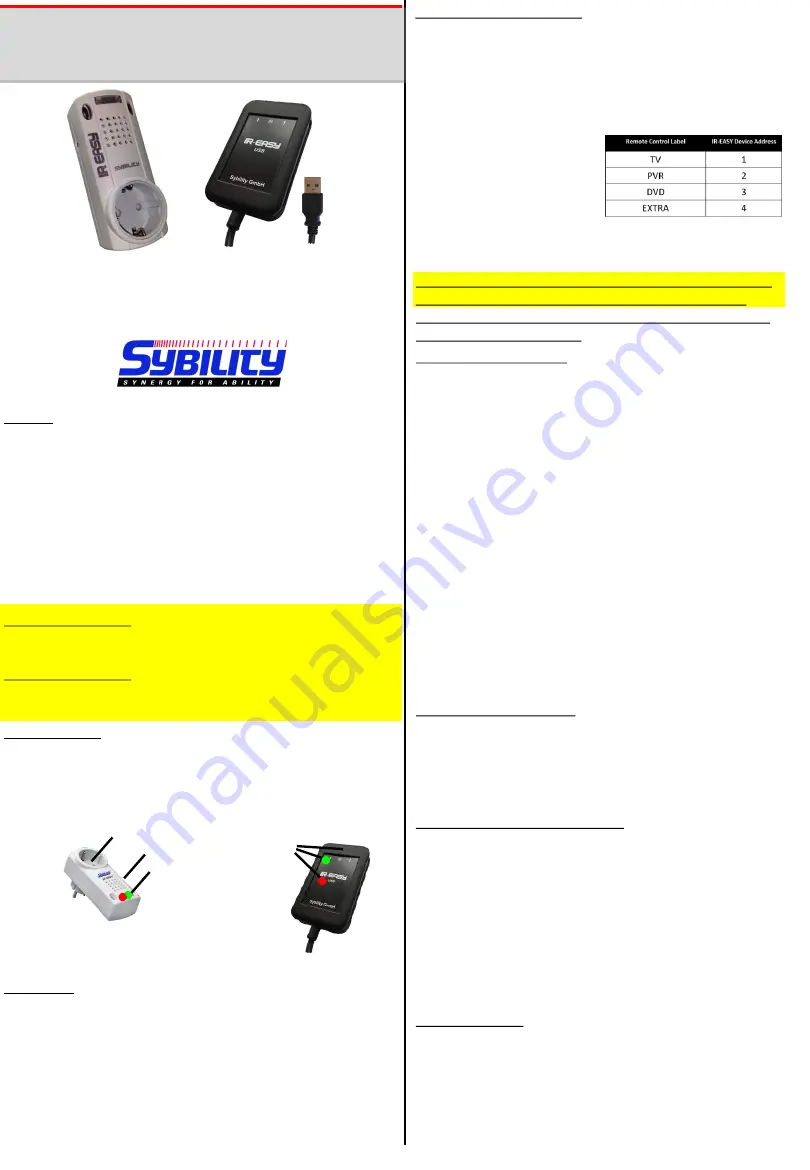
IR-EASY is available in two models.
P/N 193 1xx2 Infrared to Easywave converter in a straight
through power socket. Power supply 230V.
The power outlet cannot be switched on/off.
P/N 193 9xx1 Additional IR receiver with mounting set.
P/N 194 1MS2 Infrared to Easywave converter in a small infra-
red penetrable box with USB power supply.
There are 4 IR device addresses possible which allows to
operate up to 4 IR-EASY devices in the same room.
New in version 2.04:
With IR-address 1 you can also use the signals from the IR
power socket to control the first 8 radio signals (1 A/B to 4 A/B).
New in version 2.15:
In the first 10 Sec. the IR-address is set automatically with a
valid signal.
Technical Specs
Power Supply:
230V AC or 5V DC (USB)
Channels:
8 x Easywave A/B, 16 Signals
Dimensions:
120x48x65mm or 51x82x14mm (USB)
Weight:
170g or 70g (USB)
1: Straight through power outlet
2: IR receiver and LEDs
3: Socket for external IR receiver
How to use
- As soon as IR-EASY receives an IR signal the green LED inside
starts flashing. It also flashes if any IR signal is received.
- If a valid signal is received (correct IR-EASY address) the internal
red LED starts flashing, too. The red LED shows an Easywave
signal being transmitted.
- If only the green LED flashes please make sure the IR-EASY is
set to the correct address.
1. First select the address
on the remote control
regarding this table:
2. Send the signal
„Set Address“ from the remote to change the address in
the IR-EASY infrared receiver. IR-EASY will now work with
the signals of that IR device address.
Since Version 2.15 the IR-address must be set with a valid
control signal in the first 10 Sec! (Green LED stays on)
Please make sure that only one IR-EASY is powered when
setting the device address.
Safety and Mounting Instructions
-
IR-EASY may only be used in dry rooms.
-
Cleaning only when not connected to power supply and only
with a clammy cloth.
-
If there is a LED / LCD TV in the same room make sure to test
the functionality of IR-Easy when the TV is running. These
devices can transmit infrared light which can interfere with
the reception of IR-EASY.
-
Position IR-EASY so that it is not directly under synthetic
light or in sunlight, this can lower the reception of the IR
receiver.
Scope of Delivery
IR-EASY:
IR-EASY
User manual
Additional IR Receiver for IR-Easy:
IR-Receiver
Mounting Set
IR-EASY USB:
IR-EASY USB
User Manual
Sybility GmbH, Kreuzweg 15, 91781 Weißenburg, T: 09141-9131689, F: 09141-9132855
Stand 03/2017
Setting the Device Address
If you are planning to use more than one IR-EASY in the same
room, each one must be set to a different IR address.
The setting can be done by sending an IR signal from the remote
control to the IR-EASY (Set Addr
. 1…4) within the first 10 sec.
After the IR-EASY is plugged in.
No other signals are received within these 10 sec.!
Setting the PIN Function
You can set in your IR-EASY that one of the 16 RF signals is
only sent if a combination of the 4 PIN signals is received.
The setting of the RF signal and the PIN combination can only
be done within the first 10 sec. after the IR-EASY is connected
to the power supply.
The PIN signals are independent from the selected IR
address!
1.
Connect your IR-EASY to power.
2.
Send the IR signal „Set PIN“
3.
Send the IR signals which should only work with the PIN
signals.
4.
Send 4 PIN signals in an arbitrary order.
The RF signal will be sent once for confirmation.
The RF signal selected under 3. will now only be sent if the 4
PIN signals selected under 4. are received in the defined
order.
You can change this setting at any time following the
procedure again.
Deleting the PIN Function
1.
Connect your IR-EASY to power.
2.
Send the IR signal „Set PIN“
3.
Send the IR signals which should no longer work with the
PIN signals.
4.
Send the IR signal „Set PIN“ again.
2
1
2
3


