background image

GEbrAUchANwEIsUNG                                                  

sxT-scooTErs 

3


AVANT VOTRE PREMIERE UTILISATION

Clef allen 
6mm

Clef de 14mm (non 
incluse)

Pompe à pneus avec 
manomètre (style vélos) 
pour les pneus à valves 
Schrader (non incluse)

       ATTENTION:

NE PAS UTILISER 
DE SOUS-ORIGINAL 
PRODUITS AVEC 
VOTRE TROTTINETTE 
ELECTRIQUE.
La trottinette électrique 
a été fabriquée selon 
certaines spécifications 
techniques. L’équipement 
original fourni lors de la 
vente a été sélectionné 
selon ses critères de com-
patibilité avec le cadre, 
la fourche et les autres 
composants. Certains 
AFTERMARKET produits 
peuvent être compatibles 
ou non.

Enlever le contenu de la boîte. Ôter les protections en mousse qui protègent les composants 
des endommagements durant la livraison. Inspecter les éléments et être attentif aux égratignures 
sur la peinture, aux bosses ou câbles entortillés, qui auraient pu se produire durant la livraison. 
Grâce au fait que 95% des éléments de la trottinette sont assemblés et emballés directement à 
l’usine, il ne devrait pas y avoir de problèmes, même si la boîte comporte quelques bosses ou 
égratignures.

S’ASSURER QUE LE BOUTON D’ALLUMAGE EST EN POSITION « OFF » AVANT 
D’ENTREPRENDRE TOUTE OPERATION DE MONTAGE OU DE MAINTENANCE.

Temps estimé pour le montage et la préparation  

Compter jusqu’à 20 minutes pour le montage, sans compter le temps de chargement initial.
Compter jusqu’à 18 heures pour le chargement initial.

Outils requis

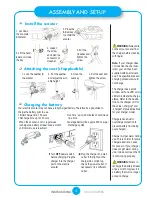
accélérateur

chargeur 

prise murale

port du chargeur

moteur

selle

frein

fourche avant

port dédié au chargeur 

bouton d’allumage

potence 

batterie

mécanisme de pliage


INsTrUcTIoNs          

sxT-scooTErs 

3

Summary of Contents for 300 KIDS

Page 1: ...Produkthandbuch Bedienungsanleitung Notice d utilisation Operating instructions Instrukcja obs ugi SXT 300 KIDS...

Page 2: ...el len Rollermodell abweichen Fahrzeugspezifikationen k nnen sich ohne vorherige Ank ndigung ndern Bitte lesen Sie diese Anleitung vor der ersten Inbe triebnahme aufmerksam durch Sicherheitshinweise 1...

Page 3: ...0 Jahre und lter Jeder Fahrer der auf Grund seiner Statur und K rper gr e den Roller nicht verwenden kann sollte dies auch nicht versuchen Die Entscheidung von Erwachsenen ob ihre Kinder diesen Roller...

Page 4: ...tz lich in Ihrer Region vorgeschrieben sein Wir empfehlen ebenfalls Ellbogen und Knieprotektoren lang rmelige Oberbekleidung lange Hosen sowie Handschuhe Tragen sie stets festes Schuhwerk wie zum Beis...

Page 5: ...ZEIT ca 20 Minuten f r die Endmontage Erstladung nicht eingeschlossen ca weitere 18 Stunden f r die Erstladung des Akkupacks BEN TIGTE WERKZEUGE 6mm Inbus schl ssel 14mm Maulschl s sel nicht enthalten...

Page 6: ...St nder her unterklappen 2 Falthebel bet tigen um Roller aufzu klappen 3 Lenkerstange herausziehen und feststellen 4 Schraube an der oberen Lenkstangen befestigung l sen 5 Lenkstange einbauen und Sch...

Page 7: ...r in Sandalen und Halten Sie die Schn rsenkel fern von beweglichen Teilen wie R dern Kette und Antriebsstrang Batterie Vergewissern sie sich dass der Roller ausgeschal ten ist wenn dieser nicht benutz...

Page 8: ...zur ck LADEGER T Das Ladeger t welches sie zusammen mit dem Roller geliefert bekommen sollte regel m ig auf Besch digungen am Netzstecker Kabel und Ladestecker berpr ft werden Im Falle einer solchen B...

Page 9: ...eckt Stellen sie sicher dass die Steckdose in der Wand Strom liefert Auch trotz korrekter Pflege und Wartung h lt ein Akku nicht ewig Die durchschnittliche Lebensdauer eines wiederaufladbaren Bleiak k...

Page 10: ...acte apparence du produit Les sp cifications techniques de ce produit peuvent tre sujets des modifications et sans pr avis Merci de lire attentivement ce manuel d utilisation avant votre premi re util...

Page 11: ...rottinette d une fa on s re et sans danger doit imm diatement stopper l utilisation du produit L autorisation et la surveillance parentale est obligatoire afin de laisser leurs enfants utiliser cette...

Page 12: ...de porter prot ge coudes et prot ge genoux v tement manches longues pantalon et gants Toujours porter des chaussures faites pour le sport lacets et avec des semelles en caoutchouc ne jamais conduire p...

Page 13: ...durant la livraison Inspecter les l ments et tre attentif aux gratignures sur la peinture aux bosses ou c bles entortill s qui auraient pu se produire durant la livraison Gr ce au fait que 95 des l me...

Page 14: ...e au sol 2 Tourner la clef de pliage pour ouvrir la trottinette 3 Lever le guidon et serrer la clef pour bloquer 4 Desserrer la vis et ouvrir le connecteur de la barre transversale 5 Ins rer la barre...

Page 15: ...es en caoutchouc ne conduisez jamais pieds nus ou en sandales et faites en sorte que les lacets soient faits et hors de port e des roues du moteur et de la colonne de direction Batterie Assurez vous q...

Page 16: ...agr de batteries automobiles Chargement Le chargeur fourni avec la trottinette lectrique doit tre r guli rement contr l le fil la prise le bo tier et les autres composants et au cas o un des composan...

Page 17: ...ur est bien branch au port du chargeur et que le chargeur est bien branch la prise murale Assurez vous que le courant passe dans la prise murale M me en en prenant soin une batterie rechargeable ne du...

Page 18: ...flect exact appearance of actual product Specifications are subject to change without notice Read and understand this entire manual before riding Safety warnings 1 Repair and Maintenance 6 Before you...

Page 19: ...bly on the scooter should not attempt to ride it A parent s decision to allow his or her child to ride this product should be based on he child s maturity skill and ability to follow rules Keep this p...

Page 20: ...roved safety helmet with chin strap securely buckled A helmet may be legally required by local law or regulation in your area Elbow and kneepads a long sleeved shirt long pants and gloves are recommen...

Page 21: ...OR MAINTENANCE PROCEDURES ESTIMATED ASSEMBLY AND SET UP TIME Allow up to 20 minutes for assembly not including initial charge time Allow up to 18 hours for initial charge REQUIRED TOOLS 6mm key wrenc...

Page 22: ...battery that will no longer accept a charge 1 put down the scooters kickstand 2 Press the folded key to unfold the scooter 3 Lift the hand lebar and close the key 4 Loosen the screw and open the conne...

Page 23: ...hoes lace up shoes with rubber soles never ride barefoot or in sandals and keep shoelaces tied and out of the way of the wheels motor and drive system Battery Make sure the power switch is turned off...

Page 24: ...automotive batteries CHARGER The charger supplied with the electric scooter should be regularly examined for damage to the cord plug enclosure and other parts and in the event of such damage the scoo...

Page 25: ...to the charging port and that the charger is plugged into the wall Make sure power flow to the wall is on Even with proper care a rechargeable battery does not last forever Average battery life is 1 t...

Page 26: ...u produkt w Producent zastrzega mo liwo zmiany specyfikacji bez uprzedzenia Przed przyst pieniem do u ytkowania produktu nale y zaznajomi si z pe n tre ci instrukcji obs ugi ZASADY BEZPIECZE STWA 1 NA...

Page 27: ...ogi w celu zapewnienia bezpiecze stwa dzieciom Hulajnoga przeznaczona jest dla os b powy ej 10 roku ycia U ytkownik kt ry swobodnie nie mie ci si na hulajnodze nie powinien z niej korzysta Zgoda rodzi...

Page 28: ...z akcesori w ochronnych takich jak atestowany kask z bezpiecznym zapi ciem pod brod nakolanniki i na okietniki Zaleca si r wnie spodnie z d ugimi nogawkami koszulki z d ugimi r kawami oraz r kawice K...

Page 29: ...i przygotowania urz dzenia Przybli ony czas monta u wynosi 20 minut wy czaj c czas adowania Czas pierwszego adowania wynosi ok 18 h Zalecane narz dzia Klucz imbusowy 6mm Klucz p aski 14mm nie do czono...

Page 30: ...t s u cy do sk adania rozk adnia hulajnogi 3 podci gnij trzpie kierow nicy i zablokuj we w a ciwym miejscu 4 poluzuj rub i otw rz z czk kierownicy 5 umie kierownic na w a ciwym miejscu i przykr rub Mo...

Page 31: ...mi oraz r kawice Konieczne jest sportowe obuwie z gumow podeszw Nigdy nie jed w sanda ach lub boso a tak e uwa aj aby mie zawsze zawi zane sznurowad a tak by nie wkr ci y si one w uk ad jezdny hulajno...

Page 32: ...i utylizacji powt rnego u ycia lub odzysku podzespo w polega na przekazaniu urz dzenia do wyspecjalizowanego punktu zbi rki gdzie b dzie przyj te adowarka Regularnie sprawdzaj adowark dostarczon wraz...

Page 33: ...ewnij si e kabel adowarki jest pod czony do hulajnogi i do dzia aj cego gniazdka Upewnij si e gniazdko do kt rego pod czasz adowark dzia a Nawet przy nale ytej dba o ci cykl ycia akumulatora nie trwa...

Page 34: ...ie jakichkolwiek pyta zach camy do kontaktu z autoryzowanym sprzedawc SXT Polska Skandynawia i Europa rodkowo Wschodnia F r Deutschland Schweiz und sterreich POL Planet e K Marco Schuler Bahnhofstrass...

Reviews: