

_____________________________________________________________________________________
SWS
–
7695 Blackburn Parkway, Niagara Falls, ON Canada
Tel: 1-877-357-0222 | Fax: 905-357-9122 | [email protected]
300138 Rev. 8
Page
4
of
7
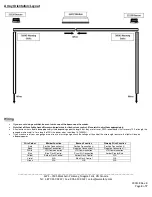
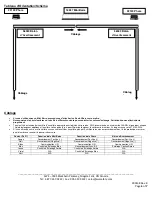
Minibar
The minibar is the master light in the system and will control the colours of the other lights.
Connect the RED positive wire to the vehicle’s power source positive connection.
Connect the BLACK negative wire to the vehicle’s power source negative connection
or chassis ground.
Connect the WHITE LIN communication wire to the other products WHITE wires.
Connect the YELLOW amber flash control wire to a positive switching ON/OFF switch.
Connect the BLUE flash control wire to a positive switching ON/OFF switch.
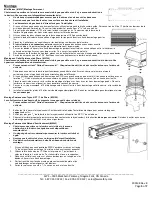
Beacons
With a minibar in the system:
Connect the RED positive wire to the vehicle’s power source positive connection.
Connect the BLACK negative wire to the vehicle’s power source negative connection or chassis ground.
Connect the WHITE LIN communication wire to the other products WHITE wires.
Connect the BLUE sync./alt. wire
of both beacons
to the RED positive wire.
If you are not using a minibar in this system:
Connect the RED positive wire to the vehicle’s power source positive connection.
Connect the BL
ACK negative wire to the vehicle’s power source negative connection or chassis ground.
Connect the WHITE LIN communication wire to the other products WHITE wires.
Connect the BLUE sync./alt. wire
of one of the beacons
to the RED positive wire (This beacon is now a slave).
Do not
connect the other beacon’
s
BLUE wire, making that beacon the master.
Connect the YELLOW amber flash control wire
of the master beacon
to a positive switching ON/OFF switch.
Connect the VIOLET blue flash control wire
of the master beacon
to a positive switching ON/OFF switch.
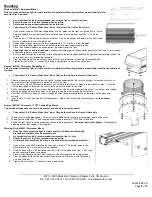
LED Sticks
The dimming function is factory installed and does not require any user wiring.
Connect all RED positive connection wires and all BLUE amber steady burn wires to the positive connection of the vehicle via an ON/OFF switch or
through the vehicle’s ignition switch.
If you do not wish the sticks to act as running lights, then connect all the RED positive wires and the BLUE amber steady burn wires
to the vehicle’s
power source positive connection via an ON/OFF switch.
Connect all the BLACK negative wires to the vehicle’s negative power supply, or a good chassis ground.
Connect all the WHITE LIN communication wires together. Connect the WHITE wires of the LED sticks to the WHITE wires of the beacons and minibar
(where present).
The GREEN and ORANGE wires are not used and can be cut away.
Troubleshooting
If your light fails to work, please follow these troubleshooting tips before calling the factory:
Check all connections for breakage or corrosion.
Check to see if the fuse has blown within the vehicle. If it has, replace with a fuse of the exact same amp rating.
For long power wire lengths, ensure the voltage at the light connection is adequate. If not, you may have to shorten the length or increase the wire
gauge.
Ensure vehicle’s battery is charged and that the charging system is functional.
If the light fails to come out of AutoDim, be sure the top of the dome/lens of the minibar/beacons is clear of debris.
CALL SWS CANADA (1-877-357-0222) FOR FURTHER ASSISTANCE