background image

7

4.4 

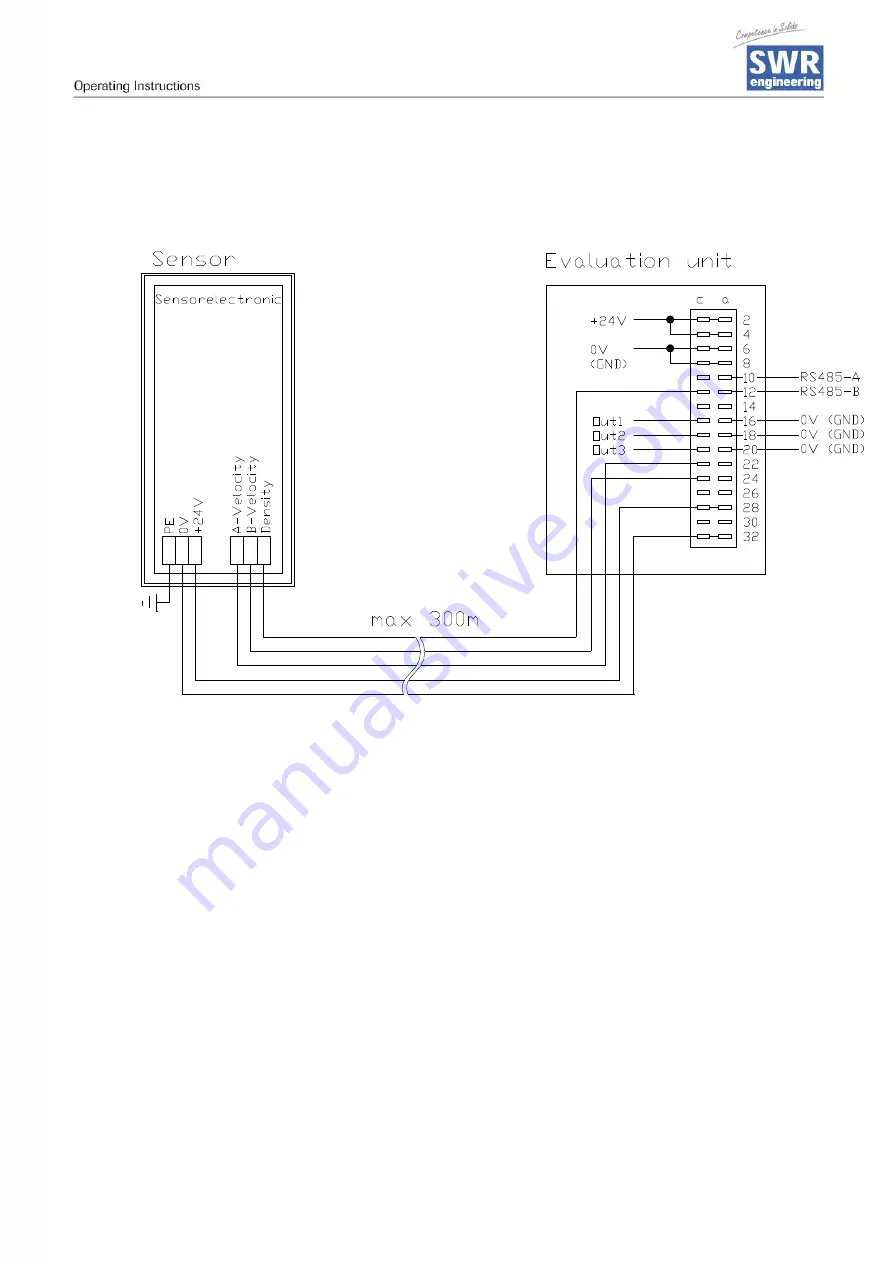
Overview of the Connection of the Senor Pipe and Evaluation
Unit

Fig. 5: Wiring of the Sensor Pipe and Measuring Instrument

A maximum length of 300 m of the sensor cable should not be exceeded.
A 5-wired cable is needed between sensor and evaluation unit.

Summary of Contents for DensFlow

Page 1: ...BA_DF_0003_E_07_04 ...

Page 2: ...4 4 MOUNTING AND INSTALLATION 5 4 1 Delivery Range 5 4 2 Auxiliary 5 4 3 Mounting of the Measuring Pipe 5 4 4 Overview of the Connection of the Senor Pipe and Evaluation Unit 7 5 COMMISSIONING 9 6 MENU STRUCTURE OF DENSFLOW 11 7 MENU PARAMETERS OF THE SYSTEM IN DETAIL 12 8 MAINTENANCE 16 9 WARRANTY 16 10 TROUBLE SHOOTING 16 11 TECHNICAL DATA 17 ...

Page 3: ... homogeneous measuring field is produced in the pipe The electromagnetic wave brought into the pipe is reciprocally acting with the solid particles These signals are evaluated in frequency and amplitude The measurement of the solid speed is done by means of correlation Two capacitive sensors are used for the production of the correlation signals A complete measuring unit consists of the sensor mea...

Page 4: ... the measuring system are marked by the following symbols in the operating instructions Warning This symbol in the operating instructions marks actions which may represent a danger for life and limb of persons when carried out in an inexpert manner Attention All actions which may endanger objects are marked with this symbol in the operating instructions 3 3 Operational Safety The measuring system ...

Page 5: ...ring 4 3 Mounting of the Measuring Pipe The sensor is to be mounted as follows Determine the place of mounting on the pipe On horizontal or inclined pipes the sensor should be mounted from top Follow the necessary distances of valves bows fans or cellular wheel sluices etc and also other measurement devices like temperature and pressure etc to the sensor see fig 3 The mounting has to be in a verti...

Page 6: ...eal in the intersection of the pipe and measuring sensor If so these resistances in the pipe must be removed Fig 4 Installation of the sensor accommodation The electronic equipment should be installed at a maximum distance of 300 m from the sensor The housing is prepared for the 19 rack system ...

Page 7: ...tion of the Senor Pipe and Evaluation Unit Fig 5 Wiring of the Sensor Pipe and Measuring Instrument A maximum length of 300 m of the sensor cable should not be exceeded A 5 wired cable is needed between sensor and evaluation unit ...

Page 8: ...c Input Supply Voltage GND Connections 10a RS 485 Data A RS485 12a RS 485 Data B 16c Output 4 20mA Throughput 16a Output 4 20mA GND 18c Output 4 20mA Density 18a Output 4 20mA GND 20c Output 4 20mA Velocity 20a Output 4 20mA GND 12c Density 0 20mA 22c Velocity A 0 20mA 24c Velocity B 0 20mA 28a c Output Supply Voltage 24V 24V DC Sensor 32a c Output Supply Voltage 0V GND ...

Page 9: ... 6 The velocity measurement is firmly defined as an absolute measurement by the distance of the sensor plates and does not have to be calibrated Min Point Set point 1 to 0 when the mass flow is shut down and the measuring pipe is empty calibrate this point now Max Point Set point 2 to known maximum flow rate with normal conveying and calibrate as well This value can be adjusted later on when weigh...

Page 10: ... of the requested density value of the final value of the measuring range in menu point 2 1 e g 20mA 800 Kg m Step 3 Alignment of the minimum density value with empty pipe min 0 kg m in menu point 3 5 Step 4 Alignment of the maximum density value by complete filled pipe e g 800 kg m in menu point 3 6 Step 5 Input the diameter of the pipe in menu point 2 5 Step 6 Conveying of the product on maximum...

Page 11: ...ity 2 4 Average density 2 5 Pipe diameter 2 6 Correction factor 2 7 Send parameters 2 8 Language 3 1 ADC 1 Density 3 2 ADC 2 Velocity 3 3 DAC Simulation 3 3 1 DAC1 preset 4 8 12 16 20mA 3 3 2 DAC2 preset 4 8 12 16 20mA 3 4 Density min value 3 5 Density max value 3 6 Velocity Range 3 7 DAC Calibration 3 7 1 Ofs DAC1 3 7 2 Ofs DAC2 3 7 3 v DAC1 3 7 4 v DAC2 3 8 Slave Adress 1 4 Display Totalisator ...

Page 12: ...ter mm 3 5 Density max value 2 6 Correction factor 3 6 Velocity measur ing range m s 2 7 Send parameters 3 7 DAC Calibration 2 8 Language 3 8 Slave Adress Use of the Evaluation Unit by ENTER button à Selection and Confirming UP DN button à Changing ESC button à Backwards 1 0 Display 1 1 Display of the measured density in kg m 1 2 Display of the calculated throughput from density and velocity kg h ...

Page 13: ...ry for the correct calculation of the quantity 2 6 Entry of the correction factor for the throughput 0 1 10 Here the value received can be corrected lateron by changing the preset value to 1 2 7 Send parameter By pressing YES the parameters factor correction throughput range density measuring range will be send via RS485 interface to all connected instruments 2 8 Select Language between German and...

Page 14: ...he dimensionless value must be changed so far until 0 are indicated 3 5 Entry of the maximum value for the density range Here you can enter the value which can maximally be expected or a second measuring point The dimensionless value must be changed so far until the requested percentage is indicated 3 6 Input of the velocity Standard 10m s ex works presetted 3 7 DAC Calibration for current outputs...

Page 15: ...or with the totalisator function it is possible to monitor entire flow rate since the last reset of the Totalisator A RESET of the counts can be accomplished over pressing the ENTER and selection of YES or NO with UP DOWN button Stop Totalisator press ESC DAC Calibration Of s DAC2 0 DAC Calibration V DAC1 1 DAC Calibration V DAC2 1 Slave Adress 001 TOTALISATOR 1 0 Kg TOTALISATOR Reset NO TOTALISAT...

Page 16: ...actory then the customer has to take over the costs for the SWR service staff SWR is not responsible for damage which did not develop at the delivery article especially SWR is not responsible for escaped profit or other financial damages of the customer 10 Trouble shooting Warning The electrical installation must only be checked by expert personnel Problem Cause Measure Measuring system does not w...

Page 17: ... size Dimension Ø NW 90mm L 500mm Accuracy 2 5 in calibrated range Evaluation Unit Supply voltage 24V DC Power consumption 12 W Operating temperature 10 45 C Dimension 19 rack system 3HE 28TE L 227mm Weight approx 0 7 kg Additional Data Input 2 x Velocity 0 20mA or 0 10V 1 x Density 0 20mA 1 x PFM Input 14V Imax 35mA 30 3kHz Connections Connector DIN 41612 Type B 32 pol connector Current output Th...

Reviews: