background image

Operating Instructions

www.snopakebrands.com

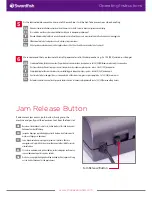
Wait until the “Ready” indicator comes on. It usually takes about 3-5 minutes for the unit to reach operating 
temperature

DE

  Warten Sie, bis die “Ready“-Anzeige aufl euchtet. Normalerweise erreicht das Gerät nach etwa 3-5 Minuten seine Betriebstemperatur

FR

  Attendre que le témoin “Ready” s’allume. L’unité atteint généralement sa température de service en quelque 3-5 minutes

IT

  Attendere fi no all’accensione della spia “Ready”. Solitamente occorrono 3-5 minuti prima che la macchina raggiunga la temperatura

di funzionamento

ES

  Espere a que se ilumine el piloto “Ready”. La máquina tarda alrededor de 3-5 minutos en alcanzar la temperatura de funcionamiento adecuada

NL

  Wacht tot het lampje ’Ready’ (Gereed) brandt. Het duurt normaliter ongeveer 3-5 minuten voordat het apparaat de bedrijfstemperatuur bereikt

2

Operation 

cont.

Insert the document into a pouch of the right size. Leave NO MORE THAN 2-3mm on each side of the 
pouch

DE


Legen Sie das Dokument in eine ausreichend große Laminiertasche. Lassen Sie auf jeder Seite der Tasche zwei bis drei Millimeter Platz frei

FR


Introduire le document dans une chemise de taille appropriée. Laisser environ 2-3 mm sur chaque bord

IT


Inserire il documento in una pouch della dimensione appropriata. Lasciare un margine di circa 2-3mm per ogni lato della pouch

ES


Introduzca el documento en una bolsa de tamaño adecuado, dejando unos 2 ó 3 mm a cada lado de la bolsa

NL


Plaats het document in een hoes met de juiste afmeting. Laat aan de randen van de hoes ongeveer 2-3 mm vrij

3

Squarely insert the pouch, with the closed end fi rst, into the feed slot. Inserting the pouch at an angle can 
seriously damage the machine

DE

  Führen Sie die Laminiertasche mit der geschlossenen Seite zuerst rechtwinklig in den Zuführschlitz ein. Durch schräges Einführen der Laminiertasche 

kann das Gerät beschädigt werden

FR

  Introduire l’extrémité fermée de la chemise dans la fente d’alimentation. Pour éviter d’endommager gravement la machine, ne pas introduire la 

chemise de biais

IT

  Inserire la pouch nella fessura di alimentazione allineandola perfettamente con quest’ultima, inserendo per primo il lato chiuso. L’inserimento della 

pouch in modo non appropriato, ad es. di sbieco o trasversalmente, potrebbe danneggiare seriamente la macchina

ES

  Inserte la bolsa bien recta en la ranura de entrada, con el extremo cerrado primero. Si introduce la bolsa en ángulo, la máquina puede estropearse

NL

  Plaats de hoes vlak en met het gesloten uiteinde naar voren in de papierinvoer. Als de hoes onder een hoek in het apparaat wordt geplaatst, kan dit 

ernstige schade aan het apparaat tot gevolg hebben

4

Summary of Contents for 230LR A4

Page 1: ...CH FRANÇAIS ITALIANO ESPAÑOL NEDERLANDS Operating Instructions Bedienungsanleitung Mode d emploi Istruzioni per l uso Instrucciones de funcionamiento Instructies A4 A3 Compact Laminators Home Small Office Laminators ...

Page 2: ...g that is too large or too small for the pouch Heat sensitive material such as wax crayon thermal fax paper instant photos etc Soft material such as tissue paper or fabric Damp documents prints or paintings Anything thicker than 0 5mm Jam Release Button Cold Off Hot Switch Ready Light Power Light For further information or to register your product visit www snopakebrands com SCAN ME ...

Page 3: ...er Dark Silver Feed Entry Width mm 230 330 Maximum Pouch Thickness 2 x 125 250 Microns 2 x 125 250 Microns Maximum Pouch Thickness Total mm 0 6 0 6 Jam Release Reverse Control Cold Lamination Option Auto Shut Off Number of Rollers 2 2 Warm up Time minutes 5 5 Speed time to laminate an A4 sheet Approx 1 min 20 secs Approx 1 min 20 secs Product Dimensions H x W x D mm 145 x 350 x 62 145 x 440 x 62 W...

Page 4: ...oblèmes IT Verificare che ci sia spazio a sufficienza dietro la plastificatrice in modo che la pouch possa liberamente inserirsi nella macchina ES Asegúrese de que hay suficiente espacio detrás de la laminadora para que la bolsa salga sin problemas de la máquina NL Zorg ervoor dat er achter de laminator voldoende ruimte is om de hoes vrij door het apparaat te laten bewegen 2 Operation Turn on the ...

Page 5: ...ocumento in una pouch della dimensione appropriata Lasciare un margine di circa 2 3mm per ogni lato della pouch ES Introduzca el documento en una bolsa de tamaño adecuado dejando unos 2 ó 3 mm a cada lado de la bolsa NL Plaats het document in een hoes met de juiste afmeting Laat aan de randen van de hoes ongeveer 2 3 mm vrij 3 Squarely insert the pouch with the closed end first into the feed slot ...

Page 6: ...ar ex 2x125 250 micromètres IT È consigliabile plastificare materiale cartaceo sottile leggero in pouch più spesse ad es da 2x125 250 micron o più ES En el caso de las hojas de papel finas es recomendable utilizar bolsas más gruesas por ejemplo de 2 x 125 250 micras o más NL Het wordt aanbevolen dun of zacht papier in dikkere hoezen te lamineren bijvoorbeeld van 2x125 250 micron of nog sterker 5 6...

Page 7: ...crayon thermal fax paper instant photos etc soft material such as tissue paper or fabric damp documents prints paintings or anything thicker than 0 6mm DE Nicht laminieren mehrere Artikel in einer einzigen Folie Blätter Blumen oder anderes organisches Material Artikel mit ungleichmäßiger Form Artikel die zu groß oder zu klein für die Laminierfolie sind wärmeempfindliches Material wieWachskreide th...

Page 8: ...cionamiento la superficie de la laminadora se calienta Si va a utilizar la máquina un niño deberá hacerlo bajo la supervisión de un adulto NL Het oppervlak van het apparaat wordt heet als deze in bedrijf is Er moet altijd een volwassene toezicht houden als het apparaat door een kind wordt bediend 5 To prevent electrical high temperature hazards never attempt to force any metallic items or your fin...

Reviews: