background image

Aperçu

16

1 Écouteur réglable 
2  Réglage du volume 
3  Voyant de contrôle LED (alimentation / signal = bleu, microphone = vert) 
4 Touche microphone pour écouter les bruits environnants 
5 Interrupteur marche/arrêt 
6 Microphone 
7 Réglage de la balance 
8 Contacts de chargement

1 Contacts de chargement 
2  Voyant de contrôle LED (alimentation / signal = vert) 
3 Ladeanzeige-LED (en charge = rouge / chargé = vert) 
4 Raccord pour bloc d'alimentation 
5 Entrée audio (3,5 mm)

Summary of Contents for TVL300

Page 1: ...ase read carefully before using this equipment Bedienungsanleitung User s Manual Manuel de l utilisateur Manuale utente Manual de instrucciones Handleiding Bedienungsanleitung User s Manual Manuel de l utilisateur Manuale utente Manual de instrucciones Handleiding ...

Page 2: ...al blau Mikrofon grün 4 Mikrofontaste zum Hören von Geräuschen in der Umgebung 5 Ein Aus Schalter 6 Mikrofon 7 Balance Einstellung 8 Ladekontakte 1 Ladekontakte 2 Anzeige LED Spannungsversorgung Signal grün 3 Ladeanzeige LED Laden rot Aufgeladen grün 4 Anschluss für Netzteil 5 3 5 mm Audio Eingang ...

Page 3: ...tion Verpackungsinhalt 1 Empfänger mit Ohrhörer Muscheln 2 Sender 3 1 Paar zusätzliche Ohrhörer Muscheln 4 Netzteil 5 Audioadapter RCA für Audiokabel 6 Audiokabel 2 x 3 5 mm Klinkenstecker Bedienungsanleitung DE ...

Page 4: ...Akku voll geladen ist Sender anschließen 1 Verbinden Sie den Stecker des Netzteils mit der Anschlussbuchse an der Rückseite des Senders 2 Stecken Sie das Netzteil in eine Steckdose 3 Verbinden Sie den Sender mit Ihrer gewünschten Tonquelle Für die unterschiedli chen Anschlussmöglichkeiten Fernsehgerät Stereo Anlage MP3 Player etc ist im Lieferumfang ein Adapter vorhanden 4 Die grüne Anzeige LED bl...

Page 5: ...m Hörer In der 4 Minute hören Sie einen doppel ten Piepton In der 5 Minute wird der Empfänger dann automatisch abgeschaltet Ein voll geladener Akku ermöglicht eine Betriebszeit von bis zu 5 Stunden Um Akkukapazität zu sparen wird der Empfänger automatisch ausgeschaltet wenn für ca 5 Minuten kein Signal vom Sender empfangen wird oder der Signalpegel zu niedrig ist Die Mikrofontaste Die Mikrofonöffn...

Page 6: ... Muscheln austauschen Im Lieferumfang sind 2 Paar Ohrhörer Muscheln Ein Paar ist bereits am Kopfhörer montiert 1 Zum Austauschen der Ohrhörer Muscheln greifen Sie die Spitze der montierten Ohr hörer Muscheln und ziehen sie einfach ab 2 Schieben Sie die Austausch Ohrhörer Muscheln auf die offenen Enden und lassen Sie sie einrasten Fehlersuche Kein Ton Kontrollieren Sie den Schalter am Empfänger Ste...

Page 7: ...eses Gerät wurde entwickelt um Tonsignale eines Senders kabellos an einen Empfän ger zu übertragen Jede andere Verwendung gilt als nicht bestimmungsgemäß Eigen mächtige Veränderungen oder Umbauten sind nicht zulässig Öffnen Sie die Geräte in keinem Fall selbst und führen Sie keine eigenen Reparaturversuche durch Benutzer mit Herzschrittmacher Wenn Sie einen Herzschrittmacher tragen sollten Sie Ihr...

Page 8: ...ie nebenstehenden Symbole bedeuten dass Sie Akkus und Batterien auf keinen Fall in den Hausmüll werfen dürfen sondern dass diese über Sammelstellen der Entsorgung zugeführt werden müssen Verpackungsmaterialien entsorgen Sie entsprechend den lokalen Vorschriften Konformitätserklärung Dieses Gerät erfüllt die Anforderungen der EU Richtlinie 2014 53 EU Die Konformität mit der o a Richtlinie wird durc...

Page 9: ...Bedienung natürliche Abnutzung durch falsches Aufstellen oder Aufbewahren durch unsachgemäßen Anschluss oder Installa tion sowie durch höhere Gewalt oder sonstige äußere Einflüsse entstehen fallen nicht unter die Garantieleistung Wir behalten uns vor bei Reklamationen die defekten Teile auszubessern zu ersetzen oder das Gerät auszutauschen Ausgetauschte Teile oder aus getauschte Geräte gehen in un...

Page 10: ...een 4 Microphone button to hear sounds from the surroundings 5 Power ON OFF 6 Microphone 7 Balance Control 8 Charging Contacts 1 Charging Contacts 2 LED Indicator Power Signal green 3 Charge LED Indicator charging red fully charged green 4 Socket for Power Adaptor 5 3 5 mm Audio Socket Audio Line In ...

Page 11: ...tarted Box contents 1 Receiver with rubber ear buds 2 Transmitter 3 1 additional pair of rubber ear buds 4 AC DC adapter 5 Adapter cable RCA for audio cable 6 Audio cable both ends with 3 5 mm stereo plug User guide ...

Page 12: ...Connect the power adapter to the DC IN input socket located on the transmitter rear panel 2 Connect the power adapter provided to an electrical outlet 3 Connect the transmitter to your audio source RCA adapter cable and audio cable are provided for various type of connection to your audio source e g TV set Hi Fi system MP3 or iPod 4 The green LED indicator will flash as soon as you have connected ...

Page 13: ...inute and 1 double beep in the forth minute The receiver will switch off automatically in the fifth minute A fully charged battery provides up to 5 hours of listening enjoyment To conserve battery power the receiver automatically shuts off if no signal is detected for a period of approx 5 minutes or when the level is too low The microphone button The microphone opening at the lower part of the rec...

Page 14: ...ver lights up constantly Changing the rubber ear buds Two pairs of ear buds are delivered with the device One pair is already mounted on the headset 1 For changing the ear buds pick the mounted ear buds at the end and tear them off simply 2 Position the spare ear buds onto the open ends and let them snap into place Troubleshooting No sound Ensure that the receiver power ON OFF switch is switched t...

Page 15: ... receiver Any other use is considered unintended use Unauthorised modification or reconstruction is not permitted Under no circumstances open the devices or complete any repair work yourself For users wearing a pacemaker It is recommended that if you have a pacemaker fitted you check with a medical expert or your health adviser before using this product Switch the device off immediately if you not...

Page 16: ...ymbols indicate that the batteries must not be disposed of in normal domestic waste and must be brought to collection points provided by local public waste authorities Packaging materials must be disposed of according to local regulations Declaration of conformity This device fulfils the requirements stipulated in the EU directive 2014 53 EU Conformity with the above mentioned directive is confirm...

Page 17: ...vention by the purchaser or third parties Damage caused as a result of improper handling or operation incorrect positioning or storing improper connection or installation Acts of God or other external influence are not covered by the terms of guarantee In the case of complaints we reserve the right to repair or replace defect parts or provide a replacement device Replacement parts or devices becom...

Page 18: ...ouche microphone pour écouter les bruits environnants 5 Interrupteur marche arrêt 6 Microphone 7 Réglage de la balance 8 Contacts de chargement 1 Contacts de chargement 2 Voyant de contrôle LED alimentation signal vert 3 Ladeanzeige LED en charge rouge chargé vert 4 Raccord pour bloc d alimentation 5 Entrée audio 3 5 mm ...

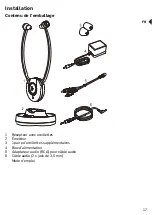
Page 19: ...n Contenu de l emballage 1 Récepteur avec oreillettes 2 Émetteur 3 1 paire d oreillettes supplémentaires 4 Bloc d alimentation 5 Adaptateur audio RCA pour câble audio 6 Câble audio 2 x jack de 3 5 mm Mode d emploi FR ...

Page 20: ...une prise de courant 3 Connectez l émetteur à votre source de son souhaitée Un adaptateur est fourni à la livraison pour les différents raccordements téléviseur chaîne hifi lecteur mp3 etc 4 L indicateur à LED clignote en vert dès que l appareil est sous tension Dès qu un signal audio est reconnu la LED s allume en permanence Utilisation L écoute à volume élevé nuit à l audition Il est possible de...

Page 21: ...ccumulateur le récepteur est désactivé automatiquement quand aucun signal n est reçu de l émetteur pendant env 5 minutes ou quand le niveau de signal est trop faible La touche microphone L ouverture du microphone située dans la partie inférieure et avant du récepteur recueille les bruits dans votre environnement Quand le microphone est activé vous entendez votre environnement avec un volume plus é...

Page 22: ... les oreillettes La livraison inclut deux paires d oreillettes Une paire est déjà montée sur le casque 1 Pour remplacer les oreillettes saisissez la pointe des oreillettes montées et retirez la simplement 2 Poussez les oreillettes de rechange sur les deux extrémités et faites les s enclencher Recherche de défauts Aucun son Contrôlez l interrupteur du récepteur position ON Il est possible que l acc...

Page 23: ...ions Cet appareil a été développé pour transmettre les signaux sonores d un émetteur sans fil à un récepteur Toute autre utilisation est considérée comme non conforme aux dispositi ons Toute modification ou transformation sont interdites N ouvrez les appareils en aucun cas et n essayez pas de les réparer vous même Utilisateurs munis d un stimulateur cardiaque Si vous portez un stimulateur cardiaqu...

Page 24: ...imination des déchets est gratuite Les symboles ci après signifient que vous ne devez en aucun cas jeter les accumulateurs et les piles dans les ordures ménagères et ceux ci doivent être recyclés via des centres de collecte Les matériaux d emballage sont à éliminer selon les consignes locales Déclaration de conformité Cet appareil répond aux exigences de la directive UE 2014 53 EU La conformité av...

Page 25: ...ou une utilisation inadéquate par un mauvais emplacement ou rangement par un raccordement ou une installation inadéquate ainsi qu en cas de force majeure ou d autres influences extérieures ne sont pas inclus dans la prestation de garantie En cas de réclamations nous nous réservons le droit de réparer ou de remplacer les pièces défectueuses ou d échanger l appareil Les pièces ou appareils échangés ...

Page 26: ...blu microno verde 4 Tasto microfono per l ascolto di rumori ambientali 5 Interruttore on off 6 Microfono 7 Equalizzatore 8 Contatti di carica 1 Contatti di carica 2 Spia di controllo a LED Spannungsversorgung Signal grün 3 LED indicatore di carica in carica rosso caricato verde 4 Collegamento per alimentatore 5 Ingresso audio 3 5 mm ...

Page 27: ... della confezione 1 Ricevitore con ricevitori con auricolari 2 Emittente 3 1 coppia di ricevitori con auricolari 4 Adattatore 5 Adattatore audio RCA per cavo audio 6 Cavo audio 2 connettori jack da 3 5 mm Manuale d istruzioni IT ...

Page 28: ...e la batteria è completamente carica Collegare l emittente 1 Colleghi la presa dell adattatore con la scatola di collegamento sul retro dell emittente 2 Inserisca l adattatore in una presa 3 3 Colleghi l emittente con la Sua fonte di tono desiderata Per le diverse possibilità di collegamento apparecchio televisivo impianto stereo lettore MP3 etc nella dotazione di fornitura è incluso un adattatore...

Page 29: ...olante Si udiranno nelle cuffie 3 brevi bip a intervalli di un minuto Nel 4 minuto si udirà un bip doppio Nel 5 minuto il ricevitore si spegnerà automaticamente Una batteria completamente carica offre un tempo di funzionamento fino a 5 ore Per risparmiare energia il ricevitore si spegne automaticamente se per circa 5 minuti non viene rilevato alcun segnale dall emittente o qualora il livello del s...

Page 30: ...nfezione sono incluse due paia di protezioni per cuffie intra auricolari Un paio è già montato sulle cuffie 1 Per sostituire le protezioni per cuffie intra auricolari è sufficiente afferrare la punta della protezione per cuffie intra auricolari montata e sfilarla 2 Spingere le protezioni sostitutive per cuffie intra auricolari sulle estremità aperte e farle scattare in posizione Ricerca anomalie N...

Page 31: ...izioni Questo apparecchio è stato progettato per trasmettere i segnali sonori di un emittente a un ricevitore Qualsiasi altro utilizzo non è conforme alle disposizioni Non sono consentite modifiche o trasformazioni arbitrarie Non aprire in alcun caso l apparecchio da sé e non eseguire personalmente alcun tentativo di riparazione Utenti con pacemaker Se si è portatori di pacemaker occorre consultar...

Page 32: ... a titolo gratuito I simboli a lati indicano che gli accumulatori e le batterie non devono assolutamente essere gettate nei rifiuti domestici e che devono essere consegnati presso i punti di raccolta addetti allo smaltimento I materiali d imballaggio deve smaltirli secondo le prescrizioni locali Dichiarazione di conformità Quest apparecchio corrisponde ai requisiti della direttiva UE 2014 53 EU La...

Page 33: ...interventi del compratore o di terzi Danni causati da uso o maneggio scorretti posizionamento o conservazione errati collegamenti scorretti o installazione errata forza maggiore o altri influssi esterni non sono contenuti nella prestazione di garanzia Ci riserviamo il diritto di riparare o sostituire parti difettose in caso di reclami e o di mettere a disposizione un apparecchio sostitutivo Parti ...

Page 34: ...fono verde 4 Tecla de micrófono para escuchar sonidos del entorno 5 Interruptor On Off 6 Micrófono 7 Ajuste de balance 8 Contactos de carga 1 Contactos de carga 2 LED indicador de control suministro de corriente señal verde 3 LED indicador de carga cargar rojo cargado verde 4 Entrada para adaptador de corriente 5 Entrada de audio 3 5 mm ...

Page 35: ...uete 1 Receptor con audífono para auricular 2 Transmisor 3 1 Par de audífonos para auricular 4 Fuente de alimentación 5 Adaptador de audio RCA para cable de audio 6 Cable de audio clavija jack de 2 x 3 5 mm Manual de instrucciones ES ...

Page 36: ... completamente cargada Conectar el transmisor 1 Conecte la fuente de alimentación a la entrada de conexión situada en la parte posterior del transmisor 2 Conecte la fuente de alimentación en un enchufe 3 Conecte el transmisor en su fuente de audio deseada Para las diversas opciones de conectividad TV equipo de música reproductor MP3 etc se proporciona con la entrega un adaptador 4 En cuanto el dis...

Page 37: ...uchará 3 cortos tonos de señal en el auricular en el intervalo de un minuto En el cuarto minuto escuchará un tono de señal doble En el quinto minuto el receptor se apagará automáticamente Una batería completamente cargada permite ofrece un tiempo de funcionamiento de hasta 5 horas Para ahorrar la energía de la batería el receptor se apaga automáticamente si durante aprox 5 minutos no recibe ningun...

Page 38: ...ambiar audífonos del auricular La entrega incluye 2 pares de audífonos para auricular Un par ya está montado en el auricular 1 Para cambiar el audífono de los auriculares basta que tire de la punta de los audífonos para auricular 2 Empuje el nuevo par de audífonos para auricular en el extremo abierto hasta que se acoplen Solución de problemas Ningún sonido Compruebe el interruptor en el receptor p...

Page 39: ... dispositivo ha sido desarrollado para transmitir de forma inalámbrica señales de tono de un emisor a un receptor Cualquier otro uso se considerará inapropiado Los cambios o modificaciones en el aparato no están permitidos No abra ni trate de reparar el dispositivo por sí mismo bajo ningún concepto Usuarios con marcapasos Si utiliza un marcapasos deberá consultar a su médico si puede utilizar este...

Page 40: ... productos es gratuita El símbolo que aparece al lado significa que está totalmente prohibido deshacerse de las pilas y baterías junto a la basura doméstica y que deben deshacerse en los puntos de recogida destinados para ello Elimine los materiales de embalaje según la normativa local Declaración de conformidad Este dispositivo cumple con los requisitos de la Directiva de la UE 2014 53 EU La conf...

Page 41: ... por parte del comprador o de terceros Los daños causados por el manejo y operación indebida colocación o almacenamiento inadecuado conexión o instalación defectuosa actos de fuerza mayor o acciones de influencia externa no están cubiertos por la garantía En caso de reclamación nos reservamos el derecho a reparar las piezas defectuosas sustituirlas o reemplazar el dispositivo Las piezas o los disp...

Page 42: ...blauw microfoon groen 4 Microfoontoets om omgevingsgeluid te horen 5 Aan uit schakelaar 6 Microfoon 7 Balansregelaar 8 Laadcontacten 1 Laadcontacten 2 Indicatorlampje stroomvoorziening signaal groen 3 Laadpeil indicator laden rood opgeladen groen 4 Aansluiting voor adapter 5 Audio ingang 3 5 mm ...

Page 43: ...41 Installatie Inhoud 1 Ontvanger met oordopkapjes 2 Zender 3 1 Paar extra oordopkapjes 4 Stroomaansluiting 5 Audio adapter RCA voor audiokabel 6 Audiokabel 2 audiostekkers van 3 5 mm Handleiding NL ...

Page 44: ...dat de batterij volledig geladen is Zender aansluiten 1 Verbind de stekker van de netstroom met de DC IN aansluiting aan de achterkant van de zender 2 Steek de stroomkabel in een stopcontact 3 Verbind de zender met uw audiobron Voor diverse aansluitmogelijkheden tv stereo installatie mp3 speler etc is een adapter meegeleverd 4 Het groene indicatorlampje knippert wanneer het apparaat wordt voorzien...

Page 45: ...efoon 3 korte pieptonen met een interval van een minuut In de 4e minuut hoort u een dubbele pieptoon In de 5e minuut wordt de ontvanger automatisch uitgeschakeld Volledig geladen batterijen gaan tot 5 uur mee Om het batterijvermogen te sparen schakelt de ontvanger automatisch uit wanneer hij ongeveer 5 minuten lang geen signaal van de zender ontvangt of wanneer het signaal te zwak is De microfoon ...

Page 46: ... indicatorlampje op de koptelefoon brandt ononderbroken Oordopjes verwisselen Bij het apparaat worden 2 paar oordopjes meegeleverd Een paar oordopjes is reeds aangesloten op de koptelefoon 1 Om de oordopjes te verwisselen grijpt u de bovenkant van de gemonteerde oordopjes vast en trekt u ze eraf 2 Schuif de nieuwe oordopjes op de open uiteinden tot ze vastzitten Storingen oplossen Geen klank Contr...

Page 47: ...draadloos over te dragen naar een ontvanger Elk ander gebruik wordt als oneigenlijk gebruik beschouwd Zelf uitgevoerde wijzigingen aan het apparaat zijn verboden Open nooit zelf het apparaat en probeert het nooit zelf te repareren Gebruikers met pacemaker Wanneer u een pacemaker draagt dient u uw arts te raadplegen voordat u dit product gebruikt Schakel onmiddellijk het apparaat uit wanneer u er d...

Page 48: ...ilige afvoer gewaarborgd is De afvoer is kosteloos De pictogrammen betekenen dat u accu s en batterijen in geen geval in het huisvuil mag gooien en dat ze via inzamelingspunten moeten worden afgevoerd Verpakkingsmaterialen voert u volgens de plaatselijke voorschriften af Conformiteitsverklaring Dit apparaat voldoet aan de Europese richtlijn 2014 53 EU De conformiteit met bovengenaamde richtlijn wo...

Page 49: ...atige hantering of bediening natuurlijke slijtage verkeerd opstellen of bewaren onrechtmatige aansluiting of installatie geweld of andere externe invloeden is ontstaan wordt niet gedekt door de garantie Wij behouden ons het recht voor in geval van een klacht om naar eigen goeddunken de defecte delen te repareren of te vervangen of het volledige apparaat te ruilen Ingeruilde onderdelen of ingeruild...

Page 50: ...echnical questions please use the service form on our website http www switel com en product information technical support En cas des questions téchniques veuillez s il vous plaît utiliser le formulaire de service sur notre site http www switel com fr support technique Per supporto tecnico compilare il seguente modulo sul nostro sito http www switel com en product information technical support ...

Reviews: