


35
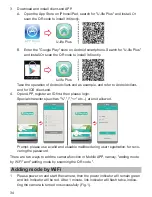
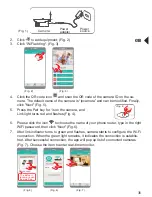
2.
Click
to add equipment; (Fig. 2)
3.
Click “WiFi adding". (Fig. 3)
4.
Click the QR code icon
and scan the QR code of the camera ID on the ca-
mera. The default name of the camera is “ipcamera” and can be modified. Finally,
click "Next" (Fig. 5).
5. Press the Pair key for 1s on the camera, and
Link light turns red and flashes (Fig. 4).
6.
Please click the icon
to choose the name of your phone router, type in the right
WiFi password, then click “Next" (Fig.6).
7.
After link indicator turns to green and flashes, camera starts to configure the Wi-Fi
connection. When the green light remains, it indicates the connection is establis-
hed. After successful connection, the app will pop up list of connected cameras
(Fig. 7). Choose the item to enter real-time monitor.
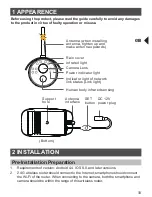
(Fig. 1)
Camera
Power
adapter
Power
source
(Fig. 2)
(Fig. 3)
(Fig. 4)
(Fig. 5)
(Fig. 6)
(Fig. 7)
The default
ipcamera can
be modified.
GB